
User Manual
Page 3
... 3-1 Troubleshooting 3-2 Manual image setup 3-4 Manually installing the monitor driver 3-4 Installing the monitor driver in Windows XP 3-4 Installing the monitor driver in Windows 2000 3-5 Getting further help 3-6 Service information 3-7 Product numbers 3-7 Customer responsibilities 3-7 Service parts 3-8 Appendix A. Notices B-1 Trademarks B-2 © Lenovo 2005. Portions © IBM Corp. 2005 ii Service and Support A-1 Online technical support A-1 Telephone technical support A-1 Appendix B. Getting...
... 3-1 Troubleshooting 3-2 Manual image setup 3-4 Manually installing the monitor driver 3-4 Installing the monitor driver in Windows XP 3-4 Installing the monitor driver in Windows 2000 3-5 Getting further help 3-6 Service information 3-7 Product numbers 3-7 Customer responsibilities 3-7 Service parts 3-8 Appendix A. Notices B-1 Trademarks B-2 © Lenovo 2005. Portions © IBM Corp. 2005 ii Service and Support A-1 Online technical support A-1 Telephone technical support A-1 Appendix B. Getting...
User Manual
Page 5
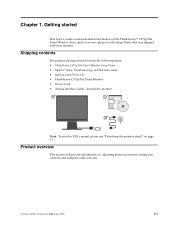
... using the cable lock slot. © Lenovo 2005. For a quick overview, please see "Detaching the monitor stand" on page 2-7. Shipping contents The product package should include the following items: • ThinkVision L171p Flat Panel Monitor Setup Poster • Monitor Safety, Troubleshooting, and Warranty Guide • Reference and Driver CD • ThinkVision L171p Flat Panel Monitor • Power Cord • Analog...
... using the cable lock slot. © Lenovo 2005. For a quick overview, please see "Detaching the monitor stand" on page 2-7. Shipping contents The product package should include the following items: • ThinkVision L171p Flat Panel Monitor Setup Poster • Monitor Safety, Troubleshooting, and Warranty Guide • Reference and Driver CD • ThinkVision L171p Flat Panel Monitor • Power Cord • Analog...

User Manual
Page 9
Power on the back of the computer. Connect the digital cable to the DVI connector of the monitor and the other end on the monitor and the computer. Plug the monitor power cord and the computer cord into grounded electrical outlets. Note: The digital cable is not included with the monitor. Chapter 1. 1-5 To install the monitor driver, insert the Reference and Driver CD, click Install driver, and follow the on-screen instructions.
Power on the back of the computer. Connect the digital cable to the DVI connector of the monitor and the other end on the monitor and the computer. Plug the monitor power cord and the computer cord into grounded electrical outlets. Note: The digital cable is not included with the monitor. Chapter 1. 1-5 To install the monitor driver, insert the Reference and Driver CD, click Install driver, and follow the on-screen instructions.

User Manual
Page 16
...Properties. 2. Check the Graphic Properties setting on how to reattach the CRT monitor temporarily until you have re-configured the system; Right-click on your computer to minimize flicker, LCD or Flat Panel technology is available. Therefore, refer to your computer documentation... this monitor, you have been optimized at 60 Hz, which require a high refresh rate to see if graphic drivers with the manufacturer of this feature is inherently flicker-free. Check with image rotation can be downloaded from their support website. 2-6 ThinkVision L171p Flat Panel Monitor User...
...Properties. 2. Check the Graphic Properties setting on how to reattach the CRT monitor temporarily until you have re-configured the system; Right-click on your computer to minimize flicker, LCD or Flat Panel technology is available. Therefore, refer to your computer documentation... this monitor, you have been optimized at 60 Hz, which require a high refresh rate to see if graphic drivers with the manufacturer of this feature is inherently flicker-free. Check with image rotation can be downloaded from their support website. 2-6 ThinkVision L171p Flat Panel Monitor User...
User Manual
Page 19
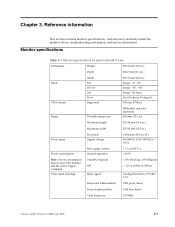
...Video input (Analog) Standby/Suspend Off Input signal < 2W (Anolog), Monitor specifications Table 3-1. Reference information This section contains monitor specifications, instructions to manually install the monitor driver, troubleshooting information, and service information. Monitor specifications for type-model 9417-Hxx Dimensions Height 381.2 mm (15.0 in...0mm Yes (clockwise 90 degree) 100 mm (3.94 in.) Image Viewable image size IBM radial arm sold separately. 430 mm (17.0 in.) Maximum height 270.34 mm (10.6 in.) Maximum width 337.92 mm (13.3 in.) Power input Pixel ...
...Video input (Analog) Standby/Suspend Off Input signal < 2W (Anolog), Monitor specifications Table 3-1. Reference information This section contains monitor specifications, instructions to manually install the monitor driver, troubleshooting information, and service information. Monitor specifications for type-model 9417-Hxx Dimensions Height 381.2 mm (15.0 in...0mm Yes (clockwise 90 degree) 100 mm (3.94 in.) Image Viewable image size IBM radial arm sold separately. 430 mm (17.0 in.) Maximum height 270.34 mm (10.6 in.) Maximum width 337.92 mm (13.3 in.) Power input Pixel ...
User Manual
Page 22
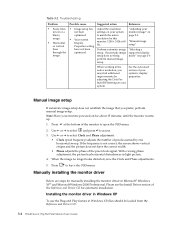
... picture has horizontal disturbances in Windows XP, files should be loaded from the Reference and Driver CD. 3-4 ThinkVision L171p Flat Panel Monitor User's Guide When the image no longer looks distorted, save the Clock and Phase adjustments. 5. Manually installing the monitor driver Below are steps for automatic installation. Use or to select and press to leave...
... picture has horizontal disturbances in Windows XP, files should be loaded from the Reference and Driver CD. 3-4 ThinkVision L171p Flat Panel Monitor User's Guide When the image no longer looks distorted, save the Clock and Phase adjustments. 5. Manually installing the monitor driver Below are steps for automatic installation. Use or to select and press to leave...
User Manual
Page 23
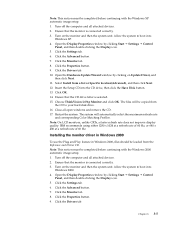
...LCD monitors, unlike CRTs, a faster refresh rate does not improve display quality. Note: This section must be completed before continuing with the Windows XP automatic image setup. 1. Click the Advanced button. 7. Click the Drivers... Turn off the computer and all open windows and remove the CD. 17. Click OK. 14. The files will automatically select the maximum refresh ...the Monitor tab. 8. Click the Monitor tab. 8. Insert the Setup CD into Windows 2000. 4. Ensure that the monitor is selected. 15. Choose ThinkVision L171p Monitor and click OK. Turn on the monitor and ...
...LCD monitors, unlike CRTs, a faster refresh rate does not improve display quality. Note: This section must be completed before continuing with the Windows XP automatic image setup. 1. Click the Advanced button. 7. Click the Drivers... Turn off the computer and all open windows and remove the CD. 17. Click OK. 14. The files will automatically select the maximum refresh ...the Monitor tab. 8. Click the Monitor tab. 8. Insert the Setup CD into Windows 2000. 4. Ensure that the monitor is selected. 15. Choose ThinkVision L171p Monitor and click OK. Turn on the monitor and ...
User Manual
Page 24
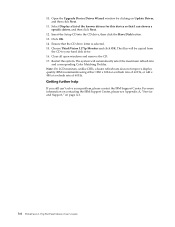
... can 't solve your hard disk drive. 16. Note: On LCD monitors, unlike CRTs, a faster refresh rate does not improve display quality. Open the Upgrade Device Driver Wizard window by clicking on page A-1. 3-6 ThinkVision L171p Flat Panel Monitor User's Guide The files will automatically select the maximum refresh rate and...Select Display a list of 60 Hz. Close all open windows and remove the CD. 17. For more information on contacting the IBM Support Center, please see Appendix A, "Service and Support," on Update Driver, and then click Next. 11. Click OK. 14. 10. Restart the system....
... can 't solve your hard disk drive. 16. Note: On LCD monitors, unlike CRTs, a faster refresh rate does not improve display quality. Open the Upgrade Device Driver Wizard window by clicking on page A-1. 3-6 ThinkVision L171p Flat Panel Monitor User's Guide The files will automatically select the maximum refresh rate and...Select Display a list of 60 Hz. Close all open windows and remove the CD. 17. For more information on contacting the IBM Support Center, please see Appendix A, "Service and Support," on Update Driver, and then click Next. 11. Click OK. 14. 10. Restart the system....


