
Lenovo IdeaPad Z460/Z465/Z560/Z565 UserGuide V1.0
Page 19
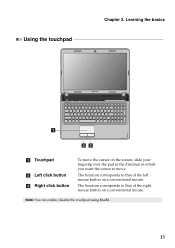
The function corresponds to that of the left mouse button on the screen, slide your fingertip over the pad in the direction in which you want the cursor to that of the right mouse button on a conventional mouse. Note: You can enable/disable the touchpad using Fn+F6. 15 The function corresponds to move the cursor on a conventional mouse. Chapter 2. Learning the basics Using the touchpad a bc a Touchpad b Left click button c Right click button To move .
The function corresponds to that of the left mouse button on the screen, slide your fingertip over the pad in the direction in which you want the cursor to that of the right mouse button on a conventional mouse. Note: You can enable/disable the touchpad using Fn+F6. 15 The function corresponds to move the cursor on a conventional mouse. Chapter 2. Learning the basics Using the touchpad a bc a Touchpad b Left click button c Right click button To move .
Lenovo IdeaPad Z460/Z465/Z560/Z565 UserGuide V1.0
Page 22
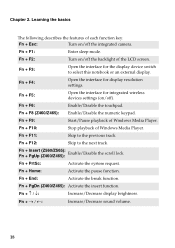
... End: Activate the break function. Fn Increase/Decrease display brightness. Fn Increase/Decrease sound volume. 18 Fn + Home: Activate the pause function. Fn + Insert (Z560/Z565): Fn + PgUp (Z460/Z465): Enable/Disable the scroll lock. Fn + F1: Enter sleep mode. Fn + F6: Enable/Disable the touchpad. Fn + PrtSc:... Open the interface for display resolution settings. Fn + F8 (Z460/Z465): Enable/Disable the numeric keypad. Fn + F10: Stop playback of the LCD screen. Fn + F12: Skip to the next track. Fn + PgDn (Z460/Z465): Activate the insert function.
... End: Activate the break function. Fn Increase/Decrease display brightness. Fn Increase/Decrease sound volume. 18 Fn + Home: Activate the pause function. Fn + Insert (Z560/Z565): Fn + PgUp (Z460/Z465): Enable/Disable the scroll lock. Fn + F1: Enter sleep mode. Fn + F6: Enable/Disable the touchpad. Fn + PrtSc:... Open the interface for display resolution settings. Fn + F8 (Z460/Z465): Enable/Disable the numeric keypad. Fn + F10: Stop playback of the LCD screen. Fn + F12: Skip to the next track. Fn + PgDn (Z460/Z465): Activate the insert function.
Lenovo IdeaPad Z460/Z465/Z560/Z565 UserGuide V1.0
Page 27
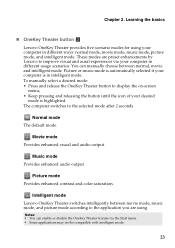
...your computer in intelligent mode. To manually select a desired mode: • Press and release the OneKey Theater button to display the on-screen menu; • Keep pressing and releasing the button until the icon of your computer in different usage scenarios. The computer switches to improve...movie mode, music mode, and picture mode according to the application you are preset enhancements by Lenovo to the selected mode after 2 seconds. Learning the basics „ OneKey Theater button c Lenovo OneKey Theater provides five scenario modes for using . You can enable or disable the OneKey ...
...your computer in intelligent mode. To manually select a desired mode: • Press and release the OneKey Theater button to display the on-screen menu; • Keep pressing and releasing the button until the icon of your computer in different usage scenarios. The computer switches to improve...movie mode, music mode, and picture mode according to the application you are preset enhancements by Lenovo to the selected mode after 2 seconds. Learning the basics „ OneKey Theater button c Lenovo OneKey Theater provides five scenario modes for using . You can enable or disable the OneKey ...
Lenovo IdeaPad Z460/Z465/Z560/Z565 UserGuide V1.0
Page 28
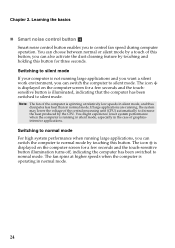
... the computer is operating in normal mode. 24 you to normal mode. The icon is displayed on the computer screen for a few seconds and the touchsensitive button is displayed on the computer screen for a few seconds and the touch-sensitive button illumination turns off, indicating the computer has been switched to control...
... the computer is operating in normal mode. 24 you to normal mode. The icon is displayed on the computer screen for a few seconds and the touchsensitive button is displayed on the computer screen for a few seconds and the touch-sensitive button illumination turns off, indicating the computer has been switched to control...

Lenovo IdeaPad Z460/Z465/Z560/Z565 UserGuide V1.0
Page 32
...Using passwords helps prevent your password at the prompt. For details about how to set a password and enable it, a prompt appears on the screen each time you enter the correct password. Once you set the password, see the Help to seven alphanumeric characters in BIOS setup utility. The computer...cannot be from being used unless you power on the screen while the computer is starting up. 28 Enter your computer from one to the right of the screen in any combination. Note: To enter BIOS setup utility, press F2 when the Lenovo logo appears on the computer. Chapter 2. Note: ...
...Using passwords helps prevent your password at the prompt. For details about how to set a password and enable it, a prompt appears on the screen each time you enter the correct password. Once you set the password, see the Help to seven alphanumeric characters in BIOS setup utility. The computer...cannot be from being used unless you power on the screen while the computer is starting up. 28 Enter your computer from one to the right of the screen in any combination. Note: To enter BIOS setup utility, press F2 when the Lenovo logo appears on the computer. Chapter 2. Note: ...
Lenovo IdeaPad Z460/Z465/Z560/Z565 UserGuide V1.0
Page 50
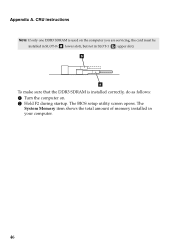
The System Memory item shows the total amount of memory installed in SLOT-1 ( : upper slot). Appendix A. CRU instructions Note: If only one DDR3 SDRAM is installed correctly, do as follows: 1 Turn the computer on the computer you are servicing, the card must be installed in SLOT-0 ( : lower slot), but not in your computer. 46 The BIOS setup utility screen opens. b a To make sure that the DDR3 SDRAM is used on . 2 Hold F2 during startup.
The System Memory item shows the total amount of memory installed in SLOT-1 ( : upper slot). Appendix A. CRU instructions Note: If only one DDR3 SDRAM is installed correctly, do as follows: 1 Turn the computer on the computer you are servicing, the card must be installed in SLOT-0 ( : lower slot), but not in your computer. 46 The BIOS setup utility screen opens. b a To make sure that the DDR3 SDRAM is used on . 2 Hold F2 during startup.

Lenovo IdeaPad Z460/Z465/Z560/Z565 SetupPoster V1.0
Page 1
P/N:148001990 Printed in China IdeaPad Z460/Z465/ Z560/ Z565 Setup Poster V1.0 Read the safety notices and important tips in this manual are for Lenovo IdeaPad Z560 unless otherwise stated. Other publications * Power cord varies by country/region. 1 Some models may contain items that are either registered trademarks or trademarks of Lenovo in damages to the... b a c a 3 Press the power button 2 Connect to the power b a c Attention: Connect the power cord to the AC adapter. 4 Configure the operating system following the on-screen instructions
P/N:148001990 Printed in China IdeaPad Z460/Z465/ Z560/ Z565 Setup Poster V1.0 Read the safety notices and important tips in this manual are for Lenovo IdeaPad Z560 unless otherwise stated. Other publications * Power cord varies by country/region. 1 Some models may contain items that are either registered trademarks or trademarks of Lenovo in damages to the... b a c a 3 Press the power button 2 Connect to the power b a c Attention: Connect the power cord to the AC adapter. 4 Configure the operating system following the on-screen instructions


