
Lenovo IdeaPad S100 Hardware Maintainence Manual
Page 3
... to electrostatic discharge 4 Grounding requirements 4 Safety notices: multilingual translations 5 Laser compliance statement 11 Important service information 14 Strategy for replacing FRUs 14 Strategy for replacing a hard disk drive........ 15 Important notice for replacing a system board 15 Important information about ... 22 Supervisor password 22 Power management 22 Screen blank mode 22 Sleep (standby) mode 22 Hibernation mode 23 Lenovo IdeaPad S100 24 Specifications 24 Status indicators 26 Fn key combinations 28 FRU replacement notices 29 Screw notices 29 Removing and...
... to electrostatic discharge 4 Grounding requirements 4 Safety notices: multilingual translations 5 Laser compliance statement 11 Important service information 14 Strategy for replacing FRUs 14 Strategy for replacing a hard disk drive........ 15 Important notice for replacing a system board 15 Important information about ... 22 Supervisor password 22 Power management 22 Screen blank mode 22 Sleep (standby) mode 22 Hibernation mode 23 Lenovo IdeaPad S100 24 Specifications 24 Status indicators 26 Fn key combinations 28 FRU replacement notices 29 Screw notices 29 Removing and...
Lenovo IdeaPad S100 Hardware Maintainence Manual
Page 4
... reference information for the following Lenovo IdeaPad product: Lenovo IdeaPad S100 Use this manual to troubleshoot problems effectively. iv Important: This manual is divided into the following sections: • The common sections provide general information, guidelines, and safety information required for trained servicers who are familiar with Lenovo IdeaPad products. Before servicing a Lenovo IdeaPad product, make sure to troubleshoot...
... reference information for the following Lenovo IdeaPad product: Lenovo IdeaPad S100 Use this manual to troubleshoot problems effectively. iv Important: This manual is divided into the following sections: • The common sections provide general information, guidelines, and safety information required for trained servicers who are familiar with Lenovo IdeaPad products. Before servicing a Lenovo IdeaPad product, make sure to troubleshoot...
Lenovo IdeaPad S100 Hardware Maintainence Manual
Page 18
...are customer-installable. then, when service has been completed, verify that the latest BIOS is loaded to http://consumersupport.lenovo.com/. 2. Lenovo IdeaPad S100 Hardware Maintenance Manual Important service information This chapter presents the following strategy to prevent unnecessary expense for replacing and servicing ... the FRUs one by one FRU, any FRUs listed in effect. 14 Strategy for replacing a system board" on page 15 • "Important information about replacing RoHS compliant FRUs" on page 14 - Running Automatic Configuration may have both a processor board and a ...
...are customer-installable. then, when service has been completed, verify that the latest BIOS is loaded to http://consumersupport.lenovo.com/. 2. Lenovo IdeaPad S100 Hardware Maintenance Manual Important service information This chapter presents the following strategy to prevent unnecessary expense for replacing and servicing ... the FRUs one by one FRU, any FRUs listed in effect. 14 Strategy for replacing a system board" on page 15 • "Important information about replacing RoHS compliant FRUs" on page 14 - Running Automatic Configuration may have both a processor board and a ...
Lenovo IdeaPad S100 Hardware Maintainence Manual
Page 24
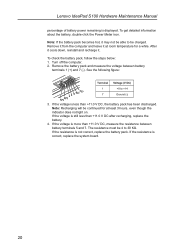
To check the battery pack, follow the steps below: 1. The resistance must be 4 to +14 7 Ground (-) 3. See the following figure: Terminal Voltage (V DC) 3 4 5 6(-) 7(-) 2(+) 1(+) 1 +0 to 30 KΩ. If the voltage is less than +11.0 V DC after recharging,...be continued for a while. Remove the battery pack and measure the voltage between battery terminals 5 and 7. If the resistance is displayed. Lenovo IdeaPad S100 Hardware Maintenance Manual percentage of battery power remaining is not correct, replace the battery pack. Remove it from the computer and leave it ...
To check the battery pack, follow the steps below: 1. The resistance must be 4 to +14 7 Ground (-) 3. See the following figure: Terminal Voltage (V DC) 3 4 5 6(-) 7(-) 2(+) 1(+) 1 +0 to 30 KΩ. If the voltage is less than +11.0 V DC after recharging,...be continued for a while. Remove the battery pack and measure the voltage between battery terminals 5 and 7. If the resistance is displayed. Lenovo IdeaPad S100 Hardware Maintenance Manual percentage of battery power remaining is not correct, replace the battery pack. Remove it from the computer and leave it ...

Lenovo IdeaPad S100 Hardware Maintainence Manual
Page 49
Remove the LCD front bezel in the direction shown by arrows . 45 Lenovo IdeaPad S100 Hardware Maintenance Manual Figure 14: Removal steps of LCD front bezel 1 2 1 2 2 Step Screw (quantity) Color Torque 2 M2.0 × 3.0 mm, flat round-head, Black nylon-coated (2) 1.35 kgfcm Remove two screws .
Remove the LCD front bezel in the direction shown by arrows . 45 Lenovo IdeaPad S100 Hardware Maintenance Manual Figure 14: Removal steps of LCD front bezel 1 2 1 2 2 Step Screw (quantity) Color Torque 2 M2.0 × 3.0 mm, flat round-head, Black nylon-coated (2) 1.35 kgfcm Remove two screws .

Lenovo IdeaPad S100 User Guide V1.0
Page 7
VGA port Connects to USB devices. USB port Connects to external display devices. Note: The combo audio jack does not support a conventional microphone. Chapter 1. Fan louvers Dissipate internal heat. Attention: • Listening to headsets or headphones. Note: For details, see "Connecting USB devices" on page 14. Combo audio jack Connects to music at high volume over extended periods of time may damage your computer Left-side view AC power adapter jack Connect the AC adapter here. Getting to know your hearing. 3
VGA port Connects to USB devices. USB port Connects to external display devices. Note: The combo audio jack does not support a conventional microphone. Chapter 1. Fan louvers Dissipate internal heat. Attention: • Listening to headsets or headphones. Note: For details, see "Connecting USB devices" on page 14. Combo audio jack Connects to music at high volume over extended periods of time may damage your computer Left-side view AC power adapter jack Connect the AC adapter here. Getting to know your hearing. 3

Lenovo IdeaPad S100 User Guide V1.0
Page 8
Chapter 1. RJ-45 port This port connects the computer to USB devices. Note: For details, see "Using memory cards (not supplied)" on page 21. Getting to know your computer Right-side view USB port Connects to an Ethernet network. Note: For details, see "Connecting USB devices" on page 14. Lanyard hole Used for attaching a lanyard (not supplied). Front view Memory card slot Insert memory cards (not supplied) here. Note: For details, see "Wired connections" on page 13. 4
Chapter 1. RJ-45 port This port connects the computer to USB devices. Note: For details, see "Using memory cards (not supplied)" on page 21. Getting to know your computer Right-side view USB port Connects to an Ethernet network. Note: For details, see "Connecting USB devices" on page 14. Lanyard hole Used for attaching a lanyard (not supplied). Front view Memory card slot Insert memory cards (not supplied) here. Note: For details, see "Wired connections" on page 13. 4
Lenovo IdeaPad S100 User Guide V1.0
Page 18
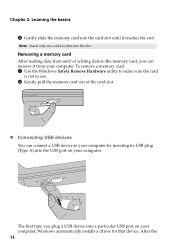
Learning the basics 2 Gently slide the memory card into the slot. After the 14 Note: Insert only one card at a time into the card slot until it from and/or writing data to make sure the card is not ...
Learning the basics 2 Gently slide the memory card into the slot. After the 14 Note: Insert only one card at a time into the card slot until it from and/or writing data to make sure the card is not ...


