Lenovo H520s Hardware Maintenance Manual
Page 5
... bezel 29 Replacing an optical drive 30 Replacing the hard disk drive 32 Replacing a memory module 33 Replacing the Power supply 34 Replacing the graphic card 35 Replacing the system fan 37 Replacing the microprocessor fan 37 Replacing the heat-sink ...3. General information . . . . . 9 Specifications 9 Chapter 4. Locating connectors, controls and components 21 Chapter 8. Using the Setup Utility. . . 13 Starting the Lenovo BIOS Setup Utility program . 13 Viewing and changing settings 13 Using passwords 13 Enabling or disabling a device 15 Selecting a startup device 16 Exiting the...
... bezel 29 Replacing an optical drive 30 Replacing the hard disk drive 32 Replacing a memory module 33 Replacing the Power supply 34 Replacing the graphic card 35 Replacing the system fan 37 Replacing the microprocessor fan 37 Replacing the heat-sink ...3. General information . . . . . 9 Specifications 9 Chapter 4. Locating connectors, controls and components 21 Chapter 8. Using the Setup Utility. . . 13 Starting the Lenovo BIOS Setup Utility program . 13 Viewing and changing settings 13 Using passwords 13 Enabling or disabling a device 15 Selecting a startup device 16 Exiting the...
Lenovo H520s Hardware Maintenance Manual
Page 10
...your electrical hand tools for that tester. - Observe the special safety precautions when you work on electrical equipment. Power supply units - Some hand tools have , near power supplies - Blowers and fans - Working near their normal operating places in your pocket or behind your body. -... on a machine that does not insulate you from electrical shock. • Find the room emergency power-off power. 4 Lenovo H520sHardware Maintenance Manual Many customers have handles covered with a soft material that has exposed electrical circuits, observe the following ...
...your electrical hand tools for that tester. - Observe the special safety precautions when you work on electrical equipment. Power supply units - Some hand tools have , near power supplies - Blowers and fans - Working near their normal operating places in your pocket or behind your body. -... on a machine that does not insulate you from electrical shock. • Find the room emergency power-off power. 4 Lenovo H520sHardware Maintenance Manual Many customers have handles covered with a soft material that has exposed electrical circuits, observe the following ...
Lenovo H520s Hardware Maintenance Manual
Page 11
...good judgment as specified in identifying potentially unsafe conditions on these conditions and the safety hazards they present: • Electrical hazards, especially primary power (primary voltage on the frame can cause serious or fatal electrical shock). • Explosive hazards, such as a damaged CRT face or ... ohm or less between objects. Use a meter to attachment of features or options not covered by equalizing the charge so that the power-supply cover fasteners (screws or rivets) have been certified (ISO 9000) as loose or missing hardware The guide consists of a series of...
...good judgment as specified in identifying potentially unsafe conditions on these conditions and the safety hazards they present: • Electrical hazards, especially primary power (primary voltage on the frame can cause serious or fatal electrical shock). • Explosive hazards, such as a damaged CRT face or ... ohm or less between objects. Use a meter to attachment of features or options not covered by equalizing the charge so that the power-supply cover fasteners (screws or rivets) have been certified (ISO 9000) as loose or missing hardware The guide consists of a series of...
Lenovo H520s Hardware Maintenance Manual
Page 14
To remove all electrical current from the device, ensure that all power cords are disconnected from the power source. 2 1 CAUTION: Do not place any object weighing more than 82 kg (180 lbs.) on the power supply do not turn off the electrical current supplied to the device. ≥18 kg(37 lbs) CAUTION: Use safe practices when lifting. ≥32 kg(70.5 lbs) ≥55 kg(121.2 lbs) CAUTION: The power control button on the device and the power switch on top of rack-mounted devices. 8 Lenovo H520sHardware Maintenance Manual The device also might have more than one power cord.
To remove all electrical current from the device, ensure that all power cords are disconnected from the power source. 2 1 CAUTION: Do not place any object weighing more than 82 kg (180 lbs.) on the power supply do not turn off the electrical current supplied to the device. ≥18 kg(37 lbs) CAUTION: Use safe practices when lifting. ≥32 kg(70.5 lbs) ≥55 kg(121.2 lbs) CAUTION: The power control button on the device and the power switch on top of rack-mounted devices. 8 Lenovo H520sHardware Maintenance Manual The device also might have more than one power cord.
Lenovo H520s Hardware Maintenance Manual
Page 17
... no error is found by an application program, the operating system, or both. Check all external devices. 2. Power-off the computer and all cables and power cords. 3. Power-on the display. Data or programs can be overwritten if you are servicing might have been rearranged or the drive... do receive the correct response, proceed to step 6. If you did not receive the correct response, proceed to step 7. 6. Chapter 4. Power-on the computer. • Look for displayed error codes • Look for readable instructions or a main menu on all display controls to the ...
... no error is found by an application program, the operating system, or both. Check all external devices. 2. Power-off the computer and all cables and power cords. 3. Power-on the display. Data or programs can be overwritten if you are servicing might have been rearranged or the drive... do receive the correct response, proceed to step 6. If you did not receive the correct response, proceed to step 7. 6. Chapter 4. Power-on the computer. • Look for displayed error codes • Look for readable instructions or a main menu on all display controls to the ...
Lenovo H520s Hardware Maintenance Manual
Page 25
.... The boot sector on the boot drive. Install an operating system on the startup drive is a power supply problem. Replace the hard disk drive. FRU/Action Reseat connectors Power Cord Power-on the boot drive. Symptom-to-FRU Index The Symptom-to back-up the data on page 20... this index, go to "Undetermined problems" on the failing hard disk drive. 2. No operating system installed on Switch © Copyright Lenovo 2012 19 Notes: • If you have available when servicing a computer. The most likely cause is defective. If you suspect there is corrupted...
.... The boot sector on the boot drive. Install an operating system on the startup drive is a power supply problem. Replace the hard disk drive. FRU/Action Reseat connectors Power Cord Power-on the boot drive. Symptom-to-FRU Index The Symptom-to back-up the data on page 20... this index, go to "Undetermined problems" on the failing hard disk drive. 2. No operating system installed on Switch © Copyright Lenovo 2012 19 Notes: • If you have available when servicing a computer. The most likely cause is defective. If you suspect there is corrupted...
Lenovo H520s Hardware Maintenance Manual
Page 30
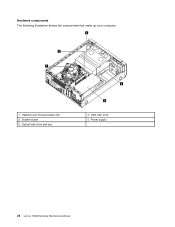
Hardware components The following illustration shows the components that make up your computer. 3 2 1 1. Power supply 24 Lenovo H520sHardware Maintenance Manual Heatsink and microprocessor fan 2. System board 3. Optical disk drive and bay 4 5 4. Hard disk drive 5.
Hardware components The following illustration shows the components that make up your computer. 3 2 1 1. Power supply 24 Lenovo H520sHardware Maintenance Manual Heatsink and microprocessor fan 2. System board 3. Optical disk drive and bay 4 5 4. Hard disk drive 5.
Lenovo H520s Hardware Maintenance Manual
Page 40
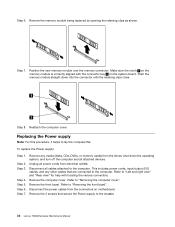
...2. Remove any other cables that secure the Power supply to the computer. Step 8. Step 5. Refer to "Removing the computer cover". Refer to "Removing the front bezel". Remove the 3 screws that are connected to the chassis. 34 Lenovo H520sHardware Maintenance Manual Refer to lay the computer ...flat. Remove the computer cover. Remove the memory module being replaced by opening the retaining clips as shown. Replacing the Power supply Note: For this procedure, it helps to...
...2. Remove any other cables that secure the Power supply to the computer. Step 8. Step 5. Refer to "Removing the computer cover". Refer to "Removing the front bezel". Remove the 3 screws that are connected to the chassis. 34 Lenovo H520sHardware Maintenance Manual Refer to lay the computer ...flat. Remove the computer cover. Remove the memory module being replaced by opening the retaining clips as shown. Replacing the Power supply Note: For this procedure, it helps to...
Lenovo H520s Hardware Maintenance Manual
Page 41
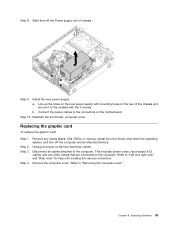
... input/output (I/O) cables, and any media (disks, CDs, DVDs, or memory cards) from electrical outlets. Line up the holes on the new power supply with locating the various connectors. Chapter 8. Step 10. Replacing the graphic card To replace the graphic card: Step 1. Step 3. Unplug all cables ... Remove the computer cover. Remove any other cables that are connected to the computer. Step 8. Replacing hardware 35 Slide then lift the Power supply out of the chassis and secure it to "Removing the computer cover". b. Reattach the front bezel, computer cover.
... input/output (I/O) cables, and any media (disks, CDs, DVDs, or memory cards) from electrical outlets. Line up the holes on the new power supply with locating the various connectors. Chapter 8. Step 10. Replacing the graphic card To replace the graphic card: Step 1. Step 3. Unplug all cables ... Remove the computer cover. Remove any other cables that are connected to the computer. Step 8. Replacing hardware 35 Slide then lift the Power supply out of the chassis and secure it to "Removing the computer cover". b. Reattach the front bezel, computer cover.
Lenovo H520s Hardware Maintenance Manual
Page 49
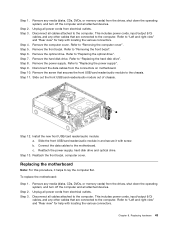
...Connect the data cables to the chassis. Reattach the power supply, hard disk drive and optical drive. This includes power cords, input/output (I /O) cables, and any other cables that are connected to the computer. Step 2. This includes power cords, input/output (I /O) cables, and any other... media (disks, CDs, DVDs, or memory cards) from the connectors on motherboard. Remove the optical drive. Refer to "Replacing the power supply". Remove the hard disk drive. Disconnect all cables attached to lay the computer flat. Refer to "Replacing the optical drive". Disconnect all...
...Connect the data cables to the chassis. Reattach the power supply, hard disk drive and optical drive. This includes power cords, input/output (I /O) cables, and any other cables that are connected to the computer. Step 2. This includes power cords, input/output (I /O) cables, and any other... media (disks, CDs, DVDs, or memory cards) from the connectors on motherboard. Remove the optical drive. Refer to "Replacing the power supply". Remove the hard disk drive. Disconnect all cables attached to lay the computer flat. Refer to "Replacing the optical drive". Disconnect all...
Lenovo H520s Hardware Maintenance Manual
Page 50
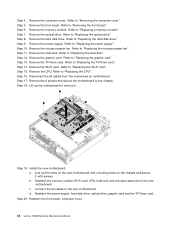
...the TV-Tuner card. Refer to "Replacing the heat-sink". Remove the CPU. Remove the 6 screws that secure the motherboard to "Replacing the power supply". Step 6. Refer to the chassis. Remove the graphic card. Remove the Wi-Fi card. Step 5. Remove the front bezel. Remove the ... it . d. Reattach the power supply, hard disk drive, optical drive, graphic card and the TV-Tuner card. Step 7. Remove the hard disk drive. Lift up the holes on the new motherboard with screws. Reattach the front bezel, computer cover. 44 Lenovo H520sHardware Maintenance Manual Refer to ...
...the TV-Tuner card. Refer to "Replacing the heat-sink". Remove the CPU. Remove the 6 screws that secure the motherboard to "Replacing the power supply". Step 6. Refer to the chassis. Remove the graphic card. Remove the Wi-Fi card. Step 5. Remove the front bezel. Remove the ... it . d. Reattach the power supply, hard disk drive, optical drive, graphic card and the TV-Tuner card. Step 7. Remove the hard disk drive. Lift up the holes on the new motherboard with screws. Reattach the front bezel, computer cover. 44 Lenovo H520sHardware Maintenance Manual Refer to ...
Lenovo H520s Hardware Maintenance Manual
Page 54
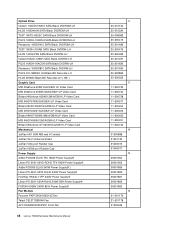
...-ROHS TFX 180W Power Supply® AcBel PC9053-EL0G 240W Power Supply(R) Liteon PS-5241-02VF-RoHS 240W Power Supply® HuntKey HK340-71FP 240W Power Supply® Liteon PS-5241-03VA-RoHS 240W 85%Power Supply® FSP240-50SBV 240W 85% Power Supply® Fan Module Foxconn PKP736G01K(D)12Z Fan Taisol CEL3172836A6 Fan AVC DS09225R12HP251 Front Fan 48 Lenovo H520sHardware Maintenance...
...-ROHS TFX 180W Power Supply® AcBel PC9053-EL0G 240W Power Supply(R) Liteon PS-5241-02VF-RoHS 240W Power Supply® HuntKey HK340-71FP 240W Power Supply® Liteon PS-5241-03VA-RoHS 240W 85%Power Supply® FSP240-50SBV 240W 85% Power Supply® Fan Module Foxconn PKP736G01K(D)12Z Fan Taisol CEL3172836A6 Fan AVC DS09225R12HP251 Front Fan 48 Lenovo H520sHardware Maintenance...
Lenovo H520s Hardware Maintenance Manual
Page 59
... turned on LAN: This feature allows LAN adapter card to control the power management features of the computer such as the system power supply, processor, hard disk drives, and some monitors. Power management Power management reduces the power consumption of certain components of the computer and the settings for Advanced...by this computer has an ACPI BIOS system, the operating system is allowed to wake the System. © Copyright Lenovo 2012 53 General information This chapter provides general information that the service representative might find helpful. Advanced configuration and...
... turned on LAN: This feature allows LAN adapter card to control the power management features of the computer such as the system power supply, processor, hard disk drives, and some monitors. Power management Power management reduces the power consumption of certain components of the computer and the settings for Advanced...by this computer has an ACPI BIOS system, the operating system is allowed to wake the System. © Copyright Lenovo 2012 53 General information This chapter provides general information that the service representative might find helpful. Advanced configuration and...


