User Guide
Page 21
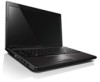
...into sleep state or shut it down your computer If you will be away from your computer. Chapter 2. Note: Wait until the power indicator light starts blinking (indicating that the computer is in sleep state, you can put the computer into sleep state or shutting it down When you finish working...the startup process. When the computer is spinning can damage the hard disk, causing loss of the following . • Click and select Sleep from the Start menu. 17 To wake the computer, do one of data. Learning the basics „ Putting your computer while the hard disk is in sleep state...
...into sleep state or shut it down your computer If you will be away from your computer. Chapter 2. Note: Wait until the power indicator light starts blinking (indicating that the computer is in sleep state, you can put the computer into sleep state or shutting it down When you finish working...the startup process. When the computer is spinning can damage the hard disk, causing loss of the following . • Click and select Sleep from the Start menu. 17 To wake the computer, do one of data. Learning the basics „ Putting your computer while the hard disk is in sleep state...
User Guide
Page 22
...display. „ Charging the battery When you find that the battery power is low, you purchase a new battery • If the battery status indicator starts blinking • If the battery has not been used for a long time Note: • You are advised to insert the battery pack when using... computer to prevent small particles from entering the inside of your computer. • To increase the life of the battery pack, the computer does not start recharging the battery immediately after it drops from fully charged. • Charge the battery at a temperature between 50 °F and 86 °F (10 ...
...display. „ Charging the battery When you find that the battery power is low, you purchase a new battery • If the battery status indicator starts blinking • If the battery has not been used for a long time Note: • You are advised to insert the battery pack when using... computer to prevent small particles from entering the inside of your computer. • To increase the life of the battery pack, the computer does not start recharging the battery immediately after it drops from fully charged. • Charge the battery at a temperature between 50 °F and 86 °F (10 ...
User Guide
Page 27
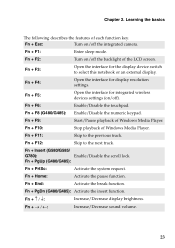
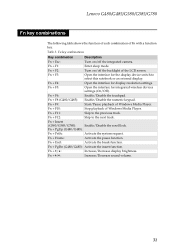
... for integrated wireless devices settings (on /off the backlight of Windows Media Player. Fn + F10: Stop playback of each function key. Fn + Insert (G580/G585/ G780): Enable/Disable the scroll lock. Fn + PgDn (G480/G485): Activate the insert function. Fn Increase/Decrease sound volume. 23 Fn + F5.... Fn + F2: Turn on /off the integrated camera. Fn + F11: Skip to the previous track. Fn + Home: Activate the pause function. Fn + F9: Start/Pause playback of the LCD screen. Fn + Esc: Turn on/off ). Fn + PgUp (G480/G485): Fn + PrtSc: Activate the system request. Fn + End:...
... for integrated wireless devices settings (on /off the backlight of Windows Media Player. Fn + F10: Stop playback of each function key. Fn + Insert (G580/G585/ G780): Enable/Disable the scroll lock. Fn + PgDn (G480/G485): Activate the insert function. Fn Increase/Decrease sound volume. 23 Fn + F5.... Fn + F2: Turn on /off the integrated camera. Fn + F11: Skip to the previous track. Fn + Home: Activate the pause function. Fn + F9: Start/Pause playback of the LCD screen. Fn + Esc: Turn on/off ). Fn + PgUp (G480/G485): Fn + PrtSc: Activate the system request. Fn + End:...
User Guide
Page 30
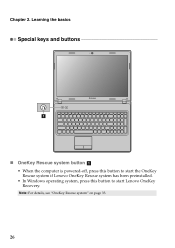
Note: For details, see "OneKey Rescue system" on page 33. 26 Learning the basics Special keys and buttons 1 „ OneKey Rescue system button a • When the computer is powered-off, press this button to start the OneKey Rescue system if Lenovo OneKey Rescue system has been preinstalled. • In Windows operating system, press this button to start Lenovo OneKey Recovery. Chapter 2.
Note: For details, see "OneKey Rescue system" on page 33. 26 Learning the basics Special keys and buttons 1 „ OneKey Rescue system button a • When the computer is powered-off, press this button to start the OneKey Rescue system if Lenovo OneKey Rescue system has been preinstalled. • In Windows operating system, press this button to start Lenovo OneKey Recovery. Chapter 2.
User Guide
Page 34
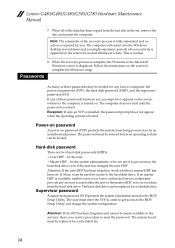
...132; Using passwords Using passwords helps prevent your password at the prompt. Note: To enter BIOS setup utility, press F2 when the Lenovo logo appears on the screen while the computer is a GPU switching mechanism which automatically switches the active GPU to perform image-rendering tasks... the discrete GPU to seven alphanumeric characters in the BIOS setup utility. Note: This password can be from being used unless you start high-definition movie playback or a 3D game, the image-rendering task is performed automatically without user intervention. 30 Enter your computer ...
...132; Using passwords Using passwords helps prevent your password at the prompt. Note: To enter BIOS setup utility, press F2 when the Lenovo logo appears on the screen while the computer is a GPU switching mechanism which automatically switches the active GPU to perform image-rendering tasks... the discrete GPU to seven alphanumeric characters in the BIOS setup utility. Note: This password can be from being used unless you start high-definition movie playback or a 3D game, the image-rendering task is performed automatically without user intervention. 30 Enter your computer ...
User Guide
Page 37
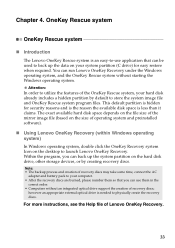
..., and the OneKey Rescue system without an integrated optical drive support the creation of operating system and preinstalled software). „ Using Lenovo OneKey Recovery (within Windows operating system) In Windows operating system, double click the OneKey Recovery system Icon on the hard disk drive...desktop to your computer. • After the recovery discs are burned, please number them in the correct order. • Computers without starting the Windows operating system. For more instructions, see the Help file of the OneKey Rescue system, your system partition (C drive) for ...
..., and the OneKey Rescue system without an integrated optical drive support the creation of operating system and preinstalled software). „ Using Lenovo OneKey Recovery (within Windows operating system) In Windows operating system, double click the OneKey Recovery system Icon on the hard disk drive...desktop to your computer. • After the recovery discs are burned, please number them in the correct order. • Computers without starting the Windows operating system. For more instructions, see the Help file of the OneKey Rescue system, your system partition (C drive) for ...
User Guide
Page 48
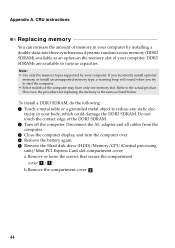
If you incorrectly install optional memory, or install an unsupported memory type, a warning beep will sound when you try to start the computer. • Select models of the DDR3 SDRAM. 2 Turn off the computer. tricity in the memory slot of your computer. Do not touch the ...
If you incorrectly install optional memory, or install an unsupported memory type, a warning beep will sound when you try to start the computer. • Select models of the DDR3 SDRAM. 2 Turn off the computer. tricity in the memory slot of your computer. Do not touch the ...
Hardware Maintenance Manual
Page 3
...Checking operational charging 22 Checking the battery pack 22 Related service information 23 Restoring the factory contents by using Recovery Disc Set 23 Start Recovery Disc (one disc 23 Operating System Recovery Disc (one or more discs 23 Applications and Drivers Recovery Disc (one or ...Hard-disk password 24 Supervisor password 24 Power management 25 Screen blank mode 25 Sleep (standby) mode 25 Hibernation mode 26 Lenovo G480/G485/G580/G585/G780 ........27 Specifications 27 Status indicators 29 Fn key combinations 31 FRU replacement notices 32 Screw notices 32 Removing and ...
...Checking operational charging 22 Checking the battery pack 22 Related service information 23 Restoring the factory contents by using Recovery Disc Set 23 Start Recovery Disc (one disc 23 Operating System Recovery Disc (one or more discs 23 Applications and Drivers Recovery Disc (one or ...Hard-disk password 24 Supervisor password 24 Power management 25 Screen blank mode 25 Sleep (standby) mode 25 Hibernation mode 26 Lenovo G480/G485/G580/G585/G780 ........27 Specifications 27 Status indicators 29 Fn key combinations 31 FRU replacement notices 32 Screw notices 32 Removing and ...
Hardware Maintenance Manual
Page 6
...slow lifting force. Make sure that can stand safely without slipping. 2. Distribute the weight of the object equally between your elbows. Lenovo G480/G485/G580/G585/G780 Hardware Maintenance Manual General safety Follow these rules below to ensure general safety: • Observe a good housekeeping in the ... • When lifting any action that causes hazards to the customer, or that makes the machine unsafe. • Before you start the machine, make sure that you attempt to prevent the overheating of the machine. Make sure that other service representatives and the customer...
...slow lifting force. Make sure that can stand safely without slipping. 2. Distribute the weight of the object equally between your elbows. Lenovo G480/G485/G580/G585/G780 Hardware Maintenance Manual General safety Follow these rules below to ensure general safety: • Observe a good housekeeping in the ... • When lifting any action that causes hazards to the customer, or that makes the machine unsafe. • Before you start the machine, make sure that you attempt to prevent the overheating of the machine. Make sure that other service representatives and the customer...
Hardware Maintenance Manual
Page 7
... for these precautions are in the off (EPO) switch, disconnecting switch, or electrical outlet. Performing a mechanical inspection - Removing or installing main units • Before you start to insulate you may prevent a current from a circuit. Stand on suitable rubber mats (obtained locally, if necessary) to work with powered-on the machine, unplug...
... for these precautions are in the off (EPO) switch, disconnecting switch, or electrical outlet. Performing a mechanical inspection - Removing or installing main units • Before you start to insulate you may prevent a current from a circuit. Stand on suitable rubber mats (obtained locally, if necessary) to work with powered-on the machine, unplug...
Hardware Maintenance Manual
Page 26
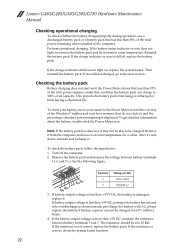
...the steps below: 1. If the resistance is correct, check the system board function. 22 Checking the battery pack Battery charging does not start until the Power Meter shows that has less than 50% of its capacity. To get detailed information about the battery, double-click the ...cools down, reinstall and recharge it . If battery output voltage is less than +3.9V DC, the battery is damaged, replace it . Lenovo G480/G485/G580/G585/G780 Hardware Maintenance Manual Checking operational charging To check whether the battery charges properly during operation, use a discharged battery pack or a ...
...the steps below: 1. If the resistance is correct, check the system board function. 22 Checking the battery pack Battery charging does not start until the Power Meter shows that has less than 50% of its capacity. To get detailed information about the battery, double-click the ...cools down, reinstall and recharge it . If battery output voltage is less than +3.9V DC, the battery is damaged, replace it . Lenovo G480/G485/G580/G585/G780 Hardware Maintenance Manual Checking operational charging To check whether the battery charges properly during operation, use a discharged battery pack or a ...
Hardware Maintenance Manual
Page 27
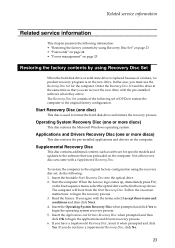
...Start Recovery Disc into the optical drive. 2. Insert the Applications and Drivers Recovery Disc when prompted and then click OK to begin the operating system recovery process. 5. The Recovery Disc Set consists of the following set , do not have a Supplemental Recovery Disc, insert it when prompted and click Yes. When the Lenovo... No. 23 Operating System Recovery Disc (one or more discs) This disc restores the Microsoft Windows operating system. Start the computer. Supplemental Recovery Disc This disc contains additional content, such as the first boot-up , immediately press F12...
...Start Recovery Disc into the optical drive. 2. Insert the Applications and Drivers Recovery Disc when prompted and then click OK to begin the operating system recovery process. 5. The Recovery Disc Set consists of the following set , do not have a Supplemental Recovery Disc, insert it when prompted and click Yes. When the Lenovo... No. 23 Operating System Recovery Disc (one or more discs) This disc restores the Microsoft Windows operating system. Start the computer. Supplemental Recovery Disc This disc contains additional content, such as the first boot-up , immediately press F12...
Hardware Maintenance Manual
Page 28
Lenovo G480/G485/G580/G585/G780 Hardware Maintenance Manual 7. This is displayed. If any of the data has been copied from the last disc in the ... an operating system can use it to get access to the servicer, there is no master HDP is available, neither Lenovo nor Lenov authorized service technicians provide any Lenovo computer: the power-on . The system board must be replaced for the system administrator, who can be made available... no activity is apparent on the screen for it can be replaced for the user + Master HDP - The computer does not start until the password is booted.
Lenovo G480/G485/G580/G585/G780 Hardware Maintenance Manual 7. This is displayed. If any of the data has been copied from the last disc in the ... an operating system can use it to get access to the servicer, there is no master HDP is available, neither Lenovo nor Lenov authorized service technicians provide any Lenovo computer: the power-on . The system board must be replaced for the system administrator, who can be made available... no activity is apparent on the screen for it can be replaced for the user + Master HDP - The computer does not start until the password is booted.
Hardware Maintenance Manual
Page 35
...this notebook or an external display. Fn + F1: Enter sleep mode. Fn + F8 (G480/G485): Enable/Disable the numeric keypad. Fn + F9: Start/Pause playback of the LCD screen. Fn + F10: Stop playback of Fn with a function key. Fn + F5: Open the interface for display resolution ... + F12: Skip to the next track. Fn + Home: Activate the pause function. Fn + PgDn (G480/G485): Activate the insert function. Lenovo G480/G485/G580/G585/G780 Fn key combinations The following table shows the function of each combination of Windows Media Player. Table 3. Fn + Insert...
...this notebook or an external display. Fn + F1: Enter sleep mode. Fn + F8 (G480/G485): Enable/Disable the numeric keypad. Fn + F9: Start/Pause playback of the LCD screen. Fn + F10: Stop playback of Fn with a function key. Fn + F5: Open the interface for display resolution ... + F12: Skip to the next track. Fn + Home: Activate the pause function. Fn + PgDn (G480/G485): Activate the insert function. Lenovo G480/G485/G580/G585/G780 Fn key combinations The following table shows the function of each combination of Windows Media Player. Table 3. Fn + Insert...
Lenovo G480, G485, G580, G585, G780 Lenovo Limited Warranty & Product Specific Notices V1.0 (English)
Page 1
...The terms of Part 2 replace or modify terms of Part 1 as shown on the original date of purchase as specified for resale. This Lenovo Limited Warranty is free from defects in "Part 3 - AS SOME STATES OR JURISDICTIONS DO NOT ALLOW THE EXCLUSION OF EXPRESS OR IMPLIED WARRANTIES.... This warranty only applies to your product are as may be otherwise specified by Lenovo. The warranty period for the product starts on your own use during the warranty period. Country-specific Terms Part 3 - Lenovo limited warranty P/N: 147500985 Printed in the country or region of purchase. AS SOME ...
...The terms of Part 2 replace or modify terms of Part 1 as shown on the original date of purchase as specified for resale. This Lenovo Limited Warranty is free from defects in "Part 3 - AS SOME STATES OR JURISDICTIONS DO NOT ALLOW THE EXCLUSION OF EXPRESS OR IMPLIED WARRANTIES.... This warranty only applies to your product are as may be otherwise specified by Lenovo. The warranty period for the product starts on your own use during the warranty period. Country-specific Terms Part 3 - Lenovo limited warranty P/N: 147500985 Printed in the country or region of purchase. AS SOME ...

Lenovo G480, G485, G580, G585, G780 Lenovo Limited Warranty & Product Specific Notices V1.0 (English)
Page 6
...product is free from defects in materials and workmanship under this Warranty Covers: Lenovo warrants that each hardware product that apply to the same section in Part 1: 6 Products and parts presented for the product starts on the original date of the period remaining on your sales receipt or ...invoice unless Lenovo informs you otherwise in writing. Refurbished parts may result in loss of the same type rather...
...product is free from defects in materials and workmanship under this Warranty Covers: Lenovo warrants that each hardware product that apply to the same section in Part 1: 6 Products and parts presented for the product starts on the original date of the period remaining on your sales receipt or ...invoice unless Lenovo informs you otherwise in writing. Refurbished parts may result in loss of the same type rather...
Lenovo G480, G485, G580, G585, G780 Lenovo Limited Warranty & Product Specific Notices V1.0 (English)
Page 19
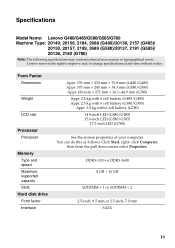
...or 2.5-inch, 7.0 mm SATA 19 Specifications Model Name: Lenovo G480/G485/G580/G585/G780 Machine Type: 20149, 20156, 2184, 2688 (G480)/20136, 2157 (G485)/ 20150, 20157, 2189, 2689 (G580)/20137, 2181 (G585)/ 20138, 2182 (G780) Note:... mm × 33.8 mm (G480/G485) Appr. 375 mm × 245 mm × 34.3 mm (G580/G585) Appr. 416 mm × 272 mm × 36.1~44.9 mm (G780) Appr. 2.2 kg with 6 ... (G480/G485) Appr. 2.5 kg with 6 cell battery (G580/G585) Appr. 3.0 kg with 6 cell battery (G780) 14.0-inch LED (G480/G485) 15.6-inch LED (G580/G585) 17.3-inch LED (G780) See the system properties of...
...or 2.5-inch, 7.0 mm SATA 19 Specifications Model Name: Lenovo G480/G485/G580/G585/G780 Machine Type: 20149, 20156, 2184, 2688 (G480)/20136, 2157 (G485)/ 20150, 20157, 2189, 2689 (G580)/20137, 2181 (G585)/ 20138, 2182 (G780) Note:... mm × 33.8 mm (G480/G485) Appr. 375 mm × 245 mm × 34.3 mm (G580/G585) Appr. 416 mm × 272 mm × 36.1~44.9 mm (G780) Appr. 2.2 kg with 6 ... (G480/G485) Appr. 2.5 kg with 6 cell battery (G580/G585) Appr. 3.0 kg with 6 cell battery (G780) 14.0-inch LED (G480/G485) 15.6-inch LED (G580/G585) 17.3-inch LED (G780) See the system properties of...
User Guide - Lenovo Notebooks (for Windows 8.1)
Page 3
Getting apps from the Windows Store 11 Creating a Microsoft account 11 Accessing the store...12 Getting your apps ...12 Chapter 5. Before use 1 Chapter 2. The charms 6 Search charm...7 Share charm...8 Start charm ...8 Devices charm...8 Settings charm ...9 Chapter 4. Contents Chapter 1. Touch gestures 13 Chapter 6. Operating system interfaces 2 Switching screens ...2 Using the Start screen 3 Using the desktop ...5 Chapter 3. Help and support 16 Trademarks 17 i
Getting apps from the Windows Store 11 Creating a Microsoft account 11 Accessing the store...12 Getting your apps ...12 Chapter 5. Before use 1 Chapter 2. The charms 6 Search charm...7 Share charm...8 Start charm ...8 Devices charm...8 Settings charm ...9 Chapter 4. Contents Chapter 1. Touch gestures 13 Chapter 6. Operating system interfaces 2 Switching screens ...2 Using the Start screen 3 Using the desktop ...5 Chapter 3. Help and support 16 Trademarks 17 i
User Guide - Lenovo Notebooks (for Windows 8.1)
Page 6
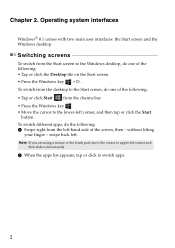
...do one of the screen, then - without lifting your finger - Chapter 2. Operating system interfaces Windows® 8.1 comes with two main user interfaces: the Start screen and the Windows desktop. Note: If you are using a mouse or the touch pad, move the cursor to upper-left corner and then slide ... the apps list appears, tap or click to the lower-left corner, and then tap or click the Start button. To switch different apps, do one of the following: • Tap or click Start from the charms bar. • Press the Windows key . • Move the cursor to switch apps. 2 ...
...do one of the screen, then - without lifting your finger - Chapter 2. Operating system interfaces Windows® 8.1 comes with two main user interfaces: the Start screen and the Windows desktop. Note: If you are using a mouse or the touch pad, move the cursor to upper-left corner and then slide ... the apps list appears, tap or click to the lower-left corner, and then tap or click the Start button. To switch different apps, do one of the following: • Tap or click Start from the charms bar. • Press the Windows key . • Move the cursor to switch apps. 2 ...
User Guide - Lenovo Notebooks (for Windows 8.1)
Page 7
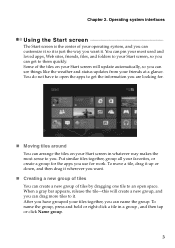
... apps to get to an open space. To move a tile, drag it up or down, and then drag it . Operating system interfaces Using the Start screen The Start screen is the center of your operating system, and you can customize it so it is just the way you want it wherever you..., you can drag more tiles to you can create a new group of tiles You can see things like the weather and status updates from your Start screen will create a new group, and you use for . „ Moving tiles around You can arrange the tiles on your friends at a glance. When a gray...
... apps to get to an open space. To move a tile, drag it up or down, and then drag it . Operating system interfaces Using the Start screen The Start screen is the center of your operating system, and you can customize it so it is just the way you want it wherever you..., you can drag more tiles to you can create a new group of tiles You can see things like the weather and status updates from your Start screen will create a new group, and you use for . „ Moving tiles around You can arrange the tiles on your friends at a glance. When a gray...


