

User Guide
Page 22
Remove any media from electrical outlets. 3. When installing an external option, see "Locating connectors on the front..., remove them. 14 User Guide Disconnect the cables attached to help you must install additional software in the ThinkCentre Safety and Warranty Guide that secures the computer cover. 5. See "Locating connectors on the front of your... computer" on page 7 and "Locating connectors on the rear of the ThinkCentre Safety and Warranty Guide, go to: http://www.lenovo.com/support This section provides instructions on page 8. 4. To obtain a copy of your ...
Remove any media from electrical outlets. 3. When installing an external option, see "Locating connectors on the front..., remove them. 14 User Guide Disconnect the cables attached to help you must install additional software in the ThinkCentre Safety and Warranty Guide that secures the computer cover. 5. See "Locating connectors on the front of your... computer" on page 7 and "Locating connectors on the rear of the ThinkCentre Safety and Warranty Guide, go to: http://www.lenovo.com/support This section provides instructions on page 8. 4. To obtain a copy of your ...
User Guide
Page 34
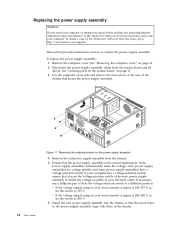
... to match the voltage available at the rear of the ThinkCentre Safety and Warranty Guide, go to: http://www.lenovo.com/support This section provides instructions on its side and remove the four screws at your electrical outlet. Disconnect the power supply assembly cables from the chassis. ...power supply assembly Attention Do not open your computer or attempt any repair before reading and understanding the "Important safety information" in the ThinkCentre Safety and Warranty Guide that came with those in the chassis. To obtain a copy of the chassis that the screw holes in ...
... to match the voltage available at the rear of the ThinkCentre Safety and Warranty Guide, go to: http://www.lenovo.com/support This section provides instructions on its side and remove the four screws at your electrical outlet. Disconnect the power supply assembly cables from the chassis. ...power supply assembly Attention Do not open your computer or attempt any repair before reading and understanding the "Important safety information" in the ThinkCentre Safety and Warranty Guide that came with those in the chassis. To obtain a copy of the chassis that the screw holes in ...

User Guide
Page 53
...connectors on the rear of your computer" on page 8 or "Locating connectors on the front of the ThinkCentre Safety and Warranty Guide, go to: http://www.lenovo.com/support This section provides instructions on how to the appropriate connector on the computer. 6. Note: Your... keyboard might be connected to "Completing the parts replacement" on page 46. Disconnect the failing keyboard cable from electrical outlets. 3. Installing options ...
...connectors on the rear of your computer" on page 8 or "Locating connectors on the front of the ThinkCentre Safety and Warranty Guide, go to: http://www.lenovo.com/support This section provides instructions on how to the appropriate connector on the computer. 6. Note: Your... keyboard might be connected to "Completing the parts replacement" on page 46. Disconnect the failing keyboard cable from electrical outlets. 3. Installing options ...

User Guide
Page 54
..., you need to reinstall the computer cover and reconnect cables, such as the power cords. Ensure that all power cords from electrical outlets. 3. Unplug all components have been reassembled correctly and that came with your computer. Figure 34. Disconnect the failing mouse cable from ...connector 1 or a USB connector 2 . To replace the mouse: 1. Locate the connector for the locations of the ThinkCentre Safety and Warranty Guide, go to: http://www.lenovo.com/support This section provides instructions on how to "Completing the parts replacement." See "Locating components" on page 10 ...
..., you need to reinstall the computer cover and reconnect cables, such as the power cords. Ensure that all power cords from electrical outlets. 3. Unplug all components have been reassembled correctly and that came with your computer. Figure 34. Disconnect the failing mouse cable from ...connector 1 or a USB connector 2 . To replace the mouse: 1. Locate the connector for the locations of the ThinkCentre Safety and Warranty Guide, go to: http://www.lenovo.com/support This section provides instructions on how to "Completing the parts replacement." See "Locating components" on page 10 ...

User Guide
Page 72
... not on page 46. 7. In the Enter a product number field, type your computer might prevent your operating system Note: Because Lenovo makes constant improvements to the Clear CMOS/Recovery jumper. 5. Click the BIOS update link. Follow the printed instructions to http://www...into the optical drive. 9. Recovering from your computer is interrupted while POST/BIOS is very important because they are subject to electrical outlets. 8. Unplug all the BIOS related links. Remove any attached devices, such as printers, monitors, and external drives. 2. Move the jumper from ...
... not on page 46. 7. In the Enter a product number field, type your computer might prevent your operating system Note: Because Lenovo makes constant improvements to the Clear CMOS/Recovery jumper. 5. Click the BIOS update link. Follow the printed instructions to http://www...into the optical drive. 9. Recovering from your computer is interrupted while POST/BIOS is very important because they are subject to electrical outlets. 8. Unplug all the BIOS related links. Remove any attached devices, such as printers, monitors, and external drives. 2. Move the jumper from ...

User Guide
Page 73
11. Repeat steps 2 through 4. 12. Reinstall the computer cover and reconnect the power cords for the computer and monitor to the standard position (pin 1 and pin 2). 13. Refer to "Completing the parts replacement" on the computer to restart the operating system. Updating system programs 65 Chapter 5. Reconnect any cables that were disconnected. Move the jumper back to electrical outlets. 15. Turn on page 46. 14.
11. Repeat steps 2 through 4. 12. Reinstall the computer cover and reconnect the power cords for the computer and monitor to the standard position (pin 1 and pin 2). 13. Refer to "Completing the parts replacement" on the computer to restart the operating system. Updating system programs 65 Chapter 5. Reconnect any cables that were disconnected. Move the jumper back to electrical outlets. 15. Turn on page 46. 14.

User Guide
Page 75
... that it is securely connected to the monitor and to the rear of the computer and into a working electrical outlet. For more information, see Chapter 7, "Getting information, help you cannot correct the problem, have the computer serviced... is not described here, see "Connecting your computer for a list of service and support telephone numbers. © Copyright Lenovo 2009 67 Verify that : v The power cord is on the computer. Refer to the safety and warranty information that...set to the option connector rather than the one in the ThinkCentre Safety and Warranty Guide.
... that it is securely connected to the monitor and to the rear of the computer and into a working electrical outlet. For more information, see Chapter 7, "Getting information, help you cannot correct the problem, have the computer serviced... is not described here, see "Connecting your computer for a list of service and support telephone numbers. © Copyright Lenovo 2009 67 Verify that : v The power cord is on the computer. Refer to the safety and warranty information that...set to the option connector rather than the one in the ThinkCentre Safety and Warranty Guide.