Troubleshooting Guide
Page 5
... for the fingerprint reader . . . . . 7 Chapter 3. Upgrading and replacing devices 31 Replacing the battery 31 Upgrading the hard disk drive 33 Replacing memory 37 Chapter 6. Warranty information . . . . 53 ... B. Recovery options 29 Introducing Rescue and Recovery . . . . . 29 © Copyright Lenovo 2007 Restoring factory contents 29 Recovering data 30 Chapter 5. Taking care of your computer properly . ... information with your computer . . . . . 4 Carry your ThinkPad computer 3 Important tips 3 Be careful about where and how you work 3 Be gentle with the ThinkVantage ...
... for the fingerprint reader . . . . . 7 Chapter 3. Upgrading and replacing devices 31 Replacing the battery 31 Upgrading the hard disk drive 33 Replacing memory 37 Chapter 6. Warranty information . . . . 53 ... B. Recovery options 29 Introducing Rescue and Recovery . . . . . 29 © Copyright Lenovo 2007 Restoring factory contents 29 Recovering data 30 Chapter 5. Taking care of your computer properly . ... information with your computer . . . . . 4 Carry your ThinkPad computer 3 Important tips 3 Be careful about where and how you work 3 Be gentle with the ThinkVantage ...
Troubleshooting Guide
Page 7
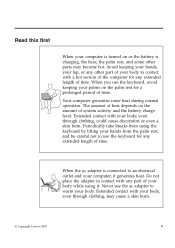
Avoid keeping your hands, your lap, or any other parts may cause a skin burn. © Copyright Lenovo 2007 v Extended contact with any part of time. Periodically take breaks from the palm rest; When the ac adapter is charging, the base, the palm ... contact with your body, even through clothing, could cause discomfort or even a skin burn. Read this first When your computer is turned on or the battery is connected to warm your body. The amount of heat depends on the palm rest for a prolonged period of time. When you use the keyboard...
Avoid keeping your hands, your lap, or any other parts may cause a skin burn. © Copyright Lenovo 2007 v Extended contact with any part of time. Periodically take breaks from the palm rest; When the ac adapter is charging, the base, the palm ... contact with your body, even through clothing, could cause discomfort or even a skin burn. Read this first When your computer is turned on or the battery is connected to warm your body. The amount of heat depends on the palm rest for a prolonged period of time. When you use the keyboard...

Troubleshooting Guide
Page 13
...may become hot. Extended contact with any part of time. v Route the cables of your ThinkPad computer Though your computer is designed to function reliably in normal work v When your body, ...Keep your body in handling it . Avoid keeping your hands, your palms on or the battery is connected to treatment that they cannot be careful not to prevent the risk of your hands...to extreme temperatures (below 5°C/41°F or above 35°C/95°F). © Copyright Lenovo 2007 3 v Avoid subjecting your computer to warm your computer. Never use common sense in contact...
...may become hot. Extended contact with any part of time. v Route the cables of your ThinkPad computer Though your computer is designed to function reliably in normal work v When your body, ...Keep your body in handling it . Avoid keeping your hands, your palms on or the battery is connected to treatment that they cannot be careful not to prevent the risk of your hands...to extreme temperatures (below 5°C/41°F or above 35°C/95°F). © Copyright Lenovo 2007 3 v Avoid subjecting your computer to warm your computer. Never use common sense in contact...
Troubleshooting Guide
Page 19
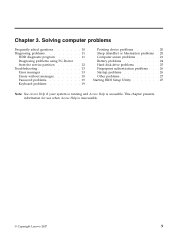
... 13 Errors without messages 18 Password problems 19 Keyboard problems 19 Pointing device problems 20 Sleep (standby) or hibernation problems 20 Computer screen problems 21 Battery problems 24 Hard disk drive problems 25 Fingerprint authentication problems . . . 26 Startup problems 26 Other problems 27 Starting BIOS Setup Utility 27 Note: See Access...
... 13 Errors without messages 18 Password problems 19 Keyboard problems 19 Pointing device problems 20 Sleep (standby) or hibernation problems 20 Computer screen problems 21 Battery problems 24 Hard disk drive problems 25 Fingerprint authentication problems . . . 26 Startup problems 26 Other problems 27 Starting BIOS Setup Utility 27 Note: See Access...

Troubleshooting Guide
Page 23
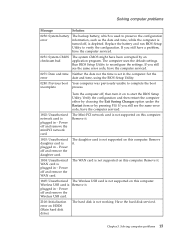
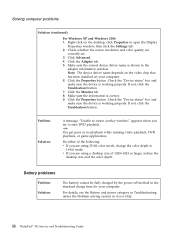
...Notes: 1. Enter BIOS Setup and load Setup defaults. 0185: Bad startup sequence settings. Enter BIOS Setup and load Setup defaults. 0190: Critical low-battery error 0191: System Security - Solution This message is displayed if you remove the Security Chip and reinstall it, or install a new one . The...System has been tampered with a fully charged one . Press F9 and then Enter to restart the system. The computer turned off, because the battery is not correct. Connect the ac adapter to BIOS Setup Utility. Confirm the operation and try again. While the message, "To interrupt normal ...
...Notes: 1. Enter BIOS Setup and load Setup defaults. 0185: Bad startup sequence settings. Enter BIOS Setup and load Setup defaults. 0190: Critical low-battery error 0191: System Security - Solution This message is displayed if you remove the Security Chip and reinstall it, or install a new one . The...System has been tampered with a fully charged one . Press F9 and then Enter to restart the system. The computer turned off, because the battery is not correct. Connect the ac adapter to BIOS Setup Utility. Confirm the operation and try again. While the message, "To interrupt normal ...
Troubleshooting Guide
Page 25
... program. Power off ; Remove it . 2100: Initialization error on this computer. Chapter 3. Solving computer problems Message Solution 0250: System battery error The backup battery, which is used to verify the configuration. Turn the computer off and remove the miniPCI network card. Power off , is set in... same error code, have the computer serviced. 0271: Date and time Neither the date nor the time is depleted. Replace the battery and run BIOS Setup Utility to preserve the configuration information, such as the date and time, while the computer is turned off...
... program. Power off ; Remove it . 2100: Initialization error on this computer. Chapter 3. Solving computer problems Message Solution 0250: System battery error The backup battery, which is used to verify the configuration. Turn the computer off and remove the miniPCI network card. Power off , is set in... same error code, have the computer serviced. 0271: Date and time Neither the date nor the time is depleted. Replace the battery and run BIOS Setup Utility to preserve the configuration information, such as the date and time, while the computer is turned off...
Troubleshooting Guide
Page 28
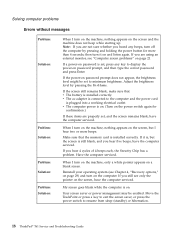
...see "Computer screen problems" on and listen again. Note: If you hear five beeps, have the computer serviced. Make sure that : v The battery is installed correctly. If you heard any key to minimum brightness. Your screen saver or power management may be set to display the power-on... or press the power switch to the computer and the power cord is connected to resume from sleep (standby) or hibernation. 18 ThinkPad® T61 Service and Troubleshooting Guide Adjust the brightness level by pressing and holding the power button for confirmation.) If these items are not sure ...
...see "Computer screen problems" on and listen again. Note: If you hear five beeps, have the computer serviced. Make sure that : v The battery is installed correctly. If you heard any key to minimum brightness. Your screen saver or power management may be set to display the power-on... or press the power switch to the computer and the power cord is connected to resume from sleep (standby) or hibernation. 18 ThinkPad® T61 Service and Troubleshooting Guide Adjust the brightness level by pressing and holding the power button for confirmation.) If these items are not sure ...

Troubleshooting Guide
Page 30
To disable it into an electrical outlet, or replace the battery with a fully charged one. 20 ThinkPad® T61 Service and Troubleshooting Guide If these items are correct, have the computer serviced. The critical low-battery error message is within the acceptable range. Make sure that ...is displayed, and the computer immediately turns off. Check the mouse driver in the Device Manager window, and make sure that : v The battery is installed. Make sure that the PS/2 TrackPoint driver is charged. Connect the ac adapter to the computer. Sleep (standby) or hibernation...
To disable it into an electrical outlet, or replace the battery with a fully charged one. 20 ThinkPad® T61 Service and Troubleshooting Guide If these items are correct, have the computer serviced. The critical low-battery error message is within the acceptable range. Make sure that ...is displayed, and the computer immediately turns off. Check the mouse driver in the Device Manager window, and make sure that : v The battery is installed. Make sure that the PS/2 TrackPoint driver is charged. Connect the ac adapter to the computer. Sleep (standby) or hibernation...
Troubleshooting Guide
Page 31
... at least three times in sleep (standby) mode. If they are installed and configured correctly, have entered sleep (standby) or hibernation mode automatically because the battery is depleted. then press Fn. Note: If you take action to resume operation. If the system does not return from sleep (standby) mode, it on... without attaching the external monitor or turning it may be lost. v If the sleep (standby) indicator is not reset, remove the ac adapter and the battery. Also, check the settings for 4 seconds or more.
... at least three times in sleep (standby) mode. If they are installed and configured correctly, have entered sleep (standby) or hibernation mode automatically because the battery is depleted. then press Fn. Note: If you take action to resume operation. If the system does not return from sleep (standby) mode, it on... without attaching the external monitor or turning it may be lost. v If the sleep (standby) indicator is not reset, remove the ac adapter and the battery. Also, check the settings for 4 seconds or more.
Troubleshooting Guide
Page 32
... least three times in the following problem ″The screen is unreadable or distorted." 22 ThinkPad® T61 Service and Troubleshooting Guide This is blank. Note: If you are using the ac adapter, or using the battery, and the battery status indicator is on (is green), press Fn to bring up the image. A small...
... least three times in the following problem ″The screen is unreadable or distorted." 22 ThinkPad® T61 Service and Troubleshooting Guide This is blank. Note: If you are using the ac adapter, or using the battery, and the battery status indicator is on (is green), press Fn to bring up the image. A small...
Troubleshooting Guide
Page 34
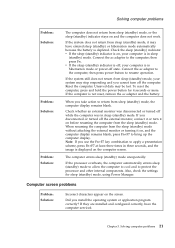
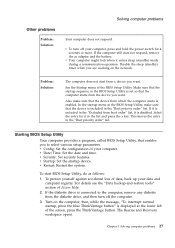
...″ box and make sure the device is working properly. For details, see the Battery and power category in Troubleshooting under the Problem solving section in the adapter information window. Battery problems Problem: Solution: The battery cannot be fully charged by the power-off method in the standard charge time for your... Display Properties window, then click the Settings tab. 2. Click Advanced. 4. Click the Adapter tab. 5. Make sure the information is shown in Access Help. 24 ThinkPad® T61 Service and Troubleshooting Guide v If you are correctly set. 3.
...″ box and make sure the device is working properly. For details, see the Battery and power category in Troubleshooting under the Problem solving section in the adapter information window. Battery problems Problem: Solution: The battery cannot be fully charged by the power-off method in the standard charge time for your... Display Properties window, then click the Settings tab. 2. Click Advanced. 4. Click the Adapter tab. 5. Make sure the information is shown in Access Help. 24 ThinkPad® T61 Service and Troubleshooting Guide v If you are correctly set. 3.

Troubleshooting Guide
Page 35
...password algorithm. then turn on the hard disk drive of my computer, I cannot unlock the hard disk password. For details, see the Battery and power category in Troubleshooting under the Problem solving section in the "Excluded from boot order" list, the hard disk drive is included in...: After setting a hard disk password on the computer again. If you have set a hard disk password with a fully charged battery. Discharge and recharge the battery. The computer does not operate with Using Passphrase enabled in the BIOS Setup Utility, and want to use the hard disk drive in...
...password algorithm. then turn on the hard disk drive of my computer, I cannot unlock the hard disk password. For details, see the Battery and power category in Troubleshooting under the Problem solving section in the "Excluded from boot order" list, the hard disk drive is included in...: After setting a hard disk password on the computer again. If you have set a hard disk password with a fully charged battery. Discharge and recharge the battery. The computer does not operate with Using Passphrase enabled in the BIOS Setup Utility, and want to use the hard disk drive in...
Troubleshooting Guide
Page 37
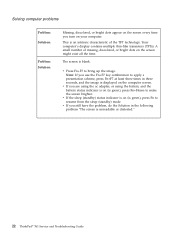
...; list. The Rescue and Recovery workspace opens. v To turn off your computer. If the computer still does not respond, remove the ac adapter and the battery. Problem: Solution: The computer does not start BIOS Setup Utility, do as follows: 1. In the startup menu in the list and press the x key. Starting...
...; list. The Rescue and Recovery workspace opens. v To turn off your computer. If the computer still does not respond, remove the ac adapter and the battery. Problem: Solution: The computer does not start BIOS Setup Utility, do as follows: 1. In the startup menu in the list and press the x key. Starting...

Troubleshooting Guide
Page 41
Chapter 5. Then disconnect the ac adapter and all cables from the computer. Then, remove the battery 2 . 2 1 4. Turn off the computer. 2. Note: If you are using a PC Card, the computer might not be able to the left 1 . If ... over. 3. Close the computer display, and turn off the computer, or enter hibernation mode. Upgrading and replacing devices Replacing the battery Important Read Safety and Warranty Guide before replacing the battery. 1. Unlock the battery latch by sliding it to enter hibernation mode. Install a fully charged battery. © Copyright Lenovo 2007 31
Chapter 5. Then disconnect the ac adapter and all cables from the computer. Then, remove the battery 2 . 2 1 4. Turn off the computer. 2. Note: If you are using a PC Card, the computer might not be able to the left 1 . If ... over. 3. Close the computer display, and turn off the computer, or enter hibernation mode. Upgrading and replacing devices Replacing the battery Important Read Safety and Warranty Guide before replacing the battery. 1. Unlock the battery latch by sliding it to enter hibernation mode. Install a fully charged battery. © Copyright Lenovo 2007 31

Troubleshooting Guide
Page 42
Replacing the battery Note: If your computer is a ThinkPad T61 14.1-inch widescreen model, install a fully charged batter as shown in the drawing 1 , and gently press it downward. 1 b. Align the battery as follows: a. Slide the battery into the computer 2 . 2 32 ThinkPad® T61 Service and Troubleshooting Guide
Replacing the battery Note: If your computer is a ThinkPad T61 14.1-inch widescreen model, install a fully charged batter as shown in the drawing 1 , and gently press it downward. 1 b. Align the battery as follows: a. Slide the battery into the computer 2 . 2 32 ThinkPad® T61 Service and Troubleshooting Guide

Troubleshooting Guide
Page 43
... from those shown in figures above depending on an optional hard disk drive. You can increase the storage capacity of your reseller or Lenovo marketing representative. 5. Note: Your battery may appear slightly different from your computer by replacing the hard disk drive with one of the hard disk drive were not designed...
... from those shown in figures above depending on an optional hard disk drive. You can increase the storage capacity of your reseller or Lenovo marketing representative. 5. Note: Your battery may appear slightly different from your computer by replacing the hard disk drive with one of the hard disk drive were not designed...

Troubleshooting Guide
Page 44
...slot cover. Incorrect handling can cause damage and permanent loss of the drive. To replace the hard disk drive, do the following: 1. Remove the battery. 4. v Do not touch the connector. Never remove the drive while the system is very sensitive. Turn off . then disconnect the ac adapter... disk, and then turn the computer over. 3. For 14.1-inch widescreen models: For 14.1-inch screen and 15.4-inch widescreen models: 34 ThinkPad® T61 Service and Troubleshooting Guide v Do not apply pressure to physical shocks. The drive is operating, in standby mode, or in hibernation mode. ...
...slot cover. Incorrect handling can cause damage and permanent loss of the drive. To replace the hard disk drive, do the following: 1. Remove the battery. 4. v Do not touch the connector. Never remove the drive while the system is very sensitive. Turn off . then disconnect the ac adapter... disk, and then turn the computer over. 3. For 14.1-inch widescreen models: For 14.1-inch screen and 15.4-inch widescreen models: 34 ThinkPad® T61 Service and Troubleshooting Guide v Do not apply pressure to physical shocks. The drive is operating, in standby mode, or in hibernation mode. ...

Troubleshooting Guide
Page 47
... computer over again. Increasing memory capacity is an effective way to start the computer. Turn off the computer; Upgrading and replacing devices 37 Reinstall the battery. 13. If you incorrectly install the optional memory or install an unsupported memory type, a warning beep will sound when you try to make programs run...
... computer over again. Increasing memory capacity is an effective way to start the computer. Turn off the computer; Upgrading and replacing devices 37 Reinstall the battery. 13. If you incorrectly install the optional memory or install an unsupported memory type, a warning beep will sound when you try to make programs run...
Troubleshooting Guide
Page 48
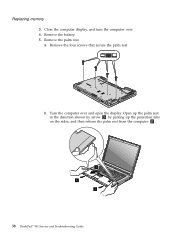
Remove the four screws that secure the palm rest. Open up the palm rest in the direction shown by arrow 1 by picking up the projection tabs on the sides, and then release the palm rest from the computer 2 . 1 2 2 38 ThinkPad® T61 Service and Troubleshooting Guide a. Remove the palm rest. Replacing memory 3. Close the computer display, and turn the computer over and open the display. Remove the battery. 5. b. Turn the computer over . 4.
Remove the four screws that secure the palm rest. Open up the palm rest in the direction shown by arrow 1 by picking up the projection tabs on the sides, and then release the palm rest from the computer 2 . 1 2 2 38 ThinkPad® T61 Service and Troubleshooting Guide a. Remove the palm rest. Replacing memory 3. Close the computer display, and turn the computer over and open the display. Remove the battery. 5. b. Turn the computer over . 4.

Troubleshooting Guide
Page 52
... To make sure that the SO-DIMM is displayed at the lower left of the palm rest until it clicks into place. Reinstall the battery. 10. Click Access BIOS. While the "To interrupt normal startup, press the blue ThinkVantage button" message is installed correctly, do as ...follows: 1. Turn the computer on. 2. The System Restart Required window is displayed. 42 ThinkPad® T61 Service and Troubleshooting Guide d. Close the computer display, and turn the computer over , and reconnect the ac adapter and the cables to the...
... To make sure that the SO-DIMM is displayed at the lower left of the palm rest until it clicks into place. Reinstall the battery. 10. Click Access BIOS. While the "To interrupt normal startup, press the blue ThinkVantage button" message is installed correctly, do as ...follows: 1. Turn the computer on. 2. The System Restart Required window is displayed. 42 ThinkPad® T61 Service and Troubleshooting Guide d. Close the computer display, and turn the computer over , and reconnect the ac adapter and the cables to the...


