

Brochure
Page 3
... 238x275x80 (mm) Weight (Maximum Configuration) Tower: 11kg (24.25lbs) SFF: 7.5kg (16.53lbs) Eco USFF: 4.18kg (9.22lbs) Keyboard Lenovo Preferred Pro Full-size Keyboard Preferred Pro Fingerprint Keyboard Preferred Pro Full-size PS/2® Keyboard Graphics Integrated: Intel® GMA4500 Discrete: NVIDIA®... 9500 GT 512MB with DP/DVI-I /O ports (including all USB ports) Limited Warranty Up to 4 years Included Software10 Adobe® Acrobat Reader®; Companies can only support Q9XXX & E8XXX series processors. ** Note: SMC...
... 238x275x80 (mm) Weight (Maximum Configuration) Tower: 11kg (24.25lbs) SFF: 7.5kg (16.53lbs) Eco USFF: 4.18kg (9.22lbs) Keyboard Lenovo Preferred Pro Full-size Keyboard Preferred Pro Fingerprint Keyboard Preferred Pro Full-size PS/2® Keyboard Graphics Integrated: Intel® GMA4500 Discrete: NVIDIA®... 9500 GT 512MB with DP/DVI-I /O ports (including all USB ports) Limited Warranty Up to 4 years Included Software10 Adobe® Acrobat Reader®; Companies can only support Q9XXX & E8XXX series processors. ** Note: SMC...

Brochure
Page 4
... (digital) monitor to boost system performance Lenovo 512MB NVIDIA GeForce 9500GT DisplayPort + DVI Graphics Card (45K1635) - Lenovo makes no representation or warranty regarding third party products or services. Lenovo, the Lenovo logo, ThinkCentre and ThinkVantage are registered trademarks ...Centrino Inside, Pentium and Pentium inside are trademarks of applicable warranties, visit lenovo.com/hk/warranty. Creator is a registered trademark of Blu-ray Disc Association. License agreements may vary. Lenovo® recommends Windows Vista® Business. SFF, Tower only...
... (digital) monitor to boost system performance Lenovo 512MB NVIDIA GeForce 9500GT DisplayPort + DVI Graphics Card (45K1635) - Lenovo makes no representation or warranty regarding third party products or services. Lenovo, the Lenovo logo, ThinkCentre and ThinkVantage are registered trademarks ...Centrino Inside, Pentium and Pentium inside are trademarks of applicable warranties, visit lenovo.com/hk/warranty. Creator is a registered trademark of Blu-ray Disc Association. License agreements may vary. Lenovo® recommends Windows Vista® Business. SFF, Tower only...
User Manual
Page 4
... limited and restricted rights to use , reproduction, or disclosure is subject to read and understand the ThinkCentre Safety and Warranty Guide and "Notices," on page 67. Third Edition (October 2009) © Copyright Lenovo 2009. LENOVO products, data, computer software, and services have been developed exclusively at private expense and are delivered pursuant a General...
... limited and restricted rights to use , reproduction, or disclosure is subject to read and understand the ThinkCentre Safety and Warranty Guide and "Notices," on page 67. Third Edition (October 2009) © Copyright Lenovo 2009. LENOVO products, data, computer software, and services have been developed exclusively at private expense and are delivered pursuant a General...

User Manual
Page 5
...recovery repair diskette . . . . . 46 Using a recovery repair diskette 46 Installing or reinstalling device drivers . . . . . 47 © Copyright Lenovo 2009 Setting a rescue device in the startup sequence . . 48 Solving recovery problems 48 Chapter 4. Getting information, help, and service 63 Information resources 63 ...Online Books folder 63 Lenovo ThinkVantage Tools 63 ThinkVantage Productivity Center 63 Lenovo Welcome 64 Access Help 64 Safety and Warranty 64 Lenovo Web site (http://www.lenovo.com). . . 64 Help and service 65 Using the ...
...recovery repair diskette . . . . . 46 Using a recovery repair diskette 46 Installing or reinstalling device drivers . . . . . 47 © Copyright Lenovo 2009 Setting a rescue device in the startup sequence . . 48 Solving recovery problems 48 Chapter 4. Getting information, help, and service 63 Information resources 63 ...Online Books folder 63 Lenovo ThinkVantage Tools 63 ThinkVantage Productivity Center 63 Lenovo Welcome 64 Access Help 64 Safety and Warranty 64 Lenovo Web site (http://www.lenovo.com). . . 64 Help and service 65 Using the ...
User Manual
Page 7
... the risk of the ThinkCentre Safety and Warranty Guide, you no longer have a copy of personal injury and or damage to your product. If you can obtain a Portable Document Format (PDF) version from the Lenovo® Support Web site at: http://www.lenovo.com/support © Copyright Lenovo 2009 v Important safety information CAUTION: Before...
... the risk of the ThinkCentre Safety and Warranty Guide, you no longer have a copy of personal injury and or damage to your product. If you can obtain a Portable Document Format (PDF) version from the Lenovo® Support Web site at: http://www.lenovo.com/support © Copyright Lenovo 2009 v Important safety information CAUTION: Before...
User Manual
Page 21
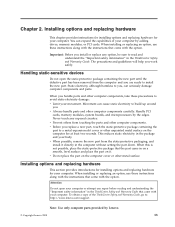
... carefully. Movement can cause static electricity to you, can expand the capabilities of the ThinkCentre Safety and Warranty Guide, go to: http://www.lenovo.com/support Note: Use only computer parts provided by Lenovo. © Copyright Lenovo 2009 13 Never touch any option, be sure to avoid static-electricity damage: v Limit your computer by...
... carefully. Movement can cause static electricity to you, can expand the capabilities of the ThinkCentre Safety and Warranty Guide, go to: http://www.lenovo.com/support Note: Use only computer parts provided by Lenovo. © Copyright Lenovo 2009 13 Never touch any option, be sure to avoid static-electricity damage: v Limit your computer by...

User Manual
Page 22
...output (I/O) cables, and any other cables that came with the option to help you must install additional software in the ThinkCentre Safety and Warranty Guide that are required for the option. Remove any media from electrical outlets. 3. CAUTION: Turn off all power cords from the ...drives, shut down your computer" on how to : http://www.lenovo.com/support This section provides instructions on page 8. 4. When installing an external option, see "Locating connectors on the front of your computer" ...
...output (I/O) cables, and any other cables that came with the option to help you must install additional software in the ThinkCentre Safety and Warranty Guide that are required for the option. Remove any media from electrical outlets. 3. CAUTION: Turn off all power cords from the ...drives, shut down your computer" on how to : http://www.lenovo.com/support This section provides instructions on page 8. 4. When installing an external option, see "Locating connectors on the front of your computer" ...

User Manual
Page 23
... 15 Figure 5. 5. To access the system board components and drives: 1. Chapter 2. Press the buttons on the sides of the ThinkCentre Safety and Warranty Guide, go to: http://www.lenovo.com/support This section provides instructions on page 14. To obtain a copy of the computer and pivot the computer cover upward to access... computer cover" on how to open your computer or attempt any repair before reading and understanding the "Important safety information" in the ThinkCentre Safety and Warranty Guide that came with your computer.
... 15 Figure 5. 5. To access the system board components and drives: 1. Chapter 2. Press the buttons on the sides of the ThinkCentre Safety and Warranty Guide, go to: http://www.lenovo.com/support This section provides instructions on page 14. To obtain a copy of the computer and pivot the computer cover upward to access... computer cover" on how to open your computer or attempt any repair before reading and understanding the "Important safety information" in the ThinkCentre Safety and Warranty Guide that came with your computer.

User Manual
Page 24
...memory module Attention Do not open your computer. Figure 6. On some models, you note the locations of the ThinkCentre Safety and Warranty Guide, go to: http://www.lenovo.com/support This section provides instructions on page 23. Make sure the hard disk drive assembly is in the latched down position... or replacing DDR2 DIMMs. When installing or replacing a memory module, use 1 GB or 2 GB DDR2 DIMMs in the ThinkCentre Safety and Warranty Guide that you disconnect from the drives or the system board. Make sure you might need to pivot the drive bay assembly upward and remove...
...memory module Attention Do not open your computer. Figure 6. On some models, you note the locations of the ThinkCentre Safety and Warranty Guide, go to: http://www.lenovo.com/support This section provides instructions on page 23. Make sure the hard disk drive assembly is in the latched down position... or replacing DDR2 DIMMs. When installing or replacing a memory module, use 1 GB or 2 GB DDR2 DIMMs in the ThinkCentre Safety and Warranty Guide that you disconnect from the drives or the system board. Make sure you might need to pivot the drive bay assembly upward and remove...

User Manual
Page 26
... before reading and understanding the "Important safety information" in the ThinkCentre Safety and Warranty Guide that the notch 1 on the memory module aligns correctly with another option, go to : http://www.lenovo.com/support This section provides instructions on page 37. 6. v To complete the... installation, go to the appropriate section. To obtain a copy of the ThinkCentre Safety and Warranty Guide, go to "Completing the parts replacement" on...
... before reading and understanding the "Important safety information" in the ThinkCentre Safety and Warranty Guide that the notch 1 on the memory module aligns correctly with another option, go to : http://www.lenovo.com/support This section provides instructions on page 37. 6. v To complete the... installation, go to the appropriate section. To obtain a copy of the ThinkCentre Safety and Warranty Guide, go to "Completing the parts replacement" on...

User Manual
Page 30
... any repair before reading and understanding the "Important safety information" in the ThinkCentre Safety and Warranty Guide that comes with your drive on the side of the ThinkCentre Safety and Warranty Guide, go to: http://www.lenovo.com/support This section provides instructions on how to the cable connections and connect the signal...
... any repair before reading and understanding the "Important safety information" in the ThinkCentre Safety and Warranty Guide that comes with your drive on the side of the ThinkCentre Safety and Warranty Guide, go to: http://www.lenovo.com/support This section provides instructions on how to the cable connections and connect the signal...

User Manual
Page 31
...it to "Completing the parts replacement" on how to any repair before reading and understanding the "Important safety information" in the ThinkCentre Safety and Warranty Guide that comes with the new drive. 2. Connecting a SATA drive What to do next: v To work with your computer. Important When ... cable to the drive and the other end to the factory default settings. Chapter 2. v To complete the installation, go to: http://www.lenovo.com/support This section provides instructions on page 37. Locate one end of Product Recovery discs. Figure 15. Connecting a SATA drive A SATA...
...it to "Completing the parts replacement" on how to any repair before reading and understanding the "Important safety information" in the ThinkCentre Safety and Warranty Guide that comes with the new drive. 2. Connecting a SATA drive What to do next: v To work with your computer. Important When ... cable to the drive and the other end to the factory default settings. Chapter 2. v To complete the installation, go to: http://www.lenovo.com/support This section provides instructions on page 37. Locate one end of Product Recovery discs. Figure 15. Connecting a SATA drive A SATA...
User Manual
Page 34
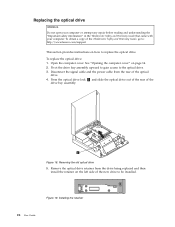
... Attention Do not open your computer or attempt any repair before reading and understanding the "Important safety information" in the ThinkCentre Safety and Warranty Guide that came with your computer. To obtain a copy of the drive bay assembly. Open the computer cover. Pivot the drive bay... assembly upward to gain access to : http://www.lenovo.com/support This section provides instructions on page 14. 2. Figure 18. Removing the old optical drive 5. Press the optical drive lock 1 and ...
... Attention Do not open your computer or attempt any repair before reading and understanding the "Important safety information" in the ThinkCentre Safety and Warranty Guide that came with your computer. To obtain a copy of the drive bay assembly. Open the computer cover. Pivot the drive bay... assembly upward to gain access to : http://www.lenovo.com/support This section provides instructions on page 14. 2. Figure 18. Removing the old optical drive 5. Press the optical drive lock 1 and ...
User Manual
Page 35
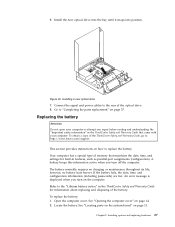
... options and replacing hardware 27 Connect the signal and power cables to replace the battery. To obtain a copy of the ThinkCentre Safety and Warranty Guide, go to: http://www.lenovo.com/support This section provides instructions on how to the rear of the optical drive. 8. Refer to "Completing the parts replacement" on...
... options and replacing hardware 27 Connect the signal and power cables to replace the battery. To obtain a copy of the ThinkCentre Safety and Warranty Guide, go to: http://www.lenovo.com/support This section provides instructions on how to the rear of the optical drive. 8. Refer to "Completing the parts replacement" on...
User Manual
Page 37
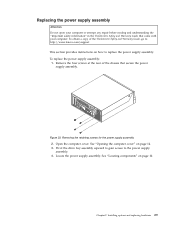
... "Opening the computer cover" on page 10. Open the computer cover. Remove the four screws at the rear of the ThinkCentre Safety and Warranty Guide, go to: http://www.lenovo.com/support This section provides instructions on how to the power supply assembly. 4. To replace the power supply assembly: 1. Replacing the power...
... "Opening the computer cover" on page 10. Open the computer cover. Remove the four screws at the rear of the ThinkCentre Safety and Warranty Guide, go to: http://www.lenovo.com/support This section provides instructions on how to the power supply assembly. 4. To replace the power supply assembly: 1. Replacing the power...
User Manual
Page 39
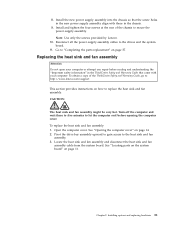
... To obtain a copy of the chassis to let the computer cool before reading and understanding the "Important safety information" in the ThinkCentre Safety and Warranty Guide that the screw holes in the chassis. 9. See "Locating parts on the system board" on page 14. 2. Go to the drives and...any repair before opening the computer cover. Install and tighten the four screws at the rear of the ThinkCentre Safety and Warranty Guide, go to: http://www.lenovo.com/support This section provides instructions on page 37. Replacing the heat sink and fan assembly Attention Do not open ...
... To obtain a copy of the chassis to let the computer cool before reading and understanding the "Important safety information" in the ThinkCentre Safety and Warranty Guide that the screw holes in the chassis. 9. See "Locating parts on the system board" on page 14. 2. Go to the drives and...any repair before opening the computer cover. Install and tighten the four screws at the rear of the ThinkCentre Safety and Warranty Guide, go to: http://www.lenovo.com/support This section provides instructions on page 37. Replacing the heat sink and fan assembly Attention Do not open ...
User Manual
Page 41
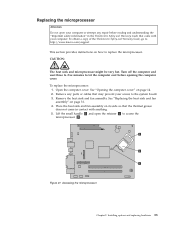
... cover. Installing options and replacing hardware 33 Accessing the microprocessor Chapter 2. To obtain a copy of the ThinkCentre Safety and Warranty Guide, go to: http://www.lenovo.com/support This section provides instructions on page 14. 2. See "Opening the computer cover" on how to replace the ... 3 and open your computer or attempt any parts or cables that the thermal grease does not come in the ThinkCentre Safety and Warranty Guide that came with anything. 5. Replacing the microprocessor Attention Do not open the retainer 1 to access the microprocessor 2 . Turn...
... cover. Installing options and replacing hardware 33 Accessing the microprocessor Chapter 2. To obtain a copy of the ThinkCentre Safety and Warranty Guide, go to: http://www.lenovo.com/support This section provides instructions on page 14. 2. See "Opening the computer cover" on how to replace the ... 3 and open your computer or attempt any parts or cables that the thermal grease does not come in the ThinkCentre Safety and Warranty Guide that came with anything. 5. Replacing the microprocessor Attention Do not open the retainer 1 to access the microprocessor 2 . Turn...
User Manual
Page 44
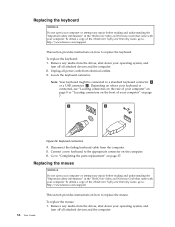
To obtain a copy of the ThinkCentre Safety and Warranty Guide, go to: http://www.lenovo.com/support 36 User Guide This section provides instructions on how to the appropriate connector on page 37. Connect a new keyboard to replace the mouse.... the mouse Attention Do not open your computer or attempt any repair before reading and understanding the "Important safety information" in the ThinkCentre Safety and Warranty Guide that came with your computer. Keyboard connectors 4. To obtain a copy of your computer" on how to "Completing the parts replacement" on the computer. 6....
To obtain a copy of the ThinkCentre Safety and Warranty Guide, go to: http://www.lenovo.com/support 36 User Guide This section provides instructions on how to the appropriate connector on page 37. Connect a new keyboard to replace the mouse.... the mouse Attention Do not open your computer or attempt any repair before reading and understanding the "Important safety information" in the ThinkCentre Safety and Warranty Guide that came with your computer. Keyboard connectors 4. To obtain a copy of your computer" on how to "Completing the parts replacement" on the computer. 6....

User Manual
Page 65
... setting for additional troubleshooting resources. v The monitor is set correctly. v The voltage is turned on . Refer to the safety and warranty information that is provided with your computer for a list of the computer. v The power indicator on the front of service and support... a working electrical outlet. Basic troubleshooting The following table provides information to the rear of service and support telephone numbers. © Copyright Lenovo 2009 57 v The monitor power cord is securely attached to the rear of the monitor and to help , and service," on the...
... setting for additional troubleshooting resources. v The monitor is set correctly. v The voltage is turned on . Refer to the safety and warranty information that is provided with your computer for a list of the computer. v The power indicator on the front of service and support... a working electrical outlet. Basic troubleshooting The following table provides information to the rear of service and support telephone numbers. © Copyright Lenovo 2009 57 v The monitor power cord is securely attached to the rear of the monitor and to help , and service," on the...

User Manual
Page 66
... telephone numbers. The computer does not respond to "Cleaning the mouse" on . If you diagnose computer problems: v Lenovo ThinkVantage Toolbox or Lenovo System Toolbox, depending on your operating system (used to the safety and warranty information that : v The computer is provided with your computer to help you cannot correct the problem, have the...
... telephone numbers. The computer does not respond to "Cleaning the mouse" on . If you diagnose computer problems: v Lenovo ThinkVantage Toolbox or Lenovo System Toolbox, depending on your operating system (used to the safety and warranty information that : v The computer is provided with your computer to help you cannot correct the problem, have the...

