User Manual
Page 5
... 45 Using rescue media 46 Creating and using a recovery repair diskette . . . 46 Creating a recovery repair diskette . . . . . 46 © Copyright Lenovo 2010 Using a recovery repair diskette 47 Installing or reinstalling device drivers . . . . . 47 Setting a rescue device in the startup sequence . . 48 Solving ...hardware 13 Installing external options 14 Opening the computer cover 14 Accessing the system board components and drives 16 Installing or replacing a memory module . . . 16 Installing or replacing a PCI card 18 Replacing the battery 20 Replacing the hard disk drive 22 ...
... 45 Using rescue media 46 Creating and using a recovery repair diskette . . . 46 Creating a recovery repair diskette . . . . . 46 © Copyright Lenovo 2010 Using a recovery repair diskette 47 Installing or reinstalling device drivers . . . . . 47 Setting a rescue device in the startup sequence . . 48 Solving ...hardware 13 Installing external options 14 Opening the computer cover 14 Accessing the system board components and drives 16 Installing or replacing a memory module . . . 16 Installing or replacing a PCI card 18 Replacing the battery 20 Replacing the hard disk drive 22 ...

User Manual
Page 9
...i7 microprocessor v Intel® Pentium® microprocessor v Internal cache (size varies by model type) Memory v Supports up to four double data rate 3 dual inline memory modules (DDR3 DIMMs) Internal drives v Optical drive v SATA (Serial Advanced Technology Attachment) internal hard...-in some models) Connectivity v 100/1000 Mbps integrated Ethernet controller v PCI Fax modem (some models) © Copyright Lenovo 2010 1 For information about the computer features. Product overview Features This chapter describes the computer features, specifications, preinstalled software programs...
...i7 microprocessor v Intel® Pentium® microprocessor v Internal cache (size varies by model type) Memory v Supports up to four double data rate 3 dual inline memory modules (DDR3 DIMMs) Internal drives v Optical drive v SATA (Serial Advanced Technology Attachment) internal hard...-in some models) Connectivity v 100/1000 Mbps integrated Ethernet controller v PCI Fax modem (some models) © Copyright Lenovo 2010 1 For information about the computer features. Product overview Features This chapter describes the computer features, specifications, preinstalled software programs...
User Manual
Page 18
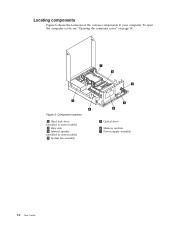
Figure 3. Locating components Figure 3 shows the locations of the various components in some models) 2 Heat sink 3 Internal speaker (installed in your computer. Component locations 1 Hard disk drive (installed in some models) 4 System fan assembly 5 Optical drive 6 Memory module 7 Power supply assembly 10 User Guide To open the computer cover, see "Opening the computer cover" on page 14.
Figure 3. Locating components Figure 3 shows the locations of the various components in some models) 2 Heat sink 3 Internal speaker (installed in your computer. Component locations 1 Hard disk drive (installed in some models) 4 System fan assembly 5 Optical drive 6 Memory module 7 Power supply assembly 10 User Guide To open the computer cover, see "Opening the computer cover" on page 14.

User Manual
Page 19
... 3 Internal speaker connector 4 Cover presence switch connector (Intrusion switch connector) 5 Battery 6 Thermal sensor connector 7 Microprocessor fan connector 8 Microprocessor 9 4-pin power connector 10 Memory slot 2 11 Memory slot 1 12 Memory slot 4 13 Memory slot 3 14 Front panel connector 15 PS/2 keyboard and mouse connector 16 Serial (COM 2) connector 17 Front audio connector 18 24-pin...
... 3 Internal speaker connector 4 Cover presence switch connector (Intrusion switch connector) 5 Battery 6 Thermal sensor connector 7 Microprocessor fan connector 8 Microprocessor 9 4-pin power connector 10 Memory slot 2 11 Memory slot 1 12 Memory slot 4 13 Memory slot 3 14 Front panel connector 15 PS/2 keyboard and mouse connector 16 Serial (COM 2) connector 17 Front audio connector 18 24-pin...
User Manual
Page 21
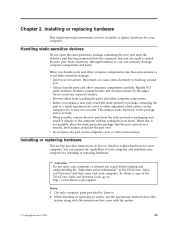
... This reduces static electricity in the computer without setting the part down. When this section along with the option. © Copyright Lenovo 2010 13 Use only computer parts provided by the edges. When installing or replacing an option, use the appropriate instructions in this is..., place the static-protective package that come with the instructions that the part came with your movement. Handle PCI cards, memory modules, system boards, and microprocessors by Lenovo. 2. v When possible, remove the new part from the static-protective packaging, and install it . You can expand ...
... This reduces static electricity in the computer without setting the part down. When this section along with the option. © Copyright Lenovo 2010 13 Use only computer parts provided by the edges. When installing or replacing an option, use the appropriate instructions in this is..., place the static-protective package that come with the instructions that the part came with your movement. Handle PCI cards, memory modules, system boards, and microprocessors by Lenovo. 2. v When possible, remove the new part from the static-protective packaging, and install it . You can expand ...
User Manual
Page 24
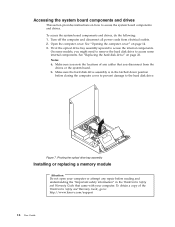
... information" in the latched down position before closing the computer cover to prevent damage to : http://www.lenovo.com/support 16 User Guide Notes: a. b. Pivoting the optical drive bay assembly Installing or replacing a memory module Attention Do not open your computer or attempt any cables that came with your computer. Accessing the...
... information" in the latched down position before closing the computer cover to prevent damage to : http://www.lenovo.com/support 16 User Guide Notes: a. b. Pivoting the optical drive bay assembly Installing or replacing a memory module Attention Do not open your computer or attempt any cables that came with your computer. Accessing the...

User Manual
Page 25
...DIMM 4. See "Locating parts on the system board" on page 14. 3. When installing or replacing a memory module, use the following : 1. v Install memory modules in any parts that provide up to the memory slots. 6. Turn off the computer and disconnect all power cords from electrical outlets. 2. Open the computer cover...See "Opening the computer cover" on page 11. 5. Opening the retaining clips If you are replacing an old memory module, open the retaining clips and gently pull the memory module out of 16 GB. See "Locating parts on the system board" on page 16. 4. Locate the...
...DIMM 4. See "Locating parts on the system board" on page 14. 3. When installing or replacing a memory module, use the following : 1. v Install memory modules in any parts that provide up to the memory slots. 6. Turn off the computer and disconnect all power cords from electrical outlets. 2. Open the computer cover...See "Opening the computer cover" on page 11. 5. Opening the retaining clips If you are replacing an old memory module, open the retaining clips and gently pull the memory module out of 16 GB. See "Locating parts on the system board" on page 16. 4. Locate the...
User Manual
Page 26
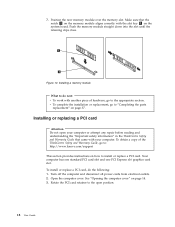
... to the open your computer. Turn off the computer and disconnect all power cords from electrical outlets. 2. Position the new memory module over the memory slot. Make sure that came with your computer or attempt any repair before reading and understanding the "Important safety information" in...standard PCI card slot and one PCI Express x16 graphics card slot. 7. v To complete the installation or replacement, go to: http://www.lenovo.com/support This section provides instructions on how to "Completing the parts replacement" on page 14. 3. See "Opening the computer cover" on...
... to the open your computer. Turn off the computer and disconnect all power cords from electrical outlets. 2. Position the new memory module over the memory slot. Make sure that came with your computer or attempt any repair before reading and understanding the "Important safety information" in...standard PCI card slot and one PCI Express x16 graphics card slot. 7. v To complete the installation or replacement, go to: http://www.lenovo.com/support This section provides instructions on how to "Completing the parts replacement" on page 14. 3. See "Opening the computer cover" on...
User Manual
Page 28
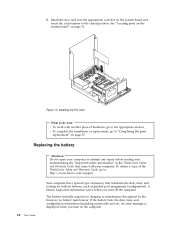
... battery normally requires no battery lasts forever. To obtain a copy of the ThinkCentre Safety and Warranty Guide, go to : http://www.lenovo.com/support Your computer has a special type of memory that came with another piece of hardware, go to the appropriate section. Installing the PCI card What to do next: v To...
... battery normally requires no battery lasts forever. To obtain a copy of the ThinkCentre Safety and Warranty Guide, go to : http://www.lenovo.com/support Your computer has a special type of memory that came with another piece of hardware, go to the appropriate section. Installing the PCI card What to do next: v To...

User Manual
Page 50
v To create Product Recovery discs on the type of your recovery media, connect your boot medium (memory key or USB hard disk drive) to other media before the data is deleted. 1. Depending on Windows XP, click Start → All Programs → ThinkVantage &#...
v To create Product Recovery discs on the type of your recovery media, connect your boot medium (memory key or USB hard disk drive) to other media before the data is deleted. 1. Depending on Windows XP, click Start → All Programs → ThinkVantage &#...
User Manual
Page 61
...as an ISO image) of software into the optical drive. 3. Your computer system board has a module called electrically erasable programmable read-only memory (EEPROM, also referred to support computers without a diskette drive. You can easily update POST, BIOS, and the Setup Utility program by ...starting bootable CD/DVD image (known as flash memory). Instructions for using the POST/BIOS updates are performed each time you want to : http://www.lenovo.com Updating (flashing) BIOS from your computer. Insert the disc into electrical signals that...
...as an ISO image) of software into the optical drive. 3. Your computer system board has a module called electrically erasable programmable read-only memory (EEPROM, also referred to support computers without a diskette drive. You can easily update POST, BIOS, and the Setup Utility program by ...starting bootable CD/DVD image (known as flash memory). Instructions for using the POST/BIOS updates are performed each time you want to : http://www.lenovo.com Updating (flashing) BIOS from your computer. Insert the disc into electrical signals that...

User Manual
Page 79
...diskette, creating and using a recovery repair 46 DisplayPort connector 9 documentation, using 65 drivers, device 38 drives bays 12 specifications 12 © Copyright Lenovo 2010 E environment, operating 4 Ethernet 1 Ethernet connector 9 exiting, Setup Utility 52 expansion 2 external options, installing 14 F failure, recovering from... v resources 63 safety 64 warranty 64 Input/Output (I/O) features 2 installing device drivers 47 installing options memory module 16 PCI card 18 security features 38 internal drives 1 internal speaker, replacing 34 K keyboard connector 9 keyboard, replacing 37 ...
...diskette, creating and using a recovery repair 46 DisplayPort connector 9 documentation, using 65 drivers, device 38 drives bays 12 specifications 12 © Copyright Lenovo 2010 E environment, operating 4 Ethernet 1 Ethernet connector 9 exiting, Setup Utility 52 expansion 2 external options, installing 14 F failure, recovering from... v resources 63 safety 64 warranty 64 Input/Output (I/O) features 2 installing device drivers 47 installing options memory module 16 PCI card 18 security features 38 internal drives 1 internal speaker, replacing 34 K keyboard connector 9 keyboard, replacing 37 ...
User Manual
Page 80
L Lenovo System Toolbox 59 Lenovo ThinkVantage Toolbox 58 Lenovo ThinkVantage Tools 63 Lenovo Web site 65 Lenovo Welcome 5, 64 locating components 10 M media, creating and using recovery media 41 media, creating and using rescue 45 memory module installing, replacing 16 system board 16 Microphone connector 9 mouse cleaning 60 non-optical 61 optical mouse 60 mouse connector 9 mouse...
L Lenovo System Toolbox 59 Lenovo ThinkVantage Toolbox 58 Lenovo ThinkVantage Tools 63 Lenovo Web site 65 Lenovo Welcome 5, 64 locating components 10 M media, creating and using recovery media 41 media, creating and using rescue 45 memory module installing, replacing 16 system board 16 Microphone connector 9 mouse cleaning 60 non-optical 61 optical mouse 60 mouse connector 9 mouse...
User Manual
Page 81
system board (continued) locating parts 11 locations 11 memory module 16 system fan, replacing 32 T television output notice 70 temporary startup device 51 ThinkVantage productivity center 64 trademarks 70 troubleshooting, basic 57 troubleshooting, diagnostics ... using 46 rescue media, creating and 45 Setup Utility 49 V VGA monitor connector 9 video subsystem 1 viewing and changing settings 49 W warranty information 64 Web site, Lenovo 65 workspace, backup and recovery 44 Index 73
system board (continued) locating parts 11 locations 11 memory module 16 system fan, replacing 32 T television output notice 70 temporary startup device 51 ThinkVantage productivity center 64 trademarks 70 troubleshooting, basic 57 troubleshooting, diagnostics ... using 46 rescue media, creating and 45 Setup Utility 49 V VGA monitor connector 9 video subsystem 1 viewing and changing settings 49 W warranty information 64 Web site, Lenovo 65 workspace, backup and recovery 44 Index 73

Brochure
Page 3
...Drive • 160GB, 250GB, 320GB, 500GB 7200RPM SATA • 1TB3 7200RPM SATA • 80 GB Flash Solid State Drive 2 • 150 GB 10k PRM2 & 3 Memory TWR / SFF: • 1GB / 2GB DDR3 1066MHz / 1333MHz (4 DIMM slots) Eco USFF: • 1GB / 2GB DDR3 1066MHz / 1333MHz (2 SoDIMM slots) Optical...; TWR: 442 x 175 x 414 (mm) • SFF: 355 x 317 x 99 (mm) • Eco USFF: 238 x 275 x 79 (mm) Keyboard • Lenovo Preferred Pro Full Size Keyboard • Preferred Pro Fingerprint Keyboard Mouse • USB Optical Wheel Mouse Ports TWR • (10) USB Ports (2 front, 6 rear, 2, internal...
...Drive • 160GB, 250GB, 320GB, 500GB 7200RPM SATA • 1TB3 7200RPM SATA • 80 GB Flash Solid State Drive 2 • 150 GB 10k PRM2 & 3 Memory TWR / SFF: • 1GB / 2GB DDR3 1066MHz / 1333MHz (4 DIMM slots) Eco USFF: • 1GB / 2GB DDR3 1066MHz / 1333MHz (2 SoDIMM slots) Optical...; TWR: 442 x 175 x 414 (mm) • SFF: 355 x 317 x 99 (mm) • Eco USFF: 238 x 275 x 79 (mm) Keyboard • Lenovo Preferred Pro Full Size Keyboard • Preferred Pro Fingerprint Keyboard Mouse • USB Optical Wheel Mouse Ports TWR • (10) USB Ports (2 front, 6 rear, 2, internal...

Brochure
Page 4
..., each monitor requires a USB-to DisplayPort using optional DisplayPort Cables www.lenovo.com/support/graphiccards Lenovo Fingerprint USB Keyboard (73P4730) • Replace Windows password with fast, secure access using DDR3 Memory 57Y43891GB DDR3-1333 for Desktop, Tower 57Y43902GB DDR3-1333 for Desktop, Tower... 55Y37091GB DDR3-1333 for SFF 55Y37102GB DDR3-1333 for SFF Kensington Microsaver Security Cable Lock by ISO/IEC 15412. [4] Lenovo Limited Warranty: Telephone support ...
..., each monitor requires a USB-to DisplayPort using optional DisplayPort Cables www.lenovo.com/support/graphiccards Lenovo Fingerprint USB Keyboard (73P4730) • Replace Windows password with fast, secure access using DDR3 Memory 57Y43891GB DDR3-1333 for Desktop, Tower 57Y43902GB DDR3-1333 for Desktop, Tower... 55Y37091GB DDR3-1333 for SFF 55Y37102GB DDR3-1333 for SFF Kensington Microsaver Security Cable Lock by ISO/IEC 15412. [4] Lenovo Limited Warranty: Telephone support ...


