
Owner's Manual (English)
Page 7
.... A Connect DVI(Digital signal) Cable B Connect D-sub(Analog signal) Cable (PC) C Connect D-sub(Analog signal) Cable (Mac) D Connect HDMI Cable NOTE This is needed to change the 15 pin high density (3 row) D-sub VGA connector on the AV equipment. Connect signal input cable 1 and power cord 2 in all countries.) Mac adapter...
.... A Connect DVI(Digital signal) Cable B Connect D-sub(Analog signal) Cable (PC) C Connect D-sub(Analog signal) Cable (Mac) D Connect HDMI Cable NOTE This is needed to change the 15 pin high density (3 row) D-sub VGA connector on the AV equipment. Connect signal input cable 1 and power cord 2 in all countries.) Mac adapter...

Owner's Manual (English)
Page 8
...on. When you encounter problems such as blurry screen, blurred letters, screen flicker or tilted screen while using the device or after changing screen resolution, touch the AUTO/SET function button to the D-sub signal cable input (RGB)) Power button NOTE 'Self Image Setting... Function'? When connecting with a D-sub signal cable. : Select RGB(D-sub analog signal). Connecting the Display 2. When monitor power is turned on the front of the monitor. Touch the power button on , the 'Self Image Setting Function' is executed automatically. (Only to improve resolution. 3. ...
...on. When you encounter problems such as blurry screen, blurred letters, screen flicker or tilted screen while using the device or after changing screen resolution, touch the AUTO/SET function button to the D-sub signal cable input (RGB)) Power button NOTE 'Self Image Setting... Function'? When connecting with a D-sub signal cable. : Select RGB(D-sub analog signal). Connecting the Display 2. When monitor power is turned on the front of the monitor. Touch the power button on , the 'Self Image Setting Function' is executed automatically. (Only to improve resolution. 3. ...

Owner's Manual (English)
Page 11
... Display. Button Use this button to enter On Screen Display Sub-menu to lock the current control settings, so that these settings are not inadvertently changed.
... Display. Button Use this button to enter On Screen Display Sub-menu to lock the current control settings, so that these settings are not inadvertently changed.

Owner's Manual (English)
Page 12
... display is in Sleep Mode (Energy Saving), this button to enter a selection in the On Screen Display. HDMI AUTO/SET Button Use this indicator color changes to amber. 11 AUTO IMAGE ADJUSTMENT When adjusting your display image to the ideal settings for the current screen resolution size (display mode). This Indicator...
... display is in Sleep Mode (Energy Saving), this button to enter a selection in the On Screen Display. HDMI AUTO/SET Button Use this indicator color changes to amber. 11 AUTO IMAGE ADJUSTMENT When adjusting your display image to the ideal settings for the current screen resolution size (display mode). This Indicator...

Owner's Manual (English)
Page 16
When you must install forteManager program. To select the image size of the monitor. For details, refer to the forteManager Installation Guide on the left SOUND M E N U : Exit , : Move AUTO/SET : Select Main menu EZ ZOOMING Description To select the...touch the bottom of the screen. 4:3 IN WIDE WIDE 4:3 1:1 • WIDE : Switch to full screen mode according to input image signal. • 4 : 3 : Change the image signal ratio into 4:3. • 1 : 1 : Change the image signal size into the input signal size. 15 button on the CD-ROM. * forteManager is not supported for HDMI input.
When you must install forteManager program. To select the image size of the monitor. For details, refer to the forteManager Installation Guide on the left SOUND M E N U : Exit , : Move AUTO/SET : Select Main menu EZ ZOOMING Description To select the...touch the bottom of the screen. 4:3 IN WIDE WIDE 4:3 1:1 • WIDE : Switch to full screen mode according to input image signal. • 4 : 3 : Change the image signal ratio into 4:3. • 1 : 1 : Change the image signal size into the input signal size. 15 button on the CD-ROM. * forteManager is not supported for HDMI input.

Owner's Manual (English)
Page 17
The screen image is brown color tone. • MONOCHROME : This option changed the screen to be Sepia tone. SOUND SOUND NORMAL GAUSSIAN BLUR SEPIA MONOCHROME To set the buzzer sound. The Sepia tone is displayed with just ... buzzer sound is to add the effect to the screen that the dark and sharp image becomes brighter and more blurred. • SEPIA : This option changes the screen to be Gray tone.
The screen image is brown color tone. • MONOCHROME : This option changed the screen to be Sepia tone. SOUND SOUND NORMAL GAUSSIAN BLUR SEPIA MONOCHROME To set the buzzer sound. The Sepia tone is displayed with just ... buzzer sound is to add the effect to the screen that the dark and sharp image becomes brighter and more blurred. • SEPIA : This option changes the screen to be Gray tone.

Owner's Manual (English)
Page 19
PHASE To adjust the focus of the screen. SHARPNESS To adjust the clearness of the display. M E N U : Exit : Decrease : Increase AUTO/SET : Select another sub-menu 18 The horizontal screen size will also change. This item allows you to remove any vertical bars or stripes visible on the screen background. CLOCK To minimize any horizontal noise and clear or sharpen the image of characters. VERTICAL To move image left and right. On Screen Display(OSD) Selection and Adjustment Main menu Sub menu Description TRACKING HORIZONTAL To move image up and down.
PHASE To adjust the focus of the screen. SHARPNESS To adjust the clearness of the display. M E N U : Exit : Decrease : Increase AUTO/SET : Select another sub-menu 18 The horizontal screen size will also change. This item allows you to remove any vertical bars or stripes visible on the screen background. CLOCK To minimize any horizontal noise and clear or sharpen the image of characters. VERTICAL To move image left and right. On Screen Display(OSD) Selection and Adjustment Main menu Sub menu Description TRACKING HORIZONTAL To move image up and down.

Owner's Manual (English)
Page 24
... mouse or pressing any time by pushing the MENU button for service. You can secure the current control settings, so that they cannot be inadvertently changed. Troubleshooting Check the following before calling for several seconds: the message "OSD UNLOCKED" will appear. 23 G Is the power on ? G Is the power indicator •...
... mouse or pressing any time by pushing the MENU button for service. You can secure the current control settings, so that they cannot be inadvertently changed. Troubleshooting Check the following before calling for several seconds: the message "OSD UNLOCKED" will appear. 23 G Is the power on ? G Is the power indicator •...
Owner's Manual (English)
Page 25
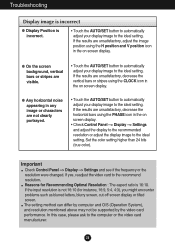
... resolution or adjust the display image to the ideal setting. Important Check Control Panel --> Display --> Settings and see if the frequency or the resolution were changed. The setting method can differ by computer and O/S (Operation System), and resolution mentioned above may not be supported by the video card performance. If the...
... resolution or adjust the display image to the ideal setting. Important Check Control Panel --> Display --> Settings and see if the frequency or the resolution were changed. The setting method can differ by computer and O/S (Operation System), and resolution mentioned above may not be supported by the video card performance. If the...

Owner's Manual (English)
Page 26
Have you see an "Unrecognized monitor, Plug&Play (VESA DDC) monitor found" message? • Make sure to check if the video card supports Plug&Play function. 25 Troubleshooting Display image is incorrect G The screen color is mono or abnormal. • Check if the signal cable is properly connected... and use a screwdriver to fasten if necessary. • Make sure the video card is set to interlace mode and if yes, change it ...
Have you see an "Unrecognized monitor, Plug&Play (VESA DDC) monitor found" message? • Make sure to check if the video card supports Plug&Play function. 25 Troubleshooting Display image is incorrect G The screen color is mono or abnormal. • Check if the signal cable is properly connected... and use a screwdriver to fasten if necessary. • Make sure the video card is set to interlace mode and if yes, change it ...

Owner's Manual (English)
Page 28
Specifications Stand Base Power cord USB Attached ( ), Detached ( O ) Wall-outlet type or PC-outlet type Standard USB 2.0, Self-Power Data Rate Max 480 Mbps Power Consumption Max 2.5W x 4 NOTE Information in this document is subject to change without notice. 27
Specifications Stand Base Power cord USB Attached ( ), Detached ( O ) Wall-outlet type or PC-outlet type Standard USB 2.0, Self-Power Data Rate Max 480 Mbps Power Consumption Max 2.5W x 4 NOTE Information in this document is subject to change without notice. 27


