
User Guide
Page 2
.... In case you leave the room for more than a short period of all safeguards incorporated in this display, observe the following basic rules for this manual or listed on a sloping shelf unless properly secured. So are frayed power cords and broken plugs. Keep children from the wall outlet. Never leave the...
.... In case you leave the room for more than a short period of all safeguards incorporated in this display, observe the following basic rules for this manual or listed on a sloping shelf unless properly secured. So are frayed power cords and broken plugs. Keep children from the wall outlet. Never leave the...
User Guide
Page 6
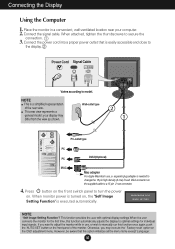
... Cord Signal Cable Varies according to secure the connection. 3. Press button on the front switch panel to turn the power on the supplied cable to manually run this function once again, push the 'AUTO/SET' button on the OSD adjustment menu. If you may differ from the view as shown. However...
... Cord Signal Cable Varies according to secure the connection. 3. Press button on the front switch panel to turn the power on the supplied cable to manually run this function once again, push the 'AUTO/SET' button on the OSD adjustment menu. If you may differ from the view as shown. However...
User Guide
Page 11
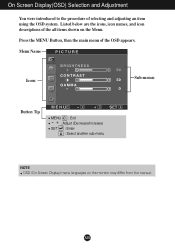
Press the MENU Button, then the main menu of selecting and adjusting an item using the OSD system. Listed below are the icons, icon names, and icon descriptions of the all items shown on the monitor may differ from the manual. A10 Menu Name PICTURE Icons Sub-menus Button Tip MENU : Exit - + : Adjust (Decrease/Increase) SET : Enter : Select another sub-menu NOTE OSD (On Screen Display) menu languages on the Menu. On Screen Display(OSD) Selection and Adjustment You were introduced to the procedure of the OSD appears.
Press the MENU Button, then the main menu of selecting and adjusting an item using the OSD system. Listed below are the icons, icon names, and icon descriptions of the all items shown on the monitor may differ from the manual. A10 Menu Name PICTURE Icons Sub-menus Button Tip MENU : Exit - + : Adjust (Decrease/Increase) SET : Enter : Select another sub-menu NOTE OSD (On Screen Display) menu languages on the Menu. On Screen Display(OSD) Selection and Adjustment You were introduced to the procedure of the OSD appears.
User Guide
Page 14
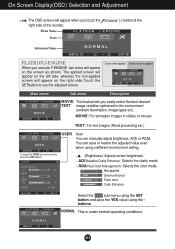
... 3 Color Enhance Select the SAVE sub-menu using the SET button and save or restore the adjusted value even when using the buttons. You can manually adjust brightness, ACE or RCM.
... 3 Color Enhance Select the SAVE sub-menu using the SET button and save or restore the adjusted value even when using the buttons. You can manually adjust brightness, ACE or RCM.

User Guide
Page 15
... power on the keyboard to the power outlet. If the display is connected properly to bring up the screen. See the 'Specifications' section of this manual and configure your display is out of horizontal or vertical frequency range of the display connected? Do you see a "CHECK SIGNAL CABLE" message on the...
... power on the keyboard to the power outlet. If the display is connected properly to bring up the screen. See the 'Specifications' section of this manual and configure your display is out of horizontal or vertical frequency range of the display connected? Do you see a "CHECK SIGNAL CABLE" message on the...


