

Owner's Manual
Page 3
... buttons Bring up and down direction adjustment. • Mute button 123 456 789 CTR. Using the Remote Control Name of the PC built in the monitor and then turn off. (The CTR.PWR function operates only when the PC Control menu is supported 2
... buttons Bring up and down direction adjustment. • Mute button 123 456 789 CTR. Using the Remote Control Name of the PC built in the monitor and then turn off. (The CTR.PWR function operates only when the PC Control menu is supported 2

Owner's Manual
Page 10
... to select the input signal. DVI Note • How to connect to each computer. Press the INPUT button on the wall or a power bar with monitor' menu. 9. INPUT SET Or, press the SOURCE button at the back side of the mouse. 2 Select 'Clone Main with a ground wire. 9 Connect the signal cables... two computers. INPUT SOURCE AUTO/SET RGB • Select RGB : 15-pin D-Sub analog signal. Click 'Yes' button. 10. Connecting to External Devices 8. 1 2 1 Select gray monitor icon and then press the right button of the product.
... to select the input signal. DVI Note • How to connect to each computer. Press the INPUT button on the wall or a power bar with monitor' menu. 9. INPUT SET Or, press the SOURCE button at the back side of the mouse. 2 Select 'Clone Main with a ground wire. 9 Connect the signal cables... two computers. INPUT SOURCE AUTO/SET RGB • Select RGB : 15-pin D-Sub analog signal. Click 'Yes' button. 10. Connecting to External Devices 8. 1 2 1 Select gray monitor icon and then press the right button of the product.

Owner's Manual
Page 24
...display. Use the assigned Set ID to set On, the lamp will not be turned on or off both the monitor and the built-in PC. Logo Light Use this function to reset the product to turn on . Specify 1... the built-in PC only. * How to the factory default. Off : Turn on the front side of the monitor. (b) Or, press the CRT.PWR button at the remote control. 23 Set ID Logo light PC Control You can... change the power setting of the PC built in the monitor after setting it to Off? (a) Press the power button while the SOURCE button is being pressed on /...
...display. Use the assigned Set ID to set On, the lamp will not be turned on or off both the monitor and the built-in PC. Logo Light Use this function to reset the product to turn on . Specify 1... the built-in PC only. * How to the factory default. Off : Turn on the front side of the monitor. (b) Or, press the CRT.PWR button at the remote control. 23 Set ID Logo light PC Control You can... change the power setting of the PC built in the monitor after setting it to Off? (a) Press the power button while the SOURCE button is being pressed on /...

Owner's Manual
Page 29
... 0.681 mm (Pixel Pitch) Rated Voltage Power Consumption AC 100-240V~ 50/60Hz 2.7A On Mode : 270W Typ.(with PC), 240W Typ.(only Monitor) Sleep Mode : ≤ 20W (only Monitor), 60W(with PC), Off Mode : ≤ 5W H W D Width x Height x Depth 99.56 cm (39.19 inches) x 58.76 cm (23.13 inches...
... 0.681 mm (Pixel Pitch) Rated Voltage Power Consumption AC 100-240V~ 50/60Hz 2.7A On Mode : 270W Typ.(with PC), 240W Typ.(only Monitor) Sleep Mode : ≤ 20W (only Monitor), 60W(with PC), Off Mode : ≤ 5W H W D Width x Height x Depth 99.56 cm (39.19 inches) x 58.76 cm (23.13 inches...
Owner's Manual
Page 34
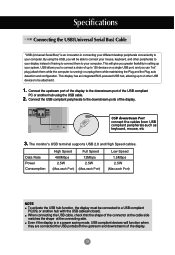
... the upstream port of the display to the downstream port of the connector at the cable side matches the shape at the connecting side. The monitor's USB terminal supports USB 2.0 and High Speed cables. RGB OUT H/PHONE USB OUT SP/DIF SERLAL PORT USB downstream Port connect the cables from USB...
... the upstream port of the display to the downstream port of the connector at the cable side matches the shape at the connecting side. The monitor's USB terminal supports USB 2.0 and High Speed cables. RGB OUT H/PHONE USB OUT SP/DIF SERLAL PORT USB downstream Port connect the cables from USB...

Owner's Manual
Page 35
...CONTROL& SERVICE) OUT IN RS-232C Cable RS-232C Configurations 7-Wire Configurations (Standard RS-232C cable) PC RXD 2 TXD 3 GND 5 DTR 4 DSR 6 RTS 7 CTS 8 Monitor 2 3 5 4 6 7 8 TXD RXD GND DSR DTR CTS RTS D-Sub 9 (Female) D-Sub 9 (Male) LLLL LLL Communication Parameter Baud Rate : 9600buadRate (UART) Data... ASCII code Use a straight cable RS-232C Cable RS-232C Cable 3-Wire Configurations (Not Standard) PC RXD 2 TXD 3 GND 5 DTR 4 DSR 6 RTS 7 CTS 8 Monitor 2 3 5 4 6 7 8 TXD RXD GND DSR DTR CTS RTS D-Sub 9 (Female) D-Sub 9 (Male) 1 Connecting the cable Connect the RS-232C cable as...
...CONTROL& SERVICE) OUT IN RS-232C Cable RS-232C Configurations 7-Wire Configurations (Standard RS-232C cable) PC RXD 2 TXD 3 GND 5 DTR 4 DSR 6 RTS 7 CTS 8 Monitor 2 3 5 4 6 7 8 TXD RXD GND DSR DTR CTS RTS D-Sub 9 (Female) D-Sub 9 (Male) LLLL LLL Communication Parameter Baud Rate : 9600buadRate (UART) Data... ASCII code Use a straight cable RS-232C Cable RS-232C Cable 3-Wire Configurations (Not Standard) PC RXD 2 TXD 3 GND 5 DTR 4 DSR 6 RTS 7 CTS 8 Monitor 2 3 5 4 6 7 8 TXD RXD GND DSR DTR CTS RTS D-Sub 9 (Female) D-Sub 9 (Male) 1 Connecting the cable Connect the RS-232C cable as...

Owner's Manual
Page 42
Remote On/Off (Command : m) Lock the buttons at the rear side of the monitor and the button at the remote control. L Transmission [k][t][ ][Set ID][ ][Data][Cr] Data Min : 00H ~ Max : 64H 32H : Center 00H : Left Acknowledgement [t][ ][Set ID][ ][OK][...
Remote On/Off (Command : m) Lock the buttons at the rear side of the monitor and the button at the remote control. L Transmission [k][t][ ][Set ID][ ][Data][Cr] Data Min : 00H ~ Max : 64H 32H : Center 00H : Left Acknowledgement [t][ ][Set ID][ ][OK][...

Owner's Manual
Page 48
PC Power On/Off (Command : d s) To turn On and Off the built in PC of the monitor and the monitor. PC Control On/Off (Command : d t) It sets the synchronized power on the remote control. You can also select an input source using the INPUT button ...
PC Power On/Off (Command : d s) To turn On and Off the built in PC of the monitor and the monitor. PC Control On/Off (Command : d t) It sets the synchronized power on the remote control. You can also select an input source using the INPUT button ...


