

Owner's Manual
Page 3
...; Power On/Off Button • Input Select Button (See next page) • ARC button To select the image size of the screen. • Auto Button Automatic adjustment function (Operational for the analog signal only) There is not a function which is supported There is not a function which is supported • Exit Button • Volume Button • Check Button * There is not a function which is supported • CTR.PWR Button Turn on the power of the Remote Control Buttons...
...; Power On/Off Button • Input Select Button (See next page) • ARC button To select the image size of the screen. • Auto Button Automatic adjustment function (Operational for the analog signal only) There is not a function which is supported There is not a function which is supported • Exit Button • Volume Button • Check Button * There is not a function which is supported • CTR.PWR Button Turn on the power of the Remote Control Buttons...
Owner's Manual
Page 5
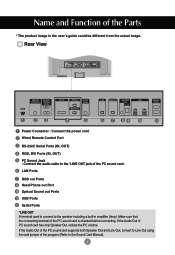
... the speaker including a built-in the user's guide could be different from the actual image. LAN Ports RGB out Ports Head Phone out Port Optical Sound out Ports USB Ports Serlal Ports *LINE OUT A terminal used to connect to the Sound Card Manual). 4 If the Audio Out of the PC sound card is checked before connecting. Rear View REMOTE CONTROL IN RS-232C (CONTROL& SERVICE) OUT IN DVI IN RGB IN AUDIO (RGB/DVI) RGB OUT LAN RGB OUT H/PHONE USB OUT SP/DIF SERLAL PORT REMOTE CONTROL IN...
... the speaker including a built-in the user's guide could be different from the actual image. LAN Ports RGB out Ports Head Phone out Port Optical Sound out Ports USB Ports Serlal Ports *LINE OUT A terminal used to connect to the Sound Card Manual). 4 If the Audio Out of the PC sound card is checked before connecting. Rear View REMOTE CONTROL IN RS-232C (CONTROL& SERVICE) OUT IN DVI IN RGB IN AUDIO (RGB/DVI) RGB OUT LAN RGB OUT H/PHONE USB OUT SP/DIF SERLAL PORT REMOTE CONTROL IN...

Owner's Manual
Page 6
.... SOURCE AUTO/SET • Select DVI : DVI Digital signal. REMOTE CONTROL IN RS-232C (CONTROL& SERVICE) OUT IN DVI IN RGB IN AUDIO (RGB/DVI) RGB OUT LAN RGB OUT H/PHONE USB OUT SP/DIF SERLAL PORT Connect the power cord. 2. Turn on power by pressing the power button on the remote control to your Built in PC When connecting with the DVI signal input cable. 1. Install the driver files contained at the back side of the product. Select an input signal. INPUT SET Or, press the SOURCE button at the supplied CD...
.... SOURCE AUTO/SET • Select DVI : DVI Digital signal. REMOTE CONTROL IN RS-232C (CONTROL& SERVICE) OUT IN DVI IN RGB IN AUDIO (RGB/DVI) RGB OUT LAN RGB OUT H/PHONE USB OUT SP/DIF SERLAL PORT Connect the power cord. 2. Turn on power by pressing the power button on the remote control to your Built in PC When connecting with the DVI signal input cable. 1. Install the driver files contained at the back side of the product. Select an input signal. INPUT SET Or, press the SOURCE button at the supplied CD...
Owner's Manual
Page 7
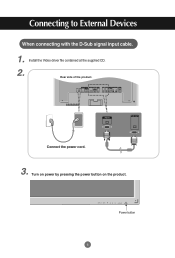
Connecting to External Devices When connecting with the D-Sub signal input cable. 1. Install the Video driver file contained at the supplied CD. 2. SOURCE AUTO/SET ON/OFF Power button 6 Rear side of the product. Turn on power by pressing the power button on the product. REMOTE CONTROL IN RS-232C (CONTROL& SERVICE) OUT IN DVI IN RGB IN AUDIO (RGB/DVI) RGB OUT LAN RGB OUT H/PHONE USB OUT SP/DIF SERLAL PORT RGB IN RGB OUT Connect the power cord. 3.
Connecting to External Devices When connecting with the D-Sub signal input cable. 1. Install the Video driver file contained at the supplied CD. 2. SOURCE AUTO/SET ON/OFF Power button 6 Rear side of the product. Turn on power by pressing the power button on the product. REMOTE CONTROL IN RS-232C (CONTROL& SERVICE) OUT IN DVI IN RGB IN AUDIO (RGB/DVI) RGB OUT LAN RGB OUT H/PHONE USB OUT SP/DIF SERLAL PORT RGB IN RGB OUT Connect the power cord. 3.

Owner's Manual
Page 10
... wall or a power bar with monitor' menu. 9. DVI Note • How to connect to each computer. Connect the signal cables (DVI and D-Sub) to two computers. INPUT SET Or, press the SOURCE button at the back side of the mouse. 2 Select 'Clone Main with a ground wire. 9 Press the INPUT button in a remote control to select the computer to use. • Directly connect to a grounded power outlet on the remote control to select the input signal...
... wall or a power bar with monitor' menu. 9. DVI Note • How to connect to each computer. Connect the signal cables (DVI and D-Sub) to two computers. INPUT SET Or, press the SOURCE button at the back side of the mouse. 2 Select 'Clone Main with a ground wire. 9 Press the INPUT button in a remote control to select the computer to use. • Directly connect to a grounded power outlet on the remote control to select the input signal...
Owner's Manual
Page 11
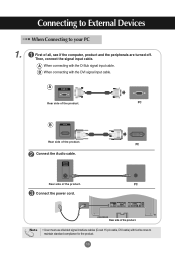
... RS-232C (CONTROL& SERVICE) OUT IN DVI IN RGB IN AUDIO (RGB/DVI) RGB OUT LAN RGB OUT H/PHONE USB OUT SP/DIF SERLAL PORT Rear side of the product. Note • User must use shielded signal interface cables (D-sub 15 pin cable, DVI cable) with ferrite cores to your PC 1. A When connecting with the DVI signal input cable. Then, connect the signal input cable. AUDIO (RGB/DVI) Rear side of the product. A RGB IN Rear side of the product. Connect the power cord.
... RS-232C (CONTROL& SERVICE) OUT IN DVI IN RGB IN AUDIO (RGB/DVI) RGB OUT LAN RGB OUT H/PHONE USB OUT SP/DIF SERLAL PORT Rear side of the product. Note • User must use shielded signal interface cables (D-sub 15 pin cable, DVI cable) with ferrite cores to your PC 1. A When connecting with the DVI signal input cable. Then, connect the signal input cable. AUDIO (RGB/DVI) Rear side of the product. A RGB IN Rear side of the product. Connect the power cord.
Owner's Manual
Page 12
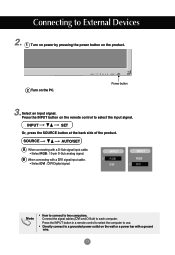
... signal input cable. • Select RGB : 15-pin D-Sub analog signal. SOURCE AUTO/SET A When connecting with a DVI signal input cable. • Select DVI : DVI Digital signal. INPUT RGB DVI INPUT RGB DVI Note • How to connect to each computer. SOURCE AUTO/SET ON/OFF Power button 3.Select an input signal. Connect the signal cables (DVI and D-Sub) to two computers. Press the INPUT button in a remote control to select the computer to use. • Directly connect to a grounded power outlet on the remote control to External Devices 2. 1 Turn on power by pressing the power...
... signal input cable. • Select RGB : 15-pin D-Sub analog signal. SOURCE AUTO/SET A When connecting with a DVI signal input cable. • Select DVI : DVI Digital signal. INPUT RGB DVI INPUT RGB DVI Note • How to connect to each computer. SOURCE AUTO/SET ON/OFF Power button 3.Select an input signal. Connect the signal cables (DVI and D-Sub) to two computers. Press the INPUT button in a remote control to select the computer to use. • Directly connect to a grounded power outlet on the remote control to External Devices 2. 1 Turn on power by pressing the power...

Owner's Manual
Page 13
... Connect one end of the signal input cable(15-pin D-Sub Signal Cable) to the RGB OUT connector of product 1 and connect the other end to the RGB IN connector of a PC to the other product. • To use cable distributor. 12 Connecting to External Devices Watching RGB Outputs Use this function when displaying ANALOG RGB inputs of other products. 15-pin D-Sub Signal Cable RGB IN RGB OUT RGB IN RGB OUT RGB IN RGB OUT RGB IN RGB...
... Connect one end of the signal input cable(15-pin D-Sub Signal Cable) to the RGB OUT connector of product 1 and connect the other end to the RGB IN connector of a PC to the other product. • To use cable distributor. 12 Connecting to External Devices Watching RGB Outputs Use this function when displaying ANALOG RGB inputs of other products. 15-pin D-Sub Signal Cable RGB IN RGB OUT RGB IN RGB OUT RGB IN RGB OUT RGB IN RGB...
Owner's Manual
Page 14
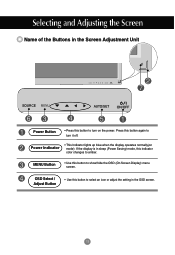
... display is in sleep (Power Saving) mode, this indicator color changes to show/hide the OSD (On Screen Display) menu screen. MENU Button • Use this button to amber. OSD Select / Adjust Button • Use this button to turn on mode). Power Indicator • This Indicator lights up blue when the display operates normally(on the power. Selecting and Adjusting the Screen Name of the Buttons in the Screen Adjustment Unit SOURCE SOURCE AUTO/SET ON/OFF AUTO/SET ON/OFF Power Button • Press this button to turn it off. Press this button...
... display is in sleep (Power Saving) mode, this indicator color changes to show/hide the OSD (On Screen Display) menu screen. MENU Button • Use this button to amber. OSD Select / Adjust Button • Use this button to turn on mode). Power Indicator • This Indicator lights up blue when the display operates normally(on the power. Selecting and Adjusting the Screen Name of the Buttons in the Screen Adjustment Unit SOURCE SOURCE AUTO/SET ON/OFF AUTO/SET ON/OFF Power Button • Press this button to turn it off. Press this button...

Owner's Manual
Page 15
... the resolution is 1920X1080 (RGB Mode) Auto in progress If the resolution is not 1920X1080 (RGB Mode) Auto in sleep (Power Saving) mode, this indicator color changes to amber. 14 The recommended resolution for 3D images is set to 1920 X 1080 * See if the resolution is 1920X1080. If the display is in progress For optimal display Change resolution to Full. IR Receiver • The unit that receives the signal from the remote control. SOURCE Button • Select the input signal DVI (Digital signal) RGB(Analog signal) Digital signal...
... the resolution is 1920X1080 (RGB Mode) Auto in progress If the resolution is not 1920X1080 (RGB Mode) Auto in sleep (Power Saving) mode, this indicator color changes to amber. 14 The recommended resolution for 3D images is set to 1920 X 1080 * See if the resolution is 1920X1080. If the display is in progress For optimal display Change resolution to Full. IR Receiver • The unit that receives the signal from the remote control. SOURCE Button • Select the input signal DVI (Digital signal) RGB(Analog signal) Digital signal...

Owner's Manual
Page 17
... optimal product screen. Press the AUTO/SET button (AUTO button in a remote Control) in the PC analog signal. Selecting and Adjusting the Screen How to adjust the OSD (On Screen Display) screen Pops up the menu screen Move where you want to adjust Select a menu icon Move where you want to adjust Select a Adjust the status menu icon Save Exit from the adjustment menu screen. • Use the remote control to adjust the OSD screen. 1 Press the MENU Button, then the main menu of the OSD appears. 2 To access a control, use...
... optimal product screen. Press the AUTO/SET button (AUTO button in a remote Control) in the PC analog signal. Selecting and Adjusting the Screen How to adjust the OSD (On Screen Display) screen Pops up the menu screen Move where you want to adjust Select a menu icon Move where you want to adjust Select a Adjust the status menu icon Save Exit from the adjustment menu screen. • Use the remote control to adjust the OSD screen. 1 Press the MENU Button, then the main menu of the OSD appears. 2 To access a control, use...
Owner's Manual
Page 19
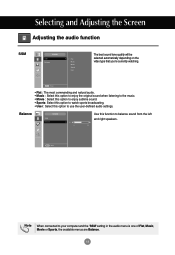
Balance SOUND SSM Balance 0 L Use this option to use the user-defined audio settings. R Note When connected to balance sound from the left and right speakers. Selecting and Adjusting the Screen Adjusting the audio function SSM SOUND SSM Balance Flat Music Movie Sports User The best sound tone quality will be selected automatically depending on the video type that you're currently watching. • Flat : The most commanding and natural audio. •...
Balance SOUND SSM Balance 0 L Use this option to use the user-defined audio settings. R Note When connected to balance sound from the left and right speakers. Selecting and Adjusting the Screen Adjusting the audio function SSM SOUND SSM Balance Flat Music Movie Sports User The best sound tone quality will be selected automatically depending on the video type that you're currently watching. • Flat : The most commanding and natural audio. •...

Owner's Manual
Page 21
... remote control. To choose the language in which the control names are displayed. The Set can be turned on the remote control and set Child lock to On or Off. Selecting and Adjusting the Screen Selecting the options Input Reset If you press the button once, the following : * Push the MENU button on . Select the signal type you set On at any time, the power indicator will appear. In order to unlock...
... remote control. To choose the language in which the control names are displayed. The Set can be turned on the remote control and set Child lock to On or Off. Selecting and Adjusting the Screen Selecting the options Input Reset If you press the button once, the following : * Push the MENU button on . Select the signal type you set On at any time, the power indicator will appear. In order to unlock...

Owner's Manual
Page 24
... PC only. * How to turn on or off both the monitor and the built-in the monitor after setting it to the factory default. Selecting and Adjusting the Screen Selecting the options - However, language selection and PC Control selection will automatically be initialized. Logo Light Use this function to reset the product to Off? (a) Press the power button while the SOURCE button is being pressed on /off...
... PC only. * How to turn on or off both the monitor and the built-in the monitor after setting it to the factory default. Selecting and Adjusting the Screen Selecting the options - However, language selection and PC Control selection will automatically be initialized. Logo Light Use this function to reset the product to Off? (a) Press the power button while the SOURCE button is being pressed on /off...

Owner's Manual
Page 25
.... Position Auto-configure H-Position 0 V-Position 0 To adjust position of the display. This item allows you to remove any vertical bars or stripes visible on the screen background. This function is suitable for analoge singnal input only. The horizontal screen size will also change. This function is suitable for analoge singnal input only. 24 Selecting and Adjusting the Screen Adjusting Screen CLOCK/PHASE and Position Auto-configure ARC To select the image size of the screen. (1:1 menu are not supported...
.... Position Auto-configure H-Position 0 V-Position 0 To adjust position of the display. This item allows you to remove any vertical bars or stripes visible on the screen background. This function is suitable for analoge singnal input only. The horizontal screen size will also change. This function is suitable for analoge singnal input only. 24 Selecting and Adjusting the Screen Adjusting Screen CLOCK/PHASE and Position Auto-configure ARC To select the image size of the screen. (1:1 menu are not supported...
Owner's Manual
Page 26
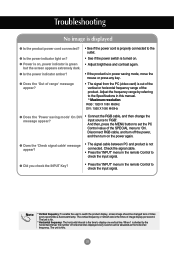
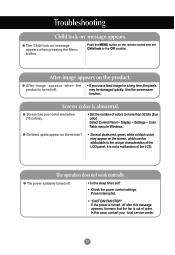
... the 'Power saving mode' On DVI message appear? • Connect the RGB cable, and then change the input source to watch the product display, screen image should be tabulated as the horizontal frequency. Note * Vertical frequency: To enable the user to 'RGB'. The unit is Hz. * Horizontal frequency: The horizontal interval is not connected. G Is the power indicator light on . • Adjust brightness and contrast again. • If the product is in the remote Control to check the input signal. G Does the 'Check signal cable' message...
... the 'Power saving mode' On DVI message appear? • Connect the RGB cable, and then change the input source to watch the product display, screen image should be tabulated as the horizontal frequency. Note * Vertical frequency: To enable the user to 'RGB'. The unit is Hz. * Horizontal frequency: The horizontal interval is not connected. G Is the power indicator light on . • Adjust brightness and contrast again. • If the product is in the remote Control to check the input signal. G Does the 'Check signal cable' message...
Owner's Manual
Page 27
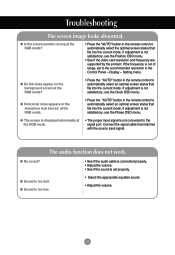
... audio cable is connected properly. • Adjust the volume. • See if the sound is out of range, set properly. If adjustment is not connected to the recommended resolution in the remote control to automatically select an optimal screen status that matches with the source input signal. The audio function does not work. G Is the screen position wrong at the RGB mode. • The proper input signal is not satisfactory, use the Position OSD menu. • See if the video card resolution and frequency...
... audio cable is connected properly. • Adjust the volume. • See if the sound is out of range, set properly. If adjustment is not connected to the recommended resolution in the remote control to automatically select an optimal screen status that matches with the source input signal. The audio function does not work. G Is the screen position wrong at the RGB mode. • The proper input signal is not satisfactory, use the Position OSD menu. • See if the video card resolution and frequency...
Owner's Manual
Page 28
... screen? • Several pixels (red, green, white or black color) may be attributable to the unique characteristics of colors to the 'Off' position. G Screen has poor color resolution (16 colors). • Set the number of the LCD panel. G Do black spots appear on the screen, which can be damaged quickly. Display - G The power suddenly turned off. • Is the sleep timer set Child lock to more than 32 bits (true color) Select Control Panel - Power interrupted. • "CAUTION! FAN STOP!" Troubleshooting...
... screen? • Several pixels (red, green, white or black color) may be attributable to the unique characteristics of colors to the 'Off' position. G Screen has poor color resolution (16 colors). • Set the number of the LCD panel. G Do black spots appear on the screen, which can be damaged quickly. Display - G The power suddenly turned off. • Is the sleep timer set Child lock to more than 32 bits (true color) Select Control Panel - Power interrupted. • "CAUTION! FAN STOP!" Troubleshooting...
Owner's Manual
Page 34
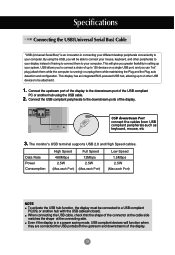
... the Plug and the Plug auto detection and configuration. Specifications Connecting the USB(Universal Serial Bus) Cable "USB (Universal Serial Bus)" is an innovation in connecting your different desktop peripherals conveniently to 120 devices on a single USB port; USB allows you will be attached it. 1. Even if the display is running) or unplug them to the downstream port of the display. 33 and you greater flexibility in a power saving mode, USB...
... the Plug and the Plug auto detection and configuration. Specifications Connecting the USB(Universal Serial Bus) Cable "USB (Universal Serial Bus)" is an innovation in connecting your different desktop peripherals conveniently to 120 devices on a single USB port; USB allows you will be attached it. 1. Even if the display is running) or unplug them to the downstream port of the display. 33 and you greater flexibility in a power saving mode, USB...

Owner's Manual
Page 40
...] Data 0 : Volume Mute On (Volume Off) 1 : Volume Mute Off (Volume On) Acknowledgement [e][ ][Set ID][ ][OK][Data][x] Data 0 : Volume Mute On (Volume Off) 1 : Volume Mute Off (Volume On) 06. Volume Control(Command : f) To adjust Volume . L L RS-232C Controlling the Multiple Product Transmission / Receiving Protocol 05. Volume Mute(Command : e) To control On/Off of the Volume Mute. Transmission [k][f][ ][Set ID][ ][Data][Cr] Data Min : 00H ~ Max : 64H (Hexadecimal code) Acknowledgement [f][ ][Set ID...
...] Data 0 : Volume Mute On (Volume Off) 1 : Volume Mute Off (Volume On) Acknowledgement [e][ ][Set ID][ ][OK][Data][x] Data 0 : Volume Mute On (Volume Off) 1 : Volume Mute Off (Volume On) 06. Volume Control(Command : f) To adjust Volume . L L RS-232C Controlling the Multiple Product Transmission / Receiving Protocol 05. Volume Mute(Command : e) To control On/Off of the Volume Mute. Transmission [k][f][ ][Set ID][ ][Data][Cr] Data Min : 00H ~ Max : 64H (Hexadecimal code) Acknowledgement [f][ ][Set ID...


