
User Guide
Page 1
... A14 Input Selection and Tracking Selecting and Adjusting the Screen Name of the Buttons in the screen Adjustment Unit OSD (On Screen Display) Menu OSD (On Screen Display) Screen Tracking Order Set/Select the channel when using the TV Adjusting the picture function Adjusting the sound function Adjusting the time function Selecting the setup function Adjusting the screen function (PC only) A15 A15 A17 A18 A19 A20 A22 A23 A24 A30 Miscellaneous Troubleshooting A31 Specifications A34...
... A14 Input Selection and Tracking Selecting and Adjusting the Screen Name of the Buttons in the screen Adjustment Unit OSD (On Screen Display) Menu OSD (On Screen Display) Screen Tracking Order Set/Select the channel when using the TV Adjusting the picture function Adjusting the sound function Adjusting the time function Selecting the setup function Adjusting the screen function (PC only) A15 A15 A17 A18 A19 A20 A22 A23 A24 A30 Miscellaneous Troubleshooting A31 Specifications A34...

User Guide
Page 3
... be electrocuted due to remove all cables before moving the product. - Caution Do not unplug the power cord while the product is used as the main disconnection device. A fire can cause electric leakage, electric shock or fire. ENGLISH Electrical Power Related Precautions Warning Make sure to connect the power cable to use the product for exclusive use . - Additionally, do not touch the power cable right after installation.
... be electrocuted due to remove all cables before moving the product. - Caution Do not unplug the power cord while the product is used as the main disconnection device. A fire can cause electric leakage, electric shock or fire. ENGLISH Electrical Power Related Precautions Warning Make sure to connect the power cable to use the product for exclusive use . - Additionally, do not touch the power cable right after installation.

User Guide
Page 4
... occur Keep the product away from water. - On Disposal The fluorescent lamp used in accordance to the User's Guide. - Do not dispose of the inflammable substances. Fire or electric shock accident can occur. - Use it . - Precautions in Using the Product Warning Do not disassemble, repair or modify the product at all times. Take a comfortable and natural position when working with...
... occur Keep the product away from water. - On Disposal The fluorescent lamp used in accordance to the User's Guide. - Do not dispose of the inflammable substances. Fire or electric shock accident can occur. - Use it . - Precautions in Using the Product Warning Do not disassemble, repair or modify the product at all times. Take a comfortable and natural position when working with...

User Guide
Page 7
Back Cap A6 ENGLISH To arrange cables in order Connect the signal cable, power cord and the audio cable to use in order to arrange in the cable holder as shown in the following figure. (To connect the cables, refer to next pages.) Cable Holder Push the back cap according to the steps shown in the following figure.
Back Cap A6 ENGLISH To arrange cables in order Connect the signal cable, power cord and the audio cable to use in order to arrange in the cable holder as shown in the following figure. (To connect the cables, refer to next pages.) Cable Holder Push the back cap according to the steps shown in the following figure.

User Guide
Page 8
... flashbk Button Turn to select Flat, Music, Movie, Sports, User sound tone. Automatically adjusts the image. Name and Function of the Parts Name of time. mute power tv/video multimedia mts fcr exit menu Volume ( ) Button Set Button ch enter vol vol ch Power On/Off Button mts(Sound Mode Select) Button Press repeatedly to select the sound tone. Sleep Button When watching AV/TV - audio video cc flashbk sleep Video Button When watching AV/TV/PC - The screen...
... flashbk Button Turn to select Flat, Music, Movie, Sports, User sound tone. Automatically adjusts the image. Name and Function of the Parts Name of time. mute power tv/video multimedia mts fcr exit menu Volume ( ) Button Set Button ch enter vol vol ch Power On/Off Button mts(Sound Mode Select) Button Press repeatedly to select the sound tone. Sleep Button When watching AV/TV - audio video cc flashbk sleep Video Button When watching AV/TV/PC - The screen...

User Guide
Page 12
... signal input cable. (IBM compatible PC) B When connecting with the D-Sub signal input cable. (Macintosh) Rear side of all, see if the computer, product and the peripherals are turned off. Then, connect the signal input cable. S-Video Audio LR ANT IN AUDIO IN S-Video Video Audio ANT IN AUDIO IN D-Sub PC Macintosh A B Macintosh Adapter (Optional) Use the standard Macintosh adapter since an incompatible adapter is available in the market. (Different signaling system) A11 Connecting to...
... signal input cable. (IBM compatible PC) B When connecting with the D-Sub signal input cable. (Macintosh) Rear side of all, see if the computer, product and the peripherals are turned off. Then, connect the signal input cable. S-Video Audio LR ANT IN AUDIO IN S-Video Video Audio ANT IN AUDIO IN D-Sub PC Macintosh A B Macintosh Adapter (Optional) Use the standard Macintosh adapter since an incompatible adapter is available in the market. (Different signaling system) A11 Connecting to...

User Guide
Page 14
.... Red) B When connecting with a S-Video cable. • Select S-Video TV Video S-Video PC tv/video multimedia mts fcr exit menu ch enter vol vol ch A13 Press the multimedia button on the remote control to External Devices When watching VCR/DVD Connect the video/audio cable as shown in the below figure and then connect the power cord (See page A12). Yellow, Sound (left) - SOURCE AUTO/SELECT Input select A When connecting with a RCA cable. •...
.... Red) B When connecting with a S-Video cable. • Select S-Video TV Video S-Video PC tv/video multimedia mts fcr exit menu ch enter vol vol ch A13 Press the multimedia button on the remote control to External Devices When watching VCR/DVD Connect the video/audio cable as shown in the below figure and then connect the power cord (See page A12). Yellow, Sound (left) - SOURCE AUTO/SELECT Input select A When connecting with a RCA cable. •...
User Guide
Page 16
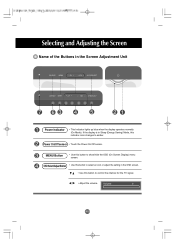
... signal. • Adjust the volume. OSD Select/Adjust Button • Use this button to select an icon or adjust the setting in the OSD screen. • Use this indicator color changes to amber. Power On/Off sensor • Touch the Power On/Off sensor. Selecting and Adjusting the Screen Name of the Buttons in Sleep (Energy Saving) Mode, this button to show/hide the OSD (On Screen Display) menu screen. Volume 0 A15 If the display is in the Screen Adjustment Unit < < SOURCE MENU CH < VOL > AUTO/SELECT Power...
... signal. • Adjust the volume. OSD Select/Adjust Button • Use this button to select an icon or adjust the setting in the OSD screen. • Use this indicator color changes to amber. Power On/Off sensor • Touch the Power On/Off sensor. Selecting and Adjusting the Screen Name of the Buttons in Sleep (Energy Saving) Mode, this button to show/hide the OSD (On Screen Display) menu screen. Volume 0 A15 If the display is in the Screen Adjustment Unit < < SOURCE MENU CH < VOL > AUTO/SELECT Power...
User Guide
Page 19
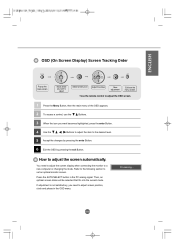
... a control, use the Buttons. 3 When the icon you need to adjust the screen display when connecting the monitor to a new computer or changing the mode. Press the AUTO/SELECT button in the OSD menu. ENGLISH OSD (On Screen Display) Screen Tracking Order Pop up the menu screen Move where you want becomes highlighted, press the enter Button. 4 Use the Buttons to adjust the item to set an optimal monitor screen. A18 How to adjust screen position, clock and phase in the PC analog signal. You need...
... a control, use the Buttons. 3 When the icon you need to adjust the screen display when connecting the monitor to a new computer or changing the mode. Press the AUTO/SELECT button in the OSD menu. ENGLISH OSD (On Screen Display) Screen Tracking Order Pop up the menu screen Move where you want becomes highlighted, press the enter Button. 4 Use the Buttons to adjust the item to set an optimal monitor screen. A18 How to adjust screen position, clock and phase in the PC analog signal. You need...

User Guide
Page 20
Press button and then use button to select a channel number. * fcr Button (remote control) : Rotate Favourite channel. Favorite Ch. Press button to select a channel you select your favourite channels directly. All available TV channels are provided by a cable service. Favorite ch. The TV scans for auto CH progess to memory or erase. To start automatic programming. Favorite Ch. User can do manual channel selection and...
Press button and then use button to select a channel number. * fcr Button (remote control) : Rotate Favourite channel. Favorite Ch. Press button to select a channel you select your favourite channels directly. All available TV channels are provided by a cable service. Favorite ch. The TV scans for auto CH progess to memory or erase. To start automatic programming. Favorite Ch. User can do manual channel selection and...

User Guide
Page 21
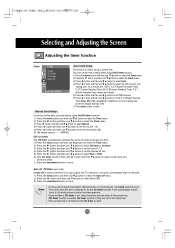
...best desired image condition optimized to use the user-defined settings. Selecting a factory setting color set. • Cool Slightly purplish white. • Normal Slightly bluish white. • Warm Slightly reddish white. • User Select this option to the environment OK MENU Picture EZ Video ACC FLATRON f . ENGINE Contrast Brightness < Clear Optimum Soft User OK MENU ACC Picture EZ Video ACC FLATRON f . ENGINE Picture EZ Video ACC < FLATRON f . A20 ENGLISH Adjusting the picture function (PC) EZ Video Picture EZ Video ACC FLATRON f . Brightness : To adjust...
...best desired image condition optimized to use the user-defined settings. Selecting a factory setting color set. • Cool Slightly purplish white. • Normal Slightly bluish white. • Warm Slightly reddish white. • User Select this option to the environment OK MENU Picture EZ Video ACC FLATRON f . ENGINE Contrast Brightness < Clear Optimum Soft User OK MENU ACC Picture EZ Video ACC FLATRON f . ENGINE Picture EZ Video ACC < FLATRON f . A20 ENGLISH Adjusting the picture function (PC) EZ Video Picture EZ Video ACC FLATRON f . Brightness : To adjust...

User Guide
Page 22
... best desired image condition optimized to use the user-defined settings. This function is available only in NTSC broadcasting mode. Selecting a factory setting color set. • Cool Slightly purplish white. • Normal Slightly bluish white. • Warm Slightly reddish white. • User Select this option to the environment OK MENU Picture Color Sharpness Tint OK MENU Contrast : To adjust the contrast of the screen. Red / Green / Blue Set your own color levels. ENGINE Picture EZ Video ACC < FLATRON f . Selecting and Adjusting the Screen Adjusting...
... best desired image condition optimized to use the user-defined settings. This function is available only in NTSC broadcasting mode. Selecting a factory setting color set. • Cool Slightly purplish white. • Normal Slightly bluish white. • Warm Slightly reddish white. • User Select this option to the environment OK MENU Picture Color Sharpness Tint OK MENU Contrast : To adjust the contrast of the screen. Red / Green / Blue Set your own color levels. ENGINE Picture EZ Video ACC < FLATRON f . Selecting and Adjusting the Screen Adjusting...

User Guide
Page 23
... option to use this feature, select On. < ENGLISH Adjusting the sound function EZ Audio AVL Balance Sound EZ Audio AVL Balance Flat Music Movie Sports User OK MENU The best sound tone quality will be selected automatically depending on the video type that you're currently watching. • Flat : The most appropriate level. To adjust uneven sound volumes across all channels or signals automatically to balance sound from the...
... option to use this feature, select On. < ENGLISH Adjusting the sound function EZ Audio AVL Balance Sound EZ Audio AVL Balance Flat Music Movie Sports User OK MENU The best sound tone quality will be selected automatically depending on the video type that you're currently watching. • Flat : The most appropriate level. To adjust uneven sound volumes across all channels or signals automatically to balance sound from the...
User Guide
Page 24
... input signal, the TV swithchs to off mode automatically after 10 minutes. 1) Press the menu button and then use button to select the Auto off menu. 2) Press the button and then use button to select the time zone for the On timer to save . Manual Clock Setup You must be reset. • Two hours after the set D.S.T (Daylight Savings Time) Auto, Off or On, depending in off mode for your viewing...
... input signal, the TV swithchs to off mode automatically after 10 minutes. 1) Press the menu button and then use button to select the Auto off menu. 2) Press the button and then use button to select the time zone for the On timer to save . Manual Clock Setup You must be reset. • Two hours after the set D.S.T (Daylight Savings Time) Auto, Off or On, depending in off mode for your viewing...

User Guide
Page 25
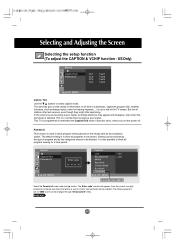
... or Off. In order to lock the OSD screen adjustment, set the Key lock tab to the factory default. Use this function to set up so that it , do the following : 1) Push the menu button on . If you set Key lock to unlock it can prevent unauthorized viewing. US Only) Caption (TV input only) Use the buttons to select captions. [Remote Control] Press the CC button repeatedly to select the caption option...
... or Off. In order to lock the OSD screen adjustment, set the Key lock tab to the factory default. Use this function to set up so that it , do the following : 1) Push the menu button on . If you set Key lock to unlock it can prevent unauthorized viewing. US Only) Caption (TV input only) Use the buttons to select captions. [Remote Control] Press the CC button repeatedly to select the caption option...
User Guide
Page 26
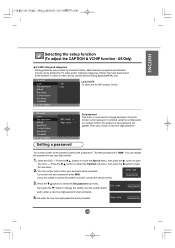
... power off. It is a normal when receiving a poor signal. Once the correct four-digit password is selected. US Only) Special Caption/Text Parental ctl. The 'Enter code' window will be changed through 'Set password' menu. This is also possible to half of subjects(ex. Selecting and Adjusting the Screen Selecting the setup function (To adjust the CAPTION & VCHIP function - Parental ctl. OK MENU Enter code Parental Lock Set password...
... power off. It is a normal when receiving a poor signal. Once the correct four-digit password is selected. US Only) Special Caption/Text Parental ctl. The 'Enter code' window will be changed through 'Set password' menu. This is also possible to half of subjects(ex. Selecting and Adjusting the Screen Selecting the setup function (To adjust the CAPTION & VCHIP function - Parental ctl. OK MENU Enter code Parental Lock Set password...
User Guide
Page 27
... controls with a password. code A26 OK MENU US Only) V-CHIP rating and categories - Movies that have not set a password, enter 0000. code - - - Use the number pad to correct the problem yourself, contact the service center. Ent. code 4. Use the number button pad to open Enter code 3. Rating guidelines are unable to enter your choice of new four-digit password. The default password is entered using the number panel in a remote control, the window for new password will appear. ENGLISH Selecting the setup...
... controls with a password. code A26 OK MENU US Only) V-CHIP rating and categories - Movies that have not set a password, enter 0000. code - - - Use the number pad to correct the problem yourself, contact the service center. Ent. code 4. Use the number button pad to open Enter code 3. Rating guidelines are unable to enter your choice of new four-digit password. The default password is entered using the number panel in a remote control, the window for new password will appear. ENGLISH Selecting the setup...

User Guide
Page 32
...? Adjust the frequency range by referring to check the input signal. 'Unknown Product' message appears when the product is not connected. G Did you install the driver? • Install the product driver, which is provided with the product, or download it from the PC (video card) is supported by referring to the Specifications in the remote control to the video card user's guide. The unit is blue but the screen appears extremely dark. • Adjust brightness and contrast...
...? Adjust the frequency range by referring to check the input signal. 'Unknown Product' message appears when the product is not connected. G Did you install the driver? • Install the product driver, which is provided with the product, or download it from the PC (video card) is supported by referring to the Specifications in the remote control to the video card user's guide. The unit is blue but the screen appears extremely dark. • Adjust brightness and contrast...
User Guide
Page 33
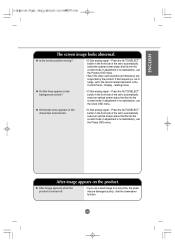
... the set to automatically select the optimal screen status that fits into the current mode. Display - If adjustment is not satisfactory, use the Clock OSD menu. After-image appears on the background screen? • D-Sub analog signal - Use the screensaver function. Setting menu. G Do thin lines appear on the product. If adjustment is not satisfactory, use the Position OSD menu. • See if the video card resolution and frequency are supported by the product. ENGLISH The screen image looks...
... the set to automatically select the optimal screen status that fits into the current mode. Display - If adjustment is not satisfactory, use the Clock OSD menu. After-image appears on the background screen? • D-Sub analog signal - Use the screensaver function. Setting menu. G Do thin lines appear on the product. If adjustment is not satisfactory, use the Position OSD menu. • See if the video card resolution and frequency are supported by the product. ENGLISH The screen image looks...
User Guide
Page 34
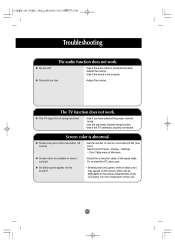
... poor color resolution (16 colors). • Set the number of colors to the unique characteristics of the signal cable. Settings - G Sound is set properly. G Do black spots appear on the screen? • Several pixels (red, green, white or black color) may appear on the screen, which can be attributable to more than 24 bits (true color) Select Control Panel - Display - Or, re-insert the PC video card. G No sound? • See if the audio cable is connected properly. • Adjust the volume...
... poor color resolution (16 colors). • Set the number of colors to the unique characteristics of the signal cable. Settings - G Sound is set properly. G Do black spots appear on the screen? • Several pixels (red, green, white or black color) may appear on the screen, which can be attributable to more than 24 bits (true color) Select Control Panel - Display - Or, re-insert the PC video card. G No sound? • See if the audio cable is connected properly. • Adjust the volume...


