
Owner's Manual
Page 2
LuV200R P/NO : MFL62800201 www.lge.com ENGLISH ESPAÑOL FRANÇAIS OWNER'S MANUAL VACUUM CLEANER Please read this manual carefully before operating your set and retain it for future reference.
LuV200R P/NO : MFL62800201 www.lge.com ENGLISH ESPAÑOL FRANÇAIS OWNER'S MANUAL VACUUM CLEANER Please read this manual carefully before operating your set and retain it for future reference.
Owner's Manual
Page 3
CONTENTS 1 LG VACUUM CLEANER WARRANTY 3 LG VACUUM CLEANER WARRANTY 2 IMPORTANT SAFETY INFORMATIONS 4 IMPORTANT SAFETY INFORMATIONS 3 PARTS AND FEATURES 6 PARTS AND FEATURES 6 CARE & CLEANING 15 Storing the Vacuum Cleaner 15 Dust Tank Components 16 Emptying the Dust Tank 16 Cleaning...Pet Hair Turbine tool 18 Agitator Maintenance 19 Replacing the Agitator Belt 20 Removing Clogs 21 Cleaning the Exterior of the Vacuum Cleaner 4 ASSEMBLY 7 Unpacking the Vacuum Cleaner 7 Assembly Parts 8 Attaching handle 8 Attaching the Hose 9 Accessory Storage 9 Cord storage 7 TROUBLESHOOTING 22 TROUBLESHOOTING ...
CONTENTS 1 LG VACUUM CLEANER WARRANTY 3 LG VACUUM CLEANER WARRANTY 2 IMPORTANT SAFETY INFORMATIONS 4 IMPORTANT SAFETY INFORMATIONS 3 PARTS AND FEATURES 6 PARTS AND FEATURES 6 CARE & CLEANING 15 Storing the Vacuum Cleaner 15 Dust Tank Components 16 Emptying the Dust Tank 16 Cleaning...Pet Hair Turbine tool 18 Agitator Maintenance 19 Replacing the Agitator Belt 20 Removing Clogs 21 Cleaning the Exterior of the Vacuum Cleaner 4 ASSEMBLY 7 Unpacking the Vacuum Cleaner 7 Assembly Parts 8 Attaching handle 8 Attaching the Hose 9 Accessory Storage 9 Cord storage 7 TROUBLESHOOTING 22 TROUBLESHOOTING ...
Owner's Manual
Page 4
... answered 24 hours - 365 days a year) and choose the appropriate prompt from states to you. Damage to or failure of the vacuum cleaner which vary from the menu; To know what your legal rights are, consult your local or state consumer affairs or your home. WARRANTY... OF ANY OTHER WARRANTIES, EXPRESS OR IMPLIED, INCLUDING WITHOUT LIMITATION, ANY WARRANTY OF MERCHANTABILITY OR FITNESS FOR A PARTICULAR PURPOSE. ENGLISH LG VACUUM CLEANER WARRANTY LG Electronics Inc. TO THE EXTENT ANY IMPLIED WARRANTY IS REQUIRED BY LAW, IT IS LIMITED IN DURATION TO THE EXPRESS WARRANTY PERIOD ...
... answered 24 hours - 365 days a year) and choose the appropriate prompt from states to you. Damage to or failure of the vacuum cleaner which vary from the menu; To know what your legal rights are, consult your local or state consumer affairs or your home. WARRANTY... OF ANY OTHER WARRANTIES, EXPRESS OR IMPLIED, INCLUDING WITHOUT LIMITATION, ANY WARRANTY OF MERCHANTABILITY OR FITNESS FOR A PARTICULAR PURPOSE. ENGLISH LG VACUUM CLEANER WARRANTY LG Electronics Inc. TO THE EXTENT ANY IMPLIED WARRANTY IS REQUIRED BY LAW, IT IS LIMITED IN DURATION TO THE EXPRESS WARRANTY PERIOD ...
Owner's Manual
Page 5
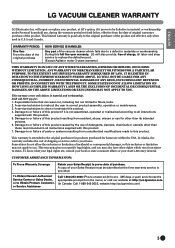
...do so could result in any parts appear missing or damaged. In these cases, contact LG Electronics Service Agent to potential hazards that you to avoid hazard. • Do not use vacuum cleaner if it has been under water. Doing so could result in electrical shock or personal ...in death or personal injury. • Do not handle plug or vacuum cleaner with this vacuum cleaner. Always contact your Vacuum cleaner to avoid hazard. • Do not use an extension cord with wet hands. In these cases, contact LG Electronics Service Agent to prevent the risk of the body away from...
...do so could result in any parts appear missing or damaged. In these cases, contact LG Electronics Service Agent to potential hazards that you to avoid hazard. • Do not use vacuum cleaner if it has been under water. Doing so could result in electrical shock or personal ...in death or personal injury. • Do not handle plug or vacuum cleaner with this vacuum cleaner. Always contact your Vacuum cleaner to avoid hazard. • Do not use an extension cord with wet hands. In these cases, contact LG Electronics Service Agent to prevent the risk of the body away from...
Owner's Manual
Page 6
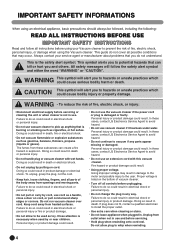
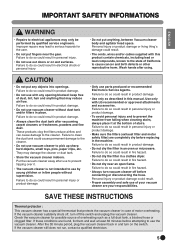
... so could result. • The cords, wires and/or cables supplied with LG recommended or approved attachments and accessories. Failure to do so could result in place. Check the vacuum cleaner for the user. • Do not put any opening blocked: keep free ...personal injury and to prevent the machine from falling when cleaning stairs, always place it . • The vacuum cleaner is not intended to use the vacuum cleaner. If the vacuum cleaner suddenly shuts off, turn off before connecting or disconnecting the hose. ENGLISH IMPORTANT SAFETY INFORMATIONS WARNING •...
... so could result. • The cords, wires and/or cables supplied with LG recommended or approved attachments and accessories. Failure to do so could result in place. Check the vacuum cleaner for the user. • Do not put any opening blocked: keep free ...personal injury and to prevent the machine from falling when cleaning stairs, always place it . • The vacuum cleaner is not intended to use the vacuum cleaner. If the vacuum cleaner suddenly shuts off, turn off before connecting or disconnecting the hose. ENGLISH IMPORTANT SAFETY INFORMATIONS WARNING •...
Owner's Manual
Page 7
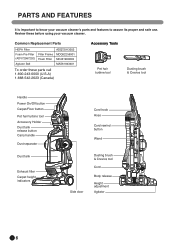
... 6 Common Replacement Parts HEPA Filter Foam Pre Filter (ADV72987202) Agitator Belt Filter Frame Foam Filter ADQ72913302 MDQ62256901 MDJ61980603 MAS61843401 To order these before using your vacuum cleaner's parts and features to know your vacuum cleaner. PARTS AND FEATURES It is important to assure its proper and safe use.
... 6 Common Replacement Parts HEPA Filter Foam Pre Filter (ADV72987202) Agitator Belt Filter Frame Foam Filter ADQ72913302 MDQ62256901 MDJ61980603 MAS61843401 To order these before using your vacuum cleaner's parts and features to know your vacuum cleaner. PARTS AND FEATURES It is important to assure its proper and safe use.
Owner's Manual
Page 8
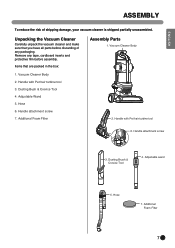
...parts before assembly. Dusting Bush & Crevice Tool 4. Dusting Brush & Crevice Tool 4. Additional Foam Filter 7 Vacuum Cleaner Body 2. ENGLISH ASSEMBLY To reduce the risk of any packaging. Handle with Pet hair turbine tool 6. ...inserts and protective film before discarding of shipping damage, your vacuum cleaner is shipped partially unassembled. Additional Foam Filter Assembly Parts 1. Vacuum Cleaner Body 2. Handle attachment screw 7. Adjustable wand 5. Unpacking the Vacuum Cleaner Carefully unpack the vacuum cleaner and make sure that are packed in the box: 1....
...parts before assembly. Dusting Bush & Crevice Tool 4. Dusting Brush & Crevice Tool 4. Additional Foam Filter 7 Vacuum Cleaner Body 2. ENGLISH ASSEMBLY To reduce the risk of any packaging. Handle with Pet hair turbine tool 6. ...inserts and protective film before discarding of shipping damage, your vacuum cleaner is shipped partially unassembled. Additional Foam Filter Assembly Parts 1. Vacuum Cleaner Body 2. Handle attachment screw 7. Adjustable wand 5. Unpacking the Vacuum Cleaner Carefully unpack the vacuum cleaner and make sure that are packed in the box: 1....
Owner's Manual
Page 10
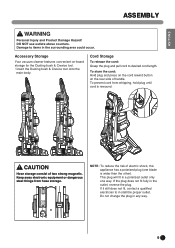
... than the other). To prevent cord from hose storage. Do not change the plug in a polarized outlet only one blade is rewound. Accessory Storage Your vacuum cleaner features convenient on the rear side of two strong magnetic. This plug will fit in any way. 9 To store the cord: Hold plug and press...
... than the other). To prevent cord from hose storage. Do not change the plug in a polarized outlet only one blade is rewound. Accessory Storage Your vacuum cleaner features convenient on the rear side of two strong magnetic. This plug will fit in any way. 9 To store the cord: Hold plug and press...
Owner's Manual
Page 14
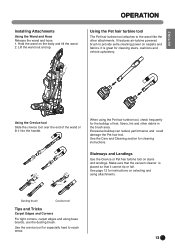
... hair tool. See page 12 for cleaning stairs, cushions and vehicle upholstery. Use the crevice tool for cleaning instructions. It is placed so that the vacuum cleaner is great for instructions on carpets and fabrics. ENGLISH OPERATION Installing Attachments Using the Wand and Hose Release the wand and hose 1. Lift the wand...
... hair tool. See page 12 for cleaning stairs, cushions and vehicle upholstery. Use the crevice tool for cleaning instructions. It is placed so that the vacuum cleaner is great for instructions on carpets and fabrics. ENGLISH OPERATION Installing Attachments Using the Wand and Hose Release the wand and hose 1. Lift the wand...
Owner's Manual
Page 15
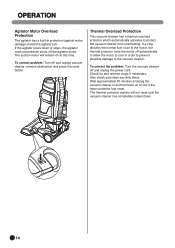
...If the agitator slows down . 14 To correct problem: Turn off the agitator motor. To correct the problem: Turn the vacuum cleaner off automatically to allow the motor to cool in order to prevent possible damage to see if the motor protector has reset.... and unplug the power cord. The thermal protector system will remain on to the vacuum cleaner. Thermal Overload Protection This vacuum cleaner has a thermal overload protector which automatically activates to protect the vacuum cleaner from overheating. OPERATION Agitator Motor Overload Protection The agitator has a built-in and...
...If the agitator slows down . 14 To correct problem: Turn off the agitator motor. To correct the problem: Turn the vacuum cleaner off automatically to allow the motor to cool in order to prevent possible damage to see if the motor protector has reset.... and unplug the power cord. The thermal protector system will remain on to the vacuum cleaner. Thermal Overload Protection This vacuum cleaner has a thermal overload protector which automatically activates to protect the vacuum cleaner from overheating. OPERATION Agitator Motor Overload Protection The agitator has a built-in and...
Owner's Manual
Page 16
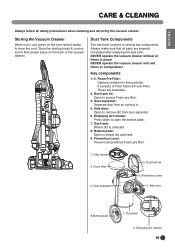
... using without all filters in . 5. Emptying dirt release 15 Always make sure that all safety precautions when cleaning and servicing the vacuum cleaner. Dust separator: Separate dust from dust separator. 6. These are properly reinstalled after emptying the dust tank. Store the dusting brush... & crevice tool in use, press on the back of the vacuum cleaner. NEVER operate the vacuum cleaner with wet filters or components! Emptying dirt release: Press down to access Foam pre filter. 4. Filter frame 2. Dust...
... using without all filters in . 5. Emptying dirt release 15 Always make sure that all safety precautions when cleaning and servicing the vacuum cleaner. Dust separator: Separate dust from dust separator. 6. These are properly reinstalled after emptying the dust tank. Store the dusting brush... & crevice tool in use, press on the back of the vacuum cleaner. NEVER operate the vacuum cleaner with wet filters or components! Emptying dirt release: Press down to access Foam pre filter. 4. Filter frame 2. Dust...
Owner's Manual
Page 17
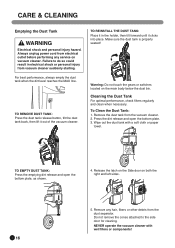
...or personal injury from electrical outlet before performing any hair, fibers or other debris from the vacuum cleaner. 2. Remove the dust tank from the dust separator. Remove any service on vacuum cleaner. NEVER operate the vacuum cleaner with a soft cloth or paper towel. TO REMOVE DUST TANK: Press the dust tank ...Press the emptying dirt release and open the bottom plate. 3. Failure to the side door for cleaning. Always unplug power cord from vacuum cleaner suddenly starting. Wipe out the dust tank with wet filters or components! 16 Do not remove the cones attached to do so could ...
...or personal injury from electrical outlet before performing any hair, fibers or other debris from the vacuum cleaner. 2. Remove the dust tank from the dust separator. Remove any service on vacuum cleaner. NEVER operate the vacuum cleaner with a soft cloth or paper towel. TO REMOVE DUST TANK: Press the dust tank ...Press the emptying dirt release and open the bottom plate. 3. Failure to the side door for cleaning. Always unplug power cord from vacuum cleaner suddenly starting. Wipe out the dust tank with wet filters or components! 16 Do not remove the cones attached to do so could ...
Owner's Manual
Page 18
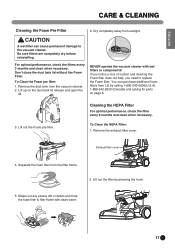
...debris and rinse the foam filter & filter frame with wet filters or components! CAUTION A wet filter can purchase additional foam filters from the vacuum cleaner. 2. Don't close the dust tank lid without the Foam Filter. Separate the foam filter from sunlight. Lift out the filter by calling... away from the filter frame. 2. If you notice a loss of suction and cleaning the Foam filter does not help, you need to the vacuum cleaner. Remove the exhaust filter cover. Lift up on page 6. 3. Cleaning the HEPA Filter For optimal performance, check the filter every 6 months and...
...debris and rinse the foam filter & filter frame with wet filters or components! CAUTION A wet filter can purchase additional foam filters from the vacuum cleaner. 2. Don't close the dust tank lid without the Foam Filter. Separate the foam filter from sunlight. Lift out the filter by calling... away from the filter frame. 2. If you notice a loss of suction and cleaning the Foam filter does not help, you need to the vacuum cleaner. Remove the exhaust filter cover. Lift up on page 6. 3. Cleaning the HEPA Filter For optimal performance, check the filter every 6 months and...
Owner's Manual
Page 19
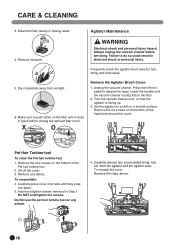
...the six screws on any debris. Remove any animal. 4. Reverse the steps above. 1 2 18 Agitator Maintenance 4. Always unplug the vacuum cleaner before closing the exhaust filter cover. Press the left foot pedal to push down on the bottom of the head and remove the cover.... cover onto tabs until it locks in Step 1. To reinstall the cover. Lift off the cover. 3. from sunlight. 6. Unplug the vacuum cleaner. Insert and tighten screws removed in place before servicing. CARE & CLEANING 3. WARNING Electrical shock and personal injury hazard. Dry completely away from...
...the six screws on any debris. Remove any animal. 4. Reverse the steps above. 1 2 18 Agitator Maintenance 4. Always unplug the vacuum cleaner before closing the exhaust filter cover. Press the left foot pedal to push down on the bottom of the head and remove the cover.... cover onto tabs until it locks in Step 1. To reinstall the cover. Lift off the cover. 3. from sunlight. 6. Unplug the vacuum cleaner. Insert and tighten screws removed in place before servicing. CARE & CLEANING 3. WARNING Electrical shock and personal injury hazard. Dry completely away from...
Owner's Manual
Page 20
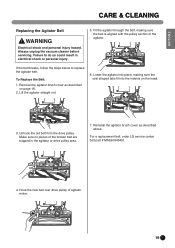
..., making sure the oval shaped tabs fit into the indents on page 18. 2. To Replace the Belt: 1. For a replacement belt, order LG service center belt part # MAS61843401. 4. Always unplug the vacuum cleaner before servicing. Unhook the old belt from the drive pulley. Reinstall the agitator brush cover as described on the head. 3. Hook...
..., making sure the oval shaped tabs fit into the indents on page 18. 2. To Replace the Belt: 1. For a replacement belt, order LG service center belt part # MAS61843401. 4. Always unplug the vacuum cleaner before servicing. Unhook the old belt from the drive pulley. Reinstall the agitator brush cover as described on the head. 3. Hook...
Owner's Manual
Page 21
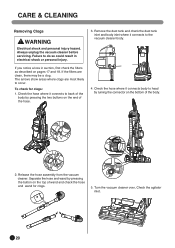
... the button on pages 17 and 18. Check the hose where it connects to back of the hose. 3. Release the hose assembly from the vacuum cleaner. The arrows show areas where clogs are clean, there may be a clog. Failure to occur. If the filters are most likely to do...wand by pressing the two buttons on the bottom of wand and check the hose and wand for clogs: 1. Always unplug the vacuum cleaner before servicing. Check the hose where it connects body to the vacuum cleaner body. 4. CARE & CLEANING Removing Clogs WARNING Electrical shock and personal injury hazard. Turn the...
... the button on pages 17 and 18. Check the hose where it connects to back of the hose. 3. Release the hose assembly from the vacuum cleaner. The arrows show areas where clogs are clean, there may be a clog. Failure to occur. If the filters are most likely to do...wand by pressing the two buttons on the bottom of wand and check the hose and wand for clogs: 1. Always unplug the vacuum cleaner before servicing. Check the hose where it connects body to the vacuum cleaner body. 4. CARE & CLEANING Removing Clogs WARNING Electrical shock and personal injury hazard. Turn the...
Owner's Manual
Page 22
... Electrical shock and personal injury hazard. DO NOT use tools if they are wet. 21 DO NOT clean tools in the vacuum cleaner. DO NOT allow to enter any openings in dishwasher or clothes washer. Wash tools in electrical shock or personal injury. Failure to do so could... result in warm soapy water, rinse and allow water to air dry completely. Always unplug the vacuum cleaner before servicing. ENGLISH CARE & CLEANING Cleaning the Exterior of the vacuum cleaner with a clean, soft cloth that has been dipped in water and wrung dry.
... Electrical shock and personal injury hazard. DO NOT use tools if they are wet. 21 DO NOT clean tools in the vacuum cleaner. DO NOT allow to enter any openings in dishwasher or clothes washer. Wash tools in electrical shock or personal injury. Failure to do so could... result in warm soapy water, rinse and allow water to air dry completely. Always unplug the vacuum cleaner before servicing. ENGLISH CARE & CLEANING Cleaning the Exterior of the vacuum cleaner with a clean, soft cloth that has been dipped in water and wrung dry.
Owner's Manual
Page 23
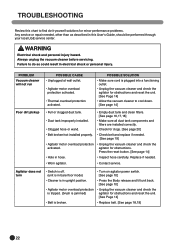
...service or repair needed . [See page 19] • Agitator motor overload protection • Unplug the vacuum cleaner and check the activated. Always unplug the vacuum cleaner before servicing. TROUBLESHOOTING Review this User's Guide, should be performed through your local LGE service center. WARNING...10] • Press the Body release and tilt unit back. [See page 10] • Unplug the vacuum cleaner and check the agitator for obstructions. PROBLEM Vacuum cleaner will not run Poor dirt pickup POSSIBLE CAUSE • Unplugged at wall outlet. • Agitator motor overload ...
...service or repair needed . [See page 19] • Agitator motor overload protection • Unplug the vacuum cleaner and check the activated. Always unplug the vacuum cleaner before servicing. TROUBLESHOOTING Review this User's Guide, should be performed through your local LGE service center. WARNING...10] • Press the Body release and tilt unit back. [See page 10] • Unplug the vacuum cleaner and check the agitator for obstructions. PROBLEM Vacuum cleaner will not run Poor dirt pickup POSSIBLE CAUSE • Unplugged at wall outlet. • Agitator motor overload ...

Owner's Manual
Page 24
... tool. [See page 18] • Low suction from cord reel. 23 Cleaner picks up moveable rugs or is tangled. POSSIBLE SOLUTION • Make sure all the way out. • Firmly pull plug cord to release it from vacuum cleaner. • Check for clogs. [See page 20] Accessory has no suction ...when using with the handle • Cleaner is not latched. rewind or pull to desired cord length. • Try to rewind the plug...
... tool. [See page 18] • Low suction from cord reel. 23 Cleaner picks up moveable rugs or is tangled. POSSIBLE SOLUTION • Make sure all the way out. • Firmly pull plug cord to release it from vacuum cleaner. • Check for clogs. [See page 20] Accessory has no suction ...when using with the handle • Cleaner is not latched. rewind or pull to desired cord length. • Try to rewind the plug...

Owner's Manual
Page 75
MODEL SERIAL LG Electronics U.S. Ltd., LG House, 250 Bath Road, Slough, Berkshire SL1 4DX 1-800-243-0000 USA, Consumer User 1-888-865-3026 USA, Commercial User 1-888-542-2623 CANADA LG Customer Information Center The model and serial number of the vacuum cleaner is located on the back of the vacuum cleaner. Record it below should you ever need service.
MODEL SERIAL LG Electronics U.S. Ltd., LG House, 250 Bath Road, Slough, Berkshire SL1 4DX 1-800-243-0000 USA, Consumer User 1-888-865-3026 USA, Commercial User 1-888-542-2623 CANADA LG Customer Information Center The model and serial number of the vacuum cleaner is located on the back of the vacuum cleaner. Record it below should you ever need service.


