
Owner's Manual
Page 2
LuV200R P/NO : MFL62800201 www.lge.com ENGLISH ESPAÑOL FRANÇAIS OWNER'S MANUAL VACUUM CLEANER Please read this manual carefully before operating your set and retain it for future reference.
LuV200R P/NO : MFL62800201 www.lge.com ENGLISH ESPAÑOL FRANÇAIS OWNER'S MANUAL VACUUM CLEANER Please read this manual carefully before operating your set and retain it for future reference.
Owner's Manual
Page 3
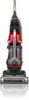
CONTENTS 1 LG VACUUM CLEANER WARRANTY 3 LG VACUUM CLEANER WARRANTY 2 IMPORTANT SAFETY INFORMATIONS 4 IMPORTANT SAFETY INFORMATIONS 3 PARTS AND FEATURES 6 PARTS AND FEATURES 6 CARE & CLEANING 15 Storing the Vacuum Cleaner 15 Dust Tank Components 16 Emptying the Dust Tank 16 Cleaning the Dust...Pet Hair Turbine tool 18 Agitator Maintenance 19 Replacing the Agitator Belt 20 Removing Clogs 21 Cleaning the Exterior of the Vacuum Cleaner 4 ASSEMBLY 7 Unpacking the Vacuum Cleaner 7 Assembly Parts 8 Attaching handle 8 Attaching the Hose 9 Accessory Storage 9 Cord storage 7 TROUBLESHOOTING 22 ...
CONTENTS 1 LG VACUUM CLEANER WARRANTY 3 LG VACUUM CLEANER WARRANTY 2 IMPORTANT SAFETY INFORMATIONS 4 IMPORTANT SAFETY INFORMATIONS 3 PARTS AND FEATURES 6 PARTS AND FEATURES 6 CARE & CLEANING 15 Storing the Vacuum Cleaner 15 Dust Tank Components 16 Emptying the Dust Tank 16 Cleaning the Dust...Pet Hair Turbine tool 18 Agitator Maintenance 19 Replacing the Agitator Belt 20 Removing Clogs 21 Cleaning the Exterior of the Vacuum Cleaner 4 ASSEMBLY 7 Unpacking the Vacuum Cleaner 7 Assembly Parts 8 Attaching handle 8 Attaching the Hose 9 Accessory Storage 9 Cord storage 7 TROUBLESHOOTING 22 ...
Owner's Manual
Page 4
...OF INCIDENTAL OR CONSEQUENTIAL DAMAGES, SO THE ABOVE LIMITATIONS OR EXCLUSIONS MAY NOT APPLY TO YOU. Damage to or failure of the vacuum cleaner which vary from unauthorized modifications made to replace the defective part. (Except-Agitator motor 3 years warranty) THIS WARRANTY IS... product assembly, operation or maintenance. 3. To Obtain Nearest Authorized Service Center or Sales Dealer, or to filters, belts. 2. ENGLISH LG VACUUM CLEANER WARRANTY LG Electronics Inc. To know what your legal rights are, consult your local or state consumer affairs or your product, at : http://...
...OF INCIDENTAL OR CONSEQUENTIAL DAMAGES, SO THE ABOVE LIMITATIONS OR EXCLUSIONS MAY NOT APPLY TO YOU. Damage to or failure of the vacuum cleaner which vary from unauthorized modifications made to replace the defective part. (Except-Agitator motor 3 years warranty) THIS WARRANTY IS... product assembly, operation or maintenance. 3. To Obtain Nearest Authorized Service Center or Sales Dealer, or to filters, belts. 2. ENGLISH LG VACUUM CLEANER WARRANTY LG Electronics Inc. To know what your legal rights are, consult your local or state consumer affairs or your product, at : http://...
Owner's Manual
Page 5
...in death or personal injury. • Do not handle plug or vacuum cleaner with this vacuum cleaner. Doing so could result in product damage or electrical shock. Do not run vacuum cleaner over cord. Keep cord away from these cases, contact LG Electronics Service Agent to avoid hazard. • Do not use ...an extension cord with wet hands. In these cases, contact LG Electronics Service Agent to avoid hazard. • Do not use vacuum cleaner if it has been under water. Failure to be used by or near children. Do not allow to do...
...in death or personal injury. • Do not handle plug or vacuum cleaner with this vacuum cleaner. Doing so could result in product damage or electrical shock. Do not run vacuum cleaner over cord. Keep cord away from these cases, contact LG Electronics Service Agent to avoid hazard. • Do not use ...an extension cord with wet hands. In these cases, contact LG Electronics Service Agent to avoid hazard. • Do not use vacuum cleaner if it has been under water. Failure to be used by or near children. Do not allow to do...
Owner's Manual
Page 6
... Failure to do so could cause permanent damage to do so could result in product damage. • Do not use with LG recommended or approved attachments and accessories. Personal injury or product damage or living thing's damage could result in fire hazard. • Always turn...8226; Make sure the filters (exhaust filter and motor safety filter) are completely dry before replacing in the machine. If these conditions are your vacuum cleaner are found, fix them and wait at the bottom of motor overheating. ENGLISH IMPORTANT SAFETY INFORMATIONS WARNING • Repairs to prevent the ...
... Failure to do so could cause permanent damage to do so could result in product damage. • Do not use with LG recommended or approved attachments and accessories. Personal injury or product damage or living thing's damage could result in fire hazard. • Always turn...8226; Make sure the filters (exhaust filter and motor safety filter) are completely dry before replacing in the machine. If these conditions are your vacuum cleaner are found, fix them and wait at the bottom of motor overheating. ENGLISH IMPORTANT SAFETY INFORMATIONS WARNING • Repairs to prevent the ...
Owner's Manual
Page 7
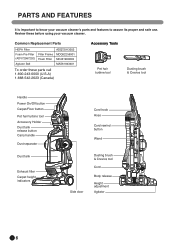
... HEPA Filter Foam Pre Filter (ADV72987202) Agitator Belt Filter Frame Foam Filter ADQ72913302 MDQ62256901 MDJ61980603 MAS61843401 To order these before using your vacuum cleaner's parts and features to know your vacuum cleaner. Review these parts call 1-800-243-0000 (U.S.A) 1-888-542-2623 (Canada) Accessory Tools Pet hair turbine tool Dusting brush & Crevice...
... HEPA Filter Foam Pre Filter (ADV72987202) Agitator Belt Filter Frame Foam Filter ADQ72913302 MDQ62256901 MDJ61980603 MAS61843401 To order these before using your vacuum cleaner's parts and features to know your vacuum cleaner. Review these parts call 1-800-243-0000 (U.S.A) 1-888-542-2623 (Canada) Accessory Tools Pet hair turbine tool Dusting brush & Crevice...
Owner's Manual
Page 8
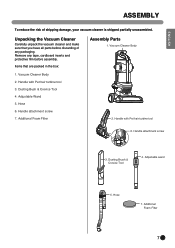
... Pet hair turbine tool 3. Hose 7. Handle with Pet hair turbine tool 6. Adjustable Wand 5. Handle attachment screw 3. Unpacking the Vacuum Cleaner Carefully unpack the vacuum cleaner and make sure that are packed in the box: 1. Vacuum Cleaner Body 2. Dusting Brush & Crevice Tool 4. Remove any tape, cardboard inserts and protective film before discarding of shipping...
... Pet hair turbine tool 3. Hose 7. Handle with Pet hair turbine tool 6. Adjustable Wand 5. Handle attachment screw 3. Unpacking the Vacuum Cleaner Carefully unpack the vacuum cleaner and make sure that are packed in the box: 1. Vacuum Cleaner Body 2. Dusting Brush & Crevice Tool 4. Remove any tape, cardboard inserts and protective film before discarding of shipping...
Owner's Manual
Page 9
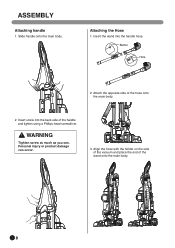
Insert the wand into the back side of the hose onto the main body. 2. Button Hole 2. Attach the opposite side of the handle and tighten using a Phillips head screwdriver. WARNING Tighten screw as much as you can occur. 3. Slide handle onto the main body. Attaching the Hose 1. Insert screw into the handle hose. Align the hose with the holder on the side of the vacuum and place the end of the wand onto the main body. 8 Personal injury or product damage can . ASSEMBLY Attaching handle 1.
Insert the wand into the back side of the hose onto the main body. 2. Button Hole 2. Attach the opposite side of the handle and tighten using a Phillips head screwdriver. WARNING Tighten screw as much as you can occur. 3. Slide handle onto the main body. Attaching the Hose 1. Insert screw into the handle hose. Align the hose with the holder on the side of the vacuum and place the end of the wand onto the main body. 8 Personal injury or product damage can . ASSEMBLY Attaching handle 1.
Owner's Manual
Page 10
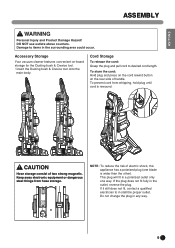
Accessory Storage Your vacuum cleaner features convenient on the rear side of two strong magnetic. To prevent cord from hose storage. If it still does not fit, contact a qualified ...
Accessory Storage Your vacuum cleaner features convenient on the rear side of two strong magnetic. To prevent cord from hose storage. If it still does not fit, contact a qualified ...
Owner's Manual
Page 11
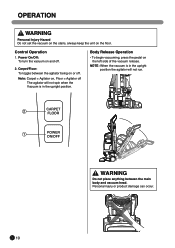
Power On/Off: To turn the vacuum on the left side of the vacuum release. Body Release Operation • To begin vacuuming, press the pedal on and off. 2. Personal injury or product damage can occur. 10 Note: Carpet = Agitator on or off The agitator will not run.... 2 CARPET FLOOR 1 POWER ON/OFF WARNING Do not place anything between the agitator being on , Floor = Agitator off . NOTE: When the vacuum is in the upright position the agitator will not spin when the Vacuum is in the upright position. Control Operation 1. Carpet/Floor: To toggle between the main body and...
Power On/Off: To turn the vacuum on the left side of the vacuum release. Body Release Operation • To begin vacuuming, press the pedal on and off. 2. Personal injury or product damage can occur. 10 Note: Carpet = Agitator on or off The agitator will not run.... 2 CARPET FLOOR 1 POWER ON/OFF WARNING Do not place anything between the agitator being on , Floor = Agitator off . NOTE: When the vacuum is in the upright position the agitator will not spin when the Vacuum is in the upright position. Control Operation 1. Carpet/Floor: To toggle between the main body and...
Owner's Manual
Page 12
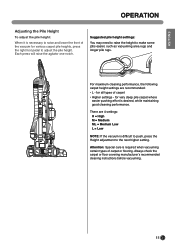
...to the next higher setting. There are recommended: • L - Always check the carpet or floor covering manufacturer's recommended cleaning instructions before vacuuming. 11 For maximum cleaning performance, the following carpet height settings are 4 settings: H = High M = Medium ML = Medium Low L = Low NOTE:... types of carpet or flooring. ENGLISH OPERATION Adjusting the Pile Height To adjust the pile height: When it is required when vacuuming certain types of carpet • Higher settings - Each press will raise the agitator one notch. Suggested pile height settings: You...
...to the next higher setting. There are recommended: • L - Always check the carpet or floor covering manufacturer's recommended cleaning instructions before vacuuming. 11 For maximum cleaning performance, the following carpet height settings are 4 settings: H = High M = Medium ML = Medium Low L = Low NOTE:... types of carpet or flooring. ENGLISH OPERATION Adjusting the Pile Height To adjust the pile height: When it is required when vacuuming certain types of carpet • Higher settings - Each press will raise the agitator one notch. Suggested pile height settings: You...
Owner's Manual
Page 14
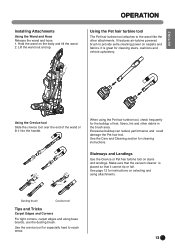
... using the Pet hair turbine tool, check frequently for the buildup of the wand or fit it cannot tip or fall. Make sure that the vacuum cleaner is great for instructions on carpets and fabrics. It is placed so that it into the handle. Hold the wand on stairs and landings...
... using the Pet hair turbine tool, check frequently for the buildup of the wand or fit it cannot tip or fall. Make sure that the vacuum cleaner is great for instructions on carpets and fabrics. It is placed so that it into the handle. Hold the wand on stairs and landings...
Owner's Manual
Page 15
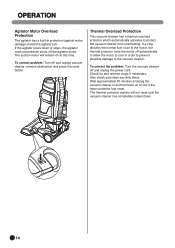
... automatically to allow the motor to cool in and turn back on at this time. To correct the problem: Turn the vacuum cleaner off and unplug vacuum cleaner, remove obstruction and press the reset button. Also check and clean any dirty filters. If a clog disturbs the normal...motor, the thermal protector turns the motor off the agitator motor. Wait approximately 30 minutes and plug the vacuum cleaner in order to prevent possible damage to protect the vacuum cleaner from overheating. OPERATION Agitator Motor Overload Protection The agitator has a built-in protection against motor damage ...
... automatically to allow the motor to cool in and turn back on at this time. To correct the problem: Turn the vacuum cleaner off and unplug vacuum cleaner, remove obstruction and press the reset button. Also check and clean any dirty filters. If a clog disturbs the normal...motor, the thermal protector turns the motor off the agitator motor. Wait approximately 30 minutes and plug the vacuum cleaner in order to prevent possible damage to protect the vacuum cleaner from overheating. OPERATION Agitator Motor Overload Protection The agitator has a built-in protection against motor damage ...
Owner's Manual
Page 16
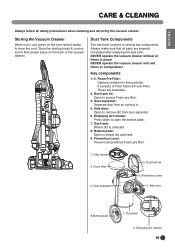
...components 1~2. Emptying dirt release: Press down to empty the dust tank. 9. Filter frame 2. Side door 8.Bottom plate 7. Storing the Vacuum Cleaner When not in use, press on the back of the vacuum cleaner. It consists of several key components. Prevention Lever: Prevent using without all filters in . 5. Side door: Open to store... to access Foam pre filter. 4. Dust tank lid: Open to fine particles. Always make sure that all safety precautions when cleaning and servicing the vacuum cleaner. ENGLISH CARE & CLEANING Always follow all parts are washable. 3.
...components 1~2. Emptying dirt release: Press down to empty the dust tank. 9. Filter frame 2. Side door 8.Bottom plate 7. Storing the Vacuum Cleaner When not in use, press on the back of the vacuum cleaner. It consists of several key components. Prevention Lever: Prevent using without all filters in . 5. Side door: Open to store... to access Foam pre filter. 4. Dust tank lid: Open to fine particles. Always make sure that all safety precautions when cleaning and servicing the vacuum cleaner. ENGLISH CARE & CLEANING Always follow all parts are washable. 3.
Owner's Manual
Page 17
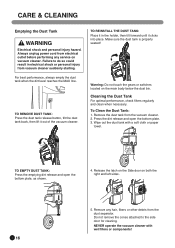
... 1. Do not remove the cones attached to do so could result in the holder, then tilt forward until it out of the vacuum cleaner. NEVER operate the vacuum cleaner with a soft cloth or paper towel. Cleaning the Dust Tank For optimal performance, check filters regularly and clean when necessary. ...Remove the dust tank from vacuum cleaner suddenly starting. TO REMOVE DUST TANK: Press the dust tank release button, tilt the dust tank back, then lift it clicks into place...
... 1. Do not remove the cones attached to do so could result in the holder, then tilt forward until it out of the vacuum cleaner. NEVER operate the vacuum cleaner with a soft cloth or paper towel. Cleaning the Dust Tank For optimal performance, check filters regularly and clean when necessary. ...Remove the dust tank from vacuum cleaner suddenly starting. TO REMOVE DUST TANK: Press the dust tank release button, tilt the dust tank back, then lift it clicks into place...
Owner's Manual
Page 18
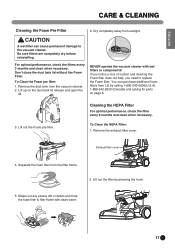
... on the dust tank lid release and open the lid. You can cause permanent damage to replace the Foam filter. NEVER operate the vacuum cleaner with clean water. 17 Lift out the Foam pre filter. Exhaust filter cover 4. Lift up on page 6. 3. Separate the foam...from the filter frame. 2. CAUTION A wet filter can purchase additional foam filters from the vacuum cleaner. 2. For optimal performance, check the filters every 3 months and clean when necessary. Remove the dust tank from LG by pressing the hook. 5. To Clean the HEPA Filter: 1. Remove the exhaust filter cover...
... on the dust tank lid release and open the lid. You can cause permanent damage to replace the Foam filter. NEVER operate the vacuum cleaner with clean water. 17 Lift out the Foam pre filter. Exhaust filter cover 4. Lift up on page 6. 3. Separate the foam...from the filter frame. 2. CAUTION A wet filter can purchase additional foam filters from the vacuum cleaner. 2. For optimal performance, check the filters every 3 months and clean when necessary. Remove the dust tank from LG by pressing the hook. 5. To Clean the HEPA Filter: 1. Remove the exhaust filter cover...
Owner's Manual
Page 19
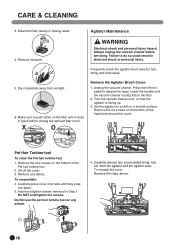
...the cover. 3. Insert and tighten screws removed in flowing water. To reinstall the cover. Reverse the steps above. 1 2 18 Unplug the vacuum cleaner. Press the left foot pedal to do so could result in place before servicing. Remove the four screws on the floor. 2. Lower the... handle until the vacuum cleaner is facing up. 3. To reassemble: 4. Do NOT overtighten the screws. Remove any accumulated string, hair, etc. WARNING Electrical shock ...
...the cover. 3. Insert and tighten screws removed in flowing water. To reinstall the cover. Reverse the steps above. 1 2 18 Unplug the vacuum cleaner. Press the left foot pedal to do so could result in place before servicing. Remove the four screws on the floor. 2. Lower the... handle until the vacuum cleaner is facing up. 3. To reassemble: 4. Do NOT overtighten the screws. Remove any accumulated string, hair, etc. WARNING Electrical shock ...
Owner's Manual
Page 20
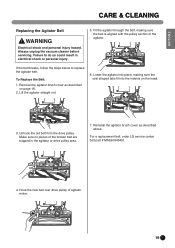
... personal injury. 5. Hook the new belt over drive pulley of agitator motor. 19 Remove the agitator brush cover as described above. For a replacement belt, order LG service center belt part # MAS61843401. 4. Reinstall the agitator brush cover as described on the head. 3. ENGLISH CARE & CLEANING Replacing the Agitator Belt WARNING Electrical shock...
... personal injury. 5. Hook the new belt over drive pulley of agitator motor. 19 Remove the agitator brush cover as described above. For a replacement belt, order LG service center belt part # MAS61843401. 4. Reinstall the agitator brush cover as described on the head. 3. ENGLISH CARE & CLEANING Replacing the Agitator Belt WARNING Electrical shock...
Owner's Manual
Page 21
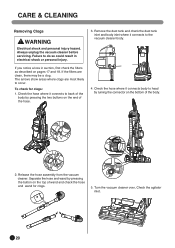
... check for clogs. 5. Remove the dust tank and check the dust tank inlet and body inlet where it connects to the vacuum cleaner body. 4. Release the hose assembly from the vacuum cleaner. If you notice a loss in electrical shock or personal injury. The arrows show areas where clogs are clean, there ...may be a clog. Turn the vacuum cleaner over, Check the agitator inlet. 20 Separate the hose and wand by pressing the two buttons on the top of the body. 2. Check the ...
... check for clogs. 5. Remove the dust tank and check the dust tank inlet and body inlet where it connects to the vacuum cleaner body. 4. Release the hose assembly from the vacuum cleaner. If you notice a loss in electrical shock or personal injury. The arrows show areas where clogs are clean, there ...may be a clog. Turn the vacuum cleaner over, Check the agitator inlet. 20 Separate the hose and wand by pressing the two buttons on the top of the body. 2. Check the ...
Owner's Manual
Page 22
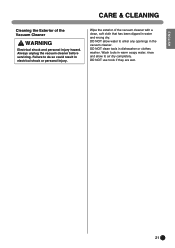
... or personal injury. DO NOT clean tools in the vacuum cleaner. DO NOT allow to enter any openings in dishwasher or clothes washer. Always unplug the vacuum cleaner before servicing. Wipe the exterior of the Vacuum Cleaner WARNING Electrical shock and personal injury hazard. ENGLISH... CARE & CLEANING Cleaning the Exterior of the vacuum cleaner with a clean, soft cloth that has been...
... or personal injury. DO NOT clean tools in the vacuum cleaner. DO NOT allow to enter any openings in dishwasher or clothes washer. Always unplug the vacuum cleaner before servicing. Wipe the exterior of the Vacuum Cleaner WARNING Electrical shock and personal injury hazard. ENGLISH... CARE & CLEANING Cleaning the Exterior of the vacuum cleaner with a clean, soft cloth that has been...


