
Owner's Manual
Page 3
CONTENTS 1 LG VACUUM CLEANER WARRANTY 3 LG VACUUM CLEANER WARRANTY 2 IMPORTANT SAFETY INFORMATIONS 4 IMPORTANT SAFETY INFORMATIONS 3 PARTS AND FEATURES 6 PARTS AND FEATURES 6 CARE & CLEANING 15 Storing the Vacuum Cleaner 15 Dust Tank Components 16 Emptying the Dust Tank 16 Cleaning the Dust Tank 17 Cleaning the Foam Pre Filter 17 Cleaning the HEPA Filter 18 Pet...
CONTENTS 1 LG VACUUM CLEANER WARRANTY 3 LG VACUUM CLEANER WARRANTY 2 IMPORTANT SAFETY INFORMATIONS 4 IMPORTANT SAFETY INFORMATIONS 3 PARTS AND FEATURES 6 PARTS AND FEATURES 6 CARE & CLEANING 15 Storing the Vacuum Cleaner 15 Dust Tank Components 16 Emptying the Dust Tank 16 Cleaning the Dust Tank 17 Cleaning the Foam Pre Filter 17 Cleaning the HEPA Filter 18 Pet...
Owner's Manual
Page 4
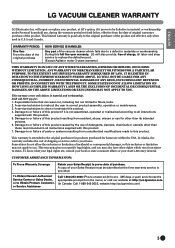
... purpose. 6. A copy of your Sales Receipt must be defective in material or workmanship under Personal household use of this product. 4. LG WILL NOT BE LIABLE FOR ANY CONSEQUENTIAL, INDIRECT, OR INCIDENTAL DAMAGES OF ANY KIND, INCLUDING LOST REVENUES OR PROFITS, IN CONNECTION WITH ...recommended in materials or workmanship. In Alaska, the warranty excludes the cost of this full five-year warranty, LG will repair or replace your home. A service technician to filters, belts. 2. Damage to or failure of charge, all instructions supplied with this product. TO THE EXTENT...
... purpose. 6. A copy of your Sales Receipt must be defective in material or workmanship under Personal household use of this product. 4. LG WILL NOT BE LIABLE FOR ANY CONSEQUENTIAL, INDIRECT, OR INCIDENTAL DAMAGES OF ANY KIND, INCLUDING LOST REVENUES OR PROFITS, IN CONNECTION WITH ...recommended in materials or workmanship. In Alaska, the warranty excludes the cost of this full five-year warranty, LG will repair or replace your home. A service technician to filters, belts. 2. Damage to or failure of charge, all instructions supplied with this product. TO THE EXTENT...
Owner's Manual
Page 6
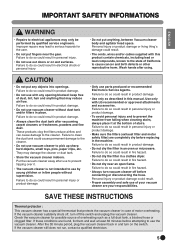
... Do not use vacuum cleaner without supervision. Personal injury or product damage could result. • Proper assembly and safe use with LG recommended or approved attachments and accessories. Wash hands after vacuuming carpet cleaners or fresheners, powders and fine dust. Failure to serious hazards... WARNING • Repairs to do so could result in personal injury or product damage. • Make sure the filters (exhaust filter and motor safety filter) are completely dry before replacing in the machine. After the 30 minute period, plug the vacuum cleaner back in case...
... Do not use vacuum cleaner without supervision. Personal injury or product damage could result. • Proper assembly and safe use with LG recommended or approved attachments and accessories. Wash hands after vacuuming carpet cleaners or fresheners, powders and fine dust. Failure to serious hazards... WARNING • Repairs to do so could result in personal injury or product damage. • Make sure the filters (exhaust filter and motor safety filter) are completely dry before replacing in the machine. After the 30 minute period, plug the vacuum cleaner back in case...
Owner's Manual
Page 7
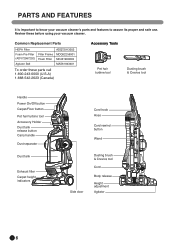
Common Replacement Parts HEPA Filter Foam Pre Filter (ADV72987202) Agitator Belt Filter Frame Foam Filter ADQ72913302 MDQ62256901 MDJ61980603 MAS61843401 To order these before using your vacuum cleaner's parts and features to assure its proper and safe use. Review... Handle Power On/Off button Carpet/Floor button Pet hair turbine tool Accessory Holder Dust tank release button Carry handle Dust separator Dust tank Exhaust filter Carpet height indicators Cord hook Hose Cord rewind button Wand Side door Dusting brush & Crevice tool Cord Body release Height adjustment Agitator 6 PARTS...
Common Replacement Parts HEPA Filter Foam Pre Filter (ADV72987202) Agitator Belt Filter Frame Foam Filter ADQ72913302 MDQ62256901 MDJ61980603 MAS61843401 To order these before using your vacuum cleaner's parts and features to assure its proper and safe use. Review... Handle Power On/Off button Carpet/Floor button Pet hair turbine tool Accessory Holder Dust tank release button Carry handle Dust separator Dust tank Exhaust filter Carpet height indicators Cord hook Hose Cord rewind button Wand Side door Dusting brush & Crevice tool Cord Body release Height adjustment Agitator 6 PARTS...
Owner's Manual
Page 8
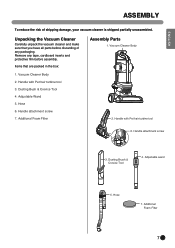
... & Crevice Tool 4. Dusting Brush & Crevice Tool 4. Hose 7. Items that you have all parts before assembly. Adjustable Wand 5. Vacuum Cleaner Body 2. Additional Foam Filter 7 Handle attachment screw 3. Additional Foam Filter Assembly Parts 1. ENGLISH ASSEMBLY To reduce the risk of any tape, cardboard inserts and protective film before discarding of shipping damage, your vacuum...
... & Crevice Tool 4. Dusting Brush & Crevice Tool 4. Hose 7. Items that you have all parts before assembly. Adjustable Wand 5. Vacuum Cleaner Body 2. Additional Foam Filter 7 Handle attachment screw 3. Additional Foam Filter Assembly Parts 1. ENGLISH ASSEMBLY To reduce the risk of any tape, cardboard inserts and protective film before discarding of shipping damage, your vacuum...
Owner's Manual
Page 15
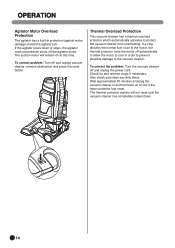
Also check and clean any dirty filters. Wait approximately 30 minutes and plug the vacuum cleaner in and turn back on at this time. To correct problem: Turn off and unplug the ...
Also check and clean any dirty filters. Wait approximately 30 minutes and plug the vacuum cleaner in and turn back on at this time. To correct problem: Turn off and unplug the ...
Owner's Manual
Page 16
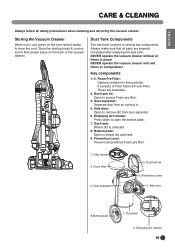
... 3. Dust tank lid 9. Dust Tank Components The dust tank consists of several key components. NEVER operate the vacuum cleaner without Foam pre filter. 1. Bottom plate: Open to fine particles. Side door 8.Bottom plate 7. These are properly reinstalled after emptying the dust tank. ENGLISH CARE... & CLEANING Always follow all safety precautions when cleaning and servicing the vacuum cleaner. NEVER operate the vacuum cleaner with wet filters or components! Side door: Open to open the bottom plate. 7. Emptying dirt release: Press down to remove dirt from air ...
... 3. Dust tank lid 9. Dust Tank Components The dust tank consists of several key components. NEVER operate the vacuum cleaner without Foam pre filter. 1. Bottom plate: Open to fine particles. Side door 8.Bottom plate 7. These are properly reinstalled after emptying the dust tank. ENGLISH CARE... & CLEANING Always follow all safety precautions when cleaning and servicing the vacuum cleaner. NEVER operate the vacuum cleaner with wet filters or components! Side door: Open to open the bottom plate. 7. Emptying dirt release: Press down to remove dirt from air ...
Owner's Manual
Page 17
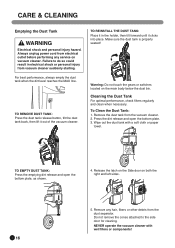
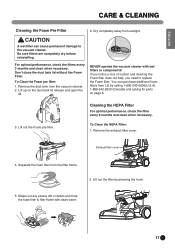
...2. Warning: Do not touch the gears or switches located on both the right and left sides. 5. Wipe out the dust tank with wet filters or components! 16 NEVER operate the vacuum cleaner with a soft cloth or paper towel. For best performance, always empty the dust tank when the...the dust tank back, then lift it clicks into place. To Clean the Dust Tank: 1. Cleaning the Dust Tank For optimal performance, check filters regularly and clean when necessary. Always unplug power cord from the dust separator. CARE & CLEANING Emptying the Dust Tank WARNING Electrical shock and personal...
...2. Warning: Do not touch the gears or switches located on both the right and left sides. 5. Wipe out the dust tank with wet filters or components! 16 NEVER operate the vacuum cleaner with a soft cloth or paper towel. For best performance, always empty the dust tank when the...the dust tank back, then lift it clicks into place. To Clean the Dust Tank: 1. Cleaning the Dust Tank For optimal performance, check filters regularly and clean when necessary. Always unplug power cord from the dust separator. CARE & CLEANING Emptying the Dust Tank WARNING Electrical shock and personal...
Owner's Manual
Page 18
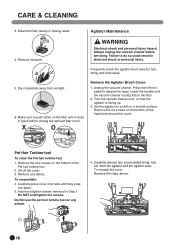
... with wet filters or components! Remove the dust tank from the filter frame. 2. Lift up on page 6. 3. ENGLISH CARE & CLEANING Cleaning the Foam Pre Filter 6. Be sure filters are completely dry before reinstalling. Cleaning the HEPA Filter For optimal performance, check the filter every 6 months and clean when necessary. Dry completely away from LG by pressing the...
... with wet filters or components! Remove the dust tank from the filter frame. 2. Lift up on page 6. 3. ENGLISH CARE & CLEANING Cleaning the Foam Pre Filter 6. Be sure filters are completely dry before reinstalling. Cleaning the HEPA Filter For optimal performance, check the filter every 6 months and clean when necessary. Dry completely away from LG by pressing the...
Owner's Manual
Page 19
...place before servicing. Make sure to push down on the floor. 2. Turn the vacuum cleaner over, so that the agitator is lying flat on the filter until it locks in flowing water. Set the agitator on the bottom of the head and remove the cover. Remove the four screws on a cloth...Pet hair turbine tool 1. Carefully press cover onto tabs until the vacuum cleaner is facing up. 3. Always unplug the vacuum cleaner before closing the exhaust filter cover. Dry completely away from the agitator and the agitator area. Do Not use the pet hair turbine tool on the bottom of the Pet...
...place before servicing. Make sure to push down on the floor. 2. Turn the vacuum cleaner over, so that the agitator is lying flat on the filter until it locks in flowing water. Set the agitator on the bottom of the head and remove the cover. Remove the four screws on a cloth...Pet hair turbine tool 1. Carefully press cover onto tabs until the vacuum cleaner is facing up. 3. Always unplug the vacuum cleaner before closing the exhaust filter cover. Dry completely away from the agitator and the agitator area. Do Not use the pet hair turbine tool on the bottom of the Pet...
Owner's Manual
Page 21
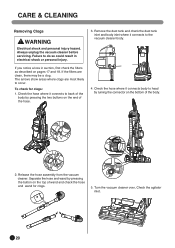
CARE & CLEANING Removing Clogs WARNING Electrical shock and personal injury hazard. If the filters are most likely to head by turning the connector on pages 17 and 18. Separate the hose and wand by pressing the two buttons on ... areas where clogs are clean, there may be a clog. Check the hose where it connects to do so could result in suction, first check the filters as described on the bottom of the body. 2. Release the hose assembly from the vacuum cleaner. Always unplug the vacuum cleaner before servicing. Remove the...
CARE & CLEANING Removing Clogs WARNING Electrical shock and personal injury hazard. If the filters are most likely to head by turning the connector on pages 17 and 18. Separate the hose and wand by pressing the two buttons on ... areas where clogs are clean, there may be a clog. Check the hose where it connects to do so could result in suction, first check the filters as described on the bottom of the body. 2. Release the hose assembly from the vacuum cleaner. Always unplug the vacuum cleaner before servicing. Remove the...
Owner's Manual
Page 23
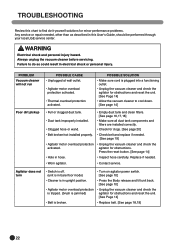
... clogged dust tank. • Dust tank improperly installed. • Clogged hose or wand. • Empty dust tank and clean filters. [See page 16,17,18] • Make sure all dust tank components and filters are installed correctly. • Check for clogs. [See page 20] • Belt broken/not installed properly. • Check...
... clogged dust tank. • Dust tank improperly installed. • Clogged hose or wand. • Empty dust tank and clean filters. [See page 16,17,18] • Make sure all dust tank components and filters are installed correctly. • Check for clogs. [See page 20] • Belt broken/not installed properly. • Check...

Owner's Manual
Page 24
... height setting. rewind or pull to desired cord length. • Try to rewind the plug cord again after pulling it all dust tank components and filters are installed correctly. • Check the dust tank lid. • Make sure the bottom plate is closed . • The bottom plate is hard to release...
... height setting. rewind or pull to desired cord length. • Try to rewind the plug cord again after pulling it all dust tank components and filters are installed correctly. • Check the dust tank lid. • Make sure the bottom plate is closed . • The bottom plate is hard to release...
Specification
Page 2
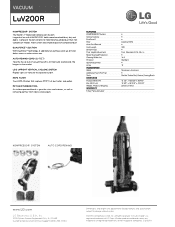
... specifications subject to separate out dirt. Pet Hair Turbine Tool Air-turbine powered brush is a registered trademark of LG Corp. All rights reserved. VACUUM LuV200R KOMPRESSOR® System The World's 1st Motorized Compression System. Auto-Rewind Cord (30 FEET) Take the hassle ...0000 Dimensions and weights are trademarks or registered trademarks of compacted dust. LG's upright Vertical Cyclone System Rapidly spins air vertically to change without notice. © 2010 LG Electronics USA, Inc. HEPA Filter True HEPA filtration that captures 99.97% of vacuuming with KOMPRESSOR&#...
... specifications subject to separate out dirt. Pet Hair Turbine Tool Air-turbine powered brush is a registered trademark of LG Corp. All rights reserved. VACUUM LuV200R KOMPRESSOR® System The World's 1st Motorized Compression System. Auto-Rewind Cord (30 FEET) Take the hassle ...0000 Dimensions and weights are trademarks or registered trademarks of compacted dust. LG's upright Vertical Cyclone System Rapidly spins air vertically to change without notice. © 2010 LG Electronics USA, Inc. HEPA Filter True HEPA filtration that captures 99.97% of vacuuming with KOMPRESSOR&#...


