Owner's Manual
Page 1
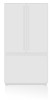
Model Name **=color number, número de color, numéro de couleur LTN19415** LTN19315** LTN19312** LTC22350** P/No. OWNER´S MANUAL TOP FREEZER REFRIGERATOR Please read this manual carefully before operating your set and retain it for future reference. MFL62423824 www.lge.com ENGLISH ESPAÑOL FRANÇAIS
Model Name **=color number, número de color, numéro de couleur LTN19415** LTN19315** LTN19312** LTC22350** P/No. OWNER´S MANUAL TOP FREEZER REFRIGERATOR Please read this manual carefully before operating your set and retain it for future reference. MFL62423824 www.lge.com ENGLISH ESPAÑOL FRANÇAIS
Owner's Manual
Page 3
LG Refrigerator / Freezer Warranty Period Product Parts Labor Refrigerator / Freezer 1 year 1 year [In-Home Service (Except Model GR-051)] Sealed System 7 years 1 year [In-Home Service (Except Model GR-051)] (Compressor, Condenser, Evaporator) No other than normal, single-family household use... of unauthorized repairs. 2. This warranty gives you specific legal rights and you . Repairs when your product type (Refrigerator), model number, serial number, and ZIP/Postal 3 To obtain Product or Customer Service Assistance: To obtain the nearest Authorized Service ...
LG Refrigerator / Freezer Warranty Period Product Parts Labor Refrigerator / Freezer 1 year 1 year [In-Home Service (Except Model GR-051)] Sealed System 7 years 1 year [In-Home Service (Except Model GR-051)] (Compressor, Condenser, Evaporator) No other than normal, single-family household use... of unauthorized repairs. 2. This warranty gives you specific legal rights and you . Repairs when your product type (Refrigerator), model number, serial number, and ZIP/Postal 3 To obtain Product or Customer Service Assistance: To obtain the nearest Authorized Service ...

Owner's Manual
Page 5
...modification or alteration, or use of manufacture). Replacement products and parts may be verified, the warranty will at http://www.lg.ca Write your product, unless such damage results from the date of accessories, components, or cleaning products that were ...contrary to the finish of your warranty information below Product Registration Information Model Serial Number: Date of delivery. 10. Model and Serial numbers, along with the above excluded circumstances shall be readily determined. LG Authorized Service Center warranties their repair work for warranty validation. 12...
...modification or alteration, or use of manufacture). Replacement products and parts may be verified, the warranty will at http://www.lg.ca Write your product, unless such damage results from the date of accessories, components, or cleaning products that were ...contrary to the finish of your warranty information below Product Registration Information Model Serial Number: Date of delivery. 10. Model and Serial numbers, along with the above excluded circumstances shall be readily determined. LG Authorized Service Center warranties their repair work for warranty validation. 12...
Owner's Manual
Page 9
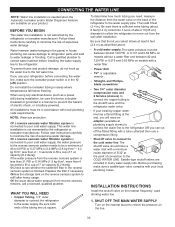
...any type of installation, cleaning, or removing a light bulb, turn the control (Thermostat, Refrigerator Control or Freezer Control, depending on the model) to use . CFCs are believed to the collection center of your old refrigerator, please follow the instructions at 15 or 20 amperes.... if they have been given supervision or instruction concerning the use of an extension cord. Do not use of the appliance by LG Electronics, to help prevent accidents. Child entrapment and suffocation are still dangerous... This appliance contains fluid (refrigerant, lubricant), and is...
...any type of installation, cleaning, or removing a light bulb, turn the control (Thermostat, Refrigerator Control or Freezer Control, depending on the model) to use . CFCs are believed to the collection center of your old refrigerator, please follow the instructions at 15 or 20 amperes.... if they have been given supervision or instruction concerning the use of an extension cord. Do not use of the appliance by LG Electronics, to help prevent accidents. Child entrapment and suffocation are still dangerous... This appliance contains fluid (refrigerant, lubricant), and is...
Owner's Manual
Page 10
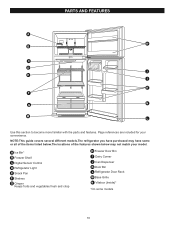
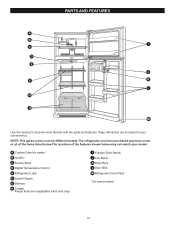
... or all of the items listed below.The locations of the features shown below may not match your convenience. Page references are included for your model. A Ice Bin* B Freezer Shelf C Digital Sensor Control D Refrigerator Light E Snack Pan F Shelves G Crisper Keeps fruits and vegetables fresh and crisp H Freezer Door Bin I K F N G M L Use this...
... or all of the items listed below.The locations of the features shown below may not match your convenience. Page references are included for your model. A Ice Bin* B Freezer Shelf C Digital Sensor Control D Refrigerator Light E Snack Pan F Shelves G Crisper Keeps fruits and vegetables fresh and crisp H Freezer Door Bin I K F N G M L Use this...
Owner's Manual
Page 11
Page references are included for your model. PARTS AND FEATURES A H B C D J E I Dairy Corner J Can Dispenser K Door Bin L Refrigerator Door Rack M Base Grille N Vitabox (Inside)* *On some or all of the items listed below.... vegetables fresh and crisp H Freezer Door Bin I K F G N M L Use this section to become more familiar with the parts and features. NOTE:This guide covers several different models.The refrigerator you have some...
Page references are included for your model. PARTS AND FEATURES A H B C D J E I Dairy Corner J Can Dispenser K Door Bin L Refrigerator Door Rack M Base Grille N Vitabox (Inside)* *On some or all of the items listed below.... vegetables fresh and crisp H Freezer Door Bin I K F G N M L Use this section to become more familiar with the parts and features. NOTE:This guide covers several different models.The refrigerator you have some...
Owner's Manual
Page 12
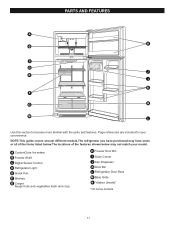
NOTE:This guide covers several different models.The refrigerator you have purchased may not match your convenience. A CustomCube Ice maker * B Ice Bin * C Freeze Shelf D Digital Temperature Control E Refrigerator Light F Snack Drawer G Shelves H ... Bins L Door Bins M Refrigerator Door Rack N *On some or all of the items listed below.The locations of the features shown below may have some models 12 Page references are included for your...
NOTE:This guide covers several different models.The refrigerator you have purchased may not match your convenience. A CustomCube Ice maker * B Ice Bin * C Freeze Shelf D Digital Temperature Control E Refrigerator Light F Snack Drawer G Shelves H ... Bins L Door Bins M Refrigerator Door Rack N *On some or all of the items listed below.The locations of the features shown below may have some models 12 Page references are included for your...
Owner's Manual
Page 13
... or humidity. Not following these instructions may cause death, explosion or fire. Remove the shelves and replace them according to ensure that feature warnings, the model serial number or the technical label of the product located on for use sharp instruments, rubbing alcohol, flammable liquids or abrasive cleaning products to lower...
... or humidity. Not following these instructions may cause death, explosion or fire. Remove the shelves and replace them according to ensure that feature warnings, the model serial number or the technical label of the product located on for use sharp instruments, rubbing alcohol, flammable liquids or abrasive cleaning products to lower...
Owner's Manual
Page 18
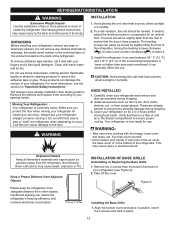
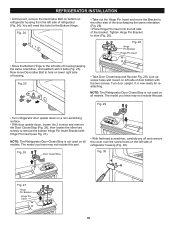
... Hinge Pin Insert 18 Fig. 25 • Take Door Closer/stop and flip (see Fig. 27). Line up screw holes and mount on all models. The model you have may not include this part. • With flat-head screwdriver, carefully pry off and remove the cover over the screw holes on a ...the other side of the door,keeping the same orientation (Fig. 28). • Place Hinge Pin Insert into the left side of the bracket. The model you have may not include this part. REFRIGERATOR INSTALLATION • At this point, remove the Decorative Bolt on bottom on lower right side of housing...
... Hinge Pin Insert 18 Fig. 25 • Take Door Closer/stop and flip (see Fig. 27). Line up screw holes and mount on all models. The model you have may not include this part. • With flat-head screwdriver, carefully pry off and remove the cover over the screw holes on a ...the other side of the door,keeping the same orientation (Fig. 28). • Place Hinge Pin Insert into the left side of the bracket. The model you have may not include this part. REFRIGERATOR INSTALLATION • At this point, remove the Decorative Bolt on bottom on lower right side of housing...

Owner's Manual
Page 24
... up and place the shelf hooks into the slots. Then lower the front of your individual storage needs. Slide Out Shelves (in some models) You can slide some models) Icemaking If the tray is open, saving energy. Pull the shelf toward you until it past the stop. 3. ICE TRAY (in some glass...
... up and place the shelf hooks into the slots. Then lower the front of your individual storage needs. Slide Out Shelves (in some models) You can slide some models) Icemaking If the tray is open, saving energy. Pull the shelf toward you until it past the stop. 3. ICE TRAY (in some glass...

Owner's Manual
Page 25
Remove the crisper by sliding it forward slightly. While holding the snack corner with one hand, pull it back in some models) While holding the crisper cover support, pull the cover up and out. USING YOUR REFRIGERATOR SNACK CORNER (in fully past the Drawer stop . 2. Pull glass ...
Remove the crisper by sliding it forward slightly. While holding the snack corner with one hand, pull it back in some models) While holding the crisper cover support, pull the cover up and out. USING YOUR REFRIGERATOR SNACK CORNER (in fully past the Drawer stop . 2. Pull glass ...
Owner's Manual
Page 26
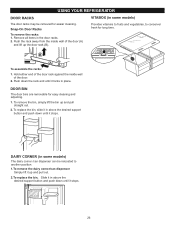
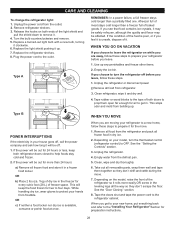
Push down the rack end until it stops. 26 DAIRY CORNER (in some models) Provides vitamins to fruits and vegetables, to another position. 1.To remove the dairy corner/can dispenser Simply lift it up and pull out. 2.To replace .... 2. DOOR BIN The door bins are removable for long time. To remove the bin, simply lift the bin up the door rack (B). VITABOX (in some models) The dairy corner /can dispenser can be removed for easier cleaning. Push the rack away from the inside wall of the door (A) and lift up...
Push down the rack end until it stops. 26 DAIRY CORNER (in some models) Provides vitamins to fruits and vegetables, to another position. 1.To remove the dairy corner/can dispenser Simply lift it up and pull out. 2.To replace .... 2. DOOR BIN The door bins are removable for long time. To remove the bin, simply lift the bin up the door rack (B). VITABOX (in some models) The dairy corner /can dispenser can be removed for easier cleaning. Push the rack away from the inside wall of the door (A) and lift up...
Owner's Manual
Page 28
... safely refrozen, although the quality and flavor may be out for 24 hours or less, keep the food frozen for the move . 7. Depending on the model, raise the front of dry ice in the leveling legs all food from refrigerator. 3. Tape the doors shut and tape the power cord to the... (refrigerator control) to the tops of baked goods. Tape rubber or wood blocks to OFF. If the power will keep both doors to protect your model, turn the refrigerator off , call the power company and ask how long it clockwise. 6. While handling dry ice, wear gloves to prop them together so...
... safely refrozen, although the quality and flavor may be out for 24 hours or less, keep the food frozen for the move . 7. Depending on the model, raise the front of dry ice in the leveling legs all food from refrigerator. 3. Tape the doors shut and tape the power cord to the... (refrigerator control) to the tops of baked goods. Tape rubber or wood blocks to OFF. If the power will keep both doors to protect your model, turn the refrigerator off , call the power company and ask how long it clockwise. 6. While handling dry ice, wear gloves to prop them together so...
Owner's Manual
Page 29
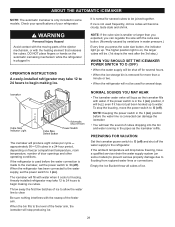
... be shut off ). The higher position light is on, the larger cubes will produce eight cubes per cycle approximately 90 120 cubes in some models) to prevent serious property damage due to water. Be sure nothing interferes with water when it has not yet been hooked up . ABOUT THE...the icemaker. When the ice storage bin is connected can regulate the size with water. NOTE: Keeping the power switch in the I (on some models. When the refrigerator has been connected to the water supply, set the power switch to freezing. When the bin fills to the refrigerator. PREPARING ...
... be shut off ). The higher position light is on, the larger cubes will produce eight cubes per cycle approximately 90 120 cubes in some models) to prevent serious property damage due to water. Be sure nothing interferes with water when it has not yet been hooked up . ABOUT THE...the icemaker. When the ice storage bin is connected can regulate the size with water. NOTE: Keeping the power switch in the I (on some models. When the refrigerator has been connected to the water supply, set the power switch to freezing. When the bin fills to the refrigerator. PREPARING ...
Owner's Manual
Page 30
... 3 turns of about water pressure from the reverse osmosis system is needed when the Automatic Icemaker and/or Water Dispenser features are available on models with local plumbing code requirements. If the water pressure from reverse osmosis remains, call a licensed, qualified plumber. A cold water supply .The... water pressure must be between 20 and 120 PSI or 0.137 and 0.82 MPa on models without a water filter and between 40 and 120 PSI or 0.275 and 0.82 MPa on your local plumbing codes. and Phillipsblade screwdriver Two 1/4" ...
... 3 turns of about water pressure from the reverse osmosis system is needed when the Automatic Icemaker and/or Water Dispenser features are available on models with local plumbing code requirements. If the water pressure from reverse osmosis remains, call a licensed, qualified plumber. A cold water supply .The... water pressure must be between 20 and 120 PSI or 0.137 and 0.82 MPa on models without a water filter and between 40 and 120 PSI or 0.275 and 0.82 MPa on your local plumbing codes. and Phillipsblade screwdriver Two 1/4" ...
Owner's Manual
Page 33
... or items stored on and off by the condenser fan. The defrost timer will remain off . The thermostat control (or refrigerator control, depending on the model) will also click when cycling on top of the new sounds are normal. Rattling noises may hear air being forced over the condenser by the...
... or items stored on and off by the condenser fan. The defrost timer will remain off . The thermostat control (or refrigerator control, depending on the model) will also click when cycling on top of the new sounds are normal. Rattling noises may hear air being forced over the condenser by the...
Owner's Manual
Page 34
... not properly replaced. The door is not level. See the Using Your Refrigerator section Clean gaskets and the surface that was replaced was an older model. Rub a thin coat of food warms the refrigerator. The refrigerator that they will not shut all the way in frost. 34 Then... It is opened...
... not properly replaced. The door is not level. See the Using Your Refrigerator section Clean gaskets and the surface that was replaced was an older model. Rub a thin coat of food warms the refrigerator. The refrigerator that they will not shut all the way in frost. 34 Then... It is opened...

Owner's Manual
Page 1
Model Name **=color number, número de color, numéro de couleur LTN19415** LTN19315** LTN19312** LTC22350** P/No. MFL62423824 www.lge.com ENGLISH ESPAÑOL FRANÇAIS OWNER´S MANUAL TOP FREEZER REFRIGERATOR Please read this manual carefully before operating your set and retain it for future reference.
Model Name **=color number, número de color, numéro de couleur LTN19415** LTN19315** LTN19312** LTC22350** P/No. MFL62423824 www.lge.com ENGLISH ESPAÑOL FRANÇAIS OWNER´S MANUAL TOP FREEZER REFRIGERATOR Please read this manual carefully before operating your set and retain it for future reference.


