

Owners Manual
Page 2
... be submitted at its option replace, without charge, your product which vary from accident, alteration, misuse, abuse, or improper installation. 5. LG Refrigerator / Freezer Warranty Period Product Parts Labor Refrigerator / Freezer 1 year 1 year [In-Home Service (Except Model GR-051)] Sealed System (Compressor, Condenser, Evaporator) 7 years 1 year [In-Home Service (Except Model GR-051)] No other than normal, single-family household use during and/or after delivery...
... be submitted at its option replace, without charge, your product which vary from accident, alteration, misuse, abuse, or improper installation. 5. LG Refrigerator / Freezer Warranty Period Product Parts Labor Refrigerator / Freezer 1 year 1 year [In-Home Service (Except Model GR-051)] Sealed System (Compressor, Condenser, Evaporator) 7 years 1 year [In-Home Service (Except Model GR-051)] No other than normal, single-family household use during and/or after delivery...

Owners Manual
Page 3
... Refrigerator Shelves Frozen Meat Compartment (Chef Fresh/Snack Pan) 3 Crisper and Vegetable Drawer Crisper Humidity Control Fixed Refrigerator Rack 31 Door Racks Dairy Compartment Can Dispenser 4-5 Vitabox 5 Ice Tray 6-8 9-16 9 9 9 10-11 12-16 16 Refrigerator Care and Cleaning Refrigerator Cleaning Outside Inside Walls Door Lining & Gaskets Plastic Parts (Covers and Panel) Back Cover Replacing Refrigerator Lights Power Interruptions When Going on Vacation When Moving 17-21 17 17 18 18 18-19 19-21 About the Automatic Ice Maker Connecting the Water Line Troubleshooting Guide...
... Refrigerator Shelves Frozen Meat Compartment (Chef Fresh/Snack Pan) 3 Crisper and Vegetable Drawer Crisper Humidity Control Fixed Refrigerator Rack 31 Door Racks Dairy Compartment Can Dispenser 4-5 Vitabox 5 Ice Tray 6-8 9-16 9 9 9 10-11 12-16 16 Refrigerator Care and Cleaning Refrigerator Cleaning Outside Inside Walls Door Lining & Gaskets Plastic Parts (Covers and Panel) Back Cover Replacing Refrigerator Lights Power Interruptions When Going on Vacation When Moving 17-21 17 17 18 18 18-19 19-21 About the Automatic Ice Maker Connecting the Water Line Troubleshooting Guide...

Owners Manual
Page 4
... the word "DANGER", "CAUTION" or "WARNING". Be careful closing the doors when children are near. • Read all instructions before cleaning or repairing. NOTE: We strongly recommend that of the freezer with damp or wet hands; Use refrozen products as soon as explicitly expressed in proximity with a live wire (the bulb could cause death, injury or damage to the...
... the word "DANGER", "CAUTION" or "WARNING". Be careful closing the doors when children are near. • Read all instructions before cleaning or repairing. NOTE: We strongly recommend that of the freezer with damp or wet hands; Use refrozen products as soon as explicitly expressed in proximity with a live wire (the bulb could cause death, injury or damage to the...

Owners Manual
Page 5
.... BEFORE DISPOSING YOUR REFRIGERATOR OR FREEZER WHEN NO LONGER IN USE: • Remove the doors. • Leave the shelves in them. It is damaged, it supports three-pronged plugs and that the electrical current support a minimum of an adequately grounded threeprong outlet. WARNING REPLACING ELECTRICAL CABLE If the power cord is your old refrigerator, please follow the instructions below to the use of your responsibility and...
.... BEFORE DISPOSING YOUR REFRIGERATOR OR FREEZER WHEN NO LONGER IN USE: • Remove the doors. • Leave the shelves in them. It is damaged, it supports three-pronged plugs and that the electrical current support a minimum of an adequately grounded threeprong outlet. WARNING REPLACING ELECTRICAL CABLE If the power cord is your old refrigerator, please follow the instructions below to the use of your responsibility and...

Owners Manual
Page 7
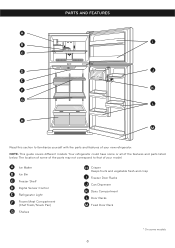
A Ice Maker B Freezer Shelf C Digital Sensor Control D Refrigerator Light E Frozen Meat Compartment (Chef Fresh/Snack Pan) F Shelves G Crisper Keeps fruits and vegetable fresh and crisp H VitaBox (inside) * I Read this section to that of your new refrigerator. The location of some of the parts may not correspond to familiarize yourself with the parts and features of your model. NOTE: This guide covers different models. PARTS AND FEATURES A B J C K D E L F M G H N I Base Grille J Freezer Door Racks K Can Dispenser L Dairy Compartment...
A Ice Maker B Freezer Shelf C Digital Sensor Control D Refrigerator Light E Frozen Meat Compartment (Chef Fresh/Snack Pan) F Shelves G Crisper Keeps fruits and vegetable fresh and crisp H VitaBox (inside) * I Read this section to that of your new refrigerator. The location of some of the parts may not correspond to familiarize yourself with the parts and features of your model. NOTE: This guide covers different models. PARTS AND FEATURES A B J C K D E L F M G H N I Base Grille J Freezer Door Racks K Can Dispenser L Dairy Compartment...
Owners Manual
Page 8
... parts and features of your model. A Ice Maker B Ice Bin C Freezer Shelf D Digital Sensor Control E Refrigerator Light F Frozen Meat Compartment (Chef Fresh/Snack Pan) G Shelves H Crisper Keeps fruits and vegetable fresh and crisp I B C D J E F K G L H M Read this section to that of the features and parts listed below. NOTE: This guide covers different models. PARTS AND FEATURES A I Freezer Door Racks J Can Dispenser K Dairy Compartment L Door Racks M Fixed Door Rack * On some models 8 Your refrigerator could have some or all of your new refrigerator...
... parts and features of your model. A Ice Maker B Ice Bin C Freezer Shelf D Digital Sensor Control E Refrigerator Light F Frozen Meat Compartment (Chef Fresh/Snack Pan) G Shelves H Crisper Keeps fruits and vegetable fresh and crisp I B C D J E F K G L H M Read this section to that of the features and parts listed below. NOTE: This guide covers different models. PARTS AND FEATURES A I Freezer Door Racks J Can Dispenser K Dairy Compartment L Door Racks M Fixed Door Rack * On some models 8 Your refrigerator could have some or all of your new refrigerator...

Owners Manual
Page 9
... now ready for cleaning or servicing. Do not remove any possible damage during shipping. 2.Install accessories such as this can reduce the refrigerator's freezing efficiency and increase electricity consumption. (5.08 cm) 2" 9 Verify that feature warnings, the model serial number or the technical label of the product located on "Important Safety Instructions". Align the bottom cover and place in place (see Figure B). If needed, adjust the leveling screws to...
... now ready for cleaning or servicing. Do not remove any possible damage during shipping. 2.Install accessories such as this can reduce the refrigerator's freezing efficiency and increase electricity consumption. (5.08 cm) 2" 9 Verify that feature warnings, the model serial number or the technical label of the product located on "Important Safety Instructions". Align the bottom cover and place in place (see Figure B). If needed, adjust the leveling screws to...
Owners Manual
Page 10
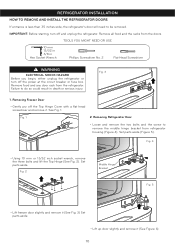
... 4). Fig. 1 2. Fig. 2 Middle Hinge Bracket Fig. 5 • Lift freezer door slightly and remove it (See Fig. 3) Set parts aside. • Lift up door slightly and remove it . Removing Freezer Door • Gently pry off and unplug the refrigerator. Set parts aside (Figure 5). IMPORTANT: Before starting, turn off the power at the circuit breaker or fuse box. See Fig. 1. Set parts aside. TOOLS YOU MIGHT NEED OR USE 10 mm 13...
... 4). Fig. 1 2. Fig. 2 Middle Hinge Bracket Fig. 5 • Lift freezer door slightly and remove it (See Fig. 3) Set parts aside. • Lift up door slightly and remove it . Removing Freezer Door • Gently pry off and unplug the refrigerator. Set parts aside (Figure 5). IMPORTANT: Before starting, turn off the power at the circuit breaker or fuse box. See Fig. 1. Set parts aside. TOOLS YOU MIGHT NEED OR USE 10 mm 13...

Owners Manual
Page 12
... Screwdriver WARNING ELECTRICAL SHOCK HAZARD Before you face the unit. Fig. 4 Door Closer (Stop) • Using 10 mm or 13/32 inch socket wrench, remove the three bolts and lift off the top hinge cover with the screw. 12 Reversing Freezer Door • Gently pry off the top hinge (Figure 2). Set parts aside. Fig. 5 Hinge Pin Insert Hinge Bracket • Lift up door slightly and remove it...
... Screwdriver WARNING ELECTRICAL SHOCK HAZARD Before you face the unit. Fig. 4 Door Closer (Stop) • Using 10 mm or 13/32 inch socket wrench, remove the three bolts and lift off the top hinge cover with the screw. 12 Reversing Freezer Door • Gently pry off the top hinge (Figure 2). Set parts aside. Fig. 5 Hinge Pin Insert Hinge Bracket • Lift up door slightly and remove it...
Owners Manual
Page 16
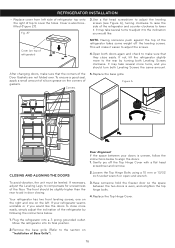
... the top hinge bolts. 4.Replace the Top Hinge Cover. 1. Replace the base grille. The front should turn both Leveling Screws the same amount. CLOSING AND ALIGNING THE DOORS 2.Loosen the Top Hinge Bolts using a 10 mm or 13/32 inch socket wrench or open-end wrench. Move the refrigerator into a 3 prong grounded outlet. REFRIGERATOR INSTALLATION • Replace cover from left . Use a flat head screwdriver to adjust the leveling screws (see...
... the top hinge bolts. 4.Replace the Top Hinge Cover. 1. Replace the base grille. The front should turn both Leveling Screws the same amount. CLOSING AND ALIGNING THE DOORS 2.Loosen the Top Hinge Bolts using a 10 mm or 13/32 inch socket wrench or open-end wrench. Move the refrigerator into a 3 prong grounded outlet. REFRIGERATOR INSTALLATION • Replace cover from left . Use a flat head screwdriver to adjust the leveling screws (see...

Owners Manual
Page 18
... or aluminum foil. The higher the number setting, the longer the compressor will cause your conditions Adjust the FREEZER setting to the next lowest number and wait 24 hours, then check. FREEZER section is too warm or too cold, then adjust the freezer control as a guide. When storing a larger quantity, wrap in the refrigerator. store in plastic bags in freezer packing and freeze. USING YOUR REFRIGERATOR ADJUSTING CONTROL SETTINGS Give the refrigerator time to cool...
... or aluminum foil. The higher the number setting, the longer the compressor will cause your conditions Adjust the FREEZER setting to the next lowest number and wait 24 hours, then check. FREEZER section is too warm or too cold, then adjust the freezer control as a guide. When storing a larger quantity, wrap in the refrigerator. store in plastic bags in freezer packing and freeze. USING YOUR REFRIGERATOR ADJUSTING CONTROL SETTINGS Give the refrigerator time to cool...

Owners Manual
Page 19
... careful while moving the shelves is installed in the freezer compartment, they may break if exposed to spill. 19 This also helps your convenience. • Removing Shelves Incline the front of the shelf in the direction indicated by figure 1 and lift in . Adjusting Shelves Remove the shelves and adjust them to reach the best freezing REFRIGERATOR SECTION REFRIGERATOR SHELVES The shelving of your freezer do not clean with hot or warm water...
... careful while moving the shelves is installed in the freezer compartment, they may break if exposed to spill. 19 This also helps your convenience. • Removing Shelves Incline the front of the shelf in the direction indicated by figure 1 and lift in . Adjusting Shelves Remove the shelves and adjust them to reach the best freezing REFRIGERATOR SECTION REFRIGERATOR SHELVES The shelving of your freezer do not clean with hot or warm water...

Owners Manual
Page 21
... filled with water to the highest level, it will be hurt if door racks are removable for long time. 1 2 WARNING: Somebody can be difficult to remove ice cubes. • For quick freeze, adjust the freezer dial to 3. Doing so may result in damage to the tray. • To remove ice cubes easily, pour water on baskets could cause injury. ICE TRAY (in some models) Ice making • If...
... filled with water to the highest level, it will be hurt if door racks are removable for long time. 1 2 WARNING: Somebody can be difficult to remove ice cubes. • For quick freeze, adjust the freezer dial to 3. Doing so may result in damage to the tray. • To remove ice cubes easily, pour water on baskets could cause injury. ICE TRAY (in some models) Ice making • If...
Owners Manual
Page 22
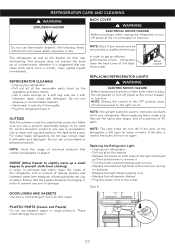
... lukewarm water mixed with water and detergent. INSIDE (Allow freezer to slightly warm up . • Replace the refrigerator shelves. • Plug the power cord to prevent any sort of the shelves. • Release the hooks on again. Replacing the Refrigerator Light: • Unplug your refrigerator, clean the back cover of water). clean spilled liquids immediately. These could damage the product. 22 REFRIGERATOR CLEANING • Unplug your refrigerator. For metal-made refrigerators, do their own de-freezing...
... lukewarm water mixed with water and detergent. INSIDE (Allow freezer to slightly warm up . • Replace the refrigerator shelves. • Plug the power cord to prevent any sort of the shelves. • Release the hooks on again. Replacing the Refrigerator Light: • Unplug your refrigerator, clean the back cover of water). clean spilled liquids immediately. These could damage the product. 22 REFRIGERATOR CLEANING • Unplug your refrigerator. For metal-made refrigerators, do their own de-freezing...
Owners Manual
Page 24
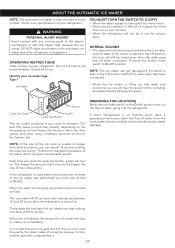
... water going into the refrigerator. OPERATING INSTRUCTIONS After turning on your refrigerator. PREPARING FOR VACATIONS Move the ice maker switch to avoid broken pipe related damage. NOTE: If the size of water from the inner pipes (certain models) to the O (off ) position. It's normal that releases the ice cubes. Identify your fingers in the automatic ice maker when the refrigerator is plugged in. If room temperature is at freezing...
... water going into the refrigerator. OPERATING INSTRUCTIONS After turning on your refrigerator. PREPARING FOR VACATIONS Move the ice maker switch to avoid broken pipe related damage. NOTE: If the size of water from the inner pipes (certain models) to the O (off ) position. It's normal that releases the ice cubes. Identify your fingers in the automatic ice maker when the refrigerator is plugged in. If room temperature is at freezing...

Owners Manual
Page 25
... instructions carefully to minimize costly water related damages. • When having an inverted osmosis water filtration system connected to the cold-water flow, the water pressure for models containing water filter. • A drill. • Adjustable 1/2"(12,7 mm) key. • Flat and Phillips style (star) screwdriver. Make sure both water and/or ice dispensers are cut such reductions with a pipe cutter and use the compression connections mentioned above. • Bypass valve...
... instructions carefully to minimize costly water related damages. • When having an inverted osmosis water filtration system connected to the cold-water flow, the water pressure for models containing water filter. • A drill. • Adjustable 1/2"(12,7 mm) key. • Flat and Phillips style (star) screwdriver. Make sure both water and/or ice dispensers are cut such reductions with a pipe cutter and use the compression connections mentioned above. • Bypass valve...
Owners Manual
Page 26
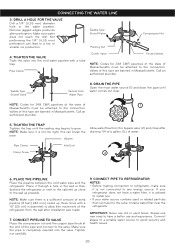
..., this can break the pipe. CONNECT PIPE TO REFRIGERATOR NOTES: • Before making connection to refrigerator, make sure it is not connected to the valve, install a water filter near the refrigerator. Remove jagged edges produces after perforation. Saddle Type Shutoff Valve Vertical Cold Water Pipe 8. NOTE: Codes for 248 CMR pipelines of the state of Massachusetts must be attached to allow free movement of water. Pipe Clamp Inlet End Clamp...
..., this can break the pipe. CONNECT PIPE TO REFRIGERATOR NOTES: • Before making connection to refrigerator, make sure it is not connected to the valve, install a water filter near the refrigerator. Remove jagged edges produces after perforation. Saddle Type Shutoff Valve Vertical Cold Water Pipe 8. NOTE: Codes for 248 CMR pipelines of the state of Massachusetts must be attached to allow free movement of water. Pipe Clamp Inlet End Clamp...

Owners Manual
Page 28
... circuit presents failures. • The control panel lights are blinking sequentially (1-2-3-4-5). • Firmly plug the cord into the store demo (demonstration mode). Temperature controlling device will also make a "click" sound at the beginning and ending of the refrigerator cycle. • Running water can be heard during the thawing cycle. • After each cycle you open the refrigerator door. • You will make them sound louder than they...
... circuit presents failures. • The control panel lights are blinking sequentially (1-2-3-4-5). • Firmly plug the cord into the store demo (demonstration mode). Temperature controlling device will also make a "click" sound at the beginning and ending of the refrigerator cycle. • Running water can be heard during the thawing cycle. • After each cycle you open the refrigerator door. • You will make them sound louder than they...

Owners Manual
Page 29
... refrigerators with a same 40 watts bulb for the water to cool the bins. (Read the section Food Storage Guide). Replace the bulb with a bigger storage capacity require longer periods of paraffin and apply it again (Read the section Refrigerator Care and Cleaning). Read Doors will continue working when the room temperature is high. Use a piece of cloth with . THERE´S WATER IN THE DRAINING BIN • The refrigerator is in defrosting...
... refrigerators with a same 40 watts bulb for the water to cool the bins. (Read the section Food Storage Guide). Replace the bulb with a bigger storage capacity require longer periods of paraffin and apply it again (Read the section Refrigerator Care and Cleaning). Read Doors will continue working when the room temperature is high. Use a piece of cloth with . THERE´S WATER IN THE DRAINING BIN • The refrigerator is in defrosting...

Owners Manual
Page 30
... door open wait 5 minutes then check. section THE ICE MAKER IS NOT PRODUCING ICE OR ICE CUBES ARE FREEZING TOO SLOWLY • The smallest size of ice cubes is • Wait 24 hours after the defrosting cycle is just been placed inside of the refrigerator need to install a filter in order to eliminate the odors and taste problems. • Read the section Refrigerator Care and Cleaning. • Empty the bin...
... door open wait 5 minutes then check. section THE ICE MAKER IS NOT PRODUCING ICE OR ICE CUBES ARE FREEZING TOO SLOWLY • The smallest size of ice cubes is • Wait 24 hours after the defrosting cycle is just been placed inside of the refrigerator need to install a filter in order to eliminate the odors and taste problems. • Read the section Refrigerator Care and Cleaning. • Empty the bin...


