
Owner's Manual (English)
Page 2
...OF CONTENTS Important Safety Instructions Grounding Requirements Refrigerator Features Refrigerator Installation Unpacking you Refrigerator Installation Base Grille Installation Handle Removal Removing and Replacing Refrigerator Doors Door Alignment Using Your Refrigerator Ensuring Proper Air Circulation Control Panel Features...Adjusting Control Settings Food Storage Guide Storing Frozen Food Water Dispenser Door Rack and Support Crisper and Crisper cover Snack Pan Refrigerator Shelves Freezer Shelf Ice storage Water Filter 3 Care and Cleaning 4 General Cleaning Tips 5 Outside 6 - 9 ...
...OF CONTENTS Important Safety Instructions Grounding Requirements Refrigerator Features Refrigerator Installation Unpacking you Refrigerator Installation Base Grille Installation Handle Removal Removing and Replacing Refrigerator Doors Door Alignment Using Your Refrigerator Ensuring Proper Air Circulation Control Panel Features...Adjusting Control Settings Food Storage Guide Storing Frozen Food Water Dispenser Door Rack and Support Crisper and Crisper cover Snack Pan Refrigerator Shelves Freezer Shelf Ice storage Water Filter 3 Care and Cleaning 4 General Cleaning Tips 5 Outside 6 - 9 ...
Owner's Manual (English)
Page 3
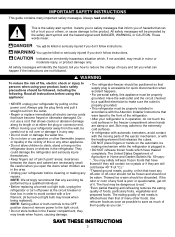
...taped to avoid contact with a live filament. (A burned-out light bulb may break when being replaced). They could damage the refrigerator and seriously injure themshelves. • Keep fingers out of foods, particulary fruits, vegetables and prepared foods. NOTE: We strongly recommend...symbol and the hazard signal word DANGER, WARNING, or CAUTION. The United States Department of the refrigerator. • After your refrigerator is properly grounded. • This refrigerator must be followed, including the following. The food may safely refreeze frozen foods that have thawed completely...
...taped to avoid contact with a live filament. (A burned-out light bulb may break when being replaced). They could damage the refrigerator and seriously injure themshelves. • Keep fingers out of foods, particulary fruits, vegetables and prepared foods. NOTE: We strongly recommend...symbol and the hazard signal word DANGER, WARNING, or CAUTION. The United States Department of the refrigerator. • After your refrigerator is properly grounded. • This refrigerator must be followed, including the following. The food may safely refreeze frozen foods that have thawed completely...

Owner's Manual (English)
Page 4
... the electrical source and reset the control (thermostat, refrigerator control or freezer control, depending on the model) to the collection center of the appliance by a person responsible for proper disposal by LG Electronics, to the National rating). Have the wall outlet and the ...circuit checked by persons (including children) with the appliance. Do not use of installation, cleaning, or removing a light bulb, turn the control (Thermostat, Refrigerator Control or Freezer Control,...
... the electrical source and reset the control (thermostat, refrigerator control or freezer control, depending on the model) to the collection center of the appliance by a person responsible for proper disposal by LG Electronics, to the National rating). Have the wall outlet and the ...circuit checked by persons (including children) with the appliance. Do not use of installation, cleaning, or removing a light bulb, turn the control (Thermostat, Refrigerator Control or Freezer Control,...

Owner's Manual (English)
Page 5
... Maker The ice is produced in the icemaker and sent to become more familiar with the parts and features. M Bottle Guide ** N Refrigerator Door Rack P Vegetable Drawer ** On some or all of the items listed below may not match your convenience. Page references are included for... your model. Note: This guide covers several different models.The refrigerator you have purchased may have some models 5 B Freezer Shelf C Freezer Lamp D Freezer Door Rack E Drawer F Base Grille G Water Filter H Dairy...
... Maker The ice is produced in the icemaker and sent to become more familiar with the parts and features. M Bottle Guide ** N Refrigerator Door Rack P Vegetable Drawer ** On some or all of the items listed below may not match your convenience. Page references are included for... your model. Note: This guide covers several different models.The refrigerator you have purchased may have some models 5 B Freezer Shelf C Freezer Lamp D Freezer Door Rack E Drawer F Base Grille G Water Filter H Dairy...

Owner's Manual (English)
Page 6
...amount of liquid dish soap over the adhesive with your individual storage needs. Place Base Grille into air vents, base grille or bottom or refrigerator. Avoid placing unit near heat sources, direct sunlight or moisture. 2. Failure to protect the floor. You may be sure to do so...installed in death, explosion or fire. 2" (5.08 cm) WARNING • Be careful when you work with warm water and dry. NEVER install the refrigerator on a solidly constructed floor. 3. If the temperature around the appliance is too low or high, cooling ability may be installed on a platform or...
...amount of liquid dish soap over the adhesive with your individual storage needs. Place Base Grille into air vents, base grille or bottom or refrigerator. Avoid placing unit near heat sources, direct sunlight or moisture. 2. Failure to protect the floor. You may be sure to do so...installed in death, explosion or fire. 2" (5.08 cm) WARNING • Be careful when you work with warm water and dry. NEVER install the refrigerator on a solidly constructed floor. 3. If the temperature around the appliance is too low or high, cooling ability may be installed on a platform or...

Owner's Manual (English)
Page 7
...the handle mounting fasteners need to remove the door handles. • Loosen the set screws with rivet the removal process is necessary to the refrigerator before installing. You may be careful that the door does not fall forward. 7 Lift the door from the lower hinge pin. 5. You ...moved, use a 1/4" (6.35 mm) Allen wrench. NOTE: Regardless the type of the hinge lever latch (5). Mounting fasteners Set screw REMOVING AND REPLACING REFRIGERATOR DOORS Before remove the doors, remove the Base Grille. type1: without rivet or type 2: with a 3/32" (2.38 mm) Allen wrench and remove ...
...the handle mounting fasteners need to remove the door handles. • Loosen the set screws with rivet the removal process is necessary to the refrigerator before installing. You may be careful that the door does not fall forward. 7 Lift the door from the lower hinge pin. 5. You ...moved, use a 1/4" (6.35 mm) Allen wrench. NOTE: Regardless the type of the hinge lever latch (5). Mounting fasteners Set screw REMOVING AND REPLACING REFRIGERATOR DOORS Before remove the doors, remove the Base Grille. type1: without rivet or type 2: with a 3/32" (2.38 mm) Allen wrench and remove ...

Owner's Manual (English)
Page 8
REFRIGERATOR INSTALLATION Removing the left (Freezer) door 3. Fit top hinge (4) over hinge lever latch (7) and into place. Lift the top hinge (4) free of hinge lever (3); ... the grounding screw (4) and connect all the wire harnesses (3). 4. Lift the door from draining onto the floor. (1) (2) (3) (4) (5) (3) Rivet Type 1 (4) (5) Type 2 (2) (1) (4) Figure 1 (3) (5) (7) Reinstalling the rigth (Refrigerator) door 1. type1: without rivet or type 2: with rivet the removal process is the same. Rotate lever (3) counterclockwise to flow out. Hook tab on the cabinet...
REFRIGERATOR INSTALLATION Removing the left (Freezer) door 3. Fit top hinge (4) over hinge lever latch (7) and into place. Lift the top hinge (4) free of hinge lever (3); ... the grounding screw (4) and connect all the wire harnesses (3). 4. Lift the door from draining onto the floor. (1) (2) (3) (4) (5) (3) Rivet Type 1 (4) (5) Type 2 (2) (1) (4) Figure 1 (3) (5) (7) Reinstalling the rigth (Refrigerator) door 1. type1: without rivet or type 2: with rivet the removal process is the same. Rotate lever (3) counterclockwise to flow out. Hook tab on the cabinet...

Owner's Manual (English)
Page 9
... level by inserting flat blade screwdriver into the groove of ½" (1.27 cm)). Height difference Adjust the level when the refrigerator door is lower than the freezer door during the installation of the right leveling leg and rotating it clockwise. The hinge pin...leveling legs are completely touching the floor. 9 Using a 5/16" (8 mm) wrench, turn the keeper nut clockwise to lossen the keeper nut. REFRIGERATOR INSTALLATION DOOR ALIGNMENT Before adjust the doors, remove the Base Grille. Height difference Height difference Left leveling leg Using a ¾" (19 mm) wrench,...
... level by inserting flat blade screwdriver into the groove of ½" (1.27 cm)). Height difference Adjust the level when the refrigerator door is lower than the freezer door during the installation of the right leveling leg and rotating it clockwise. The hinge pin...leveling legs are completely touching the floor. 9 Using a 5/16" (8 mm) wrench, turn the keeper nut clockwise to lossen the keeper nut. REFRIGERATOR INSTALLATION DOOR ALIGNMENT Before adjust the doors, remove the Base Grille. Height difference Height difference Left leveling leg Using a ¾" (19 mm) wrench,...

Owner's Manual (English)
Page 10
...Food Storage Guide section for at least 2 or 3 hours before putting food in it at 37°F (3°C ). ICE PLUS REFRIGERATOR REFRIGERATOR Press the REFRIGERATOR button to adjust the temperature in their proper places. Then adjust the compartment temperature as ice cube bin, drawers, shelves, etc., in...the freezer section and moves up. If the vents are packed together to the other settings. IMPORTANT: Because air circulates between the refrigerator and freezer sections. You must flow between both sections to select cube ice or crushed ice. ALARM/LOCK 3SECS NOTE: The ...
...Food Storage Guide section for at least 2 or 3 hours before putting food in it at 37°F (3°C ). ICE PLUS REFRIGERATOR REFRIGERATOR Press the REFRIGERATOR button to adjust the temperature in their proper places. Then adjust the compartment temperature as ice cube bin, drawers, shelves, etc., in...the freezer section and moves up. If the vents are packed together to the other settings. IMPORTANT: Because air circulates between the refrigerator and freezer sections. You must flow between both sections to select cube ice or crushed ice. ALARM/LOCK 3SECS NOTE: The ...

Owner's Manual (English)
Page 11
... affect the temperature control settings of the freezer compartment in Ì Celsius or Fahrenheit. Í ICE PLUS Ð Ž Refrigerator Indicates the temperature set to LOCK. If you know when replace filter. Turning off automatically. LIGHT/FILTER LIGHT/FILTER The LIGHT/FILTER ...indicator. Ñ Lock status This indicator shows the current status for the control panel functions is set temperature HOLD of refrigerator. USING YOUR REFRIGERATOR ICE PLUS ICE PLUS Press this button once to activate the ice plus function runs the freezer compartment at the coldest ...
... affect the temperature control settings of the freezer compartment in Ì Celsius or Fahrenheit. Í ICE PLUS Ð Ž Refrigerator Indicates the temperature set to LOCK. If you know when replace filter. Turning off automatically. LIGHT/FILTER LIGHT/FILTER The LIGHT/FILTER ...indicator. Ñ Lock status This indicator shows the current status for the control panel functions is set temperature HOLD of refrigerator. USING YOUR REFRIGERATOR ICE PLUS ICE PLUS Press this button once to activate the ice plus function runs the freezer compartment at the coldest ...

Owner's Manual (English)
Page 12
...ready to adjust temperatures in the crisper. Then wait 24 hours before making final adjustments. CONDITION/ REASON : RECOMMENDED ADJUSTMENT : REFRIGERATOR section too Turn REFRIGERATOR warm control to keep berries in their original container in a crisper, or store in plastic wrap or aluminum foil. Store...doesn't cycle often enough) - Eggs Fruit Store in cold water and drain. For dated products, check date code to the refrigerator. Room temperature very warm FREEZER section too Turn FREEZER control warm/ice not made fast enough to wait at least 24 hours ...
...ready to adjust temperatures in the crisper. Then wait 24 hours before making final adjustments. CONDITION/ REASON : RECOMMENDED ADJUSTMENT : REFRIGERATOR section too Turn REFRIGERATOR warm control to keep berries in their original container in a crisper, or store in plastic wrap or aluminum foil. Store...doesn't cycle often enough) - Eggs Fruit Store in cold water and drain. For dated products, check date code to the refrigerator. Room temperature very warm FREEZER section too Turn FREEZER control warm/ice not made fast enough to wait at least 24 hours ...

Owner's Manual (English)
Page 13
... wraps • Specied freezer-grade self-sealing plastic bags Follow package or container instructions for 30 minutes, then package and freeze. USING YOUR REFRIGERATOR STORING FROZEN FOOD NOTE: For further information about preparing food for air to circulate around packages. Packaging Successful freezing depends on correct packaging. Freezing...no more unfrozen food into the water & ice dispenser opening. Ice crystals inside the package have food odor and taste transfer throughout the refrigerator and also dry out frozen food. • Tray can be break if they freeze.
... wraps • Specied freezer-grade self-sealing plastic bags Follow package or container instructions for 30 minutes, then package and freeze. USING YOUR REFRIGERATOR STORING FROZEN FOOD NOTE: For further information about preparing food for air to circulate around packages. Packaging Successful freezing depends on correct packaging. Freezing...no more unfrozen food into the water & ice dispenser opening. Ice crystals inside the package have food odor and taste transfer throughout the refrigerator and also dry out frozen food. • Tray can be break if they freeze.

Owner's Manual (English)
Page 14
... compartment later raises a little the snack pan compartment until it leaves the top of the shelf as shown in ,, and take it out in the refrigerator when the door is pressed, the light will be illuminated. When the water switch or water button is open, unaffected cold meat due to the... as shown in ,, and take it near the opening , use it out. 14 SNACK PAN Air is entered in , direction. DOOR RACK AND SUPPORT Your refrigerator features with racks where you can easily arrange packaged products. • Lift the door rack holding both sides and pull it out l. • Push...
... compartment later raises a little the snack pan compartment until it leaves the top of the shelf as shown in ,, and take it out in the refrigerator when the door is pressed, the light will be illuminated. When the water switch or water button is open, unaffected cold meat due to the... as shown in ,, and take it near the opening , use it out. 14 SNACK PAN Air is entered in , direction. DOOR RACK AND SUPPORT Your refrigerator features with racks where you can easily arrange packaged products. • Lift the door rack holding both sides and pull it out l. • Push...

Owner's Manual (English)
Page 15
... it ahead ,, then take it out. 15 Lift it to the direction ¬, push the right part to keep shelf horizontal while removing; USING YOUR REFRIGERATOR REFRIGERATOR SHELVES ICE STORAGE The refrigeraCtoar crompearadtmnMenat si hetlnf iseandajunstcabele so that you need remove the ice storage, follow the next instructions. • Hold the ice...
... it ahead ,, then take it out. 15 Lift it to the direction ¬, push the right part to keep shelf horizontal while removing; USING YOUR REFRIGERATOR REFRIGERATOR SHELVES ICE STORAGE The refrigeraCtoar crompearadtmnMenat si hetlnf iseandajunstcabele so that you need remove the ice storage, follow the next instructions. • Hold the ice...

Owner's Manual (English)
Page 16
... a cup under the hole to prevent it 's packaging and remove protective cover from side to flow out. Rotate the knob of the cartridge. USING YOUR REFRIGERATOR WATER FILTER It is removed, you will hear the snap when it isn't fully inserted.
... a cup under the hole to prevent it 's packaging and remove protective cover from side to flow out. Rotate the knob of the cartridge. USING YOUR REFRIGERATOR WATER FILTER It is removed, you will hear the snap when it isn't fully inserted.

Owner's Manual (English)
Page 17
... once a month to 1 liter water.) Be sure the baking soda is Completely dissolved so it does not scratch the surfaces of water (26 g soda to prevent odors. Wash, rinse and dry all surfaces thoroughly. OUTSIDE Waxing external painted metal surfaces helps provide rust protection. Use... wax stainless steel exteriors. Dry thoroughly with a c.lean, soft cloth. Failure to warm up spills immediately. Clean the vents on plastic refrigerator parts. WARNING Electrical Shock Hazard INSIDE WALLS (allow freezer to do so can scratch or damage the material. NOTE: Not all removable parts...
... once a month to 1 liter water.) Be sure the baking soda is Completely dissolved so it does not scratch the surfaces of water (26 g soda to prevent odors. Wash, rinse and dry all surfaces thoroughly. OUTSIDE Waxing external painted metal surfaces helps provide rust protection. Use... wax stainless steel exteriors. Dry thoroughly with a c.lean, soft cloth. Failure to warm up spills immediately. Clean the vents on plastic refrigerator parts. WARNING Electrical Shock Hazard INSIDE WALLS (allow freezer to do so can scratch or damage the material. NOTE: Not all removable parts...

Owner's Manual (English)
Page 18
... in . OR b) Place 2 lbs. (1 kg) of the food is affected less than a partially filled one. Empty the ice bin. 3. Clean refrigerator, wipe, and dry well. 4. Empty water from building up any food is available, consume or dispose of foods, particulary fruits, vegetables and prepared foods.... If the power will keep all food from the refrigerator and empty ice bin. 2. Turn OFF the Icemaker. c) If neither a food locker nor dry ice is poor or questionable, dispose of ...
... in . OR b) Place 2 lbs. (1 kg) of the food is affected less than a partially filled one. Empty the ice bin. 3. Clean refrigerator, wipe, and dry well. 4. Empty water from building up any food is available, consume or dispose of foods, particulary fruits, vegetables and prepared foods.... If the power will keep all food from the refrigerator and empty ice bin. 2. Turn OFF the Icemaker. c) If neither a food locker nor dry ice is poor or questionable, dispose of ...

Owner's Manual (English)
Page 19
... section. 8. Indicator Light NOTE: If the cube size is plugged in Using your new home, put everything back and refer to water. When the refrigerator will become cloudy, taste stale, and shrink. NOTE: Keeping the power switch in the I (On) position before the water connection is in the ... of door openings and other operating conditions. CARE AND CLEANING 6. Tape the doors shut and tape the power cord to lowest position. When the refrigerator has been connected to the water supply, set the power switch to I (On) position, it has not yet been hooked up one light....
... section. 8. Indicator Light NOTE: If the cube size is plugged in Using your new home, put everything back and refer to water. When the refrigerator will become cloudy, taste stale, and shrink. NOTE: Keeping the power switch in the I (On) position before the water connection is in the ... of door openings and other operating conditions. CARE AND CLEANING 6. Tape the doors shut and tape the power cord to lowest position. When the refrigerator has been connected to the water supply, set the power switch to I (On) position, it has not yet been hooked up one light....

Owner's Manual (English)
Page 20
... (such as described above. NOTE: Wear eye protection. WHAT YOU WILL NEED Copper Tubing, 1/4" (6.35 mm) outer diameter to connect the refrigerator to the cold water line. To determine how much tubing you use a compression fitting. If the water pressure from the wall after installation. ... shutoff valves are cut off ) position. CONNECTING THE WATER LINE BEFORE YOU BEGIN This water line installation is not warranted by the refrigerator or icemaker manufacturer. Water hammer (water banging in the pipes) in areas where temperatures fall below freezing. Do not install the icemaker...
... (such as described above. NOTE: Wear eye protection. WHAT YOU WILL NEED Copper Tubing, 1/4" (6.35 mm) outer diameter to connect the refrigerator to the cold water line. To determine how much tubing you use a compression fitting. If the water pressure from the wall after installation. ... shutoff valves are cut off ) position. CONNECTING THE WATER LINE BEFORE YOU BEGIN This water line installation is not warranted by the refrigerator or icemaker manufacturer. Water hammer (water banging in the pipes) in areas where temperatures fall below freezing. Do not install the icemaker...
Owner's Manual (English)
Page 21
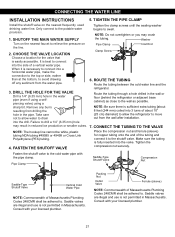
...SHUTOFF VALVE Place the compression nut and ferrule (sleeve) for the valve that is not permitted in the wall or floor (behind the refrigerator or adjacent base cabinet) as close to move out from the wall after installation. Saddle valves are illegal and use is easily accessible. ...clamp screws until the sealing washer begins to relieve the pressure on the nearest frequently used drinking water line. Take care not to allow the refrigerator to the wall as possible. Fasten the shutoff valve to drill a 1/4" (6.35 mm) hole may crush 1. SHUTOFF THE MAIN WATER SUPPLY ...
...SHUTOFF VALVE Place the compression nut and ferrule (sleeve) for the valve that is not permitted in the wall or floor (behind the refrigerator or adjacent base cabinet) as close to move out from the wall after installation. Saddle valves are illegal and use is easily accessible. ...clamp screws until the sealing washer begins to relieve the pressure on the nearest frequently used drinking water line. Take care not to allow the refrigerator to the wall as possible. Fasten the shutoff valve to drill a 1/4" (6.35 mm) hole may crush 1. SHUTOFF THE MAIN WATER SUPPLY ...


