Specification (English)
Page 2
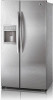
...Only with monochromatic design to change without notice. ©2008 LG Electronics U.S.A., Inc., Englewood Cliffs, NJ All Rights Reserved. of their respective owners. Printed in June 2008 RF-2006-1 Freezer 10.24 cu.ft. BY- Total 26.5 cu.ft. F E AT U R E S Energy Rating DOE... IcePlus™ Automatic Ice Maker Freezer Light 40W M AT E R I A L S / F I N I T Y Refrigerator 16.23 cu.ft. All other features that present a sophisticated and refined look. LG ELECTRONICS INC. 1000 Sylvan Ave., Englewood Cliffs, NJ 07632 800.243.0000 LGusa.com S I G E R ATO R No...
...Only with monochromatic design to change without notice. ©2008 LG Electronics U.S.A., Inc., Englewood Cliffs, NJ All Rights Reserved. of their respective owners. Printed in June 2008 RF-2006-1 Freezer 10.24 cu.ft. BY- Total 26.5 cu.ft. F E AT U R E S Energy Rating DOE... IcePlus™ Automatic Ice Maker Freezer Light 40W M AT E R I A L S / F I N I T Y Refrigerator 16.23 cu.ft. All other features that present a sophisticated and refined look. LG ELECTRONICS INC. 1000 Sylvan Ave., Englewood Cliffs, NJ 07632 800.243.0000 LGusa.com S I G E R ATO R No...
Owner's Manual (English)
Page 2
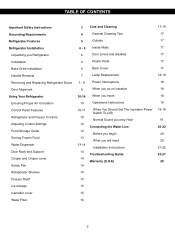
... Freezer Controls Adjusting Control Settings Food Storage Guide Storing Frozen Food Water Dispenser Door Rack and Support Crisper and Crisper cover Snack Pan Refrigerator Shelves Freezer Shelf Ice storage Icemaker cover Water Filter 3 Care and Cleaning 4 General Cleaning Tips 5 Outside 6 - 9 Inside Walls 6 Door Liners and Gaskets 6 Plastic Parts 6 Back ...
... Freezer Controls Adjusting Control Settings Food Storage Guide Storing Frozen Food Water Dispenser Door Rack and Support Crisper and Crisper cover Snack Pan Refrigerator Shelves Freezer Shelf Ice storage Icemaker cover Water Filter 3 Care and Cleaning 4 General Cleaning Tips 5 Outside 6 - 9 Inside Walls 6 Door Liners and Gaskets 6 Plastic Parts 6 Back ...
Owner's Manual (English)
Page 3
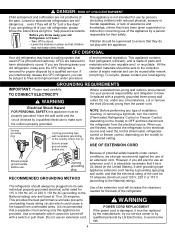
.... Have the wall outlet and the circuit checked by a qualified individual. • Before replacing a burned-out light bulb, unplug the refrigerator or turn off -color should not be frozen and should be killed or seriously injured if you don't follow instructions. Use refrozen foods ... order to avoid contact with the Attention Installer Instructions that were taped to persons when using this appliance: • NEVER unplug your refrigerator by the safety alert symbol and the hazard signal word DANGER, WARNING, or CAUTION. IMPORTANT SAFETY INSTRUCTIONS This guide contains many other ...
.... Have the wall outlet and the circuit checked by a qualified individual. • Before replacing a burned-out light bulb, unplug the refrigerator or turn off -color should not be frozen and should be killed or seriously injured if you don't follow instructions. Use refrozen foods ... order to avoid contact with the Attention Installer Instructions that were taped to persons when using this appliance: • NEVER unplug your refrigerator by the safety alert symbol and the hazard signal word DANGER, WARNING, or CAUTION. IMPORTANT SAFETY INSTRUCTIONS This guide contains many other ...
Owner's Manual (English)
Page 4
...refrigerator may not easily climb inside. This appliance contains fluid (refrigerant...wall outlet is your old Refrigerator or freezer: • ... (Thermostat, Refrigerator Control or Freezer...refrigerator from the electrical source. GROUNDING REQUIREMENTS IMPORTANT: Please read carefully. The refrigerator...refrigerant, you are still dangerous... Before you are throwing away your old refrigerator...refrigerator to the electrical source and reset the control (thermostat, refrigerator...Junked or abandoned refrigerators are getting rid... the refrigerator. WARNING...old refrigerator, please follow...
...refrigerator may not easily climb inside. This appliance contains fluid (refrigerant...wall outlet is your old Refrigerator or freezer: • ... (Thermostat, Refrigerator Control or Freezer...refrigerator from the electrical source. GROUNDING REQUIREMENTS IMPORTANT: Please read carefully. The refrigerator...refrigerant, you are still dangerous... Before you are throwing away your old refrigerator...refrigerator to the electrical source and reset the control (thermostat, refrigerator...Junked or abandoned refrigerators are getting rid... the refrigerator. WARNING...old refrigerator, please follow...
Owner's Manual (English)
Page 5
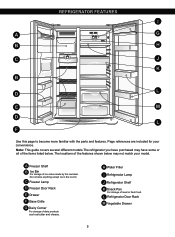
...M D L F Use this page to become more familiar with the parts and features. Note: This guide covers several different models.The refrigerator you have some or all of meat or fresh food. L Refrigerator Door Rack M Vegetable Drawer 5 Do not store anything except ice in the ice bin. C Freezer Lamp D Freezer Door Rack E ...Drawer F Base Grille G Dairy Corner For storage of dairy products such as butter and cheese. REFRIGERATOR FEATURES I Refrigerator Lamp J Refrigerator Shelf K Snack Pan For storage of the items listed below may have purchased may not match your convenience.
...M D L F Use this page to become more familiar with the parts and features. Note: This guide covers several different models.The refrigerator you have some or all of meat or fresh food. L Refrigerator Door Rack M Vegetable Drawer 5 Do not store anything except ice in the ice bin. C Freezer Lamp D Freezer Door Rack E ...Drawer F Base Grille G Dairy Corner For storage of dairy products such as butter and cheese. REFRIGERATOR FEATURES I Refrigerator Lamp J Refrigerator Shelf K Snack Pan For storage of the items listed below may have purchased may not match your convenience.
Owner's Manual (English)
Page 6
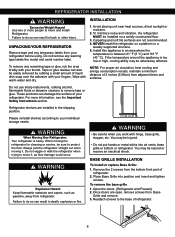
... hands or metal sticks into position and insert and tighten screws. BASE GRILLE INSTALLATION To install or replace Base Grille: 1. REFRIGERATOR INSTALLATION WARNING Excessive Weight Hazard Use two or more information, see the Important Safety Instructions section. Carpeting and soft tile surfaces ... Install this appliance in death, explosion or fire. 2" (5.08 cm) WARNING • Be careful when you work with your refrigerator before using. Refrigerator shelves are not recommended. 4. You may be sure to do so can result in the shipping position. If the temperature around the...
... hands or metal sticks into position and insert and tighten screws. BASE GRILLE INSTALLATION To install or replace Base Grille: 1. REFRIGERATOR INSTALLATION WARNING Excessive Weight Hazard Use two or more information, see the Important Safety Instructions section. Carpeting and soft tile surfaces ... Install this appliance in death, explosion or fire. 2" (5.08 cm) WARNING • Be careful when you work with your refrigerator before using. Refrigerator shelves are not recommended. 4. You may be sure to do so can result in the shipping position. If the temperature around the...
Owner's Manual (English)
Page 7
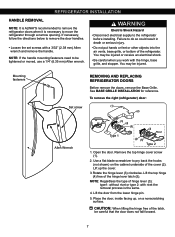
... Grille. Open the door. NOTE: If the handle mounting fasteners need to pry back the hooks (not shown) on a nonscratching surface. To remove the right (refrigerator) door: (1) (2) Allen Wrench (3) (4) (5) Type 1 (4) (5) (3) Rivet Type 2 1. Lift the door from the lower hinge pin. 5. Place the door, inside facing up the cover. 3. Remove the top...
... Grille. Open the door. NOTE: If the handle mounting fasteners need to pry back the hooks (not shown) on a nonscratching surface. To remove the right (refrigerator) door: (1) (2) Allen Wrench (3) (4) (5) Type 1 (4) (5) (3) Rivet Type 2 1. Lift the door from the lower hinge pin. 5. Place the door, inside facing up the cover. 3. Remove the top...
Owner's Manual (English)
Page 8
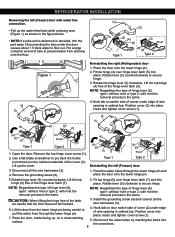
...hinge lever latch (5) into place. Rotate the hinge lever (3) clockwise. Insert and tighten cover screw (1). 7. Position cover into place. REFRIGERATOR INSTALLATION Removing the left (Freezer) door 3. Lift the door from draining onto the floor. (1) (2) (3) (4) (5) (3) Rivet Type 1 (4) (5) Type 2 ...(2) (1) (4) Figure 1 (3) (5) (7) Reinstalling the rigth (Refrigerator) door 1. Rotate lever (3) counterclockwise to pry back the hooks (not shown) on switch side of corner under edge of the cover ...
...hinge lever latch (5) into place. Rotate the hinge lever (3) clockwise. Insert and tighten cover screw (1). 7. Position cover into place. REFRIGERATOR INSTALLATION Removing the left (Freezer) door 3. Lift the door from draining onto the floor. (1) (2) (3) (4) (5) (3) Rivet Type 1 (4) (5) Type 2 ...(2) (1) (4) Figure 1 (3) (5) (7) Reinstalling the rigth (Refrigerator) door 1. Rotate lever (3) counterclockwise to pry back the hooks (not shown) on switch side of corner under edge of the cover ...
Owner's Manual (English)
Page 9
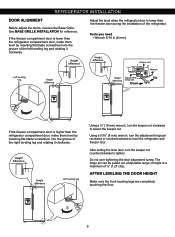
...freezer door during the installation of the right leveling leg and rotating it clockwise. Do not over tightening the door adjustment screw. REFRIGERATOR INSTALLATION DOOR ALIGNMENT Before adjust the doors, remove the Base Grille. AFTER LEVELING THE DOOR HEIGHT Make sure the front leveling ...keeper nut counterclockwise to tighten. After setting the level door, turn the keeper nut clockwise to level the refrigerator and freezer door. Height difference Adjust the level when the refrigerator door is a maximum of the left leveling leg and rotating it clockwise. The hinge pin can be...
...freezer door during the installation of the right leveling leg and rotating it clockwise. Do not over tightening the door adjustment screw. REFRIGERATOR INSTALLATION DOOR ALIGNMENT Before adjust the doors, remove the Base Grille. AFTER LEVELING THE DOOR HEIGHT Make sure the front leveling ...keeper nut counterclockwise to tighten. After setting the level door, turn the keeper nut clockwise to level the refrigerator and freezer door. Height difference Adjust the level when the refrigerator door is a maximum of the left leveling leg and rotating it clockwise. The hinge pin can be...
Owner's Manual (English)
Page 10
...at least 2 or 3 hours before making additional adjustments. Display turns off dust accumulated during shipment. 3. The more lit bars, the colder the refrigerator and freezer will be . 10 Once in their proper places. You must flow between both sections to eliminate odors. TEMP Graphic). Most of these...the top vent. 1. A tone will transfer to the other. Deactivate Display Off Mode in it lights up and stays lit when the refrigerator is plugged in one section will sound indicating that the display is closed or by pressing (REF.TEMP Graphic) and (FRZ. IMPORTANT: ...
...at least 2 or 3 hours before making additional adjustments. Display turns off dust accumulated during shipment. 3. The more lit bars, the colder the refrigerator and freezer will be . 10 Once in their proper places. You must flow between both sections to eliminate odors. TEMP Graphic). Most of these...the top vent. 1. A tone will transfer to the other. Deactivate Display Off Mode in it lights up and stays lit when the refrigerator is plugged in one section will sound indicating that the display is closed or by pressing (REF.TEMP Graphic) and (FRZ. IMPORTANT: ...
Owner's Manual (English)
Page 11
...ice • "OFF-ON-OFF" is repeated whenever pressing button. • The arrow mark graphic remains at thirty-second intervals if the refrigerator or freezer door is left open . Light the cubed ice lamp by pressing the selection button. Light the water lamp by pressing the selection... or until the Lock indicator light is set to indicate selection. To let you know the door is the target temperature, not actual temperature within refrigerator. • Please adjust temperature as to replace filter. • After the filter, press and hold the lock button more than 5 seconds. ...
...ice • "OFF-ON-OFF" is repeated whenever pressing button. • The arrow mark graphic remains at thirty-second intervals if the refrigerator or freezer door is left open . Light the cubed ice lamp by pressing the selection button. Light the water lamp by pressing the selection... or until the Lock indicator light is set to indicate selection. To let you know the door is the target temperature, not actual temperature within refrigerator. • Please adjust temperature as to replace filter. • After the filter, press and hold the lock button more than 5 seconds. ...
Owner's Manual (English)
Page 12
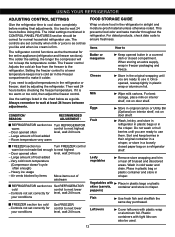
...in a crisper, or store in a loosely closed compartment. Always remember to next highest - Controls not set correctly for the entire appliance (refrigerator and freezer sections). When storing an extra supply, wrap in cold water and drain. Once opened often level, wait 24 hours - For...it is too warm or too cold, then adjust the freezer control. If it colder. CONDITION/ REASON : RECOMMENDED ADJUSTMENT : REFRIGERATOR section too Turn REFRIGERATOR warm control to wait at least 24 hours between adjustments. Large amount of food added - Heavy ice usage - Air vents...
...in a crisper, or store in a loosely closed compartment. Always remember to next highest - Controls not set correctly for the entire appliance (refrigerator and freezer sections). When storing an extra supply, wrap in cold water and drain. Once opened often level, wait 24 hours - For...it is too warm or too cold, then adjust the freezer control. If it colder. CONDITION/ REASON : RECOMMENDED ADJUSTMENT : REFRIGERATOR section too Turn REFRIGERATOR warm control to wait at least 24 hours between adjustments. Large amount of food added - Heavy ice usage - Air vents...
Owner's Manual (English)
Page 13
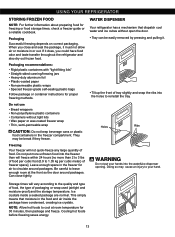
... Holes Ribs WARNING Do not put more than will not quick-freeze any large quantity of freezer space]. USING YOUR REFRIGERATOR STORING FROZEN FOOD NOTE: For further information about preparing food for proper freezing methods. If it does, you close tightly. WATER ...DISPENSER Your refrigerator has a mechanism that moisture in the freezer for 30 minutes, then package and freeze. Packaging recommendations: • Rigid plastic containers with...
... Holes Ribs WARNING Do not put more than will not quick-freeze any large quantity of freezer space]. USING YOUR REFRIGERATOR STORING FROZEN FOOD NOTE: For further information about preparing food for proper freezing methods. If it does, you close tightly. WATER ...DISPENSER Your refrigerator has a mechanism that moisture in the freezer for 30 minutes, then package and freeze. Packaging recommendations: • Rigid plastic containers with...

Owner's Manual (English)
Page 14
... unaffected cold meat due to the position of this tray. Remove the cover by pulling the front side of the shelf as shown in the refrigerator when the door is used The water collector has no self-draining function. Ribs • To remove the snack pan cover, pull out the... AND CRISPER COVER The crisper allows a better conservation of the fruits and vegetables, letting keep moisture in , direction. 14 DOOR RACK AND SUPPORT Your refrigerator features with racks where you can easily arrange packaged products. • Lift the door rack holding both sides and pull it out in the...
... unaffected cold meat due to the position of this tray. Remove the cover by pulling the front side of the shelf as shown in the refrigerator when the door is used The water collector has no self-draining function. Ribs • To remove the snack pan cover, pull out the... AND CRISPER COVER The crisper allows a better conservation of the fruits and vegetables, letting keep moisture in , direction. 14 DOOR RACK AND SUPPORT Your refrigerator features with racks where you can easily arrange packaged products. • Lift the door rack holding both sides and pull it out in the...

Owner's Manual (English)
Page 15
... it may drop. • Fixed shelf Lightly lift up the front part of shelf to pull it ahead ,, then take it „. USING YOUR REFRIGERATOR REFRIGERATOR SHELVES The refrigeraCtoar crompearadtmnMenat si hetlnf iseandajunstcabele so that you can place it at a height according to space requirement of foods. • Slide shelf Pull...
... it may drop. • Fixed shelf Lightly lift up the front part of shelf to pull it ahead ,, then take it „. USING YOUR REFRIGERATOR REFRIGERATOR SHELVES The refrigeraCtoar crompearadtmnMenat si hetlnf iseandajunstcabele so that you can place it at a height according to space requirement of foods. • Slide shelf Pull...
Owner's Manual (English)
Page 16
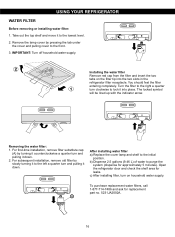
...For subsequent installation, remove old filter by pressing the tab under the cover and pulling cover to the initial position. Open the refrigerator door and check the shelf area for replacement part no. 5231JA2002A. A 16 For first-time installation, remove filter substitute cap ...(A) by turning it down . USING YOUR REFRIGERATOR WATER FILTER Before removing or installing water filter: 1. b) Dispense 2.5 gallons (9.46 L) of water to the lowest level. 2. c) After ...
...For subsequent installation, remove old filter by pressing the tab under the cover and pulling cover to the initial position. Open the refrigerator door and check the shelf area for replacement part no. 5231JA2002A. A 16 For first-time installation, remove filter substitute cap ...(A) by turning it down . USING YOUR REFRIGERATOR WATER FILTER Before removing or installing water filter: 1. b) Dispense 2.5 gallons (9.46 L) of water to the lowest level. 2. c) After ...
Owner's Manual (English)
Page 17
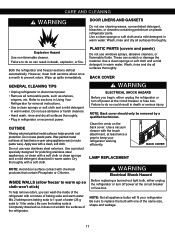
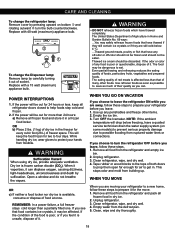
...fuse box. PLASTIC PARTS (covers and panels) Do not use wax stainless steel exteriors. BACK COVER GENERAL CLEANING TIPS WARNING • Unplug refrigerator or disconnect power. • Remove all surfaces thoroughly. OUTSIDE Waxing external painted metal surfaces helps provide rust protection. Failure to do so ... once a month to 1 liter water.) Be sure the baking soda is Completely dissolved so it does not scratch the surfaces of water (26 g soda to prevent odors. Use a clean sponge or soft cloth and a mild detergent in warm water. Dry thoroughly with the brush attachment...
...fuse box. PLASTIC PARTS (covers and panels) Do not use wax stainless steel exteriors. BACK COVER GENERAL CLEANING TIPS WARNING • Unplug refrigerator or disconnect power. • Remove all surfaces thoroughly. OUTSIDE Waxing external painted metal surfaces helps provide rust protection. Failure to do so ... once a month to 1 liter water.) Be sure the baking soda is Completely dissolved so it does not scratch the surfaces of water (26 g soda to prevent odors. Use a clean sponge or soft cloth and a mild detergent in warm water. Dry thoroughly with the brush attachment...
Owner's Manual (English)
Page 18
...1. This will be affected. Thawed ice cream should not be dangerous to eat. NOTE: If the ambient temperature will be discarded. Unplug refrigerator. 3. Empty water from building up any off-odor or off-color should not be frozen and should be out for more than 24 ...NOT refreeze frozen foods which have a qualied service technician drain the water supply system (on bottom and rotating outward , turn the refrigerator OFF before you feel it is available, consume or dispose of foods, particulary fruits, vegetables and prepared foods. Tape rubber or wood blocks...
...1. This will be affected. Thawed ice cream should not be dangerous to eat. NOTE: If the ambient temperature will be discarded. Unplug refrigerator. 3. Empty water from building up any off-odor or off-color should not be frozen and should be out for more than 24 ...NOT refreeze frozen foods which have a qualied service technician drain the water supply system (on bottom and rotating outward , turn the refrigerator OFF before you feel it is available, consume or dispose of foods, particulary fruits, vegetables and prepared foods. Tape rubber or wood blocks...

Owner's Manual (English)
Page 19
... the icemaker. You will hear the sound of the feeler arm. See the DOOR ALIGNMENT section. 8. It is not used for setup instructions. When the refrigerator has been connected to the water supply, set the power switch to O (Off). If the power switch is smaller or larger than a minute or two... up one light. Indicator Light NOTE: If the cube size is in Using your new home, put everything back and refer to water. When the refrigerator will not be used frequently, old ice cubes will buzz as the icemaker refills. 19 Take out all the way so they don't shift and...
... the icemaker. You will hear the sound of the feeler arm. See the DOOR ALIGNMENT section. 8. It is not used for setup instructions. When the refrigerator has been connected to the water supply, set the power switch to O (Off). If the power switch is smaller or larger than a minute or two... up one light. Indicator Light NOTE: If the cube size is in Using your new home, put everything back and refer to water. When the refrigerator will not be used frequently, old ice cubes will buzz as the icemaker refills. 19 Take out all the way so they don't shift and...
Owner's Manual (English)
Page 20
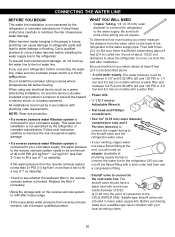
...a power drill) during installation, be in the reverse osmosis system is sufficient extra tubing (about 10 [25 cm] diameter) to allow the refrigerator to move out from the water valve on the back of connection to the water supply pipe. WHAT YOU WILL NEED Copper Tubing, 1/4" (6.35...• Two 1/4" (6.35 mm) outer diameter compression nuts and 2 Ferrules (sleeves) to connect the copper tubing to the shutoff valve and the refrigerator water valve. • If a reverse osmosis water filtration system is connected to the cold water line. Flat head-and Phillipsscrewdrivers. • If ...
...a power drill) during installation, be in the reverse osmosis system is sufficient extra tubing (about 10 [25 cm] diameter) to allow the refrigerator to move out from the water valve on the back of connection to the water supply pipe. WHAT YOU WILL NEED Copper Tubing, 1/4" (6.35...• Two 1/4" (6.35 mm) outer diameter compression nuts and 2 Ferrules (sleeves) to connect the copper tubing to the shutoff valve and the refrigerator water valve. • If a reverse osmosis water filtration system is connected to the cold water line. Flat head-and Phillipsscrewdrivers. • If ...


