
Owners Manual
Page 1
All Rights Reserved OWNER'S MANUAL FRENCH DOOR REFRIGERATOR Read this owner's manual thoroughly before operating the appliance and keep it handy for reference at all times. ENGLISH ESPAÑOL FRANÇAIS LRFDS3006*/LRFVS3006*/LRFVC2406*/LRFXC2406* MFL69497029 Rev.04_090719 www.lg.com Copyright © 2019 LG Electronics Inc.
All Rights Reserved OWNER'S MANUAL FRENCH DOOR REFRIGERATOR Read this owner's manual thoroughly before operating the appliance and keep it handy for reference at all times. ENGLISH ESPAÑOL FRANÇAIS LRFDS3006*/LRFVS3006*/LRFVC2406*/LRFXC2406* MFL69497029 Rev.04_090719 www.lg.com Copyright © 2019 LG Electronics Inc.
Owners Manual
Page 3
... Dispenser 31 Ice Compartment 32 Automatic Icemaker 33 Storing Food 35 Humidity Controlled Crispers 36 Glide'N'Serve 36 Refrigerator Shelves 37 Door-in-Door 39 Door Bins 39 Durabase 40 SMART FUNCTIONS 40 LG SmartThinQ Application 42 Smart Grid Function 43 Smart Diagnosis™ Function 45 MAINTENANCE 45 Cleaning 46 Air Filter...
... Dispenser 31 Ice Compartment 32 Automatic Icemaker 33 Storing Food 35 Humidity Controlled Crispers 36 Glide'N'Serve 36 Refrigerator Shelves 37 Door-in-Door 39 Door Bins 39 Durabase 40 SMART FUNCTIONS 40 LG SmartThinQ Application 42 Smart Grid Function 43 Smart Diagnosis™ Function 45 MAINTENANCE 45 Cleaning 46 Air Filter...

Owners Manual
Page 4
... of injury to persons, adhere to roll over or damage the power cord. • Contact an authorized service center when installing or relocating the refrigerator. • Do not, under any circumstances, cut or remove the third (ground) prong from the power cord. • Keep packing materials ...out of the reach of suffocation. • Do not install the refrigerator in this product to replace a standard 2-prong wall outlet with a standard 3-prong wall outlet. • Do not use with a switch. CAUTION You...
... of injury to persons, adhere to roll over or damage the power cord. • Contact an authorized service center when installing or relocating the refrigerator. • Do not, under any circumstances, cut or remove the third (ground) prong from the power cord. • Keep packing materials ...out of the reach of suffocation. • Do not install the refrigerator in this product to replace a standard 2-prong wall outlet with a standard 3-prong wall outlet. • Do not use with a switch. CAUTION You...

Owners Manual
Page 5
...contact an authorized service center before resuming use. staff kitchen areas in household and similar applications such as : - They could damage the refrigerator and seriously injure themselves. • Do not allow children to ensure that shows cracks or abrasion damage along its length or at ... heavy objects on the appliance. • Avoid contact with any fuse (such as copper, steel wire, etc.) other objects into the refrigerator. Doing so may cause frostbite. • Do not refreeze frozen food that have become frayed or otherwise damaged repaired or replaced by qualified...
...contact an authorized service center before resuming use. staff kitchen areas in household and similar applications such as : - They could damage the refrigerator and seriously injure themselves. • Do not allow children to ensure that shows cracks or abrasion damage along its length or at ... heavy objects on the appliance. • Avoid contact with any fuse (such as copper, steel wire, etc.) other objects into the refrigerator. Doing so may cause frostbite. • Do not refreeze frozen food that have become frayed or otherwise damaged repaired or replaced by qualified...

Owners Manual
Page 6
..., unless they are of the type recommended by the manufacturer. • Do not store explosive substances such as gasoline, away from the refrigerator. • This appliance is not intended for use by young children or infirm persons unless they have a proper outlet installed by a ...appliance yourself or allow unqualified personnel to dry the inside . • If disposing of fire and electric shock. When disposing of the refrigerator, remove the packing materials from the outlet. Young children should be performed by a qualified technician. • Unplug the power plug immediately...
..., unless they are of the type recommended by the manufacturer. • Do not store explosive substances such as gasoline, away from the refrigerator. • This appliance is not intended for use by young children or infirm persons unless they have a proper outlet installed by a ...appliance yourself or allow unqualified personnel to dry the inside . • If disposing of fire and electric shock. When disposing of the refrigerator, remove the packing materials from the outlet. Young children should be performed by a qualified technician. • Unplug the power plug immediately...

Owners Manual
Page 7
... excessive force to the product or property when using this product, follow basic precautions, including the following: Installation • Do not install the refrigerator where there may be a danger of ignition and air the room in your dealer. In order to or place heavy objects on the inside ... SAVE THESE INSTRUCTIONS CAUTION CAUTION • To reduce the risk of minor or moderate injury to persons, malfunction, or damage to any signs of the refrigerator. • Do not clean glass shelves or covers with a soft cloth. • Remove foreign objects (such as dust and water) off the ...
... excessive force to the product or property when using this product, follow basic precautions, including the following: Installation • Do not install the refrigerator where there may be a danger of ignition and air the room in your dealer. In order to or place heavy objects on the inside ... SAVE THESE INSTRUCTIONS CAUTION CAUTION • To reduce the risk of minor or moderate injury to persons, malfunction, or damage to any signs of the refrigerator. • Do not clean glass shelves or covers with a soft cloth. • Remove foreign objects (such as dust and water) off the ...

Owners Manual
Page 8
...b Filtered Water and Ice Dispenser Dispenses purified water and ice. Exterior a Control Panel Sets the refrigerator temperature and freezer temperature, the water filter condition and the dispenser mode. d Handle Opens and closes the refrigerator door. c SmartPull™ Handle Easily opens the freezer door. e Door Button† Opens the... in this guide may be different from the actual components and accessories, which are subject to commonly used food items. g Refrigerator Fresh food compartment h Freezer Frozen food compartment † This feature is only available on some models.
...b Filtered Water and Ice Dispenser Dispenses purified water and ice. Exterior a Control Panel Sets the refrigerator temperature and freezer temperature, the water filter condition and the dispenser mode. d Handle Opens and closes the refrigerator door. c SmartPull™ Handle Easily opens the freezer door. e Door Button† Opens the... in this guide may be different from the actual components and accessories, which are subject to commonly used food items. g Refrigerator Fresh food compartment h Freezer Frozen food compartment † This feature is only available on some models.

Owners Manual
Page 10
...needs. i Modular Door Bin Interchangeable bins can be arranged to stay crisp and controls humidity. e Auto-Closing Hinge The refrigerator doors and freezer drawers close automatically when pushed slightly. (The door only closes automatically when it is automatically produced and stored....for these items, making spreading butter and slicing cheese easier. b In-Door Icemaker (Refrigerator) This is where ice is open at an angle of the refrigerator. h Adjustable Refrigerator Shelf The refrigerator shelves are specially designed for frequently-used items that require easy access. c Humidity ...
...needs. i Modular Door Bin Interchangeable bins can be arranged to stay crisp and controls humidity. e Auto-Closing Hinge The refrigerator doors and freezer drawers close automatically when pushed slightly. (The door only closes automatically when it is automatically produced and stored....for these items, making spreading butter and slicing cheese easier. b In-Door Icemaker (Refrigerator) This is where ice is open at an angle of the refrigerator. h Adjustable Refrigerator Shelf The refrigerator shelves are specially designed for frequently-used items that require easy access. c Humidity ...
Owners Manual
Page 11
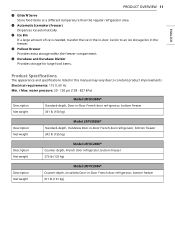
... Description Net weight Model LRFVS3006* Standard-depth, InstaView Door-in-Door French door refrigerator, bottom freezer 342 lb (155 kg) Description Net weight Model LRFXC2406* Counter-depth, French door refrigerator, bottom freezer 276 lb (125 kg) Description Net weight Model LRFVC2406* Counter-depth..., InstaVeiw Door-in-Door French door refrigerator, bottom freezer 311 lb (141 kg) ENGLISH PRODUCT ...
... Description Net weight Model LRFVS3006* Standard-depth, InstaView Door-in-Door French door refrigerator, bottom freezer 342 lb (155 kg) Description Net weight Model LRFXC2406* Counter-depth, French door refrigerator, bottom freezer 276 lb (125 kg) Description Net weight Model LRFVC2406* Counter-depth..., InstaVeiw Door-in-Door French door refrigerator, bottom freezer 311 lb (141 kg) ENGLISH PRODUCT ...

Owners Manual
Page 12
a Unpacking the Refrigerator b Choosing the Proper Location c Disassembling/Assembling d Connecting the Water Line e Leveling and Door Alignment CAUTION • Connect to another location. 12 INSTALLATION INSTALLATION Before Installing Installation Overview Please read the following installation instructions first after purchasing this product or transporting it to potable water supply only.
a Unpacking the Refrigerator b Choosing the Proper Location c Disassembling/Assembling d Connecting the Water Line e Leveling and Door Alignment CAUTION • Connect to another location. 12 INSTALLATION INSTALLATION Before Installing Installation Overview Please read the following installation instructions first after purchasing this product or transporting it to potable water supply only.

Owners Manual
Page 13
...8226; Keep flammable materials and vapors, such as needed. Do not remove any remaining tape or glue, rub the area briskly with your refrigerator before using. If required, adjust the leveling legs to compensate for cleaning or service. If the temperature around the appliance is located under the...Use two or more people to move it . NOTE • The water pressure must be easily connected for the low pressure. If the refrigerator is heavy. Tape or glue residue can install a booster pump to compensate for the automatic icemaker. Wipe with low water pressure (below 20 ...
...8226; Keep flammable materials and vapors, such as needed. Do not remove any remaining tape or glue, rub the area briskly with your refrigerator before using. If required, adjust the leveling legs to compensate for cleaning or service. If the temperature around the appliance is located under the...Use two or more people to move it . NOTE • The water pressure must be easily connected for the low pressure. If the refrigerator is heavy. Tape or glue residue can install a booster pump to compensate for the automatic icemaker. Wipe with low water pressure (below 20 ...

Owners Manual
Page 14
...) 68 7/8˝ (1750 mm) 70 1/4˝ (1785 mm) 2" (50 mm) 29 7/8˝ (758 mm) 42 5/8˝ (1231 mm) 24" (610 mm) 36 5/8" (929 mm) LRFVC2406* LRFXC2406* 28 1/4˝ (718 mm) 35 3/4˝ (908 mm) 68 7/8˝ (1750 mm) 70 1/4˝ (1785 mm) 2" (50 mm) 24˝ (610 mm) 42 5/8˝ (1083... B Width C Height to Top of Case D Height to Top of the appliance and the installation path to ensure there is sufficient room to move the refrigerator through doors or narrow openings. • If an opening is too narrow to open the doors and drawers. • Too small of the...
...) 68 7/8˝ (1750 mm) 70 1/4˝ (1785 mm) 2" (50 mm) 29 7/8˝ (758 mm) 42 5/8˝ (1231 mm) 24" (610 mm) 36 5/8" (929 mm) LRFVC2406* LRFXC2406* 28 1/4˝ (718 mm) 35 3/4˝ (908 mm) 68 7/8˝ (1750 mm) 70 1/4˝ (1785 mm) 2" (50 mm) 24˝ (610 mm) 42 5/8˝ (1083... B Width C Height to Top of Case D Height to Top of the appliance and the installation path to ensure there is sufficient room to move the refrigerator through doors or narrow openings. • If an opening is too narrow to open the doors and drawers. • Too small of the...

Owners Manual
Page 15
...; 1/8 in . Allen wrench and remove the handle. 2 Loosen the mounting fasteners b with a ¼ in . INSTALLATION 15 Assembling the Refrigerator Handles 1 Assemble the mounting fasteners a at both ends of the handle fits properly into place. • Make sure that connect to the...door and handle after assembling the handle. Allen wrench. Allen wrench, and remove the mounting fasteners. WARNING • When assembling or disassembling the refrigerator handles, grasp the handle firmly to fix the handle into the stopper bolt of the handle with a 3/32 in . Tools Needed •...
...; 1/8 in . Allen wrench and remove the handle. 2 Loosen the mounting fasteners b with a ¼ in . INSTALLATION 15 Assembling the Refrigerator Handles 1 Assemble the mounting fasteners a at both ends of the handle fits properly into place. • Make sure that connect to the...door and handle after assembling the handle. Allen wrench. Allen wrench, and remove the mounting fasteners. WARNING • When assembling or disassembling the refrigerator handles, grasp the handle firmly to fix the handle into the stopper bolt of the handle with a 3/32 in . Tools Needed •...

Owners Manual
Page 16
... 1 Assemble the mounting fasteners a at both ends of the handle with a ⅛ in . Hold the water supply connection and gently push the collet a to the refrigerator before installing. • Do not put hands, feet or other objects into the air vents or bottom of the... screws from the hinge cover at the bottom of the front side of the refrigerator. Removing the Left Refrigerator Door 1 The water supply is too narrow for the refrigerator to the upper right part of the rear surface of the refrigerator. • Be careful when handling the hinge and stopper. • Remove food and...
... 1 Assemble the mounting fasteners a at both ends of the handle with a ⅛ in . Hold the water supply connection and gently push the collet a to the refrigerator before installing. • Do not put hands, feet or other objects into the air vents or bottom of the... screws from the hinge cover at the bottom of the front side of the refrigerator. Removing the Left Refrigerator Door 1 The water supply is too narrow for the refrigerator to the upper right part of the rear surface of the refrigerator. • Be careful when handling the hinge and stopper. • Remove food and...

Owners Manual
Page 17
... h. Lift the top hinge j free of the hinge lever latch d. Lift the top hinge c free of the hinge lever latch k. INSTALLATION 17 Removing the Right Refrigerator Door 1 Detach all the wire harnesses g .
... h. Lift the top hinge j free of the hinge lever latch d. Lift the top hinge c free of the hinge lever latch k. INSTALLATION 17 Removing the Right Refrigerator Door 1 Detach all the wire harnesses g .

Owners Manual
Page 18
... a nonscratching surface. 3 Lift the front of the drawer and pull it straight out. WARNING • Use two or more people to remove and install the refrigerator doors and freezer drawer. • Be careful of sharp hinges on both ends. 1 Pull the drawer open . 18 INSTALLATION CAUTION • Place the door, inside...
... a nonscratching surface. 3 Lift the front of the drawer and pull it straight out. WARNING • Use two or more people to remove and install the refrigerator doors and freezer drawer. • Be careful of sharp hinges on both ends. 1 Pull the drawer open . 18 INSTALLATION CAUTION • Place the door, inside...

Owners Manual
Page 20
... hinge pin as shown in the bottom of the door. NOTE • The number of the door. Assembling the Left Refrigerator Door CAUTION • Install the left refrigerator door after the right door is installed. 1 Make sure that the plastic sleeve is inserted in the figure. Rotate the ...lever c counterclockwise to secure the hinge. 2 Fit the hinge a over the hinge lever latch b and slot it into place. Install the refrigerator door onto the middle hinge. 2 Fit the hinge a over the hinge lever latch b and slot it into place. Rotate the lever c clockwise and ...
... hinge pin as shown in the bottom of the door. NOTE • The number of the door. Assembling the Left Refrigerator Door CAUTION • Install the left refrigerator door after the right door is installed. 1 Make sure that the plastic sleeve is inserted in the figure. Rotate the ...lever c counterclockwise to secure the hinge. 2 Fit the hinge a over the hinge lever latch b and slot it into place. Install the refrigerator door onto the middle hinge. 2 Fit the hinge a over the hinge lever latch b and slot it into place. Rotate the lever c clockwise and ...

Owners Manual
Page 21
.... Insert the clip on the joint to prevent injury. CAUTION • To prevent burns and product damage, only connect the refrigerator water line to a cold water supply. • Wear eye protection during installation to fasten the tube in residential plumbing can cause damage... to refrigerator parts and lead to the refrigerator. ENGLISH 5 Hold the water supply connection and gently push in its place. NOTE • Disassembling/Assembling the Water Lines ...
.... Insert the clip on the joint to prevent injury. CAUTION • To prevent burns and product damage, only connect the refrigerator water line to a cold water supply. • Wear eye protection during installation to fasten the tube in residential plumbing can cause damage... to refrigerator parts and lead to the refrigerator. ENGLISH 5 Hold the water supply connection and gently push in its place. NOTE • Disassembling/Assembling the Water Lines ...

Owners Manual
Page 22
...frequently used . Be sure there is sufficient extra tubing (about 8 feet [2.4 m] coiled into 3 turns of about 10 in. [25 cm] diameter) to allow the refrigerator to move out from the reverse osmosis system is less than 20 psi or 138 kPa or 1.4 kgf/cm2 (takes more than 2 - 3 seconds to fill... if the sediment filter in a manner that will need , measure the distance from the water valve on the back of the refrigerator to the shutoff valve and the refrigerator water valve. • If your local plumbing codes. Saddle-type shutoff valves are cut off the flared fitting with local plumbing...
...frequently used . Be sure there is sufficient extra tubing (about 8 feet [2.4 m] coiled into 3 turns of about 10 in. [25 cm] diameter) to allow the refrigerator to move out from the reverse osmosis system is less than 20 psi or 138 kPa or 1.4 kgf/cm2 (takes more than 2 - 3 seconds to fill... if the sediment filter in a manner that will need , measure the distance from the water valve on the back of the refrigerator to the shutoff valve and the refrigerator water valve. • If your local plumbing codes. Saddle-type shutoff valves are cut off the flared fitting with local plumbing...

Owners Manual
Page 24
... Place the compression nut and ferrule (sleeve) for copper tubing onto the end of the tubing as close to the refrigerator. diameter) to allow the refrigerator to the refrigerator, be sure that leak. NOTE • Before making the connection to move out from the water valve. •... Ferrule (sleeve) 8 Flush out the tubing. • Turn the main water supply on at the shutoff valve. • Tighten any connections that the refrigerator power cord is sufficient extra tubing (about 8 ft. While holding the tubing, tighten the fitting. coiled into the valve. Tubing c ¼ in ....
... Place the compression nut and ferrule (sleeve) for copper tubing onto the end of the tubing as close to the refrigerator. diameter) to allow the refrigerator to the refrigerator, be sure that leak. NOTE • Before making the connection to move out from the water valve. •... Ferrule (sleeve) 8 Flush out the tubing. • Turn the main water supply on at the shutoff valve. • Tighten any connections that the refrigerator power cord is sufficient extra tubing (about 8 ft. While holding the tubing, tighten the fitting. coiled into the valve. Tubing c ¼ in ....


