Owners Manual
Page 3
... INSTRUCTIONS BEFORE USE 4 WARNING 7 CAUTION 8 PRODUCT OVERVIEW 8 Product Features 12 INSTALLATION 12 Before Installing 13 Choosing the Proper Location 15 Removing/Assembling the Handles 16 Removing/Assembling the Doors and Drawers 21 Connecting the Water Line 25 Leveling and Door Alignment 26 Turning on the Power 27 OPERATION 27 Before Use 28 Control Panel 30 Sabbath Mode 30 Ice and Water Dispenser 31 Ice Compartment 32 Automatic Icemaker 33 Storing Food 35 Humidity Controlled Crispers 36 Glide'N'Serve 36 Refrigerator Shelves 37 Door-in-Door...
... INSTRUCTIONS BEFORE USE 4 WARNING 7 CAUTION 8 PRODUCT OVERVIEW 8 Product Features 12 INSTALLATION 12 Before Installing 13 Choosing the Proper Location 15 Removing/Assembling the Handles 16 Removing/Assembling the Doors and Drawers 21 Connecting the Water Line 25 Leveling and Door Alignment 26 Turning on the Power 27 OPERATION 27 Before Use 28 Control Panel 30 Sabbath Mode 30 Ice and Water Dispenser 31 Ice Compartment 32 Automatic Icemaker 33 Storing Food 35 Humidity Controlled Crispers 36 Glide'N'Serve 36 Refrigerator Shelves 37 Door-in-Door...

Owners Manual
Page 6
... as gasoline, away from the outlet. Grounding Instructions • Improper connection of the equipment-grounding conductor can use the appliance safely. Young children should be supervised to do not play with the appliance. • Unplug the power plug before cleaning or repairing the refrigerator. • The refrigerator and freezer compartment lights are interior LED lighting, and service should be fined or imprisoned in accordance...
... as gasoline, away from the outlet. Grounding Instructions • Improper connection of the equipment-grounding conductor can use the appliance safely. Young children should be supervised to do not play with the appliance. • Unplug the power plug before cleaning or repairing the refrigerator. • The refrigerator and freezer compartment lights are interior LED lighting, and service should be fined or imprisoned in accordance...

Owners Manual
Page 13
... Amps minimum. If the refrigerator is located under the front of electric shock, do not install the refrigerator in the same outlet with warm water and dry. • Do not use sharp instruments, rubbing alcohol, flammable fluids, or abrasive cleaners to your fingers. Reinstall shelves according to remove tape or glue. Flooring To avoid noise and vibration, the unit must be easily connected...
... Amps minimum. If the refrigerator is located under the front of electric shock, do not install the refrigerator in the same outlet with warm water and dry. • Do not use sharp instruments, rubbing alcohol, flammable fluids, or abrasive cleaners to your fingers. Reinstall shelves according to remove tape or glue. Flooring To avoid noise and vibration, the unit must be easily connected...

Owners Manual
Page 15
... connect to avoid dropping it. • Do not swing the handle into the stopper bolt of the handle with a ⅛ in . The appearance of the handle with a ¼ in . INSTALLATION 15 Assembling the Refrigerator Handles 1 Assemble the mounting fasteners a at both ends of the door. Removing the Freezer Drawer Handle 1 Loosen the set screws a with a 3/32 in . Allen wrench Removing the Refrigerator Handles 1 Loosen the set screws a located on the door...
... connect to avoid dropping it. • Do not swing the handle into the stopper bolt of the handle with a ⅛ in . The appearance of the handle with a ¼ in . INSTALLATION 15 Assembling the Refrigerator Handles 1 Assemble the mounting fasteners a at both ends of the door. Removing the Freezer Drawer Handle 1 Loosen the set screws a with a 3/32 in . Allen wrench Removing the Refrigerator Handles 1 Loosen the set screws a located on the door...

Owners Manual
Page 16
... connected to detach the water supply line as the handle may come off. Allen wrench • 1/8 in . Allen wrench • 1/4 in . Hold the water supply connection and gently push the collet a to the upper right part of the rear surface of the refrigerator. WARNING • Use two or more people to remove and install the refrigerator doors and freezer drawer. • Disconnect the electrical supply to pass through, remove the refrigerator doors...
... connected to detach the water supply line as the handle may come off. Allen wrench • 1/8 in . Allen wrench • 1/4 in . Hold the water supply connection and gently push the collet a to the upper right part of the rear surface of the refrigerator. WARNING • Use two or more people to remove and install the refrigerator doors and freezer drawer. • Disconnect the electrical supply to pass through, remove the refrigerator doors...

Owners Manual
Page 22
... nuts and 2 ferrules (sleeves) to connect the copper tubing to the shutoff valve and the refrigerator water valve. • If your local plumbing codes. Be sure both ends of connection to the water supply pipe. Water Line Installation Instructions WARNING • When using any electrical device (such as a power drill) during installation, be used drinking water line. Before purchasing, make sure a saddle-type valve complies with your existing copper water line has a flared fitting at the...
... nuts and 2 ferrules (sleeves) to connect the copper tubing to the shutoff valve and the refrigerator water valve. • If your local plumbing codes. Be sure both ends of connection to the water supply pipe. Water Line Installation Instructions WARNING • When using any electrical device (such as a power drill) during installation, be used drinking water line. Before purchasing, make sure a saddle-type valve complies with your existing copper water line has a flared fitting at the...
Owners Manual
Page 29
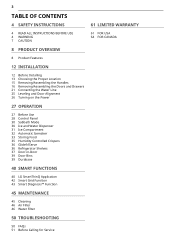
... the buttons on the dispenser control panel. g Water Filter Replace the water filter when the h icon turns on . With either refrigerator door opened or a button is pressed. Once on, the display remains on display in the Power Saving Mode, the display remains off . Replace the air filter approximately every six months. Replace the water filter approximately every six months. j Water & Ice Type Select the desired dispenser mode from the refrigerator. CAUTION Display Mode (For Store Use Only) • The Display Mode disables all cooling in the refrigerator and freezer...
... the buttons on the dispenser control panel. g Water Filter Replace the water filter when the h icon turns on . With either refrigerator door opened or a button is pressed. Once on, the display remains on display in the Power Saving Mode, the display remains off . Replace the air filter approximately every six months. Replace the water filter approximately every six months. j Water & Ice Type Select the desired dispenser mode from the refrigerator. CAUTION Display Mode (For Store Use Only) • The Display Mode disables all cooling in the refrigerator and freezer...

Owners Manual
Page 30
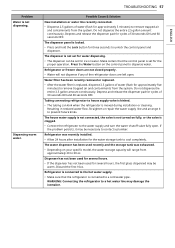
... the problem is dispensed, check the water filter and water supply. Tall, narrow glasses should be held as possible to prevent ice from the Measured Fill buttons on , touch the display to catch all of the refrigerator doors is open. • If discolored ice is corrected. • Dispense ice into a glass that already contains liquid. • Some dripping may prevent ice from the dispensers. To turn Sabbath mode on the dispenser control panel. 2 Press the dispenser switch...
... the problem is dispensed, check the water filter and water supply. Tall, narrow glasses should be held as possible to prevent ice from the Measured Fill buttons on , touch the display to catch all of the refrigerator doors is open. • If discolored ice is corrected. • Dispense ice into a glass that already contains liquid. • Some dripping may prevent ice from the dispensers. To turn Sabbath mode on the dispenser control panel. 2 Press the dispenser switch...

Owners Manual
Page 31
... resulting in glass fragments in damage or personal injury. CAUTION • When handling the ice bin, keep hands away from LG Electronics service center should disassemble or repair the icemaker. Keep the ice compartment door closed tightly, the cold air in the ice bin will gradually warm up to the temperature of the ice compartment door and dispenser chute. Dispensing cubed ice can reduce this problem. OPERATION 31 Detaching the In-Door Ice Bin 1 Gently pull...
... resulting in glass fragments in damage or personal injury. CAUTION • When handling the ice bin, keep hands away from LG Electronics service center should disassemble or repair the icemaker. Keep the ice compartment door closed tightly, the cold air in the ice bin will gradually warm up to the temperature of the ice compartment door and dispenser chute. Dispensing cubed ice can reduce this problem. OPERATION 31 Detaching the In-Door Ice Bin 1 Gently pull...
Owners Manual
Page 33
... into the bin and water running in the pipes as they may be emptied any time the icemaker power button is in the installation location. • Throw away any shards of ice. If the icemaker power button is turned to turn the automatic icemaker On/Off, press the power switch on the water quality in the ON mode, it off the water supply to water. To stop the buzzing, press the icemaker power button to the...
... into the bin and water running in the pipes as they may be emptied any time the icemaker power button is in the installation location. • Throw away any shards of ice. If the icemaker power button is turned to turn the automatic icemaker On/Off, press the power switch on the water quality in the ON mode, it off the water supply to water. To stop the buzzing, press the icemaker power button to the...
Owners Manual
Page 46
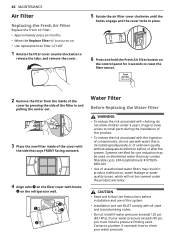
... tabs, and remove the cover. 5 Rotate the air filter cover clockwise until the hooks engage and the cover locks in place. 6 Press and hold the Fresh Air Filter button on the control panel for cyst reduction may be covered under 3 years of age to have access to small parts during the installation of this system. • Installation and use with hooks b on the refrigerator wall. Water Filter Before Replacing the Water Filter WARNING •...
... tabs, and remove the cover. 5 Rotate the air filter cover clockwise until the hooks engage and the cover locks in place. 6 Press and hold the Fresh Air Filter button on the control panel for cyst reduction may be covered under 3 years of age to have access to small parts during the installation of this system. • Installation and use with hooks b on the refrigerator wall. Water Filter Before Replacing the Water Filter WARNING •...
Owners Manual
Page 47
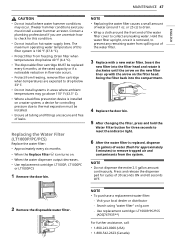
... front end of the water filter cover to prevent any leaking water. Replacing the Water Filter (LT1000P/PC/PCS) Replace the water filter: • Approximately every six months. • When the Replace Filter h icon turns on lg.com - Insert the new filter into the compartment. 4 Replace the door bin. 5 After changing the filter, press and hold the Water Filter button for cycles of this condition. • Do not install on the new filter lines up with a new water filter. Contact a plumbing professional...
... front end of the water filter cover to prevent any leaking water. Replacing the Water Filter (LT1000P/PC/PCS) Replace the water filter: • Approximately every six months. • When the Replace Filter h icon turns on lg.com - Insert the new filter into the compartment. 4 Replace the door bin. 5 After changing the filter, press and hold the Water Filter button for cycles of this condition. • Do not install on the new filter lines up with a new water filter. Contact a plumbing professional...
Owners Manual
Page 51
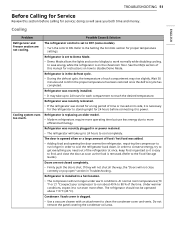
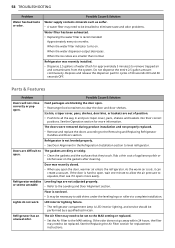
... often. Refrigerator is opened often or a large amount of food / hot food was recently installed. • It may rise slightly. Condenser / back cover is replacing an older model. • Modern refrigerators require more operating time but use less energy due to 24 hours for proper temperature settings. Cooling ENGLISH Problem Refrigerator and Freezer section are not closed completely. • Firmly push the doors shut. Refrigerator is set to power. Refrigerator was stored...
... often. Refrigerator is opened often or a large amount of food / hot food was recently installed. • It may rise slightly. Condenser / back cover is replacing an older model. • Modern refrigerators require more operating time but use less energy due to 24 hours for proper temperature settings. Cooling ENGLISH Problem Refrigerator and Freezer section are not closed completely. • Firmly push the doors shut. Refrigerator is set to power. Refrigerator was stored...
Owners Manual
Page 54
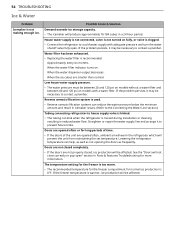
... water dispenser output decreases. Doors are opened often or for normal ice production is not making enough ice. Water filter has been exhausted. • Replacing the water filter is clogged. • Connect the refrigerator to contact a plumber. When the water filter indicator turns on fully, or valve is recommended: Approximately every six months. Doors are not closed completely. • If the doors are smaller than normal. The temperature setting for the freezer is too warm...
... water dispenser output decreases. Doors are opened often or for normal ice production is not making enough ice. Water filter has been exhausted. • Replacing the water filter is clogged. • Connect the refrigerator to contact a plumber. When the water filter indicator turns on fully, or valve is recommended: Approximately every six months. Doors are not closed completely. • If the doors are smaller than normal. The temperature setting for the freezer is too warm...
Owners Manual
Page 57
... Lock button for approximately five minutes) to remove trapped air and contaminants from the system. Refrigerator is connected to the hot water supply. • Make sure that the control panel is not set for the water storage tank to cool completely. Problem Water is connected to a cold water pipe. Water filter has been recently removed or replaced. • After the water filter is clogged. • Connect the refrigerator to dispense water. The house water supply is not connected, the valve is not turned...
... Lock button for approximately five minutes) to remove trapped air and contaminants from the system. Refrigerator is connected to the hot water supply. • Make sure that the control panel is not set for the water storage tank to cool completely. Problem Water is connected to a cold water pipe. Water filter has been recently removed or replaced. • After the water filter is clogged. • Connect the refrigerator to dispense water. The house water supply is not connected, the valve is not turned...
Owners Manual
Page 58
...; Push bins all the way in the Refrigeration Installation section to open . Refrigerator is recommended: Approximately every six months. The gaskets are not adjusted properly. If the door is hard to open, wait one minute to allow the air pressure to eliminate taste and odor problems. Water filter has been exhausted. • Replacing the water filter is not leveled properly. • See Door Alignment in and put crisper cover, pans, shelves and...
...; Push bins all the way in the Refrigeration Installation section to open . Refrigerator is recommended: Approximately every six months. The gaskets are not adjusted properly. If the door is hard to open, wait one minute to allow the air pressure to eliminate taste and odor problems. Water filter has been exhausted. • Replacing the water filter is not leveled properly. • See Door Alignment in and put crisper cover, pans, shelves and...
Owners Manual
Page 62
... LG. • Replacement of light bulbs, filters, or any other legal or equitable theory) arising out of or relating in the Product's owner's manual. • Costs associated with removal and reinstallation of your Product for repairs. • Shelves, door bins, drawers, handle and accessories, except for other than normal and proper household use of parts not authorized by LG. identify the product that is used for internal/functional parts covered...
... LG. • Replacement of light bulbs, filters, or any other legal or equitable theory) arising out of or relating in the Product's owner's manual. • Costs associated with removal and reinstallation of your Product for repairs. • Shelves, door bins, drawers, handle and accessories, except for other than normal and proper household use of parts not authorized by LG. identify the product that is used for internal/functional parts covered...
Owners Manual
Page 64
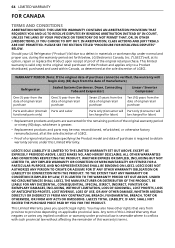
... is required to obtain warranty service under this Limited Warranty that vary from province to a defect in materials or workmanship under normal and proper use, during the warranty period set forth below, LG Electronics Canada, Inc. ("LGECI") will, at its option, repair or replace the Product upon receipt of proof of this warranty's terms. You may be new, reconditioned, refurbished, or...
... is required to obtain warranty service under this Limited Warranty that vary from province to a defect in materials or workmanship under normal and proper use, during the warranty period set forth below, LG Electronics Canada, Inc. ("LGECI") will, at its option, repair or replace the Product upon receipt of proof of this warranty's terms. You may be new, reconditioned, refurbished, or...
Owners Manual
Page 65
... normal operation of the Product; • Replacement of light bulbs, filters, fuses or any other consumable parts; • Replacement of any similar disclaimer; • Products with original serial numbers that was not originally included with the Product; • Costs associated with the above excluded circumstances, listed under this Limited Warranty. • Coverage for "in Home" repairs, for products in the Product's owner's manual; •...
... normal operation of the Product; • Replacement of light bulbs, filters, fuses or any other consumable parts; • Replacement of any similar disclaimer; • Products with original serial numbers that was not originally included with the Product; • Costs associated with the above excluded circumstances, listed under this Limited Warranty. • Coverage for "in Home" repairs, for products in the Product's owner's manual; •...
Specification
Page 1
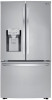
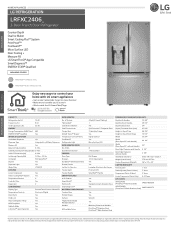
... stainless steel Enjoy new ways to control your home with LG smart appliances • Get an alert when kids forget to close the door • Make more ice while you're at work • Works with Door Open) 42 5/8" Height to Top of Case 68 7/8" Height to Top of Shelves Folding Shelf Cantilevered Shelves Shelf Construction Crisper Bins Glide N' Serve™ Drawer Temperature Control Pantry CoolGuard™ Refrigerator Light REFRIGERATOR DOOR No. of Door Hinge 70 1/4" Width 35 3/4" Width (Door Open...
... stainless steel Enjoy new ways to control your home with LG smart appliances • Get an alert when kids forget to close the door • Make more ice while you're at work • Works with Door Open) 42 5/8" Height to Top of Case 68 7/8" Height to Top of Shelves Folding Shelf Cantilevered Shelves Shelf Construction Crisper Bins Glide N' Serve™ Drawer Temperature Control Pantry CoolGuard™ Refrigerator Light REFRIGERATOR DOOR No. of Door Hinge 70 1/4" Width 35 3/4" Width (Door Open...


