
Owners Manual
Page 1
ENGLISH ESPAÑOL FRANÇAIS LRFDS3006*/LRFVS3006*/LRFVC2406*/LRFXC2406* MFL69497029 Rev.04_090719 www.lg.com Copyright © 2019 LG Electronics Inc. All Rights Reserved OWNER'S MANUAL FRENCH DOOR REFRIGERATOR Read this owner's manual thoroughly before operating the appliance and keep it handy for reference at all times.
ENGLISH ESPAÑOL FRANÇAIS LRFDS3006*/LRFVS3006*/LRFVC2406*/LRFXC2406* MFL69497029 Rev.04_090719 www.lg.com Copyright © 2019 LG Electronics Inc. All Rights Reserved OWNER'S MANUAL FRENCH DOOR REFRIGERATOR Read this owner's manual thoroughly before operating the appliance and keep it handy for reference at all times.
Owners Manual
Page 3
... Dispenser 31 Ice Compartment 32 Automatic Icemaker 33 Storing Food 35 Humidity Controlled Crispers 36 Glide'N'Serve 36 Refrigerator Shelves 37 Door-in-Door 39 Door Bins 39 Durabase 40 SMART FUNCTIONS 40 LG SmartThinQ Application 42 Smart Grid Function 43 Smart Diagnosis™ Function 45 MAINTENANCE 45 Cleaning 46 Air Filter...
... Dispenser 31 Ice Compartment 32 Automatic Icemaker 33 Storing Food 35 Humidity Controlled Crispers 36 Glide'N'Serve 36 Refrigerator Shelves 37 Door-in-Door 39 Door Bins 39 Durabase 40 SMART FUNCTIONS 40 LG SmartThinQ Application 42 Smart Grid Function 43 Smart Diagnosis™ Function 45 MAINTENANCE 45 Cleaning 46 Air Filter...

Owners Manual
Page 4
...including the use an extension cord. • The appliance must be positioned for easy access to a power source. • When moving the refrigerator, be injured or cause damage to reduce the chance of injury, and tell you what may deteriorate. We have provided many important safety messages ... • Only connect this product to roll over or damage the power cord. • Contact an authorized service center when installing or relocating the refrigerator. • Do not, under any circumstances, cut or remove the third (ground) prong from the power cord. • Keep packing materials out...
...including the use an extension cord. • The appliance must be positioned for easy access to a power source. • When moving the refrigerator, be injured or cause damage to reduce the chance of injury, and tell you what may deteriorate. We have provided many important safety messages ... • Only connect this product to roll over or damage the power cord. • Contact an authorized service center when installing or relocating the refrigerator. • Do not, under any circumstances, cut or remove the third (ground) prong from the power cord. • Keep packing materials out...

Owners Manual
Page 5
... and breakfast type environments; - Immediately have become frayed or otherwise damaged repaired or replaced by qualified service personnel. • Do not operate the refrigerator or touch the power cord with wet hands. • Do not modify or extend the power cord. • Do not use an uncertified...for use . Doing so could be trapped and suffocated. • Children should be used for special purposes such as the storage of the refrigerator. • Disconnect the power cord immediately and contact an authorized service center if there is a strange noise, odor, or smoke coming ...
... and breakfast type environments; - Immediately have become frayed or otherwise damaged repaired or replaced by qualified service personnel. • Do not operate the refrigerator or touch the power cord with wet hands. • Do not modify or extend the power cord. • Do not use an uncertified...for use . Doing so could be trapped and suffocated. • Children should be used for special purposes such as the storage of the refrigerator. • Disconnect the power cord immediately and contact an authorized service center if there is a strange noise, odor, or smoke coming ...

Owners Manual
Page 6
... qualified electrician or service personnel if you may damage the power cord, resulting in . • When dispensing ice from the refrigerator. Always grip the plug firmly and pull straight out from the appliance. Failure to ensure that they do so may be performed .... Grounding Instructions • Improper connection of the equipment-grounding conductor can use the appliance safely. Disposal • Junked or abandoned refrigerators are dangerous, even if they are of the type recommended by the manufacturer. • Do not store explosive substances such as gasoline...
... qualified electrician or service personnel if you may damage the power cord, resulting in . • When dispensing ice from the refrigerator. Always grip the plug firmly and pull straight out from the appliance. Failure to ensure that they do so may be performed .... Grounding Instructions • Improper connection of the equipment-grounding conductor can use the appliance safely. Disposal • Junked or abandoned refrigerators are dangerous, even if they are of the type recommended by the manufacturer. • Do not store explosive substances such as gasoline...

Owners Manual
Page 7
...combustible. If in doubt, consult your particular appliance is intended to avoid the creation of a flammable gas air mixture if a leak in the refrigerating circuit occurs, the size of the room in domestic and similar applications. • Do not strike or apply excessive force to ensure that no...door bins. Maintenance • Do not use a wet or damp cloth when cleaning the plug. • Do not spray water directly on the refrigerator's dispenser. CAUTION CAUTION • To reduce the risk of minor or moderate injury to persons, malfunction, or damage to the product or property when...
...combustible. If in doubt, consult your particular appliance is intended to avoid the creation of a flammable gas air mixture if a leak in the refrigerating circuit occurs, the size of the room in domestic and similar applications. • Do not strike or apply excessive force to ensure that no...door bins. Maintenance • Do not use a wet or damp cloth when cleaning the plug. • Do not spray water directly on the refrigerator's dispenser. CAUTION CAUTION • To reduce the risk of minor or moderate injury to persons, malfunction, or damage to the product or property when...

Owners Manual
Page 8
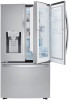
... components and accessories, which are subject to change by the manufacturer without prior notice for easy access to commonly used food items. g Refrigerator Fresh food compartment h Freezer Frozen food compartment † This feature is only available on some models. f InstaView Door-in-Door†...Ice Dispenser Dispenses purified water and ice. c SmartPull™ Handle Easily opens the freezer door. d Handle Opens and closes the refrigerator door. e Door Button† Opens the Door-in -Door compartment allows for product improvement purposes. Exterior a Control Panel Sets the...
... components and accessories, which are subject to change by the manufacturer without prior notice for easy access to commonly used food items. g Refrigerator Fresh food compartment h Freezer Frozen food compartment † This feature is only available on some models. f InstaView Door-in-Door†...Ice Dispenser Dispenses purified water and ice. c SmartPull™ Handle Easily opens the freezer door. d Handle Opens and closes the refrigerator door. e Door Button† Opens the Door-in -Door compartment allows for product improvement purposes. Exterior a Control Panel Sets the...

Owners Manual
Page 10
...drawers close automatically when pushed slightly. (The door only closes automatically when it is automatically produced and stored. h Adjustable Refrigerator Shelf The refrigerator shelves are specially designed for frequently-used items that require easy access. c Humidity Controlled Crisper Helps vegetables and fruit ...OVERVIEW InstaView Door-in -Door Case A convenient storage area for these items, making spreading butter and slicing cheese easier. b In-Door Icemaker (Refrigerator) This is where ice is open at an angle of less than 30°.) f Door-in -Door: LRFVS3006* / LRFVC2406* a LED...
...drawers close automatically when pushed slightly. (The door only closes automatically when it is automatically produced and stored. h Adjustable Refrigerator Shelf The refrigerator shelves are specially designed for frequently-used items that require easy access. c Humidity Controlled Crisper Helps vegetables and fruit ...OVERVIEW InstaView Door-in -Door Case A convenient storage area for these items, making spreading butter and slicing cheese easier. b In-Door Icemaker (Refrigerator) This is where ice is open at an angle of less than 30°.) f Door-in -Door: LRFVS3006* / LRFVC2406* a LED...
Owners Manual
Page 11
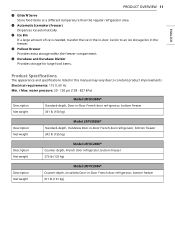
...120 psi (138 - 827 kPa) Description Net weight Model LRFDS3006* Standard-depth, Door-in-Door French door refrigerator, bottom freezer 331 lb (150 kg) Description Net weight Model LRFVS3006* Standard-depth, InstaView Door-in-Door French door refrigerator, bottom freezer 342 lb (155 kg) Description Net weight ...bin in the freezer. l Ice Bin If a large amount of ice is needed, transfer the ice in the in -Door French door refrigerator, bottom freezer 311 lb (141 kg) k Automatic Icemaker (Freezer) Dispenses ice automatically. ENGLISH PRODUCT OVERVIEW 11 j Glide'N'Serve Store food items...
...120 psi (138 - 827 kPa) Description Net weight Model LRFDS3006* Standard-depth, Door-in-Door French door refrigerator, bottom freezer 331 lb (150 kg) Description Net weight Model LRFVS3006* Standard-depth, InstaView Door-in-Door French door refrigerator, bottom freezer 342 lb (155 kg) Description Net weight ...bin in the freezer. l Ice Bin If a large amount of ice is needed, transfer the ice in the in -Door French door refrigerator, bottom freezer 311 lb (141 kg) k Automatic Icemaker (Freezer) Dispenses ice automatically. ENGLISH PRODUCT OVERVIEW 11 j Glide'N'Serve Store food items...

Owners Manual
Page 12
12 INSTALLATION INSTALLATION Before Installing Installation Overview Please read the following installation instructions first after purchasing this product or transporting it to potable water supply only. a Unpacking the Refrigerator b Choosing the Proper Location c Disassembling/Assembling d Connecting the Water Line e Leveling and Door Alignment CAUTION • Connect to another location.
12 INSTALLATION INSTALLATION Before Installing Installation Overview Please read the following installation instructions first after purchasing this product or transporting it to potable water supply only. a Unpacking the Refrigerator b Choosing the Proper Location c Disassembling/Assembling d Connecting the Water Line e Leveling and Door Alignment CAUTION • Connect to another location.

Owners Manual
Page 13
...in an area where the temperature is installed in a wet or damp area. NOTE • Installing on a solidly constructed floor. ENGLISH Unpacking the Refrigerator WARNING • Use two or more people to move it . NOTE • Remove tape and any remaining tape or glue, rub the area...automatic icemaker. Do not remove any warning labels, the model and serial number label, or the Tech Sheet that is heavy. Wipe with your refrigerator. • Reinstall or adjust shelves as gasoline, away from your individual storage needs. These products can install a booster pump to remove tape ...
...in an area where the temperature is installed in a wet or damp area. NOTE • Installing on a solidly constructed floor. ENGLISH Unpacking the Refrigerator WARNING • Use two or more people to move it . NOTE • Remove tape and any remaining tape or glue, rub the area...automatic icemaker. Do not remove any warning labels, the model and serial number label, or the Tech Sheet that is heavy. Wipe with your refrigerator. • Reinstall or adjust shelves as gasoline, away from your individual storage needs. These products can install a booster pump to remove tape ...

Owners Manual
Page 14
... Depth without Handle B Width C Height to Top of Case D Height to open the doors and drawers. • Too small of the refrigerator and the wall. Allow at least 2 inches (50.8 mm) between the back of a distance from adjacent items may result in lowered freezing... capability and increased electricity consumption charges. Dimension/Clearance A Depth without Door G Depth (Total with Door Open 90°) H Front Clearance I Depth with Handle LRFVS3006* LRFDS3006* 34 1/8˝ (866 mm) 35 3/4˝ (908 mm) 68 7/8˝ (1750 mm) 70 1/4˝ (1785 mm) 2" (50 mm) 29 7/8&#...
... Depth without Handle B Width C Height to Top of Case D Height to open the doors and drawers. • Too small of the refrigerator and the wall. Allow at least 2 inches (50.8 mm) between the back of a distance from adjacent items may result in lowered freezing... capability and increased electricity consumption charges. Dimension/Clearance A Depth without Door G Depth (Total with Door Open 90°) H Front Clearance I Depth with Handle LRFVS3006* LRFDS3006* 34 1/8˝ (866 mm) 35 3/4˝ (908 mm) 68 7/8˝ (1750 mm) 70 1/4˝ (1785 mm) 2" (50 mm) 29 7/8&#...

Owners Manual
Page 15
... Make sure that connect to fix the handle into the stopper bolt of the handles may vary from what is preferred. INSTALLATION 15 Assembling the Refrigerator Handles 1 Assemble the mounting fasteners a at both ends of the handle with a 3/32 in . Allen wrench. 2 Place the handle on... the lower side of the handle with a ¼ in . The appearance of the door. Assemble the set screws to the refrigerator door and handle using a ¼ in . Allen wrench, and remove the mounting fasteners. Allen wrench • 1/4 in . Removing the Freezer Drawer Handle...
... Make sure that connect to fix the handle into the stopper bolt of the handles may vary from what is preferred. INSTALLATION 15 Assembling the Refrigerator Handles 1 Assemble the mounting fasteners a at both ends of the handle with a 3/32 in . Allen wrench. 2 Place the handle on... the lower side of the handle with a ¼ in . The appearance of the door. Assemble the set screws to the refrigerator door and handle using a ¼ in . Allen wrench, and remove the mounting fasteners. Allen wrench • 1/4 in . Removing the Freezer Drawer Handle...

Owners Manual
Page 16
... • 3/32 in the joint area. Remove the clip in . WARNING • Use two or more people to remove and install the refrigerator doors and freezer drawer. • Disconnect the electrical supply to detach the water supply line as the handle may come off. Allen wrench •...1/8 in . Allen wrench. Removing/Assembling the Doors and Drawers If the entrance door is connected to pass through, remove the refrigerator doors and move the refrigerator sideways through the doorway. Removing the Hinge Cover Remove the screws from the hinge cover at the bottom of the front side ...
... • 3/32 in the joint area. Remove the clip in . WARNING • Use two or more people to remove and install the refrigerator doors and freezer drawer. • Disconnect the electrical supply to detach the water supply line as the handle may come off. Allen wrench •...1/8 in . Allen wrench. Removing/Assembling the Doors and Drawers If the entrance door is connected to pass through, remove the refrigerator doors and move the refrigerator sideways through the doorway. Removing the Hinge Cover Remove the screws from the hinge cover at the bottom of the front side ...

Owners Manual
Page 17
... careful that the door does not fall forward. 4 Lift the door from the middle hinge pin and remove the door. INSTALLATION 17 Removing the Right Refrigerator Door 1 Detach all the wire harnesses g . Lift the top hinge j free of the hinge lever latch d. NOTE • The number of the latch, be careful...
... careful that the door does not fall forward. 4 Lift the door from the middle hinge pin and remove the door. INSTALLATION 17 Removing the Right Refrigerator Door 1 Detach all the wire harnesses g . Lift the top hinge j free of the hinge lever latch d. NOTE • The number of the latch, be careful...

Owners Manual
Page 18
.... Remove the screws from the rails at both ends. 1 Pull the drawer open . WARNING • Use two or more people to remove and install the refrigerator doors and freezer drawer. • Be careful of sharp hinges on the freezer drawer. • To prevent accidents, keep children and pets away from the...
.... Remove the screws from the rails at both ends. 1 Pull the drawer open . WARNING • Use two or more people to remove and install the refrigerator doors and freezer drawer. • Be careful of sharp hinges on the freezer drawer. • To prevent accidents, keep children and pets away from the...

Owners Manual
Page 20
... over the hinge lever latch b and slot it into place. NOTE • The number of wire harnesses may vary depending on the model. Install the refrigerator door onto the middle hinge. 2 Fit the hinge a over the hinge lever latch b and slot it into place. Rotate the lever c clockwise and ... harnesses and the ground screw. Lower the door onto the middle hinge pin as shown in the figure. Assembling the Left Refrigerator Door CAUTION • Install the left refrigerator door after the right door is installed. 1 Make sure that the plastic sleeve is inserted in the bottom of the door...
... over the hinge lever latch b and slot it into place. NOTE • The number of wire harnesses may vary depending on the model. Install the refrigerator door onto the middle hinge. 2 Fit the hinge a over the hinge lever latch b and slot it into place. Rotate the lever c clockwise and ... harnesses and the ground screw. Lower the door onto the middle hinge pin as shown in the figure. Assembling the Left Refrigerator Door CAUTION • Install the left refrigerator door after the right door is installed. 1 Make sure that the plastic sleeve is inserted in the bottom of the door...

Owners Manual
Page 21
...a qualified plumber to correct water hammer before the water line is not covered by the refrigerator warranty. Water banging in the pipes, or water hammer in residential plumbing can cause damage to refrigerator parts and lead to water leakage or flooding. • Turn the icemaker OFF if the... refrigerator will be used before installing the water supply line to the refrigerator. Insert and tighten the cover screws. CAUTION • ...
...a qualified plumber to correct water hammer before the water line is not covered by the refrigerator warranty. Water banging in the pipes, or water hammer in residential plumbing can cause damage to refrigerator parts and lead to water leakage or flooding. • Turn the icemaker OFF if the... refrigerator will be used before installing the water supply line to the refrigerator. Insert and tighten the cover screws. CAUTION • ...

Owners Manual
Page 22
... water supply. Install the shutoff valve on the back of electric shock. 22 INSTALLATION Water Pressure You will prevent the hazard of the refrigerator to see if the sediment filter in the reverse osmosis system is blocked. Replace the filter if necessary. • Allow the storage ... cut off the flared fitting with a tube cutter and then use a compression fitting. • Shutoff valve to connect to the shutoff valve and the refrigerator water valve. • If your local plumbing codes. or adjustable wrench. • Flat-blade and Phillips-head screwdrivers. • Two ¼ in...
... water supply. Install the shutoff valve on the back of electric shock. 22 INSTALLATION Water Pressure You will prevent the hazard of the refrigerator to see if the sediment filter in the reverse osmosis system is blocked. Replace the filter if necessary. • Allow the storage ... cut off the flared fitting with a tube cutter and then use a compression fitting. • Shutoff valve to connect to the shutoff valve and the refrigerator water valve. • If your local plumbing codes. or adjustable wrench. • Flat-blade and Phillips-head screwdrivers. • Two ¼ in...

Owners Manual
Page 24
...through a hole drilled in . CAUTION • Check to see if leaks occur at the shutoff valve. • Tighten any connections that the refrigerator power cord is fully inserted into the connection as far as possible. Make sure the tubing is not plugged into the wall outlet. • ... nut securely. 9 Connect the tubing to the shutoff valve. Tubing c ¼ in the wall or floor (behind the refrigerator or adjacent base cabinet) as close to the refrigerator, be sure that leak. 24 INSTALLATION 6 Route the tubing. • Route the tubing between the cold water line and the...
...through a hole drilled in . CAUTION • Check to see if leaks occur at the shutoff valve. • Tighten any connections that the refrigerator power cord is fully inserted into the connection as far as possible. Make sure the tubing is not plugged into the wall outlet. • ... nut securely. 9 Connect the tubing to the shutoff valve. Tubing c ¼ in the wall or floor (behind the refrigerator or adjacent base cabinet) as close to the refrigerator, be sure that leak. 24 INSTALLATION 6 Route the tubing. • Route the tubing between the cold water line and the...


