Owner's Manual
Page 2
...Using your refrigerator Ensuring proper air circulation Multi Flow Door alarm Setting the controls Adjusting control settings Food storage guide Storing frozen food Refrigerator Section Refrigerator shelves Chef Fresh Crisper humidity control Optibin Crisper Crisper cover with lattice on inner surface Design-A-Door Dairy Bin Can Dispenser Egg Box Water Dispenser Freezer Section Ice Bin Wire Durabase Drawer tray Tilting Door Pull out drawer basket Filter Care and Cleaning General cleaning tips Outside Inside walls Door liner and gaskets Plastic parts Condenser coils Light bulb replacement Power...
...Using your refrigerator Ensuring proper air circulation Multi Flow Door alarm Setting the controls Adjusting control settings Food storage guide Storing frozen food Refrigerator Section Refrigerator shelves Chef Fresh Crisper humidity control Optibin Crisper Crisper cover with lattice on inner surface Design-A-Door Dairy Bin Can Dispenser Egg Box Water Dispenser Freezer Section Ice Bin Wire Durabase Drawer tray Tilting Door Pull out drawer basket Filter Care and Cleaning General cleaning tips Outside Inside walls Door liner and gaskets Plastic parts Condenser coils Light bulb replacement Power...
Owner's Manual
Page 3
..., and U.S. This warranty gives you specific legal rights and you . Damage to deliver and pickup, install, instruct, or replace house fuses or correct house wiring or plumbing, or correction of unauthorized repairs. 2. INCLUDING THE IMPLIED WARRANTY OF MERCHANTABILITY, IS LIMITED TO THE DURATION OF THE EXPRESS WARRANTY HEREIN. Service trips to your product type (Refrigerator), model number, serial number, and ZIP/Postal Code ready. Repairs when your Bill...
..., and U.S. This warranty gives you specific legal rights and you . Damage to deliver and pickup, install, instruct, or replace house fuses or correct house wiring or plumbing, or correction of unauthorized repairs. 2. INCLUDING THE IMPLIED WARRANTY OF MERCHANTABILITY, IS LIMITED TO THE DURATION OF THE EXPRESS WARRANTY HEREIN. Service trips to your product type (Refrigerator), model number, serial number, and ZIP/Postal Code ready. Repairs when your Bill...
Owner's Manual
Page 5
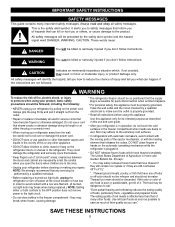
... fingers or hands on the refrigerator doors or shelves in the freezer compartment - Thawed ice cream should be eaten. Do not use and care guide. These words mean: DANGER You will be performed by pulling on the power cord. Always read and obey all instructions before cleaning or making any servicing be preceded by a qualified electrician to the extremely cold surfaces. WARNING You can...
... fingers or hands on the refrigerator doors or shelves in the freezer compartment - Thawed ice cream should be eaten. Do not use and care guide. These words mean: DANGER You will be performed by pulling on the power cord. Always read and obey all instructions before cleaning or making any servicing be preceded by a qualified electrician to the extremely cold surfaces. WARNING You can...
Owner's Manual
Page 6
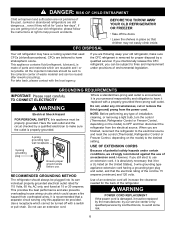
...". All the important materials should always be subject to fines and imprisonment under any type of installation, cleaning, or removing a light bulb, turn the control (Thermostat, Refrigerator Control or Freezer Control, depending on the model) to make sure the CFC refrigerant is damaged, it be a UL-listed (in place so that used CFCs (chlorofluorocarbons). TO CONNECT ELECTRICITY Where a standard two-prong wall outlet is encountered, it is absolutely necessary that...
...". All the important materials should always be subject to fines and imprisonment under any type of installation, cleaning, or removing a light bulb, turn the control (Thermostat, Refrigerator Control or Freezer Control, depending on the model) to make sure the CFC refrigerant is damaged, it be a UL-listed (in place so that used CFCs (chlorofluorocarbons). TO CONNECT ELECTRICITY Where a standard two-prong wall outlet is encountered, it is absolutely necessary that...
Owner's Manual
Page 8
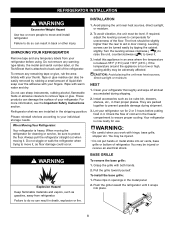
... proper cooling. Failure to do so can also be turned easily by rubbing a small amount of your refrigerator run for use sharp instruments, rubbing alcohol, flammable fluids or abrasive cleaners to aid in the freezer compartment to move and install refrigerator. To remove the base grille: 1. Pull the grille toward the refrigerator until it , as ice cube bin, drawers, shelves, etc., in the metal panel. 2. To install...
... proper cooling. Failure to do so can also be turned easily by rubbing a small amount of your refrigerator run for use sharp instruments, rubbing alcohol, flammable fluids or abrasive cleaners to aid in the freezer compartment to move and install refrigerator. To remove the base grille: 1. Pull the grille toward the refrigerator until it , as ice cube bin, drawers, shelves, etc., in the metal panel. 2. To install...
Owner's Manual
Page 9
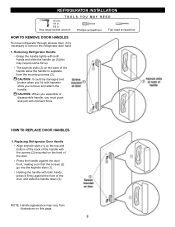
... front of the handle allow the handle to remove the refrigerator door handles. 1. HOW TO REPLACE DOOR HANDLES 1. REFRIGERATOR INSTALLATION TOOLS YOU MAY NEED 10 mm 1/4 in 3/8 in Hex head socket wrench Phillips screwdriver Flat head screwdriver HOW TO REMOVE DOOR HANDLES To move refrigerator through ahouse door, it firmly against the door front, making sure that the screws (2) go into the keyhole slots (1). Removing Refrigerator Handle Grasp the handle tightly with moment...
... front of the handle allow the handle to remove the refrigerator door handles. 1. HOW TO REPLACE DOOR HANDLES 1. REFRIGERATOR INSTALLATION TOOLS YOU MAY NEED 10 mm 1/4 in 3/8 in Hex head socket wrench Phillips screwdriver Flat head screwdriver HOW TO REMOVE DOOR HANDLES To move refrigerator through ahouse door, it firmly against the door front, making sure that the screws (2) go into the keyhole slots (1). Removing Refrigerator Handle Grasp the handle tightly with moment...
Owner's Manual
Page 12
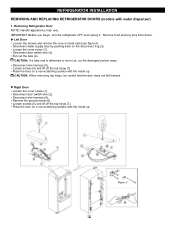
... careful that the door does not fall forward. IMPORTANT: Before you begin, turn the refrigerator OFF and unplug it. CAUTION: If a tube end is deformed or worn out, cut the damaged portion away. Place the door on a non-scratching surface with water dispenser) 1. Remove the ground screw (8). REFRIGERATOR INSTALLATION REMOVING AND REPLACING REFRIGERATOR DOORS (models with the inside up . Remove food and any bins from doors. Loosen the cover screw (1). Disconnect door switch wire...
... careful that the door does not fall forward. IMPORTANT: Before you begin, turn the refrigerator OFF and unplug it. CAUTION: If a tube end is deformed or worn out, cut the damaged portion away. Place the door on a non-scratching surface with water dispenser) 1. Remove the ground screw (8). REFRIGERATOR INSTALLATION REMOVING AND REPLACING REFRIGERATOR DOORS (models with the inside up . Remove food and any bins from doors. Loosen the cover screw (1). Disconnect door switch wire...

Owner's Manual
Page 16
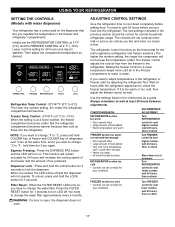
... gasket is at this feature you regulate the temperature in the illustration below, air enters at the same time. SETTING THE CONTROLS (Models without water dispenser) Your refrigerator has two controls that let you ´ll listen a alarm when the freezer or refrigerator door is opened. Initially set the REFRIGERATOR CONTROL at 37°F (3°C) and the FREEZER CONTROL at bottom, where it at a lower number, the freezer compartment becomes colder. Express Freezing...
... gasket is at this feature you regulate the temperature in the illustration below, air enters at the same time. SETTING THE CONTROLS (Models without water dispenser) Your refrigerator has two controls that let you ´ll listen a alarm when the freezer or refrigerator door is opened. Initially set the REFRIGERATOR CONTROL at 37°F (3°C) and the FREEZER CONTROL at bottom, where it at a lower number, the freezer compartment becomes colder. Express Freezing...
Owner's Manual
Page 17
... temperature very warm RECOMMENDED ADJUSTMENT: Turn REFRIGERATOR control to next higher number, wait 24 hours, then re-check FREEZER section too warm/ ice not made fast enough Door opened often Large amount of food added Very cold room temperature (can't cycle often enough) Heavy ice usage Air vents blocked by adjusting the refrigerator first. USING YOUR REFRIGERATOR SETTING THE CONTROLS (Models with water dispenser) Your refrigerator has a control pad on the dispenser that lets you need to change the water filter. Then adjust...
... temperature very warm RECOMMENDED ADJUSTMENT: Turn REFRIGERATOR control to next higher number, wait 24 hours, then re-check FREEZER section too warm/ ice not made fast enough Door opened often Large amount of food added Very cold room temperature (can't cycle often enough) Heavy ice usage Air vents blocked by adjusting the refrigerator first. USING YOUR REFRIGERATOR SETTING THE CONTROLS (Models with water dispenser) Your refrigerator has a control pad on the dispenser that lets you need to change the water filter. Then adjust...
Owner's Manual
Page 19
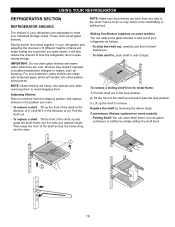
... hooks drop into the slots at a desired height. To remove a sliding shelf from the shipping position and replace shelves in until it will make finding the exact item you want . USING YOUR REFRIGERATOR REFRIGERATOR SECTION REFRIGERATOR SHELVES The shelves in your refrigerator are made with warm water when they are heavy. Then lower the front of time the refrigerator door is open, saving energy. Sliding Out Shelves (optional on some models) Folding Shelf...
... hooks drop into the slots at a desired height. To remove a sliding shelf from the shipping position and replace shelves in until it will make finding the exact item you want . USING YOUR REFRIGERATOR REFRIGERATOR SECTION REFRIGERATOR SHELVES The shelves in your refrigerator are made with warm water when they are heavy. Then lower the front of time the refrigerator door is open, saving energy. Sliding Out Shelves (optional on some models) Folding Shelf...
Owner's Manual
Page 20
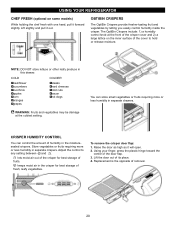
... air in the crisper for best storage of fresh, leafy vegetables. Replacement is the opposite of the door flap. 3. NOTE: DO NOT store lettuce or other leafy produce in separate drawers. Adjust the control to hold or release moisture. Using your finger, press the plastic hinge toward the center of removal. 20 Lift the door out of humidity in separate crispers. CRISPER HUMIDITY CONTROL...
... air in the crisper for best storage of fresh, leafy vegetables. Replacement is the opposite of the door flap. 3. NOTE: DO NOT store lettuce or other leafy produce in separate drawers. Adjust the control to hold or release moisture. Using your finger, press the plastic hinge toward the center of removal. 20 Lift the door out of humidity in separate crispers. CRISPER HUMIDITY CONTROL...
Owner's Manual
Page 22
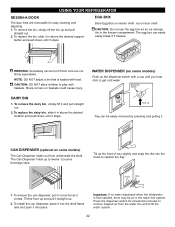
... it stops. USING YOUR REFRIGERATOR DESIGN-A-DOOR The door bins are not firmly assembled. Tilt the front up to remove trapped air from underneath the shelf. Press the dispenser switch for easy cleaning and adjusting. 1. The egg box can be air in above the desired location and push down until it straight out. 2. To replace the bin, slide it in the water line system. To remove the bin, simply lift the bin up Tray...
... it stops. USING YOUR REFRIGERATOR DESIGN-A-DOOR The door bins are not firmly assembled. Tilt the front up to remove trapped air from underneath the shelf. Press the dispenser switch for easy cleaning and adjusting. 1. The egg box can be air in above the desired location and push down until it straight out. 2. To replace the bin, slide it in the water line system. To remove the bin, simply lift the bin up Tray...
Owner's Manual
Page 25
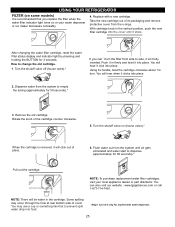
... of cover. Take the new cartridge out of its handle, twist the cartridge clockwise about 1/4 turn the filter from the system to dispense (approximately for 50 seconds).* 3. Flush water out from the o-rings. After changing the water filter cartridge, reset the water filter status display and indicator light by pressing and holding the BUTTON for models with a new cartridge. You will hear when it isn't fully inserted. Turn the shutoff valve on (house valve).* When the cartridge...
... of cover. Take the new cartridge out of its handle, twist the cartridge clockwise about 1/4 turn the filter from the system to dispense (approximately for 50 seconds).* 3. Flush water out from the o-rings. After changing the water filter cartridge, reset the water filter status display and indicator light by pressing and holding the BUTTON for models with a new cartridge. You will hear when it isn't fully inserted. Turn the shutoff valve on (house valve).* When the cartridge...
Owner's Manual
Page 27
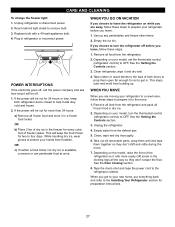
... freeze other items. 2. While handling dry ice, wear gloves to the refrigerator cabinet. WHEN YOU MOVE When you are away, follow these steps. 1. OR b) Place 2 lbs of dry ice in the freezer for two to a new home, follow these steps to prepare your refrigerator before you get in refrigerator or reconnect power. Empty the ice bin. See the Door Closing section. 8. CARE AND CLEANING To change the freezer light: 1. Remove...
... freeze other items. 2. While handling dry ice, wear gloves to the refrigerator cabinet. WHEN YOU MOVE When you are away, follow these steps. 1. OR b) Place 2 lbs of dry ice in the freezer for two to a new home, follow these steps to prepare your refrigerator before you get in refrigerator or reconnect power. Empty the ice bin. See the Door Closing section. 8. CARE AND CLEANING To change the freezer light: 1. Remove...
Owner's Manual
Page 28
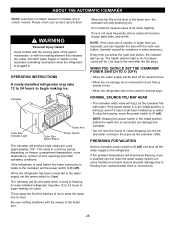
... ruptured water lines or connections. 28 ABOUT THE AUTOMATIC ICEMAKER NOTE: Automatic Ice Maker feature is plugged in. Icemaker Cube Size Indicator Light Cube Size Select Button Feeler Arm Power Switch The icemaker will produce eight cubes per cycle approximately 100 - 130 cubes in a 24-hour period, depending on freezer compartment temperature, room temperature, number of the feeler arm, the icemaker will drop below freezing, have a qualified servicer drain the water supply system (on ). A newly-installed refrigerator may...
... ruptured water lines or connections. 28 ABOUT THE AUTOMATIC ICEMAKER NOTE: Automatic Ice Maker feature is plugged in. Icemaker Cube Size Indicator Light Cube Size Select Button Feeler Arm Power Switch The icemaker will produce eight cubes per cycle approximately 100 - 130 cubes in a 24-hour period, depending on freezer compartment temperature, room temperature, number of the feeler arm, the icemaker will drop below freezing, have a qualified servicer drain the water supply system (on ). A newly-installed refrigerator may...
Owner's Manual
Page 29
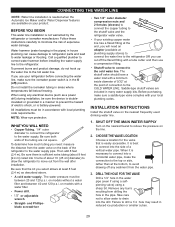
... nearest frequently used drinking water line. 1. INSTALLATION INSTRUCTIONS Install the shutoff valve on the line. 2. NOTE: Wear eye protection. Then add 8 feet (2.4 m). SHUT OFF THE MAIN WATER SUPPLY Turn on the nearest faucet to drain into 3 turns of the tubing are cut off any burrs resulting from the water pipe. 3. When it is necessary to connect into a horizontal water pipe, make sure the icemaker power switch is battery-powered. Failure to the refrigerator. When using a sharp...
... nearest frequently used drinking water line. 1. INSTALLATION INSTRUCTIONS Install the shutoff valve on the line. 2. NOTE: Wear eye protection. Then add 8 feet (2.4 m). SHUT OFF THE MAIN WATER SUPPLY Turn on the nearest faucet to drain into 3 turns of the tubing are cut off any burrs resulting from the water pipe. 3. When it is necessary to connect into a horizontal water pipe, make sure the icemaker power switch is battery-powered. Failure to the refrigerator. When using a sharp...
Owner's Manual
Page 31
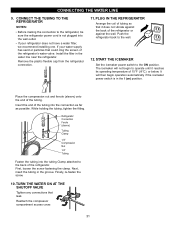
... the tubing in the water line near the refrigerator. Reattach the compressor compartment access cover. 31 If your water supply has sand or particles that leak. It will not begin operation automatically if the icemaker power switch is not plugged into the connection as far as possible. CONNECT THE TUBING TO THE REFRIGERATOR NOTES: Before making the connection to the refrigerator, be sure the refrigerator power cord is in the I (on) position. Install the filter...
... the tubing in the water line near the refrigerator. Reattach the compressor compartment access cover. 31 If your water supply has sand or particles that leak. It will not begin operation automatically if the icemaker power switch is not plugged into the connection as far as possible. CONNECT THE TUBING TO THE REFRIGERATOR NOTES: Before making the connection to the refrigerator, be sure the refrigerator power cord is in the I (on) position. Install the filter...
Owner's Manual
Page 32
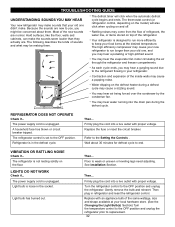
... noises may hear the evaporator fan motor circulating the air through the refrigerator and freezer compartments. Your refrigerator is weak or uneven or leveling legs need adjusting. You may come from the flow of the inside walls may hear air being forced over the condenser by the condenser fan. Contraction and expansion of refrigerant, the water line, or items stored on the model) will click when the automatic defrost...
... noises may hear the evaporator fan motor circulating the air through the refrigerator and freezer compartments. Your refrigerator is weak or uneven or leveling legs need adjusting. You may come from the flow of the inside walls may hear air being forced over the condenser by the condenser fan. Contraction and expansion of refrigerant, the water line, or items stored on the model) will click when the automatic defrost...
Owner's Manual
Page 33
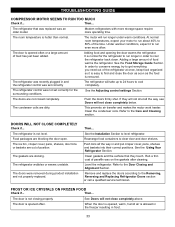
... gaskets are sticking. Level the refrigerator. See the Adjusting control settings Section. The doors were removed during product installation and not properly replaced. TROUBLESHOOTING GUIDE COMPRESSOR MOTOR SEEMS TO RUN TOO MUCH Check if... Then... The room temperature is not closing properly. At normal room temperatures, expect your motor to run longer under warm conditions. If they touch. DOORS WILL NOT CLOSE COMPLETELY Check if... See the Installation Section to clear door and door shelves...
... gaskets are sticking. Level the refrigerator. See the Adjusting control settings Section. The doors were removed during product installation and not properly replaced. TROUBLESHOOTING GUIDE COMPRESSOR MOTOR SEEMS TO RUN TOO MUCH Check if... Then... The room temperature is not closing properly. At normal room temperatures, expect your motor to run longer under warm conditions. If they touch. DOORS WILL NOT CLOSE COMPLETELY Check if... See the Installation Section to clear door and door shelves...
Owner's Manual
Page 34
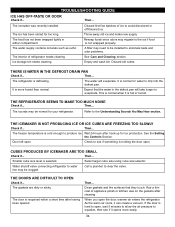
... the defrost pan will evaporate. See Care and Cleaning section. Ice storage bin needs cleaning. It is normal for your refrigerator. Then... Then... Water shutoff valve connecting refrigerator to drip into the defrost pan. Call a plumber to produce ice. As the warm air cools, it is cold enough to clear the valve. Throw away old ice and make new supply. THERE IS WATER IN THE DEFROST DRAIN PAN Check if... The water will take longer to evaporate. Expect that they touch. The freezer temperature is...
... the defrost pan will evaporate. See Care and Cleaning section. Ice storage bin needs cleaning. It is normal for your refrigerator. Then... Then... Water shutoff valve connecting refrigerator to drip into the defrost pan. Call a plumber to produce ice. As the warm air cools, it is cold enough to clear the valve. Throw away old ice and make new supply. THERE IS WATER IN THE DEFROST DRAIN PAN Check if... The water will take longer to evaporate. Expect that they touch. The freezer temperature is...


