Owner's Manual
Page 2
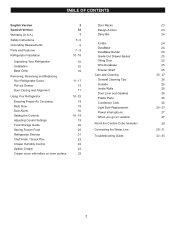
... Warranty (U.S.A.) Safety Instructions Grounding Requirements Parts and Features Refrigerator Installation Unpacking Your Refrigerator Installation Base Grille Removing, Reversing and Replacing Your Refrigerator Doors Pull out Drawer Door Closing and Alignment Using Your Refrigerator Ensuring Proper Air Circulation Multi Flow Door... Alarm Setting the Controls Adjusting Control Settings Food Storage Guide Storing Frozen Food Refrigerator Shelves Chef Fresh / Snack Pan Crisper Humidity Control Optibin Crisper Crisper cover with lattice on inner surface 2 36 ...
... Warranty (U.S.A.) Safety Instructions Grounding Requirements Parts and Features Refrigerator Installation Unpacking Your Refrigerator Installation Base Grille Removing, Reversing and Replacing Your Refrigerator Doors Pull out Drawer Door Closing and Alignment Using Your Refrigerator Ensuring Proper Air Circulation Multi Flow Door... Alarm Setting the Controls Adjusting Control Settings Food Storage Guide Storing Frozen Food Refrigerator Shelves Chef Fresh / Snack Pan Crisper Humidity Control Optibin Crisper Crisper cover with lattice on inner surface 2 36 ...
Owner's Manual
Page 3
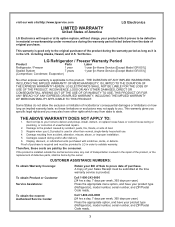
...not allow the exclusion or limitation of God. 3. Display, discount, or refurbished units purchased with scratches, dents, or defects. Territories. LG Refrigerator / Freezer Warranty Period Product Parts Labor Refrigerator / Freezer 1 year 1 year [In-Home Service (Except Model GR-051)] Sealed System 7 years 1 year [In-Home Service (... area, any cost of transportation involved in the repair of the product, or the replacement of defective parts, shall be defective in the U.S. LG ELECTRONICS SHALL NOT BE LIABLE FOR THE LOSS OF USE OF THE PRODUCT, INCONVIENCE, LOSS OR ANY ...
...not allow the exclusion or limitation of God. 3. Display, discount, or refurbished units purchased with scratches, dents, or defects. Territories. LG Refrigerator / Freezer Warranty Period Product Parts Labor Refrigerator / Freezer 1 year 1 year [In-Home Service (Except Model GR-051)] Sealed System 7 years 1 year [In-Home Service (... area, any cost of transportation involved in the repair of the product, or the replacement of defective parts, shall be defective in the U.S. LG ELECTRONICS SHALL NOT BE LIABLE FOR THE LOSS OF USE OF THE PRODUCT, INCONVIENCE, LOSS OR ANY ...
Owner's Manual
Page 5
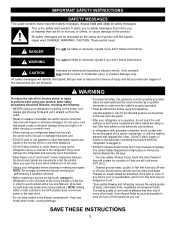
...bulb may adhere to roll over or damage the power cord. DO NOT place fingers or hands on the automatic icemaking mechanism while the refrigerator is poor or questionable, get rid of any off-odor or off power at either or both controls to the OFF position does ...from the wall, be killed or seriously injured if you can happen if the instructions are necessarily small. When moving parts of the ejector mechanism, or with the moving your refrigerator before using your product, basic safety precautions should be properly grounded. Keep fingers out of foods, particularly fruits, ...
...bulb may adhere to roll over or damage the power cord. DO NOT place fingers or hands on the automatic icemaking mechanism while the refrigerator is poor or questionable, get rid of any off-odor or off power at either or both controls to the OFF position does ...from the wall, be killed or seriously injured if you can happen if the instructions are necessarily small. When moving parts of the ejector mechanism, or with the moving your refrigerator before using your product, basic safety precautions should be properly grounded. Keep fingers out of foods, particularly fruits, ...
Owner's Manual
Page 7
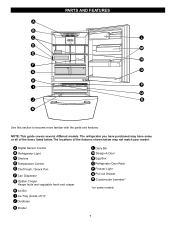
... fruits and vegetable fresh and crisper H Ice Bin I Q J R K Use this section to become more familiar with the parts and features. PARTS AND FEATURES A B C L D M E N F O G H P I Ice Tray (Inside of H)* J Durabase K Divider L Dairy Bin M Design-A-Door N Egg Box O Refrigerator Door Rack P Freezer Light Q Pull out Drawer R Customcube Icemaker* *on some or all of the features shown...
... fruits and vegetable fresh and crisper H Ice Bin I Q J R K Use this section to become more familiar with the parts and features. PARTS AND FEATURES A B C L D M E N F O G H P I Ice Tray (Inside of H)* J Durabase K Divider L Dairy Bin M Design-A-Door N Egg Box O Refrigerator Door Rack P Freezer Light Q Pull out Drawer R Customcube Icemaker* *on some or all of the features shown...

Owner's Manual
Page 8
... Light O Customcube Icemaker* *on some models 8 NOTE: This guide covers several different models. The refrigerator you have some or all of H)* H Durabase I O Use this section to become more familiar with the parts and features. A Digital Sensor Control B Refrigerator Light C Shelves D Chef Fresh / Snack Pan E Optibin Crisper Keeps fruits and vegetable fresh and crisper...
... Light O Customcube Icemaker* *on some models 8 NOTE: This guide covers several different models. The refrigerator you have some or all of H)* H Durabase I O Use this section to become more familiar with the parts and features. A Digital Sensor Control B Refrigerator Light C Shelves D Chef Fresh / Snack Pan E Optibin Crisper Keeps fruits and vegetable fresh and crisper...

Owner's Manual
Page 9
... Keeps fruits and vegetable fresh and crisp F Ice Trays* G Ice Bin H Wire Durabase I C J D K E L F M G H N Use this section to become more familiar with the parts and features. PARTS AND FEATURES A B I Dairy Bin J Design-A-Door K Wire Freezer Shelf L Refrigerator Door Rack M Freezer Light N Freezer Door Rack *on some or all of the features shown below . The...
... Keeps fruits and vegetable fresh and crisp F Ice Trays* G Ice Bin H Wire Durabase I C J D K E L F M G H N Use this section to become more familiar with the parts and features. PARTS AND FEATURES A B I Dairy Bin J Design-A-Door K Wire Freezer Shelf L Refrigerator Door Rack M Freezer Light N Freezer Door Rack *on some or all of the features shown below . The...
Owner's Manual
Page 11
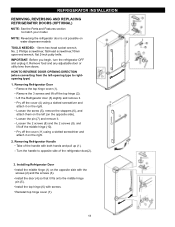
... cover (11) using a slotted screwdriver and attach it on the right. 2. Loosen the pin (7) and remove it . Removing Refrigerator Handle Take of the refrigerator door(2). 11 2 1 3. Install the top hinge (6) with both hands and pull up (1). Remove food and any adjustable door ...them on the left -opening type to match your model. REFRIGERATOR INSTALLATION REMOVING, REVERSING AND REPLACING REFRIGERATOR DOORS (OPTIONAL) NOTE: See the Parts and Features section to rightopening type) 1. IMPORTANT: Before you begin, turn the refrigerator OFF and unplug it fits onto the middle hinge pin ...
... cover (11) using a slotted screwdriver and attach it on the right. 2. Loosen the pin (7) and remove it . Removing Refrigerator Handle Take of the refrigerator door(2). 11 2 1 3. Install the top hinge (6) with both hands and pull up (1). Remove food and any adjustable door ...them on the left -opening type to match your model. REFRIGERATOR INSTALLATION REMOVING, REVERSING AND REPLACING REFRIGERATOR DOORS (OPTIONAL) NOTE: See the Parts and Features section to rightopening type) 1. IMPORTANT: Before you begin, turn the refrigerator OFF and unplug it fits onto the middle hinge pin ...
Owner's Manual
Page 14
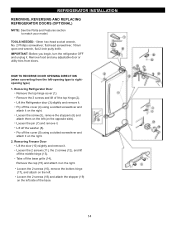
...knife. Loosen the 2 screws (11), the 2 screws (12), and lift off the middle hinge (13). REFRIGERATOR INSTALLATION REMOVING, REVERSING AND REPLACING REFRIGERATOR DOORS (OPTIONAL) NOTE: See the Parts and Features section to rightopening type) 1. Loosen the 2 screws (18) and attach the stopper (19) on... the opposite side). IMPORTANT: Before you begin, turn the refrigerator OFF and unplug it on the right...
...knife. Loosen the 2 screws (11), the 2 screws (12), and lift off the middle hinge (13). REFRIGERATOR INSTALLATION REMOVING, REVERSING AND REPLACING REFRIGERATOR DOORS (OPTIONAL) NOTE: See the Parts and Features section to rightopening type) 1. Loosen the 2 screws (18) and attach the stopper (19) on... the opposite side). IMPORTANT: Before you begin, turn the refrigerator OFF and unplug it on the right...
Owner's Manual
Page 25
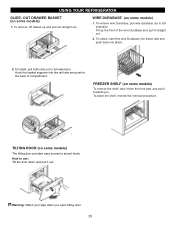
... down and pull it out.E Warning: Watch your step when you . How to full extension. USING YOUR REFRIGERATOR GLIDE - OUT DRAWER BASKET (on some models) To remove the shelf, take it from the front part, and pull it straight out. 2. TILTING DOOR (on some models) 1. To remove wire Durabase, pull wire durabase...
... down and pull it out.E Warning: Watch your step when you . How to full extension. USING YOUR REFRIGERATOR GLIDE - OUT DRAWER BASKET (on some models) To remove the shelf, take it from the front part, and pull it straight out. 2. TILTING DOOR (on some models) 1. To remove wire Durabase, pull wire durabase...

Owner's Manual
Page 26
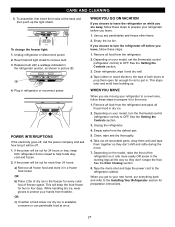
... Hazard Use non-flammable cleaner. For products with a mixture of the same size, shape and wattage. These can result in warm water. Remove refrigerator shelves. 3. To change the refrigerator light: 1. GENERAL CLEANING TIPS Unplug refrigerator or disconnect power. CARE AND CLEANING WARNING PLASTIC PARTS (covers and panels) Do not use abrasive or harsh cleaners.
... Hazard Use non-flammable cleaner. For products with a mixture of the same size, shape and wattage. These can result in warm water. Remove refrigerator shelves. 3. To change the refrigerator light: 1. GENERAL CLEANING TIPS Unplug refrigerator or disconnect power. CARE AND CLEANING WARNING PLASTIC PARTS (covers and panels) Do not use abrasive or harsh cleaners.
Owner's Manual
Page 27
...for air to get to your model, turn the thermostat control (refrigerator control) to turn the refrigerator off , call the power company and ask how long it rolls more than 24 hours: a) Remove all removable parts, wrap them well and tape them open far enough for preparation ...instructions. 27 See the Setting the Controls section. 3. Reach behind light shield to the refrigerator cabinet. Empty water from frostbite. Tape the doors shut and...
...for air to get to your model, turn the thermostat control (refrigerator control) to turn the refrigerator off , call the power company and ask how long it rolls more than 24 hours: a) Remove all removable parts, wrap them well and tape them open far enough for preparation ...instructions. 27 See the Setting the Controls section. 3. Reach behind light shield to the refrigerator cabinet. Empty water from frostbite. Tape the doors shut and...

Owner's Manual
Page 28
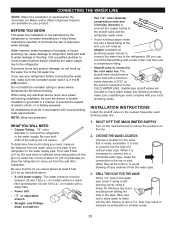
...temperature, room temperature, number of ice to allow the water line to clear. DO NOT place fingers or hands on ). OPERATION INSTRUCTIONS A newly-installed refrigerator may take 12 to 24 hours to begin making ice. • When the ice storage bin is smaller or larger than a minute or two....power switch to O (off the water supply to freezing. Please check your product specification. WARNING Personal Injury Hazard Avoid contact with the moving parts of the feeler arm. Be sure nothing interferes with the sweep of the ejector mechanism, or with water when it has not yet been ...
...temperature, room temperature, number of ice to allow the water line to clear. DO NOT place fingers or hands on ). OPERATION INSTRUCTIONS A newly-installed refrigerator may take 12 to 24 hours to begin making ice. • When the ice storage bin is smaller or larger than a minute or two....power switch to O (off the water supply to freezing. Please check your product specification. WARNING Personal Injury Hazard Avoid contact with the moving parts of the feeler arm. Be sure nothing interferes with the sweep of the ejector mechanism, or with water when it has not yet been ...
Owner's Manual
Page 29
...tubing you use a compression fitting. Be sure that is needed when the Automatic Ice Maker and/or Water Dispenser features are available on your refrigerator before installing the water supply line to drill a 1/4 hole may result in reduced ice production or smaller cubes. 29 Power drill. 1/2" ... the connection to the top or side, rather than at plumbing supply stores) to connect the water line to the refrigerator OR you can cause damage to refrigerator parts and lead to water leakage or flooding. on the nearest frequently used drinking water line. 1. Straight- on the nearest...
...tubing you use a compression fitting. Be sure that is needed when the Automatic Ice Maker and/or Water Dispenser features are available on your refrigerator before installing the water supply line to drill a 1/4 hole may result in reduced ice production or smaller cubes. 29 Power drill. 1/2" ... the connection to the top or side, rather than at plumbing supply stores) to connect the water line to the refrigerator OR you can cause damage to refrigerator parts and lead to water leakage or flooding. on the nearest frequently used drinking water line. 1. Straight- on the nearest...


