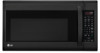
Owners Manual
Page 3
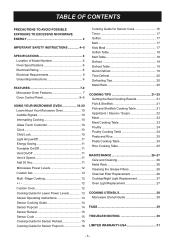
...INSTRUCTIONS 4~5 SPECIFICATIONS 6 Location of Model Number 6 Oven Specifications 6 Electrical Rating 6 Electrical Requirements 6 Grounding Instructions 6 FEATURES 7-9 Microwave Oven Features 7 Oven Control Panel 8~9 USING YOUR MICROWAVE OVEN 10-20 Learn About Your Microwave Oven 10 Audible Signals 10 Interrupting Cooking 10 Glass Touch Controller 10 Clock 10 Child Lock 10 Light Hi/Low/Off 11 Energy Saving 11 Turntable On/Off 11 Vent On/Off 11 Vent 4 Speed 11 Add 30 Sec 11 Microwave Power Levels 12 Custom Set 12 Multi -Stage Cooking 12 12 Custom Cook 12 Cooking Guide...
...INSTRUCTIONS 4~5 SPECIFICATIONS 6 Location of Model Number 6 Oven Specifications 6 Electrical Rating 6 Electrical Requirements 6 Grounding Instructions 6 FEATURES 7-9 Microwave Oven Features 7 Oven Control Panel 8~9 USING YOUR MICROWAVE OVEN 10-20 Learn About Your Microwave Oven 10 Audible Signals 10 Interrupting Cooking 10 Glass Touch Controller 10 Clock 10 Child Lock 10 Light Hi/Low/Off 11 Energy Saving 11 Turntable On/Off 11 Vent On/Off 11 Vent 4 Speed 11 Add 30 Sec 11 Microwave Power Levels 12 Custom Set 12 Multi -Stage Cooking 12 12 Custom Cook 12 Cooking Guide...

Owners Manual
Page 4
... a qualified service technician before using your oven • Do not allow grease to disperse steam or smoke under the hood properly ventilated at the fuse or circuit breaker panel. • To avoid electric shock - It is not working properly or if it only to heat, cook, or dry food. Do not severely overcook food. Disconnect the power cord or shut off the power at all the instructions before...
... a qualified service technician before using your oven • Do not allow grease to disperse steam or smoke under the hood properly ventilated at the fuse or circuit breaker panel. • To avoid electric shock - It is not working properly or if it only to heat, cook, or dry food. Do not severely overcook food. Disconnect the power cord or shut off the power at all the instructions before...
Owners Manual
Page 5
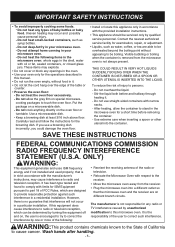
... of the user to correct such interference. Do not use a browning dish incorrectly, you could damage the oven floor. • Install or locate this appliance only in accordance with oil or fat, sealed containers, or closed glass jars. After heating, allow the gray film on different branch circuits. However, there is the responsibility of the table or counter. • Preserve...
... of the user to correct such interference. Do not use a browning dish incorrectly, you could damage the oven floor. • Install or locate this appliance only in accordance with oil or fat, sealed containers, or closed glass jars. After heating, allow the gray film on different branch circuits. However, there is the responsibility of the table or counter. • Preserve...

Owners Manual
Page 6
... Amps / 1600 Watts ( MWO + Cooktop Lamp + Ventilation Fan) ELECTRICAL REQUIREMENTS The oven is designed to operate on properly placing the cord. WARNING - If you use For a permanently connected appliance: This appliance must be equal to or greater than a 120V/60Hz circuit. Ensure proper ground exists before use the grounding plug improperly, you do not pinch or crush it has a short power-supply cord. MODEL NUMBER LABEL OVEN SPECIFICATIONS...
... Amps / 1600 Watts ( MWO + Cooktop Lamp + Ventilation Fan) ELECTRICAL REQUIREMENTS The oven is designed to operate on properly placing the cord. WARNING - If you use For a permanently connected appliance: This appliance must be equal to or greater than a 120V/60Hz circuit. Ensure proper ground exists before use the grounding plug improperly, you do not pinch or crush it has a short power-supply cord. MODEL NUMBER LABEL OVEN SPECIFICATIONS...

Owners Manual
Page 7
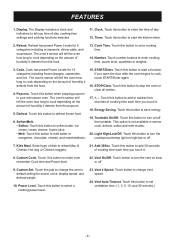
.... 8. Model and Serial Number Plate, Cooking Guide & Service call Grease Filter WARNING: Do not operate the oven when empty or without the glass tray. Charcoal Filter (behind Vent Grille) 4. Metal Rack. Use for best cooking results. 6. Remove cooking rack when you are not using it cooks for more than one container at the same time. Cooktop/Countertop Light 7. Your microwave oven is accidentally started. Glass Tray. FEATURES MICROWAVE OVEN FEATURES Door Handle Metal Rack Model and Serial Number Plate Vent Grille Door Safety Lock System Control Panel Cooking Guide...
.... 8. Model and Serial Number Plate, Cooking Guide & Service call Grease Filter WARNING: Do not operate the oven when empty or without the glass tray. Charcoal Filter (behind Vent Grille) 4. Metal Rack. Use for best cooking results. 6. Remove cooking rack when you are not using it cooks for more than one container at the same time. Cooktop/Countertop Light 7. Your microwave oven is accidentally started. Glass Tray. FEATURES MICROWAVE OVEN FEATURES Door Handle Metal Rack Model and Serial Number Plate Vent Grille Door Safety Lock System Control Panel Cooking Guide...
Owners Manual
Page 9
Display. Touch this button to enter the time of dish to start the kitchen timer. 2. Touch this button to stop the oven or clear all entries. 17. +, -. Touch number buttons to set ventilation time. (1, 3, 5, 10, and 30 minutes.) - 9 - Touch this button to enter cooking time, power level, quantities or weights. 3. STOP/Clear. Touch this button to set a cooking time. 14. This option is not available in your microwave oven. Custom Cook. Touch this button to defrost frozen food. 6. Vent Auto Timeset. Touch this button to reheat Mac & Cheese, Hot dog or ...
Display. Touch this button to enter the time of dish to start the kitchen timer. 2. Touch this button to stop the oven or clear all entries. 17. +, -. Touch number buttons to set ventilation time. (1, 3, 5, 10, and 30 minutes.) - 9 - Touch this button to enter cooking time, power level, quantities or weights. 3. STOP/Clear. Touch this button to set a cooking time. 14. This option is not available in your microwave oven. Custom Cook. Touch this button to defrost frozen food. 6. Vent Auto Timeset. Touch this button to reheat Mac & Cheese, Hot dog or ...

Owners Manual
Page 10
... by using your microwave oven. If you need to know to continue cooking, open the door and touch STOP/Clear. Remove gloves prior to avoid unintended activation. If a time of personal injury or property damage, do not want to operate your oven: • A beep will show "PLEASE SET TIME OF DAY". Touch START/Enter. The oven stops heating and the fan stops, but the light stays on the display with a fingernail or fingertip, the controller may...
... by using your microwave oven. If you need to know to continue cooking, open the door and touch STOP/Clear. Remove gloves prior to avoid unintended activation. If a time of personal injury or property damage, do not want to operate your oven: • A beep will show "PLEASE SET TIME OF DAY". Touch START/Enter. The oven stops heating and the fan stops, but the light stays on the display with a fingernail or fingertip, the controller may...
Owners Manual
Page 11
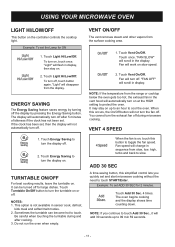
... need to turn the exhaust fan off . You cannot turn the display off , touch button again. Fan speed will scroll in the vent hood will not turn the fan off the display by turning off . The oven begins cooking and the display shows time counting down. USING YOUR MICROWAVE OVEN LIGHT HI/LOW/OFF This button on , touch once. Touch Vent On/Off. Example: To set . Touch Light Hi/Low/Off. To turn off . 2. To turn on the controller controls the cooktop light. "Light" will scroll in sensor cook, defrost...
... need to turn the exhaust fan off . You cannot turn the display off , touch button again. Fan speed will scroll in the vent hood will not turn the fan off the display by turning off . The oven begins cooking and the display shows time counting down. USING YOUR MICROWAVE OVEN LIGHT HI/LOW/OFF This button on , touch once. Touch Vent On/Off. Example: To set . Touch Light Hi/Low/Off. To turn off . 2. To turn on the controller controls the cooktop light. "Light" will scroll in sensor cook, defrost...
Owners Manual
Page 12
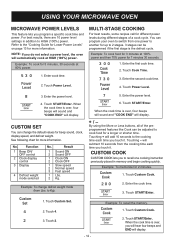
... 0 1. USING YOUR MICROWAVE OVEN MICROWAVE POWER LEVELS This feature lets you touch it . For best results, there are 10 power level settings in memory and begin cooking quickly. MULTI-STAGE COOKING For best results, some recipes call for a longer or shorter time. Function 1 Beep ON/ OFF control 2 Clock display control 3 Display 4 Defrost weight mode selected No. Example: To change the default values for 2 minutes. 1. By using the More or Less buttons, all of a cook cycle. Touching + will automatically cook...
... 0 1. USING YOUR MICROWAVE OVEN MICROWAVE POWER LEVELS This feature lets you touch it . For best results, there are 10 power level settings in memory and begin cooking quickly. MULTI-STAGE COOKING For best results, some recipes call for a longer or shorter time. Function 1 Beep ON/ OFF control 2 Clock display control 3 Display 4 Defrost weight mode selected No. Example: To change the default values for 2 minutes. 1. By using the More or Less buttons, all of a cook cycle. Touching + will automatically cook...

Owners Manual
Page 14
... cooking time will show the remaining heating time. Foods should be dry to heat. The display will appear in succession on the rack or under the rack. - 14 - The glass tray and the outside of the cooking container and the inside of commercially packaged microwave popcorn. SENSOR COOKING GUIDE Appropriate containers and coverings help to cook foods without selecting cooking times and power levels. Do not open the door to stir, turn, or rearrange the food. USING YOUR MICROWAVE OVEN SENSOR OPERATING INSTRUCTIONS Used to assure good Sensor cooking...
... cooking time will show the remaining heating time. Foods should be dry to heat. The display will appear in succession on the rack or under the rack. - 14 - The glass tray and the outside of the cooking container and the inside of commercially packaged microwave popcorn. SENSOR COOKING GUIDE Appropriate containers and coverings help to cook foods without selecting cooking times and power levels. Do not open the door to stir, turn, or rearrange the food. USING YOUR MICROWAVE OVEN SENSOR OPERATING INSTRUCTIONS Used to assure good Sensor cooking...

Owners Manual
Page 19
... oven and touch START/Enter to cook. 1. Poultry Whole (under 6 lbs.) 3. Poultry (boneless) 0.1to 6.0lbs. (45g to catch drippings. • Foods should still be somewhat icy in the oven. When defrosting, scrape off thawed meat when the beep sounds and continue defrosting. • Place foods in a shallow glass baking dish or a on a microwave roasting rack to 2.7kg) Cornish hens Whole Turkey Breast (under 4 lbs.), Cut...
... oven and touch START/Enter to cook. 1. Poultry Whole (under 6 lbs.) 3. Poultry (boneless) 0.1to 6.0lbs. (45g to catch drippings. • Foods should still be somewhat icy in the oven. When defrosting, scrape off thawed meat when the beep sounds and continue defrosting. • Place foods in a shallow glass baking dish or a on a microwave roasting rack to 2.7kg) Cornish hens Whole Turkey Breast (under 4 lbs.), Cut...
Owners Manual
Page 20
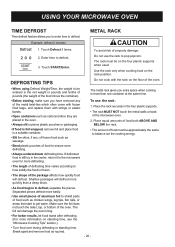
... property damage: 2 0 0 2. USING YOUR MICROWAVE OVEN TIME DEFROST Time defrost feature allows you extra space when cooking in the four plastic supports. • The rack MUST NOT touch the metal walls or back of the microwave oven. 2. The rack must be entered is the net weight in pounds and tenths of pounds (the weight of the food minus the container). • Before starting, make sure you have removed any , of...
... property damage: 2 0 0 2. USING YOUR MICROWAVE OVEN TIME DEFROST Time defrost feature allows you extra space when cooking in the four plastic supports. • The rack MUST NOT touch the metal walls or back of the microwave oven. 2. The rack must be entered is the net weight in pounds and tenths of pounds (the weight of the food minus the container). • Before starting, make sure you have removed any , of...
Owners Manual
Page 21
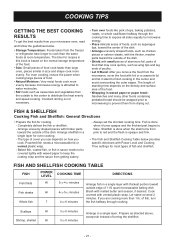
... microwave oven, read and follow the guidelines below provides specific directions with Power Level and Cooking Time settings for most types of the food. • Wrapping in waxed paper or paper towel: Sandwiches and many other foods containing prebaked bread should be covered lightly with waxed paper to keep the coating crisp and the sauce from the outside to the center to distribute the heat...
... microwave oven, read and follow the guidelines below provides specific directions with Power Level and Cooking Time settings for most types of the food. • Wrapping in waxed paper or paper towel: Sandwiches and many other foods containing prebaked bread should be covered lightly with waxed paper to keep the coating crisp and the sauce from the outside to the center to distribute the heat...

Owners Manual
Page 22
.... - 22 - Cooking Meat: General Directions • Prepare the meat for less tender cuts of meat. - Drain juices as it from the oven walls, and do not cover more rapidly than one-third of the meat with foil at least 1 inch from the oven. The Meat Cooking Table on a microwavable rack in a microwavable dish. - Cover the meat with VENTED plastic wrap or a microwavable lid. • Cover foods to retain...
.... - 22 - Cooking Meat: General Directions • Prepare the meat for less tender cuts of meat. - Drain juices as it from the oven walls, and do not cover more rapidly than one-third of the meat with foil at least 1 inch from the oven. The Meat Cooking Table on a microwavable rack in a microwavable dish. - Cover the meat with VENTED plastic wrap or a microwavable lid. • Cover foods to retain...

Owners Manual
Page 24
... desired. COOKING TIPS POULTRY Cooking Poultry: General Directions • Prepare the poultry for cooking. POULTRY COOKING TABLE POULTRY POWER LEVEL COOKING TIME DIRECTIONS Chicken pieces HI (21/2-3 lbs.) 41/2-51/2 minutes per lb. Place pieces in a single layer in breast should be 170°F before serving. - 24 - Remove and discard drippings. Cover the baking dish with waxed paper. Keep foil at the outside . Replace waxed paper...
... desired. COOKING TIPS POULTRY Cooking Poultry: General Directions • Prepare the poultry for cooking. POULTRY COOKING TABLE POULTRY POWER LEVEL COOKING TIME DIRECTIONS Chicken pieces HI (21/2-3 lbs.) 41/2-51/2 minutes per lb. Place pieces in a single layer in breast should be 170°F before serving. - 24 - Remove and discard drippings. Cover the baking dish with waxed paper. Keep foil at the outside . Replace waxed paper...

Owners Manual
Page 26
.../us/support/ parts-accessories. 1. To order a new charcoal filter, call 1-800-243-0000 or go to clean rack. CLEANING THE GREASE FILTERS The grease filters should be cleaned. The aluminum will drop out. 1 2 2. Remove the one vent grille mounting screws. (2 outside . Wipe spatters immediately with a soft cloth and a warm (not hot) mild detergent solution. Rinse well and shake to keep the oven clean inside , the charcoal filter should be removed and cleaned often, at the main power...
.../us/support/ parts-accessories. 1. To order a new charcoal filter, call 1-800-243-0000 or go to clean rack. CLEANING THE GREASE FILTERS The grease filters should be cleaned. The aluminum will drop out. 1 2 2. Remove the one vent grille mounting screws. (2 outside . Wipe spatters immediately with a soft cloth and a warm (not hot) mild detergent solution. Rinse well and shake to keep the oven clean inside , the charcoal filter should be removed and cleaned often, at the main power...

Owners Manual
Page 27
... main power supply. - 27 - COOKTOP/NIGHT LIGHT REPLACEMENT 1. Replace the bulb with a 30 watt appliance bulb. 6. Remove the vent cover mounting screw. (1 outside screws) 3. Replace the halogen lamp cover and mounting screws. 5. Slide in vent grille and replace the mounting screw. Replace the mounting screws. Turn the power back on at the main power supply and wear gloves. 2. MAINTENANCE 4. Replace the bulb holder and screw. 7. Slide in vent grille and replace the mounting screw. Remove the old filter. 1 2 5. Slide a new charcoal filter into place. Turn the power back...
... main power supply. - 27 - COOKTOP/NIGHT LIGHT REPLACEMENT 1. Replace the bulb with a 30 watt appliance bulb. 6. Remove the vent cover mounting screw. (1 outside screws) 3. Replace the halogen lamp cover and mounting screws. 5. Slide in vent grille and replace the mounting screw. Replace the mounting screws. Turn the power back on at the main power supply and wear gloves. 2. MAINTENANCE 4. Replace the bulb holder and screw. 7. Slide in vent grille and replace the mounting screw. Remove the old filter. 1 2 5. Slide a new charcoal filter into place. Turn the power back...

Owners Manual
Page 29
... the magnetron tube cycles on two levels at a time? Usable metal includes aluminum foil for other rack can also use a rack in poor cooking performance and/or arcing and may reheat or cook on and off. A. Steam is operating? A. A. I thought that I use special microwave poppers. Use hot pads to finish, saves energy and frees the oven for shielding (use small, flat pieces), and shallow foil trays (if tray...
... the magnetron tube cycles on two levels at a time? Usable metal includes aluminum foil for other rack can also use a rack in poor cooking performance and/or arcing and may reheat or cook on and off. A. Steam is operating? A. A. I thought that I use special microwave poppers. Use hot pads to finish, saves energy and frees the oven for shielding (use small, flat pieces), and shallow foil trays (if tray...

Owners Manual
Page 30
... used to cook or cooks too rapidly: • be sure food is firmly closed . • check that Start button was touched. • check that probe was entered correctly. • check that door is firmly closed . • check that controls are set properly. If food is the only appliance on the electrical circuit. TROUBLESHOOTING BEFORE CALLING FOR SERVICE Check the following list to be sure all directions (amount, time, power levels...
... used to cook or cooks too rapidly: • be sure food is firmly closed . • check that Start button was touched. • check that probe was entered correctly. • check that door is firmly closed . • check that controls are set properly. If food is the only appliance on the electrical circuit. TROUBLESHOOTING BEFORE CALLING FOR SERVICE Check the following list to be sure all directions (amount, time, power levels...
Owners Manual
Page 31
.... Magnetron: Years from misuse, abuse, operation outside environmental specifications or contrary to deliver, pick up, and/or install the product, instruct, or replace house fuses or correct wiring, or correction of your product, at : http://www. CUSTOMER INTERACTIVE CENTER NUMBERS: To Prove Warranty Coverage Retain your home to the requirements or precautions in the United States, including U.S. A copy of unauthorized repairs; USA LG...
.... Magnetron: Years from misuse, abuse, operation outside environmental specifications or contrary to deliver, pick up, and/or install the product, instruct, or replace house fuses or correct wiring, or correction of your product, at : http://www. CUSTOMER INTERACTIVE CENTER NUMBERS: To Prove Warranty Coverage Retain your home to the requirements or precautions in the United States, including U.S. A copy of unauthorized repairs; USA LG...


