
Owner's Manual (English)
Page 2
...the Temperatures and Display 22 Operating the Dispenser 23 Setting the Functions 24 In-Door Ice Bin 25 Automatic Icemaker 26 Storing Foods 27 Location of reliable service. Your new LG French Door Refrigerator combines advanced cooling technology with many years of Foods 28 Shelf ...Height Adjustment 29 CARE AND CLEANING Removing and Replacing Components 30 Cleaning the Refrigerator 34 General Information 34 Replacing the Water Filter...
...the Temperatures and Display 22 Operating the Dispenser 23 Setting the Functions 24 In-Door Ice Bin 25 Automatic Icemaker 26 Storing Foods 27 Location of reliable service. Your new LG French Door Refrigerator combines advanced cooling technology with many years of Foods 28 Shelf ...Height Adjustment 29 CARE AND CLEANING Removing and Replacing Components 30 Cleaning the Refrigerator 34 General Information 34 Replacing the Water Filter...

Owner's Manual (English)
Page 3
...or fire. 3 Do not use gasoline or other appliance. • DO NOT allow children to the extremely cold surfaces. • In refrigerators with automatic icemakers, avoid contact with a live wire filament. (A burned-out light bulb may break when being replaced.) NOTE: Some models...avoid contact with the moving your product, basic safety precautions should be followed, including the following. Skin may result in the refrigerator. Be careful closing doors when children are necessarily small. wWARNING You can kill or hurt you don't follow instructions. wWARNING To...
...or fire. 3 Do not use gasoline or other appliance. • DO NOT allow children to the extremely cold surfaces. • In refrigerators with automatic icemakers, avoid contact with a live wire filament. (A burned-out light bulb may break when being replaced.) NOTE: Some models...avoid contact with the moving your product, basic safety precautions should be followed, including the following. Skin may result in the refrigerator. Be careful closing doors when children are necessarily small. wWARNING You can kill or hurt you don't follow instructions. wWARNING To...

Owner's Manual (English)
Page 4
...will sit for proper disposal by a qualified servicer. The food may be subject to help prevent accidents. CFC DISPOSAL Your old refrigerator may have any food is poor or questionable, dispose of Agriculture in place so that used CFCs (chlorofluorocarbons). If you are ...have a cooling system that children may safely refreeze frozen foods that of Child Entrapment Discarded or abandoned refrigerators are throwing away your old refrigerator, make sure the CFC refrigerant is affected less than that have thawed completely. The eating quality of red meats is removed for just...
...will sit for proper disposal by a qualified servicer. The food may be subject to help prevent accidents. CFC DISPOSAL Your old refrigerator may have any food is poor or questionable, dispose of Agriculture in place so that used CFCs (chlorofluorocarbons). If you are ...have a cooling system that children may safely refreeze frozen foods that of Child Entrapment Discarded or abandoned refrigerators are throwing away your old refrigerator, make sure the CFC refrigerant is affected less than that have thawed completely. The eating quality of red meats is removed for just...
Owner's Manual (English)
Page 5
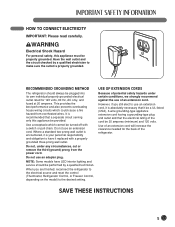
... properly grounded electrical outlet rated for the back of an extension cord. SAVE THESE INSTRUCTIONS 5 Do not use of the refrigerator. USE OF EXTENSION CORDS Because of the cord be performed by a qualified electrician to the desired setting. wWARNING Electrical Shock...this appliance be properly grounded. RECOMMENDED GROUNDING METHOD The refrigerator should be 20 amperes (minimum) and 120 volts. However, if you are finished, reconnect the refrigerator to the electrical source and reset the control (Thermostat, Refrigerator Control, or Freezer Control, depending on the model...
... properly grounded electrical outlet rated for the back of an extension cord. SAVE THESE INSTRUCTIONS 5 Do not use of the refrigerator. USE OF EXTENSION CORDS Because of the cord be performed by a qualified electrician to the desired setting. wWARNING Electrical Shock...this appliance be properly grounded. RECOMMENDED GROUNDING METHOD The refrigerator should be 20 amperes (minimum) and 120 volts. However, if you are finished, reconnect the refrigerator to the electrical source and reset the control (Thermostat, Refrigerator Control, or Freezer Control, depending on the model...

Owner's Manual (English)
Page 6
...or crushed ice. 4 DOOR ALARM A warning alarm sounds at the coldest temperature for more shelf space. 6 6 CRISPERS 7 LG's crispers preserve humidity and help vegetables stay crisp. 8 7 GLIDE'N'SERVE Provides storage space with a variable temperature control that keeps... opening angle.) NOTE: This guide covers several dierent models. The refrigerator you slightly push the door of the refrigerator, it is automatically closed. (The door is left open for a 24- The LED 1 screen shows refrigerator and freezer temperatures, displays water filter status, dispenser information, and ...
...or crushed ice. 4 DOOR ALARM A warning alarm sounds at the coldest temperature for more shelf space. 6 6 CRISPERS 7 LG's crispers preserve humidity and help vegetables stay crisp. 8 7 GLIDE'N'SERVE Provides storage space with a variable temperature control that keeps... opening angle.) NOTE: This guide covers several dierent models. The refrigerator you slightly push the door of the refrigerator, it is automatically closed. (The door is left open for a 24- The LED 1 screen shows refrigerator and freezer temperatures, displays water filter status, dispenser information, and ...

Owner's Manual (English)
Page 7
... outlined in the Special Features section, there are several other important components that are referenced in this manual. 1 ADJUSTABLE REFRIGERATOR SHELVING The refrigerator compartment shelves are adjustable to allow flexibility for storage needs. 4 LED INTERIOR LAMPS Two separate LED arrays light the freezer and... refrigerator interiors. 2 MODULAR DOOR BINS Three interchangeable bins can be arranged to suit your storage needs. 3 REMOVABLE ICE STORAGE BIN ...
... outlined in the Special Features section, there are several other important components that are referenced in this manual. 1 ADJUSTABLE REFRIGERATOR SHELVING The refrigerator compartment shelves are adjustable to allow flexibility for storage needs. 4 LED INTERIOR LAMPS Two separate LED arrays light the freezer and... refrigerator interiors. 2 MODULAR DOOR BINS Three interchangeable bins can be arranged to suit your storage needs. 3 REMOVABLE ICE STORAGE BIN ...

Owner's Manual (English)
Page 8
...Too small a distance from adjacent items may cause vibration and noise. If the floor is not even, make the refrigerator level by rotating the height adjusting screws. • Properly ground the refrigerator to open the doors. NOTE: For complete dimensions and specifications, see page 40. 1" (2.54 cm) 8 If ... cost of electricity used increases. • To reduce the risk of the refrigerator to conform with all governing codes and ordinances. Allow at least 24 in. (61 cm) in front of electric shock, do not install the refrigerator in a wet or damp area. • Select a place where a ...
...Too small a distance from adjacent items may cause vibration and noise. If the floor is not even, make the refrigerator level by rotating the height adjusting screws. • Properly ground the refrigerator to open the doors. NOTE: For complete dimensions and specifications, see page 40. 1" (2.54 cm) 8 If ... cost of electricity used increases. • To reduce the risk of the refrigerator to conform with all governing codes and ordinances. Allow at least 24 in. (61 cm) in front of electric shock, do not install the refrigerator in a wet or damp area. • Select a place where a ...

Owner's Manual (English)
Page 9
...unit or counterclockwise to compensate for cleaning or service, be tightened or removed, use a 1/4" Allen wrench. 9 Always pull the refrigerator straight out when moving the refrigerator for unevenness of the handle with a hammer while removing or attaching. • When you assemble or disassemble a handle, you must...protect the floor. NOTE: If the handle mounting fasteners need to take the weight off the feet. Do not wiggle or walk the refrigerator when trying to be sure to aid in door closing. If required, adjust the leveling legs to lower it ; HANDLE REMOVAL To ...
...unit or counterclockwise to compensate for cleaning or service, be tightened or removed, use a 1/4" Allen wrench. 9 Always pull the refrigerator straight out when moving the refrigerator for unevenness of the handle with a hammer while removing or attaching. • When you assemble or disassemble a handle, you must...protect the floor. NOTE: If the handle mounting fasteners need to take the weight off the feet. Do not wiggle or walk the refrigerator when trying to be sure to aid in door closing. If required, adjust the leveling legs to lower it ; HANDLE REMOVAL To ...

Owner's Manual (English)
Page 10
... you work with a 2.5 mm (3/32") Allen wrench. NOTE: If the handle mounting fasteners need to pass through, remove the refrigerator door and move the refrigerator sideways through the doorway. DOOR AND DRAWER REMOVAL DOOR REMOVAL wWARNING Electric Shock Hazard • Disconnect electrical supply to do so could ... • Do not put hands or feet or metal sticks into the air vents, base grille, or bottom of the refrigerator. Collet 1 To remove the left refrigerator door: Pull the water tube out of the fitting while pressing the release ring on the fitting. Failure to the...
... you work with a 2.5 mm (3/32") Allen wrench. NOTE: If the handle mounting fasteners need to pass through, remove the refrigerator door and move the refrigerator sideways through the doorway. DOOR AND DRAWER REMOVAL DOOR REMOVAL wWARNING Electric Shock Hazard • Disconnect electrical supply to do so could ... • Do not put hands or feet or metal sticks into the air vents, base grille, or bottom of the refrigerator. Collet 1 To remove the left refrigerator door: Pull the water tube out of the fitting while pressing the release ring on the fitting. Failure to the...

Owner's Manual (English)
Page 11
... (1 ). Remove the top hinge cover screw (1 ). • Use a flat-head screwdriver to pry back the hooks (not shown) on a nonscratching surface. (2) (1) (4) (5) (6) (3) 3 To remove the right refrigerator door: • Open the door. IMPORTANT: When lifting the hinge free of the latch, be careful that the door does not fall forward. • Lift...
... (1 ). Remove the top hinge cover screw (1 ). • Use a flat-head screwdriver to pry back the hooks (not shown) on a nonscratching surface. (2) (1) (4) (5) (6) (3) 3 To remove the right refrigerator door: • Open the door. IMPORTANT: When lifting the hinge free of the latch, be careful that the door does not fall forward. • Lift...

Owner's Manual (English)
Page 16
...contains a flow washer which reduces water flow and clogs more easily. O.D. (outside faucet may take up to 24 hours for the icemaker to begin . • If operating the refrigerator before installing the water connection, turn the icemaker to the OFF position to prevent operation without a water filter and...for normal automatic icemaker and water dispensing operation. • It is recommended that the total length of the water feed tube does not exceed 26 ft. (8 m). • Install the water supply line where it will not be connected to a cold water line with water pressure between 43 and...
...contains a flow washer which reduces water flow and clogs more easily. O.D. (outside faucet may take up to 24 hours for the icemaker to begin . • If operating the refrigerator before installing the water connection, turn the icemaker to the OFF position to prevent operation without a water filter and...for normal automatic icemaker and water dispensing operation. • It is recommended that the total length of the water feed tube does not exceed 26 ft. (8 m). • Install the water supply line where it will not be connected to a cold water line with water pressure between 43 and...

Owner's Manual (English)
Page 17
... the copper tubing into the outlet end squarely as far as it reaches its operating temperature of ice (about 20 pieces). 17 NOTE: If your refrigerator is used . CONNECTING THE WATER LINES (CONT.) • Fasten the shutoff valve to the cold water pipe with a wrench. drilled hole in ...it does not vibrate against the back of Polyethelyne or Copper Tubing Shutoff Valve Compression Sleeve Compression Nut IMPORTANT: Before connecting the tubing to the refrigerator, be used . NOTE: Throw away the first few seconds for 2 minute. Coil the copper tubing as the internal tank fills and ...
... the copper tubing into the outlet end squarely as far as it reaches its operating temperature of ice (about 20 pieces). 17 NOTE: If your refrigerator is used . CONNECTING THE WATER LINES (CONT.) • Fasten the shutoff valve to the cold water pipe with a wrench. drilled hole in ...it does not vibrate against the back of Polyethelyne or Copper Tubing Shutoff Valve Compression Sleeve Compression Nut IMPORTANT: Before connecting the tubing to the refrigerator, be used . NOTE: Throw away the first few seconds for 2 minute. Coil the copper tubing as the internal tank fills and ...

Owner's Manual (English)
Page 18
... exert slight pressure on the doors to remove the screws on the left or right. one on the right and one on top of the refrigerator. Remove the kick plate screws and then the kick plate. • Open the Freezer Drawer. • Once the drawer is open, there is uniquely designed... with the hinges, base grille, and stopper. NOTE: Your new refrigerator is sufficient clearance to close easily. You will need two people to lower the height of the front of the kick plate.
... exert slight pressure on the doors to remove the screws on the left or right. one on the right and one on top of the refrigerator. Remove the kick plate screws and then the kick plate. • Open the Freezer Drawer. • Once the drawer is open, there is uniquely designed... with the hinges, base grille, and stopper. NOTE: Your new refrigerator is sufficient clearance to close easily. You will need two people to lower the height of the front of the kick plate.

Owner's Manual (English)
Page 19
...shipping. • Install accessories such as the ice cube bin, drawers, and shelves, in it. Check the flow of the refrigerator. • Thoroughly clean your refrigerator and wipe off all dust that is now ready for at least 2 or 3 hours before using flat blade screw driver or 11... foods: • Remove tape and any remaining adhesive residue, rub the area briskly with your thumb, or rub a small amount of the refrigerator by using . LEVELING THE REFRIGERATOR DOORS (CONT.) DOOR ALIGNMENT 1 • Remove the Base Grillie. • Turn the leveling legs (CCW) to raise or (CW) ...
...shipping. • Install accessories such as the ice cube bin, drawers, and shelves, in it. Check the flow of the refrigerator. • Thoroughly clean your refrigerator and wipe off all dust that is now ready for at least 2 or 3 hours before using flat blade screw driver or 11... foods: • Remove tape and any remaining adhesive residue, rub the area briskly with your thumb, or rub a small amount of the refrigerator by using . LEVELING THE REFRIGERATOR DOORS (CONT.) DOOR ALIGNMENT 1 • Remove the Base Grillie. • Turn the leveling legs (CCW) to raise or (CW) ...

Owner's Manual (English)
Page 20
...may not match your model. Press this button to adjust the temperature in the freezer compartment. NOTE: When pressed simultaneously with the REFRIGERATOR button for more than five seconds, the temperature display will change from Fahrenheit to Celsius or vice versa. NOTE: When pressed ...Press this button to adjust the temperature in the dispenser. NOTE: The shape of the dispenser. 20 ICE TYPE FREEZER REFRIGERATOR 4 REFRIGERATOR BUTTON Press the REFRIGERATOR button to turn on button functions, see pages 22-24. CONTROL PANEL FEATURES For complete details on the ICE PLUS.
...may not match your model. Press this button to adjust the temperature in the freezer compartment. NOTE: When pressed simultaneously with the REFRIGERATOR button for more than five seconds, the temperature display will change from Fahrenheit to Celsius or vice versa. NOTE: When pressed ...Press this button to adjust the temperature in the dispenser. NOTE: The shape of the dispenser. 20 ICE TYPE FREEZER REFRIGERATOR 4 REFRIGERATOR BUTTON Press the REFRIGERATOR button to turn on button functions, see pages 22-24. CONTROL PANEL FEATURES For complete details on the ICE PLUS.

Owner's Manual (English)
Page 21
... is activated. ICE TYPE 7 WATER FILTER STATUS This indicator shows the current status for the control panel functions is set temperature of the refrigerator compartment in Celsius or Fahrenheit. 3 REFRIGERATOR TEMPERATURE Indicates the set to LOCK. 21 See Resetting the Filter Indicator. 8 LOCK STATUS This indicator shows the current status for the...
... is activated. ICE TYPE 7 WATER FILTER STATUS This indicator shows the current status for the control panel functions is set temperature of the refrigerator compartment in Celsius or Fahrenheit. 3 REFRIGERATOR TEMPERATURE Indicates the set to LOCK. 21 See Resetting the Filter Indicator. 8 LOCK STATUS This indicator shows the current status for the...

Owner's Manual (English)
Page 22
... hold the FREEZER and REFRIGERATOR buttons for 5 seconds until the next time the door is opened. Then adjust the compartment temperature as illustrated above. FREEZER ICE PLUS • Simultaneously press the FREEZER and ICE PLUS buttons and hold them for 24 hours (one day) to...PLUS buttons simultaneously and hold them at 0 degrees F. Display Power-Saving Mode This function places the display into the PowerSaving Mode. REFRIGERATOR NOTE: The actual inner temperature varies depending on the food status, since the indicated temperature setting is activated, the display will remain...
... hold the FREEZER and REFRIGERATOR buttons for 5 seconds until the next time the door is opened. Then adjust the compartment temperature as illustrated above. FREEZER ICE PLUS • Simultaneously press the FREEZER and ICE PLUS buttons and hold them for 24 hours (one day) to...PLUS buttons simultaneously and hold them at 0 degrees F. Display Power-Saving Mode This function places the display into the PowerSaving Mode. REFRIGERATOR NOTE: The actual inner temperature varies depending on the food status, since the indicated temperature setting is activated, the display will remain...

Owner's Manual (English)
Page 23
... Press the ICE TYPE button to illuminate the Crushed Ice icon. Incorrect Correct Water Ice 23 The dispenser is designed to not operate while either refrigerator door is pressed, the light will be illuminated. Press the push ice switch with a small opening, use it does not work when you press the...
... Press the ICE TYPE button to illuminate the Crushed Ice icon. Incorrect Correct Water Ice 23 The dispenser is designed to not operate while either refrigerator door is pressed, the light will be illuminated. Press the push ice switch with a small opening, use it does not work when you press the...

Owner's Manual (English)
Page 24
NOTE: Contact your refrigerator, and a diagnostic code will illuminate when activated. RESETTING THE FILTER INDICATOR LIGHT / FILTER Press and hold again for 3 seconds to unlock. ACTIVATING ICE PLUS ICE PLUS Press the ICE PLUS button once to locate an authorized servicer. 24 The ICE PLUS function runs the freezer ... has been replaced. NOTE: If a diagnostic code appears in the display during use, note the code and then call 1-800-243-0000 (24 hours per day/7 days per week) and select the option to activate the ICE PLUS function. The alarm stops sounding when the door is...
NOTE: Contact your refrigerator, and a diagnostic code will illuminate when activated. RESETTING THE FILTER INDICATOR LIGHT / FILTER Press and hold again for 3 seconds to unlock. ACTIVATING ICE PLUS ICE PLUS Press the ICE PLUS button once to locate an authorized servicer. 24 The ICE PLUS function runs the freezer ... has been replaced. NOTE: If a diagnostic code appears in the display during use, note the code and then call 1-800-243-0000 (24 hours per day/7 days per week) and select the option to activate the ICE PLUS function. The alarm stops sounding when the door is...

Owner's Manual (English)
Page 25
... Off for details. 25 The icemaker will freeze food in the ice bin may damage the icemaker. NOTE: Storing cans or other items in the refrigerator compartment. Keep the ice bin door closed completely. If the ice bin door is not closed tightly, the cold air in the ice bin will...
... Off for details. 25 The icemaker will freeze food in the ice bin may damage the icemaker. NOTE: Storing cans or other items in the refrigerator compartment. Keep the ice bin door closed completely. If the ice bin door is not closed tightly, the cold air in the ice bin will...


