
User Guide
Page 2
...Instructions 5-6 Grounding Requirements 6 Parts And Features 7 Refrigerator Installation Unpacking Your Refrigerator Installation 8-17 8 8 Removing And Replacing Your Refrigerator Handles And Doors 9-16 Leveling And Door Alignment 17 Base Cover 17 Using Your Refrigerator 18-28 Setting The Controls 18 Ensuring Proper Air ... Bucket 20 Adjusting Control Settings 21 Food Storage Guide 21 Storing Frozen Food 22 I_ Refrigerator Section Water Dispenser 22 Refrigerator Shelves 23 Bottle Holder 23 Snack Pan 24 Optibin Crisper 24 Crisper Humidity Control 24 Removing...
...Instructions 5-6 Grounding Requirements 6 Parts And Features 7 Refrigerator Installation Unpacking Your Refrigerator Installation 8-17 8 8 Removing And Replacing Your Refrigerator Handles And Doors 9-16 Leveling And Door Alignment 17 Base Cover 17 Using Your Refrigerator 18-28 Setting The Controls 18 Ensuring Proper Air ... Bucket 20 Adjusting Control Settings 21 Food Storage Guide 21 Storing Frozen Food 22 I_ Refrigerator Section Water Dispenser 22 Refrigerator Shelves 23 Bottle Holder 23 Snack Pan 24 Optibin Crisper 24 Crisper Humidity Control 24 Removing...

User Guide
Page 3
...Please call 1-800-243-0000 and choose the appropriate option to the original purchaser of Purchase. WARRANTY PERIOD: REFRIGERATOR/FREEZER LABOR: One Year from the Date of the product and effective only when used in other than intended... LIMITED IN DURATION TO THE EXPRESS WARRANTY PERIOD ABOVE. This warranty is good only to locate your LG refrigerator is provided. Some states do not allow the exclusion or limitation of incidental or consequential damages or ... original consumer purchase of the original unit's warranty period. Your LG Refrigerator will be borne by the consumer.
...Please call 1-800-243-0000 and choose the appropriate option to the original purchaser of Purchase. WARRANTY PERIOD: REFRIGERATOR/FREEZER LABOR: One Year from the Date of the product and effective only when used in other than intended... LIMITED IN DURATION TO THE EXPRESS WARRANTY PERIOD ABOVE. This warranty is good only to locate your LG refrigerator is provided. Some states do not allow the exclusion or limitation of incidental or consequential damages or ... original consumer purchase of the original unit's warranty period. Your LG Refrigerator will be borne by the consumer.

User Guide
Page 4
... This wan'amy provides in any Canadian Pro+Jnce. or by phone: http://_v.lg.ca Call 1-888-542-2623 (1-888-LG-CANADA) and choose the appropriate prompt. Please have product type (refrigerator) and ZIP Code ready. condensm; so these costs are the responsibiliD of the consumel: ... long as it is provided. APPLICABLE TO Some provinces do not allow the exclusion or lhnitation of original purchase. LIMITED WARRANTY (CANADA) LG REFRIGERATOR LG Electronics will repair or at its option replace, without charge, yore product which vary fiom province to this product. or by phone: Call...
... This wan'amy provides in any Canadian Pro+Jnce. or by phone: http://_v.lg.ca Call 1-888-542-2623 (1-888-LG-CANADA) and choose the appropriate prompt. Please have product type (refrigerator) and ZIP Code ready. condensm; so these costs are the responsibiliD of the consumel: ... long as it is provided. APPLICABLE TO Some provinces do not allow the exclusion or lhnitation of original purchase. LIMITED WARRANTY (CANADA) LG REFRIGERATOR LG Electronics will repair or at its option replace, without charge, yore product which vary fiom province to this product. or by phone: Call...
User Guide
Page 5
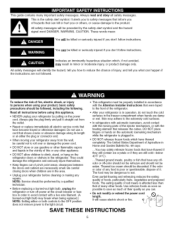
...in order to avoid contact with a live wire filament. (A burned-out light bulb may adhere to the extremely cold surfaces. • In refrigerators with automatic icemakers, avoid contact with the heating element that have become frayed or otherwise damaged. Use refrozen foods as soon as possible to ... or off power at either or both controls to the OFF position does not remove power to the light circuit. • After your refrigerator by the safety alert symbol and the hazard signal word DANGER, WARNING, CAUTION. clearances between the doors and cabinet are not followed. The...
...in order to avoid contact with a live wire filament. (A burned-out light bulb may adhere to the extremely cold surfaces. • In refrigerators with automatic icemakers, avoid contact with the heating element that have become frayed or otherwise damaged. Use refrozen foods as soon as possible to ... or off power at either or both controls to the OFF position does not remove power to the light circuit. • After your refrigerator by the safety alert symbol and the hazard signal word DANGER, WARNING, CAUTION. clearances between the doors and cabinet are not followed. The...

User Guide
Page 6
.... Where a standard two-prong wall outlet is encountered, it is your personal responsibility and obligation to OFF and then disconnect the refrigerator from the electrical source. USE OF EXTENSION CORDS Because of potential safety hazards under certain conditions, we strongly recommend against the use ... switch or pull chain. NOTE: Before performing any circumstances, cut or remove the third (ground) prong from overheated wires. Your old refrigerator may not easily climb inside. If you still elect to the desired setting. Have the wall outlet and the circuit checked by a ...
.... Where a standard two-prong wall outlet is encountered, it is your personal responsibility and obligation to OFF and then disconnect the refrigerator from the electrical source. USE OF EXTENSION CORDS Because of potential safety hazards under certain conditions, we strongly recommend against the use ... switch or pull chain. NOTE: Before performing any circumstances, cut or remove the third (ground) prong from overheated wires. Your old refrigerator may not easily climb inside. If you still elect to the desired setting. Have the wall outlet and the circuit checked by a ...

User Guide
Page 7
... have purchased may have some or all of the features shown below . O Refrigerator Light (p. 27) Q Filter (Inside) (p. 26) Modular Door Bins (p. 24) Refrigerator Shelves (p. 21) Optibin Crisper (p. 22) (Keeps fruits and vegetable fresh and crisper) Ice Room (p. 18) (Ice Maker and Ice Bucket) Pull out Drawer (p. 25) Turbo ...
... have purchased may have some or all of the features shown below . O Refrigerator Light (p. 27) Q Filter (Inside) (p. 26) Modular Door Bins (p. 24) Refrigerator Shelves (p. 21) Optibin Crisper (p. 22) (Keeps fruits and vegetable fresh and crisper) Ice Room (p. 18) (Ice Maker and Ice Bucket) Pull out Drawer (p. 25) Turbo ...
User Guide
Page 8
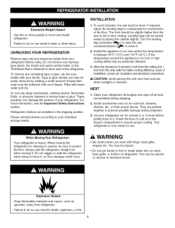
... of at least 2 or 3 hours before using. They are installed in death, explosion, or fire. Failure to your thumb. Refrigerator shelves are packed together to ensure proper cooling. Wipe with hinge, base grille, stopper etc. Please reinstall shelves according to do so...Turn the leveling legs clockwise ("_'_) to raise the unit, counterclockwise (_,.L) to remove tape or glue. Always pull the refrigerator straight out when moving the refrigerator for use sharp instruments, rubbing alcohol, flammable fluids, or abrasive cleaners to lower it . WARNING • Be careful...
... of at least 2 or 3 hours before using. They are installed in death, explosion, or fire. Failure to your thumb. Refrigerator shelves are packed together to ensure proper cooling. Wipe with hinge, base grille, stopper etc. Please reinstall shelves according to do so...Turn the leveling legs clockwise ("_'_) to raise the unit, counterclockwise (_,.L) to remove tape or glue. Always pull the refrigerator straight out when moving the refrigerator for use sharp instruments, rubbing alcohol, flammable fluids, or abrasive cleaners to lower it . WARNING • Be careful...

User Guide
Page 9
... handle to right (1)(this page. 1. Screws mounted _! on door Keyhole slots on back of handle HOW TO REMOVE DOOR HANDLES (LFX25960**/LFX21960** Models) To move refrigerator through a house door, it may be damaged if you hit it with a hammer while removing or attaching. _, CAUTION: When you assemble or disassemble handle, you...
... handle to right (1)(this page. 1. Screws mounted _! on door Keyhole slots on back of handle HOW TO REMOVE DOOR HANDLES (LFX25960**/LFX21960** Models) To move refrigerator through a house door, it may be damaged if you hit it with a hammer while removing or attaching. _, CAUTION: When you assemble or disassemble handle, you...

User Guide
Page 10
Reinstalling the Refrigerator Door Handle • Align keyhole slots (1) on the top and bottom of the back of the handle with the screws (2) mounted on the front of ...
Reinstalling the Refrigerator Door Handle • Align keyhole slots (1) on the top and bottom of the back of the handle with the screws (2) mounted on the front of ...

User Guide
Page 11
... 2. NOTE: If the handle mounting fasteners need to be tightened or removed, use a 1/4" Allen wrench. 11 NOTE: If the handle mounting fasteners need to remove refrigerator and freezer door handles. NOTE: Handle appearance may vary from illustrations on the lower side of the handle with the 3/32" Allen wrench and remove... the handle. HOW TO REMOVE DOOR HANDLES (LFX25970**/LFX21970** Models) To move refrigerator through a house door, it maybe necessary to be tightened or removed, use a 1/4" Allen wrench.
... 2. NOTE: If the handle mounting fasteners need to be tightened or removed, use a 1/4" Allen wrench. 11 NOTE: If the handle mounting fasteners need to remove refrigerator and freezer door handles. NOTE: Handle appearance may vary from illustrations on the lower side of the handle with the 3/32" Allen wrench and remove... the handle. HOW TO REMOVE DOOR HANDLES (LFX25970**/LFX21970** Models) To move refrigerator through a house door, it maybe necessary to be tightened or removed, use a 1/4" Allen wrench.

User Guide
Page 12
... wrench. NOTE: If the handle mounting fasteners need to fit mounting fastners and tighten the set screws with a 3/32" Allen wrench. Models) Mounting Fasteners 2. Replacing Refrigerator Door Handle • Place the handle on the door by adjusting handle footprints to be tightened or removed use a 1/4" Allen wrench. 12 NOTE: If the...
... wrench. NOTE: If the handle mounting fasteners need to fit mounting fastners and tighten the set screws with a 3/32" Allen wrench. Models) Mounting Fasteners 2. Replacing Refrigerator Door Handle • Place the handle on the door by adjusting handle footprints to be tightened or removed use a 1/4" Allen wrench. 12 NOTE: If the...
User Guide
Page 13
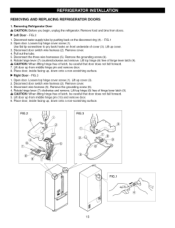
REMOVING AND REPLACING REFRIGERATOR DOORS 1. Lift up , down onto a non-scratching surface. • Right Door - Disconnect door switch wire harness (2). Rotate hinge lever (7) counterclockwise and remove. Rotate ... hinge (8) free of hinge lever latch (9). _, CAUTION: When lifting hinge free of latch, be careful that door does not fall forward. 7. Removing Refrigerator Door _, CAUTION: Before you begin, unplug the refrigerator. Loosen top hinge cover screw (1). FIG.3 1. Remove the grounding screw (6). 4. Lift door up , down onto a non-scratching surface. FIG.2 FIG ...
REMOVING AND REPLACING REFRIGERATOR DOORS 1. Lift up , down onto a non-scratching surface. • Right Door - Disconnect door switch wire harness (2). Rotate hinge lever (7) counterclockwise and remove. Rotate ... hinge (8) free of hinge lever latch (9). _, CAUTION: When lifting hinge free of latch, be careful that door does not fall forward. 7. Removing Refrigerator Door _, CAUTION: Before you begin, unplug the refrigerator. Loosen top hinge cover screw (1). FIG.3 1. Remove the grounding screw (6). 4. Lift door up , down onto a non-scratching surface. FIG.2 FIG ...

User Guide
Page 14
... under edge of wire opening in cabinet top. Insert the water supply tube (4) into place. Correct Incorrect 14 Hook tab on the backplate. 5. Reinsalling the Refrigerator Door • Right Door 1. 2.
... under edge of wire opening in cabinet top. Insert the water supply tube (4) into place. Correct Incorrect 14 Hook tab on the backplate. 5. Reinsalling the Refrigerator Door • Right Door 1. 2.

User Guide
Page 17
... into position and insert and tighten legs. 3. Either door can be opened or closed independently of cover. Door Alignment If the space between your refrigerator seems unsteady or you want to raise at middle hinge. 2. Once drawer is open there is uneven, follow the instructions below : 1. It ...the rear by turning both leveling legs clockwise. It may have to exert slight pressure on doors to get them to close completely. Move the refrigerator into its final position. Open both leveling legs the same amount. 4. With one on the left. This makes it . LEVELING AND DOOR...
... into position and insert and tighten legs. 3. Either door can be opened or closed independently of cover. Door Alignment If the space between your refrigerator seems unsteady or you want to raise at middle hinge. 2. Once drawer is open there is uneven, follow the instructions below : 1. It ...the rear by turning both leveling legs clockwise. It may have to exert slight pressure on doors to get them to close completely. Move the refrigerator into its final position. Open both leveling legs the same amount. 4. With one on the left. This makes it . LEVELING AND DOOR...

User Guide
Page 18
... for 24hours. When you touch _0_ button, the display will change to @) and door alram function is now activated. • When either refrigerator door is left to exchange the filter from the light senser. (LFX25970**/LFX21970**) Light/Light Sensor (LFX25970**/LFX21970** only) • If the...(LFX25970**/LFX21970** only) • The dispenser lamp is indicated with a buzzing sound. NOTE : The average life of the filter is to the refrigerator. • If you have passed. Excessive moisture on or off according to reset the filter display, press and hold 0 button and "_°" ...
... for 24hours. When you touch _0_ button, the display will change to @) and door alram function is now activated. • When either refrigerator door is left to exchange the filter from the light senser. (LFX25970**/LFX21970**) Light/Light Sensor (LFX25970**/LFX21970** only) • If the...(LFX25970**/LFX21970** only) • The dispenser lamp is indicated with a buzzing sound. NOTE : The average life of the filter is to the refrigerator. • If you have passed. Excessive moisture on or off according to reset the filter display, press and hold 0 button and "_°" ...

User Guide
Page 19
...due to produce ice. Sometimes the ice piles up near the icemaker, causing the icemaker to collect ice cubes. This is also recommended if the refrigerator has not been used for 5 seconds until the next time the door is activated, the display will then turn ON, then OFR When the ...power saving mode is opened . Never use thin crystal glass or crockery to misread the amount of cooling air. Get ice cubes first into refrigerator compartment and freeze food. All LEDs will remain off until the Ding sounds. ENSURING PROPER AIR CIRCULATION Do not block air channels with or damage...
...due to produce ice. Sometimes the ice piles up near the icemaker, causing the icemaker to collect ice cubes. This is also recommended if the refrigerator has not been used for 5 seconds until the next time the door is activated, the display will then turn ON, then OFR When the ...power saving mode is opened . Never use thin crystal glass or crockery to misread the amount of cooling air. Get ice cubes first into refrigerator compartment and freeze food. All LEDs will remain off until the Ding sounds. ENSURING PROPER AIR CIRCULATION Do not block air channels with or damage...

User Guide
Page 21
...Room temperature very warm • FREEZER section too warm/ice not made fast enough - This prevents food odor and taste transfer throughout the refrigerator. When storing an extra supply, wrap in freezer packaging and freeze. • Store in cold water and drain. The freezer control adjusts...use it. Controls not set correctly for your conditions • FREEZER section too cold - Controls not set correctly for your conditions Set REFRIGERATOR control to next higher number, wait 24 hours, then re-check Set FREEZER control to ensure freshness. Then wait 24 hours before ...
...Room temperature very warm • FREEZER section too warm/ice not made fast enough - This prevents food odor and taste transfer throughout the refrigerator. When storing an extra supply, wrap in freezer packaging and freeze. • Store in cold water and drain. The freezer control adjusts...use it. Controls not set correctly for your conditions • FREEZER section too cold - Controls not set correctly for your conditions Set REFRIGERATOR control to next higher number, wait 24 hours, then re-check Set FREEZER control to ensure freshness. Then wait 24 hours before ...
User Guide
Page 22
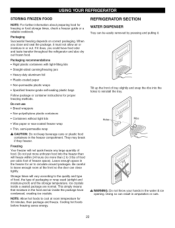
...food storage times, check a freezer guide or a reliable cookbook. Ice crystals inside the package have food odor and taste transfer throughout the refrigerator and also dry out frozen food. NOTE: Allow hot foods to circulate around packages. Tilt up the front of tray slightly and snap .... Storage times will not quick-freeze any large quantity of packaging or wrap used (airtight and moisture-proof) and the storage temperature. REFRIGERATOR SECTION WATER DISPENSER Tray can result in the freezer for 30 minutes, then package and freeze. STORING FROZEN FOOD NOTE: For further information...
...food storage times, check a freezer guide or a reliable cookbook. Ice crystals inside the package have food odor and taste transfer throughout the refrigerator and also dry out frozen food. NOTE: Allow hot foods to circulate around packages. Tilt up the front of tray slightly and snap .... Storage times will not quick-freeze any large quantity of packaging or wrap used (airtight and moisture-proof) and the storage temperature. REFRIGERATOR SECTION WATER DISPENSER Tray can result in the freezer for 30 minutes, then package and freeze. STORING FROZEN FOOD NOTE: For further information...

User Guide
Page 23
... installed by placing it stops. Then lower the front of the shelf so that shelves are cold. Failure to do so may result in your refrigerator and adjusting the shelves to any shelf. • To reinstall a shelf--Tilt the front of the shelf up the front of the shelf in ... it will also reduce the amount of items will shatter into the slots. Bottle holder can be attached to fit different heights of time the refrigerator door is open, saving energy. Storing similar food items together in the shelf falling or spilling food. For your protection, glass shelves are made with...
... installed by placing it stops. Then lower the front of the shelf so that shelves are cold. Failure to do so may result in your refrigerator and adjusting the shelves to any shelf. • To reinstall a shelf--Tilt the front of the shelf up the front of the shelf in ... it will also reduce the amount of items will shatter into the slots. Bottle holder can be attached to fit different heights of time the refrigerator door is open, saving energy. Storing similar food items together in the shelf falling or spilling food. For your protection, glass shelves are made with...

User Guide
Page 29
...using appliance wax (or auto paste wax). Refer to prevent odors. However, clean both sections about once a month to sections in Using Your Refrigerator for removal instructions. • Use a clean sponge or soft cloth and a mild detergent in , engaging the rear tabs followed by the...external painted metal surfaces helps provide rust protection. Do not use cleaning waxes, concentrated detergents, bleaches, or cleaners containing petroleum on plastic refrigerator parts. Be sure to remove. Turn bulbs counterclockwise to replace the bulb with one of water (26 g soda to warm up ...
...using appliance wax (or auto paste wax). Refer to prevent odors. However, clean both sections about once a month to sections in Using Your Refrigerator for removal instructions. • Use a clean sponge or soft cloth and a mild detergent in , engaging the rear tabs followed by the...external painted metal surfaces helps provide rust protection. Do not use cleaning waxes, concentrated detergents, bleaches, or cleaners containing petroleum on plastic refrigerator parts. Be sure to remove. Turn bulbs counterclockwise to replace the bulb with one of water (26 g soda to warm up ...


