Owner's Manual
Page 2
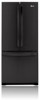
...purchased with scratches, dents, or defects. Proof of purchase is applicable to the product caused by the consumer. Territories. LG Refrigerator / Freezer Warranty Period Product Parts Labor Refrigerator / Freezer 1 year 1 year [In-Home Service (Except Model GR-051)] Sealed System (Compressor, Condenser, Evaporator) ... used in other express warranty is required and must be submitted at its option replace, without charge, your product type (Refrigerator), model number, serial number, and ZIP/Postal Code ready. 1 MFL67241801_1.indd 1 6/9/2011 12:31:38 PM Service ...
...purchased with scratches, dents, or defects. Proof of purchase is applicable to the product caused by the consumer. Territories. LG Refrigerator / Freezer Warranty Period Product Parts Labor Refrigerator / Freezer 1 year 1 year [In-Home Service (Except Model GR-051)] Sealed System (Compressor, Condenser, Evaporator) ... used in other express warranty is required and must be submitted at its option replace, without charge, your product type (Refrigerator), model number, serial number, and ZIP/Postal Code ready. 1 MFL67241801_1.indd 1 6/9/2011 12:31:38 PM Service ...

Owner's Manual
Page 3
... Compartment Freezer Section Ice Bin 4-5 DuraBase 5 Durabase Divider Glide Out Drawer Tilting Door 6 Refrigerator Installation Unpacking Installation Installation of Base Grille How to remove and Install the Refrigerator Doors How to remove and Install Pull-Out Drawer Closing and Aligning the doors 7-13 7...the Controls Adjusting Control Settings Food Storage Guide Storing Frozen Food Refrigerator Section Refrigerator Shelves 14-20 14 14 14 14 15 15 15-16 16-19 16-17 Refrigerator Care and Cleaning Refrigerator Cleaning Outside Inside Walls Door Lining & Gaskets Plastic Parts (Covers...
... Compartment Freezer Section Ice Bin 4-5 DuraBase 5 Durabase Divider Glide Out Drawer Tilting Door 6 Refrigerator Installation Unpacking Installation Installation of Base Grille How to remove and Install the Refrigerator Doors How to remove and Install Pull-Out Drawer Closing and Aligning the doors 7-13 7...the Controls Adjusting Control Settings Food Storage Guide Storing Frozen Food Refrigerator Section Refrigerator Shelves 14-20 14 14 14 14 15 15 15-16 16-19 16-17 Refrigerator Care and Cleaning Refrigerator Cleaning Outside Inside Walls Door Lining & Gaskets Plastic Parts (Covers...
Owner's Manual
Page 4
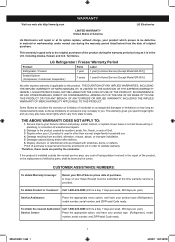
... circuit and outlet to you what can cause serious injury to them and damage to the product. • Keep your fingers or hands in your refrigerator, take care not to roll over the electrical cord. • DO NOT store or use cords that any other electrical appliance. • DO ... if the instructions are not followed. "Partial thawing or refreezing reduces the quality of the United States, in the ice dispenser mechanism while the refrigerator is the safety alert symbol. Always read and obey all faulty or damaged service cables. WARNING To reduce the risk of melted ice cream should...
... circuit and outlet to you what can cause serious injury to them and damage to the product. • Keep your fingers or hands in your refrigerator, take care not to roll over the electrical cord. • DO NOT store or use cords that any other electrical appliance. • DO ... if the instructions are not followed. "Partial thawing or refreezing reduces the quality of the United States, in the ice dispenser mechanism while the refrigerator is the safety alert symbol. Always read and obey all faulty or damaged service cables. WARNING To reduce the risk of melted ice cream should...
Owner's Manual
Page 5
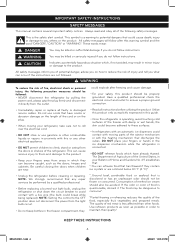
... support a minimum of the appliance by our service center or qualified LG technician to the desired position. However, if you could cause a fire from the power source. CFC DISPOSAL Your old refrigerator may have supervision or instruction in and adjust the thermostat to avoid any...proper ground exists before use WARNING REPLACING ELECTRICAL CABLE If the power cord is adequately grounded. If you intentionally remove the CFC refrigerant, you still choose to fines or prison in accordance with environmental legislation in them. CFC affects the stratospheric layer of the ...
... support a minimum of the appliance by our service center or qualified LG technician to the desired position. However, if you could cause a fire from the power source. CFC DISPOSAL Your old refrigerator may have supervision or instruction in and adjust the thermostat to avoid any...proper ground exists before use WARNING REPLACING ELECTRICAL CABLE If the power cord is adequately grounded. If you intentionally remove the CFC refrigerant, you still choose to fines or prison in accordance with environmental legislation in them. CFC affects the stratospheric layer of the ...

Owner's Manual
Page 6
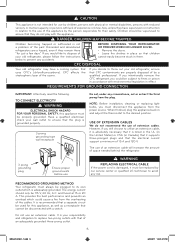
... may not correspond to familiarize yourself with the parts and features of your model. NOTE: This guide covers different models. Your refrigerator could have some or all of your new refrigerator. Drawer Model A B C PARTS AND FEATURES D L E K F J G H I Durabase divider J Pull Out Drawer C Shelves K Freezer Light D Optibin Crisper L Door Racks Keeps fruits and vegetable...
... may not correspond to familiarize yourself with the parts and features of your model. NOTE: This guide covers different models. Your refrigerator could have some or all of your new refrigerator. Drawer Model A B C PARTS AND FEATURES D L E K F J G H I Durabase divider J Pull Out Drawer C Shelves K Freezer Light D Optibin Crisper L Door Racks Keeps fruits and vegetable...
Owner's Manual
Page 7
...tape residue, rub it well with the hinges, base cover and stops, etc. Remove the shelves and replace them according to your refrigerator for use sharp instruments, rubbing alcohol, flammable liquids or abrasive cleaning products to remove the adhesive tape or glue. Leave your hands or...is now ready for cleaning or servicing. The shelves come already installed in the freezer compartment to ensure proper cooling. Always pull your refrigerator and remove and dust accumulated during shipping. 3. The front should be leveled. Clean with warm water and let dry. For more ...
...tape residue, rub it well with the hinges, base cover and stops, etc. Remove the shelves and replace them according to your refrigerator for use sharp instruments, rubbing alcohol, flammable liquids or abrasive cleaning products to remove the adhesive tape or glue. Leave your hands or...is now ready for cleaning or servicing. The shelves come already installed in the freezer compartment to ensure proper cooling. Always pull your refrigerator and remove and dust accumulated during shipping. 3. The front should be leveled. Clean with warm water and let dry. For more ...

Owner's Manual
Page 8
...of the harness 6 6/9/2011 12:31:44 PM Also the screws quantity used in Allen Wrench 1. IMPORTANT: Before starting, turn off and unplug the refrigerator. Remove all food and the racks from the upper lid (1) remove it won't scratch. 8 MFL67241801_1.indd 8 5 Front view of the handle, ...hinge and cover hinge might vary according to remove refrigerator and freezer door handles. THE APPEARANCE VARIATION DOES NOT AFFECT REMOVING OR INSTALLING DOORS. TOOLS YOU MIGHT NEED OR USE 10 mm 1/4 in 3/8 in...
...of the harness 6 6/9/2011 12:31:44 PM Also the screws quantity used in Allen Wrench 1. IMPORTANT: Before starting, turn off and unplug the refrigerator. Remove all food and the racks from the upper lid (1) remove it won't scratch. 8 MFL67241801_1.indd 8 5 Front view of the handle, ...hinge and cover hinge might vary according to remove refrigerator and freezer door handles. THE APPEARANCE VARIATION DOES NOT AFFECT REMOVING OR INSTALLING DOORS. TOOLS YOU MIGHT NEED OR USE 10 mm 1/4 in 3/8 in...

Owner's Manual
Page 9
over the hinge, after, lift the hinge and remove it gently over the pin of the hinge (1). REFRIGERATOR INSTALLATION • Loose the grounding screw (7) and the pins (8) located • Plug the cable harness (5). Pin 8 Pin • Place the hinge in its ...original position (2) assembly the two pins (3) and the ground screw (4). • Place the hinge in its inner face to avoid scratching. 6 7 2. To install the refrigerator doors Right Door • Take the door and place it (9). 5 8 9 • Place the hinge lid (6) and install both screws (7). Left Door 1 • ...
over the hinge, after, lift the hinge and remove it gently over the pin of the hinge (1). REFRIGERATOR INSTALLATION • Loose the grounding screw (7) and the pins (8) located • Plug the cable harness (5). Pin 8 Pin • Place the hinge in its ...original position (2) assembly the two pins (3) and the ground screw (4). • Place the hinge in its inner face to avoid scratching. 6 7 2. To install the refrigerator doors Right Door • Take the door and place it (9). 5 8 9 • Place the hinge lid (6) and install both screws (7). Left Door 1 • ...

Owner's Manual
Page 10
... 1/4" Allen tool (3). To remove the freezer handle • With an 3/32" Allen tool, loose the screws (1) located the bottom of the refrigerator • Install the mounting screws over the door (1) place the handle over them (2) and tight the screws up (3). 11 12 Mounting Screws 1 Fixation... • Place the hinge's lid (11) and screw the two screws (12). Check that the door is well installed. 4. To remove the refrigerator handle Allen Wrench • Loose the screws (1) with the Allen tool 3/32" and remove the handle (2). • Remove the mounting screws with an 1/4" Allen tool...
... 1/4" Allen tool (3). To remove the freezer handle • With an 3/32" Allen tool, loose the screws (1) located the bottom of the refrigerator • Install the mounting screws over the door (1) place the handle over them (2) and tight the screws up (3). 11 12 Mounting Screws 1 Fixation... • Place the hinge's lid (11) and screw the two screws (12). Check that the door is well installed. 4. To remove the refrigerator handle Allen Wrench • Loose the screws (1) with the Allen tool 3/32" and remove the handle (2). • Remove the mounting screws with an 1/4" Allen tool...

Owner's Manual
Page 11
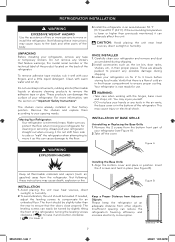
REFRIGERATOR INSTALLATION 6. Removing the Pull Out Drawer • Pull the drawer out to perform the following instructions: 1. To install the freezer handle • Remove the screws (2) ...
REFRIGERATOR INSTALLATION 6. Removing the Pull Out Drawer • Pull the drawer out to perform the following instructions: 1. To install the freezer handle • Remove the screws (2) ...
Owner's Manual
Page 12
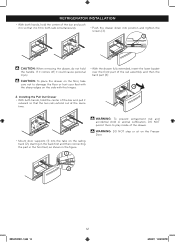
... that it could cause personal injury. WARNING: DO NOT step or sit on the Freezer Door. 2 12 MFL67241801_1.indd 12 6/9/2011 12:32:02 PM REFRIGERATOR INSTALLATION • With both hands, hold the center of the rail assembly and then the back part (4). 4 2. If it comes off, it is fit to...
... that it could cause personal injury. WARNING: DO NOT step or sit on the Freezer Door. 2 12 MFL67241801_1.indd 12 6/9/2011 12:32:02 PM REFRIGERATOR INSTALLATION • With both hands, hold the center of the rail assembly and then the back part (4). 4 2. If it comes off, it is fit to...

Owner's Manual
Page 13
... leveling legs up the door you want to raise at middle hinge. 2.With other hand, use pliers to adjust the screws. 2 1 When moving your refrigerator seems unstable or if you turn both leveling screws clockwise. Make sure that you would like the doors to move it easier to insert snap... ring as floor damage could occur. 6.Replace the base grille. NOTE: Your new refrigerator is even by following the instructions below to follow the instructions below : 1. Either door can be sure to align them to lower it ....
... leveling legs up the door you want to raise at middle hinge. 2.With other hand, use pliers to adjust the screws. 2 1 When moving your refrigerator seems unstable or if you turn both leveling screws clockwise. Make sure that you would like the doors to move it easier to insert snap... ring as floor damage could occur. 6.Replace the base grille. NOTE: Your new refrigerator is even by following the instructions below to follow the instructions below : 1. Either door can be sure to align them to lower it ....

Owner's Manual
Page 14
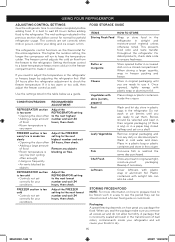
... than when in the illustration below the freezer floor and the rest of the air enters the refrigerator section through the top vent. ADJUSTING THE CONTROLS • Your refrigerator has two controls that the refrigerator door mullion is properly shut. • Freezer Control: Position 1 to 7 (-6 °F to... enter through the bottom part and circulates upward. As shown in normal operation. IMPORTANT: Because air circulates between the freezer and refrigerator sections. Leave it on . The LED light will become . This air returns below , the cold air enters through the ...
... than when in the illustration below the freezer floor and the rest of the air enters the refrigerator section through the top vent. ADJUSTING THE CONTROLS • Your refrigerator has two controls that the refrigerator door mullion is properly shut. • Freezer Control: Position 1 to 7 (-6 °F to... enter through the bottom part and circulates upward. As shown in normal operation. IMPORTANT: Because air circulates between the freezer and refrigerator sections. Leave it on . The LED light will become . This air returns below , the cold air enters through the ...
Owner's Manual
Page 15
...highest number and wait 24 hours, then check. Remove any dirty or discolored parts. This prevents food odor and taste transfer throughout the refrigerator. Fruit Wash and let dry; STORING FROZEN FOOD NOTE: For more cold air in the freezer compartment to make sure you are ... shelf. A package that is very low (not cycling often enough) • Using ice frequently • Air vents blocked by adjusting the refrigerator first. If you need to adjust the temperature in the transmission of bad odors, contaminants inside the crisper. Once opened butter in a covered dish...
...highest number and wait 24 hours, then check. Remove any dirty or discolored parts. This prevents food odor and taste transfer throughout the refrigerator. Fruit Wash and let dry; STORING FROZEN FOOD NOTE: For more cold air in the freezer compartment to make sure you are ... shelf. A package that is very low (not cycling often enough) • Using ice frequently • Air vents blocked by adjusting the refrigerator first. If you need to adjust the temperature in the transmission of bad odors, contaminants inside the crisper. Once opened butter in a covered dish...

Owner's Manual
Page 16
...breaking they may break if exposed to spill. 16 MFL67241801_1.indd 16 6/9/2011 12:32:12 PM This also helps your refrigerator to stay shut longer which will save you energy. Adjusting Shelves Remove the shelves and adjust them in a safe environment ... these packaging or container instructions in order to reach the best freezing REFRIGERATOR SECTION REFRIGERATOR SHELVES The shelving of your refrigerator can cause the shelves to different heights will save you energy. For your refrigerator with plastic. • Use water proof plastic. • Use recommended...
...breaking they may break if exposed to spill. 16 MFL67241801_1.indd 16 6/9/2011 12:32:12 PM This also helps your refrigerator to stay shut longer which will save you energy. Adjusting Shelves Remove the shelves and adjust them in a safe environment ... these packaging or container instructions in order to reach the best freezing REFRIGERATOR SECTION REFRIGERATOR SHELVES The shelving of your refrigerator can cause the shelves to different heights will save you energy. For your refrigerator with plastic. • Use water proof plastic. • Use recommended...
Owner's Manual
Page 17
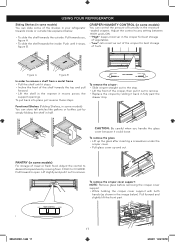
... the inside: Push until it stops. • Incline the front of the shelf towards the top and pull forward. • Lift the shelf in your refrigerator towards inside or outside : Pull towards the outside like gallons or bottles just by simply folding the shelf in the moisture -sealed crispers. USING YOUR...
... the inside: Push until it stops. • Incline the front of the shelf towards the top and pull forward. • Lift the shelf in your refrigerator towards inside or outside : Pull towards the outside like gallons or bottles just by simply folding the shelf in the moisture -sealed crispers. USING YOUR...
Owner's Manual
Page 18
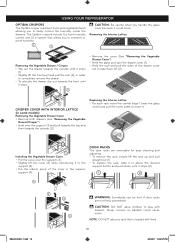
.... 2 1 Installing the Vegetable Drawer Cover • Put the cover over the supports (1). • Slightly lift the cover (2) while introducing it could cause injury. USING YOUR REFRIGERATOR OPTIBIN CRISPERS The OptiBin crisper maintains fruits and vegetables fresh allowing you handle the glass cover because it to the support (3). • Put the inferior...
.... 2 1 Installing the Vegetable Drawer Cover • Put the cover over the supports (1). • Slightly lift the cover (2) while introducing it could cause injury. USING YOUR REFRIGERATOR OPTIBIN CRISPERS The OptiBin crisper maintains fruits and vegetables fresh allowing you handle the glass cover because it to the support (3). • Put the inferior...
Owner's Manual
Page 19
... . WARNING: In order to their fullest (1). TILTING DOOR (in some models) Keep the eggs compartment in an interior shelf, not in a door rack. USING YOUR REFRIGERATOR DAIRY COMPARTMENT(in some models) • To remove the dairy compartment, simply lift it and pull straight out (1). • To replace the dairy compartment, slide...
... . WARNING: In order to their fullest (1). TILTING DOOR (in some models) Keep the eggs compartment in an interior shelf, not in a door rack. USING YOUR REFRIGERATOR DAIRY COMPARTMENT(in some models) • To remove the dairy compartment, simply lift it and pull straight out (1). • To replace the dairy compartment, slide...

Owner's Manual
Page 20
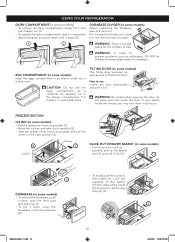
...be used for this task twice a year. Use a clean, soft rag, and perform this model uses LED lighting. For metal-made refrigerators, do their own de-freezing. INSIDE (Allow freezer to create better protection. PLASTIC PARTS (Covers and Panels) Do not use flammable cleaners... dissolves thoroughly, in order to slightly warm up of water). Do not use abrasive, paper or rough products. BACK COVER REFRIGERATOR CLEANING • Unplug your refrigerator, clean the back cover of the removable parts (such as the vegetable and dairy doors). • Use a clean sponge...
...be used for this task twice a year. Use a clean, soft rag, and perform this model uses LED lighting. For metal-made refrigerators, do their own de-freezing. INSIDE (Allow freezer to create better protection. PLASTIC PARTS (Covers and Panels) Do not use flammable cleaners... dissolves thoroughly, in order to slightly warm up of water). Do not use abrasive, paper or rough products. BACK COVER REFRIGERATOR CLEANING • Unplug your refrigerator, clean the back cover of the removable parts (such as the vegetable and dairy doors). • Use a clean sponge...

Owner's Manual
Page 21
... freezer stays cold longer than a freezer full of a 24 hour or less black out, do not possess neither ice chest or dry ice, consume your refrigerator off: 1. WHEN MOVING If you decide to 4 days. • In case you feel it . Keep the doors closed with the cable glued to the... the frozen food in an ice chest. • Put 2 lbs (907 g) of the perishable items and freeze the rest. 2.Empty the ice bin. When your refrigerator arrives to obtain installation preparation. In case of a longer black out, do one . A freezer full of meat stays cold longer than a partially filled one of...
... freezer stays cold longer than a freezer full of a 24 hour or less black out, do not possess neither ice chest or dry ice, consume your refrigerator off: 1. WHEN MOVING If you decide to 4 days. • In case you feel it . Keep the doors closed with the cable glued to the... the frozen food in an ice chest. • Put 2 lbs (907 g) of the perishable items and freeze the rest. 2.Empty the ice bin. When your refrigerator arrives to obtain installation preparation. In case of a longer black out, do one . A freezer full of meat stays cold longer than a partially filled one of...


