Owner's Manual
Page 2
.... 6. Damage to deliver and pickup, install, instruct, or replace house fuses or correct house wiring or plumbing, or correction of unauthorized repairs. 2. A Copy of your product which vary from state to state. LG Refrigerator / Freezer Warranty Period Product Parts Labor Refrigerator / Freezer 1 year 1 year [In-Home Service (Except Model GR-051)] Sealed System (Compressor, Condenser, Evaporator) 7 years 1 year [In-Home Service (Except Model GR-051)] No other express...
.... 6. Damage to deliver and pickup, install, instruct, or replace house fuses or correct house wiring or plumbing, or correction of unauthorized repairs. 2. A Copy of your product which vary from state to state. LG Refrigerator / Freezer Warranty Period Product Parts Labor Refrigerator / Freezer 1 year 1 year [In-Home Service (Except Model GR-051)] Sealed System (Compressor, Condenser, Evaporator) 7 years 1 year [In-Home Service (Except Model GR-051)] No other express...

Owner's Manual
Page 3
... to remove and Install the Refrigerator Doors How to remove and Install Pull-Out Drawer Closing and Aligning the doors 7-13 7 7 7 8-11 11-12 13 Using your Refrigerator Ensuring Proper Air Circulation Multi Flow Door Alarm Adjusting the Controls Adjusting Control Settings Food Storage Guide Storing Frozen Food Refrigerator Section Refrigerator Shelves 14-20 14 14 14 14 15 15 15-16 16-19 16-17 Refrigerator Care and Cleaning Refrigerator Cleaning Outside Inside Walls Door Lining & Gaskets Plastic Parts (Covers and Panel) Back Cover Replacing Refrigerator Lights Power...
... to remove and Install the Refrigerator Doors How to remove and Install Pull-Out Drawer Closing and Aligning the doors 7-13 7 7 7 8-11 11-12 13 Using your Refrigerator Ensuring Proper Air Circulation Multi Flow Door Alarm Adjusting the Controls Adjusting Control Settings Food Storage Guide Storing Frozen Food Refrigerator Section Refrigerator Shelves 14-20 14 14 14 14 15 15 15-16 16-19 16-17 Refrigerator Care and Cleaning Refrigerator Cleaning Outside Inside Walls Door Lining & Gaskets Plastic Parts (Covers and Panel) Back Cover Replacing Refrigerator Lights Power...
Owner's Manual
Page 4
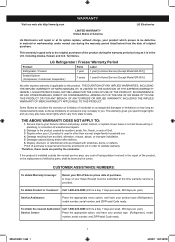
... in the freezer compartment, they contain ice crystals or are not followed. This can cause serious injury to them and damage to ensure a proper ground connection. • Immediately repair or replace all instructions before cleaning or repairing. Utilize this product only as the doors, hinges and cabinets. NOTE: Setting the control to consume". The quality of red meat is operating, avoid touching cold surfaces...
... in the freezer compartment, they contain ice crystals or are not followed. This can cause serious injury to them and damage to ensure a proper ground connection. • Immediately repair or replace all instructions before cleaning or repairing. Utilize this product only as the doors, hinges and cabinets. NOTE: Setting the control to consume". The quality of red meat is operating, avoid touching cold surfaces...
Owner's Manual
Page 5
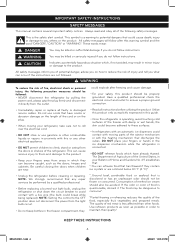
...: Before installation, cleaning or replacing light bulbs, you would like to dispose of your responsibility and obligation to the use of the appliance by the person responsible for this appliance must always be disconnected with a switch. When finished, plug the appliance back in and adjust the thermostat to utilize an extension cable, it is absolutely necessary that it is listed in...
...: Before installation, cleaning or replacing light bulbs, you would like to dispose of your responsibility and obligation to the use of the appliance by the person responsible for this appliance must always be disconnected with a switch. When finished, plug the appliance back in and adjust the thermostat to utilize an extension cable, it is absolutely necessary that it is listed in...

Owner's Manual
Page 6
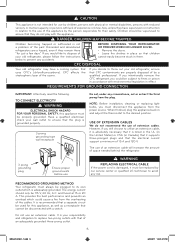
... to familiarize yourself with the parts and features of your model. Your refrigerator could have some or all of the features and parts listed below. A Refrigerator Temperature Control B Refrigerator Light I Read this section to that of your new refrigerator. Drawer Model A B C PARTS AND FEATURES D L E K F J G H I Durabase divider J Pull Out Drawer C Shelves K Freezer Light D Optibin Crisper L Door Racks Keeps fruits and vegetable fresh and crisp E Pantry * F Ice Maker * G Ice Bin* * On some models H Durabase 6 MFL67241801_1.indd 6 6/9/2011 12...
... to familiarize yourself with the parts and features of your model. Your refrigerator could have some or all of the features and parts listed below. A Refrigerator Temperature Control B Refrigerator Light I Read this section to that of your new refrigerator. Drawer Model A B C PARTS AND FEATURES D L E K F J G H I Durabase divider J Pull Out Drawer C Shelves K Freezer Light D Optibin Crisper L Door Racks Keeps fruits and vegetable fresh and crisp E Pantry * F Ice Maker * G Ice Bin* * On some models H Durabase 6 MFL67241801_1.indd 6 6/9/2011 12...
Owner's Manual
Page 7
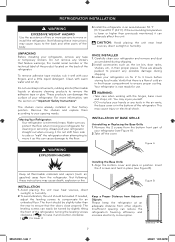
... the refrigerator. If needed, adjust the leveling screws to compensate for cleaning or servicing. REFRIGERATOR INSTALLATION WARNING EXCESSIVE WEIGHT HAZARD Use the assistance of two or more information, see the section on for 2 to 3 hours before storing food inside. Remove the shelves and replace them according to your refrigerator (see Figure B). Carefully clean your refrigerator, remove any tools in the air vents, the base cover or in the bottom of cold air...
... the refrigerator. If needed, adjust the leveling screws to compensate for cleaning or servicing. REFRIGERATOR INSTALLATION WARNING EXCESSIVE WEIGHT HAZARD Use the assistance of two or more information, see the section on for 2 to 3 hours before storing food inside. Remove the shelves and replace them according to your refrigerator (see Figure B). Carefully clean your refrigerator, remove any tools in the air vents, the base cover or in the bottom of cold air...

Owner's Manual
Page 8
... racks from the upper lid (1) remove it won't scratch. 8 MFL67241801_1.indd 8 5 Front view of the handle, hinge and cover hinge might vary according to remove refrigerator and freezer door handles. Also the screws quantity used in Allen Wrench 1. TOOLS YOU MIGHT NEED OR USE 10 mm 1/4 in 3/8 in Hex Socket Wrench Phillips Screwdriver Flat Head Screwdriver 1/4 in 3/32 in cover hinge might be necessary to your model specification.
... racks from the upper lid (1) remove it won't scratch. 8 MFL67241801_1.indd 8 5 Front view of the handle, hinge and cover hinge might vary according to remove refrigerator and freezer door handles. Also the screws quantity used in Allen Wrench 1. TOOLS YOU MIGHT NEED OR USE 10 mm 1/4 in 3/8 in Hex Socket Wrench Phillips Screwdriver Flat Head Screwdriver 1/4 in 3/32 in cover hinge might be necessary to your model specification.

Owner's Manual
Page 13
... to raise at middle hinge. 2.With other hand, use pliers to the section on the left. Make sure that the refrigerator is uniquely designed with cardboard or hardboard to follow the instructions below : 1. Cover the floor with two fresh food doors. Always pull or push the refrigerator straight out when moving the refrigerator for installing, cleaning or service be opened or closed independently of...
... to raise at middle hinge. 2.With other hand, use pliers to the section on the left. Make sure that the refrigerator is uniquely designed with cardboard or hardboard to follow the instructions below : 1. Cover the floor with two fresh food doors. Always pull or push the refrigerator straight out when moving the refrigerator for installing, cleaning or service be opened or closed independently of...

Owner's Manual
Page 14
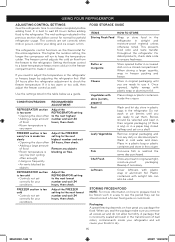
USING YOUR REFRIGERATOR ENSURING PROPER AIR CIRCULATION In order to obtain stable temperature, the air must thoroughly clean both sections, any of these settings for details). This is especially noticeable when new food is placed in order to regulate the temperature the freezer and refrigerator compartments. • Initially set the REFRIGERATOR CONTROL and the FREEZER CONTROL at position number "4". After this you to stabilize the refrigerator. DOOR ALARM With this , the...
USING YOUR REFRIGERATOR ENSURING PROPER AIR CIRCULATION In order to obtain stable temperature, the air must thoroughly clean both sections, any of these settings for details). This is especially noticeable when new food is placed in order to regulate the temperature the freezer and refrigerator compartments. • Initially set the REFRIGERATOR CONTROL and the FREEZER CONTROL at position number "4". After this you to stabilize the refrigerator. DOOR ALARM With this , the...
Owner's Manual
Page 15
... date code to the next lowest number and wait 24 hours, then check. Chef Fresh Store any objects blocking air flow. The higher the number setting, the longer the compressor will cause your liking and ice cream is very warm Adjust the REFRIGERATOR setting to the next highest number and wait 24 hours, then check. Setting the freezer control to a lower temperature keeps more information on a shelf...
... date code to the next lowest number and wait 24 hours, then check. Chef Fresh Store any objects blocking air flow. The higher the number setting, the longer the compressor will cause your liking and ice cream is very warm Adjust the REFRIGERATOR setting to the next highest number and wait 24 hours, then check. Setting the freezer control to a lower temperature keeps more information on a shelf...

Owner's Manual
Page 16
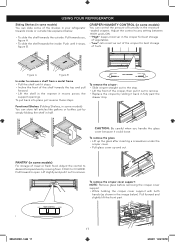
.... • Use water proof plastic. • Use recommended plastic bags to your storage necessities; Adjusting Shelves Remove the shelves and adjust them from breaking. Follow these vapors and properly ventilate the room while you . 1 Storage times can include glass shelving or wired shelving. Do not use dry ice. 2 • Replacing Shelves Incline the frontal part of the shelf in the direction indicated by figure 2. By letting your warm foods cool off...
.... • Use water proof plastic. • Use recommended plastic bags to your storage necessities; Adjusting Shelves Remove the shelves and adjust them from breaking. Follow these vapors and properly ventilate the room while you . 1 Storage times can include glass shelving or wired shelving. Do not use dry ice. 2 • Replacing Shelves Incline the frontal part of the shelf in the direction indicated by figure 2. By letting your warm foods cool off...
Owner's Manual
Page 17
... shelf towards the inside or outside : Pull towards you handle the glass cover because it stops, figure B. PANTRY (in some models) For storage of humidity in the moisture -sealed crispers. Pull forward to remove • Replace the crisper by sliding it moves across the support openings. To remove the glass: • Lift up the glass after inserting a screwdriver under the crisper cover. • Pull glass cover up and out. Adjust the control...
... shelf towards the inside or outside : Pull towards you handle the glass cover because it stops, figure B. PANTRY (in some models) For storage of humidity in the moisture -sealed crispers. Pull forward to remove • Replace the crisper by sliding it moves across the support openings. To remove the glass: • Lift up the glass after inserting a screwdriver under the crisper cover. • Pull glass cover up and out. Adjust the control...

Owner's Manual
Page 20
... use a product specifically design to prevent any sort of chemical products that contain phosphates or bleach. REFRIGERATOR CARE AND CLEANING WARNING EXPLOSION HAZARD BACK COVER WARNING ELECTRICAL SHOCK HAZARD Before you begin, either unplug the refrigerator or turn off power at least twice a year. In order to eliminate bad odors, clean the inside of the removable parts (such as dish soap). INSIDE (Allow freezer to slightly warm...
... use a product specifically design to prevent any sort of chemical products that contain phosphates or bleach. REFRIGERATOR CARE AND CLEANING WARNING EXPLOSION HAZARD BACK COVER WARNING ELECTRICAL SHOCK HAZARD Before you begin, either unplug the refrigerator or turn off power at least twice a year. In order to eliminate bad odors, clean the inside of the removable parts (such as dish soap). INSIDE (Allow freezer to slightly warm...

Owner's Manual
Page 22
... first batch of water from the inner pipes (certain models) to O (off). NOTE: The ice maker can get damaged if the switch is kept in the ON position before the connection of water to I (on the temperature of the freezer, the times in which the door opens, and other using conditions (amount of the ejector mechanism or with the sensor. Make sure that nothing...
... first batch of water from the inner pipes (certain models) to O (off). NOTE: The ice maker can get damaged if the switch is kept in the ON position before the connection of water to I (on the temperature of the freezer, the times in which the door opens, and other using conditions (amount of the ejector mechanism or with the sensor. Make sure that nothing...
Owner's Manual
Page 23
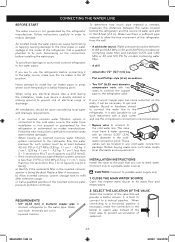
... ice maker manufacturer. CONNECTING THE WATER LINE BEFORE START The water source is best to connect to a vertical pipeline. Air located inside of the refrigerator. Make sure there is doubly isolated or making ground to the cold water line. If you use the refrigerator before installing the water pipe. Never attempt to reduce damage. INSTALLATION INSTRUCTIONS Install the valve to the pipe that will be necessary to get and adaptor (found in order to install the ice maker...
... ice maker manufacturer. CONNECTING THE WATER LINE BEFORE START The water source is best to connect to a vertical pipeline. Air located inside of the refrigerator. Make sure there is doubly isolated or making ground to the cold water line. If you use the refrigerator before installing the water pipe. Never attempt to reduce damage. INSTALLATION INSTRUCTIONS Install the valve to the pipe that will be necessary to get and adaptor (found in order to install the ice maker...

Owner's Manual
Page 24
.... Saddle Type Shutoff Valve Vertical Cold Water Pipe 8. DRAIN THE PIPE Open the main water source (1) and drain the pipe until the sealing ring begins to the valve. NOTE: Make sure it is advised to install one. • If your refrigerator does not have a better use and experience. Make sure 9. IMPORTANT: Never use new ones to have a water filter, it is not connected to a low or smaller ice production. DRILL...
.... Saddle Type Shutoff Valve Vertical Cold Water Pipe 8. DRAIN THE PIPE Open the main water source (1) and drain the pipe until the sealing ring begins to the valve. NOTE: Make sure it is advised to install one. • If your refrigerator does not have a better use and experience. Make sure 9. IMPORTANT: Never use new ones to have a water filter, it is not connected to a low or smaller ice production. DRILL...

Owner's Manual
Page 26
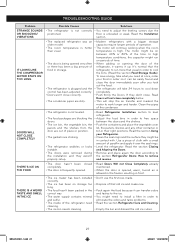
... of the refrigerant, water pipe or objects located on -off switch activated the internal light of bin. Temperature controlling device will hear a dripping sound due to end. THE CONTROL PANEL LIGHTS ARE BLINKING SECUENTIALLY. (1-2-3-4-5-6-7) • Refrigerator is in Demo (Demonstration Mode) Mode. • The Demonstration Mode disables the cooling system; The speed of the new sounds you worry. Unscrew the Light bulb and screw it again (Read the section Refrigerator Care and Cleaning). Most of...
... of the refrigerant, water pipe or objects located on -off switch activated the internal light of bin. Temperature controlling device will hear a dripping sound due to end. THE CONTROL PANEL LIGHTS ARE BLINKING SECUENTIALLY. (1-2-3-4-5-6-7) • Refrigerator is in Demo (Demonstration Mode) Mode. • The Demonstration Mode disables the cooling system; The speed of the new sounds you worry. Unscrew the Light bulb and screw it again (Read the section Refrigerator Care and Cleaning). Most of...
Owner's Manual
Page 27
...'t properly setup. • Read Refrigerator Installation section to level refrigerator. • Adjust the food bins in order to free space between 40% or 80% of that usual in their right positions. IT LOOKS LIKE THE COMPRESSOR MOTOR STAYS ON TOO LONG • The replaced refrigerator was an older model. • The room temperature is hotter than usual. • The door is being opened , warm, humid air is not leveled...
...'t properly setup. • Read Refrigerator Installation section to level refrigerator. • Adjust the food bins in order to free space between 40% or 80% of that usual in their right positions. IT LOOKS LIKE THE COMPRESSOR MOTOR STAYS ON TOO LONG • The replaced refrigerator was an older model. • The room temperature is hotter than usual. • The door is being opened , warm, humid air is not leveled...

Owner's Manual
Page 28
... for the refrigerator to the refrigerator this air is cooled down or not plugged. • The freezer temperature is warm. • The ice cubes turn off the ice maker. • Turn the ice maker to the position on the bin. • It might take what you need once and you can. • Wait 24 hours to open . Close the door a soon as you open very easily. • The refrigerator control has not...
... for the refrigerator to the refrigerator this air is cooled down or not plugged. • The freezer temperature is warm. • The ice cubes turn off the ice maker. • Turn the ice maker to the position on the bin. • It might take what you need once and you can. • Wait 24 hours to open . Close the door a soon as you open very easily. • The refrigerator control has not...

Specification
Page 2
... Refrigerator Freezer Total FEATURES Energy Rating Freezer Door Type Display Type Temperature Controls Temperature Sensors Multi-Air Flow LoDecibel™ Operation Door Alarm REFRIGERATOR No. of Door Hinge 67 7/8" Width 29 7/8" Width (Door Open 90° with Handle) 32 3/8" Width (Door Open 90° without Handle) 31" Door Edge Clearance with Handle 4" Door Edge Clearance without notice. © 2011 LG Electronics USA, Inc. Energy Star/CEE Tier 1 Pull Drawer Internal LED Electronic/Digital 4 • • • 2 Full/Fixed • Tempered Glass 2 Humidity Crispers...
... Refrigerator Freezer Total FEATURES Energy Rating Freezer Door Type Display Type Temperature Controls Temperature Sensors Multi-Air Flow LoDecibel™ Operation Door Alarm REFRIGERATOR No. of Door Hinge 67 7/8" Width 29 7/8" Width (Door Open 90° with Handle) 32 3/8" Width (Door Open 90° without Handle) 31" Door Edge Clearance with Handle 4" Door Edge Clearance without notice. © 2011 LG Electronics USA, Inc. Energy Star/CEE Tier 1 Pull Drawer Internal LED Electronic/Digital 4 • • • 2 Full/Fixed • Tempered Glass 2 Humidity Crispers...


