
Owners Manual
Page 2
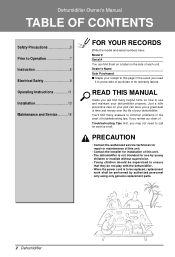
...find many answers to common problems in the event you need to call for use and maintain your dehumidifier properly. READ THIS MANUAL Inside you will find many helpful hints on the side of each unit. If you review our chart of Troubleshooting Tips ...or maintenance of this unit. • Contact the installer for installation of this page in the chart of troubleshooting tips. Dehumidifier Owner's Manual TABLE OF CONTENTS Safety Precautions 3 Prior to Operation 7 Instruction 8 Electrical Safety 9 Operating Instructions 11 Installation 13 Maintenance and Service...........14...
...find many answers to common problems in the event you need to call for use and maintain your dehumidifier properly. READ THIS MANUAL Inside you will find many helpful hints on the side of each unit. If you review our chart of Troubleshooting Tips ...or maintenance of this unit. • Contact the installer for installation of this page in the chart of troubleshooting tips. Dehumidifier Owner's Manual TABLE OF CONTENTS Safety Precautions 3 Prior to Operation 7 Instruction 8 Electrical Safety 9 Operating Instructions 11 Installation 13 Maintenance and Service...........14...
Owners Manual
Page 3
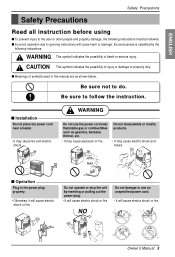
... all instruction before using s To prevent injury to follow the instruction. s Incorrect operation due to ignoring instructions will cause electric shock or fire. NO Owner's Manual 3 WARNING Do not use an unspecified power cord. • It will cause harm or damage; s Operation Plug in this... manual are as gasoline, benzene, thinner, etc. • It may cause explosion or fire. Gasolin Do not operate or stop the unit by the following instructions ...
... all instruction before using s To prevent injury to follow the instruction. s Incorrect operation due to ignoring instructions will cause electric shock or fire. NO Owner's Manual 3 WARNING Do not use an unspecified power cord. • It will cause harm or damage; s Operation Plug in this... manual are as gasoline, benzene, thinner, etc. • It may cause explosion or fire. Gasolin Do not operate or stop the unit by the following instructions ...
Owners Manual
Page 5
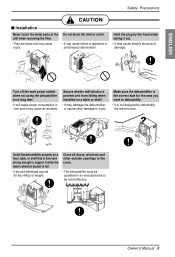
... and it out. • It may cause an accident. Hold the plug by the head when taking it may cause electric shock and damage. Owner's Manual 5 Close all doors, windows and other damage or injury. Do not block the inlet or outlet. • It may cause injury. Install the dehumidifier properly...
... and it out. • It may cause an accident. Hold the plug by the head when taking it may cause electric shock and damage. Owner's Manual 5 Close all doors, windows and other damage or injury. Do not block the inlet or outlet. • It may cause injury. Install the dehumidifier properly...
Owners Manual
Page 7
... supply may be hazardous to clean inside the dehumidifier. When cleaning the unit, first make sure that the power and breaker are turned off. Owner's Manual 7 Do not use water to your authorized service dealer. Use a dedicated circuit. 4. Do not use an extension cord. 5. preserving precision devices, food, pets, plants, and...
... supply may be hazardous to clean inside the dehumidifier. When cleaning the unit, first make sure that the power and breaker are turned off. Owner's Manual 7 Do not use water to your authorized service dealer. Use a dedicated circuit. 4. Do not use an extension cord. 5. preserving precision devices, food, pets, plants, and...
Owners Manual
Page 8
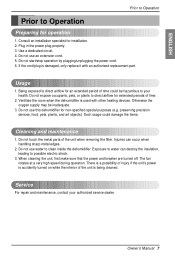
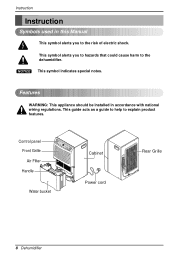
... High Low SPFEAEND SEHTUTMINIDGITY CHOUNMTRIDOITLY PAOUWTOERRESTABRFUUTCLLKET ENERGY STAR Water bucket Cabinet Power cord Rear Grille 8 Dehumidifier Features WARNING: This appliance should be installed in this Manual This symbol alerts you to hazards that could cause harm to the dehumidifier. This symbol alerts you to explain product features. Instruction Instruction Symbols used...
... High Low SPFEAEND SEHTUTMINIDGITY CHOUNMTRIDOITLY PAOUWTOERRESTABRFUUTCLLKET ENERGY STAR Water bucket Cabinet Power cord Rear Grille 8 Dehumidifier Features WARNING: This appliance should be installed in this Manual This symbol alerts you to hazards that could cause harm to the dehumidifier. This symbol alerts you to explain product features. Instruction Instruction Symbols used...
Owners Manual
Page 9
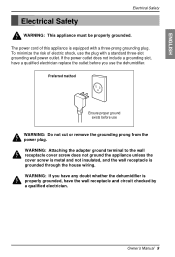
... is properly grounded, have a qualified electrician replace the outlet before use WARNING: Do not cut or remove the grounding prong from the power plug. Owner's Manual 9 If the power outlet does not include a grounding slot, have the wall receptacle and circuit checked by a qualified electrician. WARNING: If you use the plug...
... is properly grounded, have a qualified electrician replace the outlet before use WARNING: Do not cut or remove the grounding prong from the power plug. Owner's Manual 9 If the power outlet does not include a grounding slot, have the wall receptacle and circuit checked by a qualified electrician. WARNING: If you use the plug...
Owners Manual
Page 11
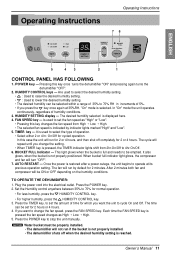
... FOLLOWING 1. ENGLISH Operating Instructions Operating Instructions 76 Constantly On. 4hr. The fan will repeat until you want the unit to set for cycled operation. Owner's Manual 11 FAN SPEED key --- Each time the FAN SPEED key is restored after a power outage, the unit begins to stop the unit...
... FOLLOWING 1. ENGLISH Operating Instructions Operating Instructions 76 Constantly On. 4hr. The fan will repeat until you want the unit to set for cycled operation. Owner's Manual 11 FAN SPEED key --- Each time the FAN SPEED key is restored after a power outage, the unit begins to stop the unit...
Owners Manual
Page 12
... supporting it from the 3. Push hose connector tightly to dehumidifier to the hose connector, use a rubber washer and tighten by the handle. Empty the bucket manually. Do not over tighten the hose when connecting it properly. The hose should lie flat from the bottom as well as by hand firmly without...
... supporting it from the 3. Push hose connector tightly to dehumidifier to the hose connector, use a rubber washer and tighten by the handle. Empty the bucket manually. Do not over tighten the hose when connecting it properly. The hose should lie flat from the bottom as well as by hand firmly without...
Owners Manual
Page 13
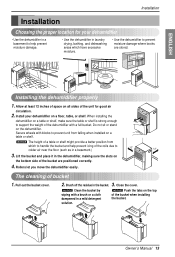
... installing the bucket. Allow at least 12 inches of space on a floor, table, or shelf. NOTICE Clean the bucket by wiping with a full bucket. Owner's Manual 13 TIMER High Low SPFEAEND SEHTUTMINIDGITY CHOUNMTRIDOITLY PAOUWTOERRESTABRFUUTCLLKET ENERGY STAR 12" The cleaning of the dehumidifier with a brush or a cloth dampened in the bucket. 3. ENGLISH...
... installing the bucket. Allow at least 12 inches of space on a floor, table, or shelf. NOTICE Clean the bucket by wiping with a full bucket. Owner's Manual 13 TIMER High Low SPFEAEND SEHTUTMINIDGITY CHOUNMTRIDOITLY PAOUWTOERRESTABRFUUTCLLKET ENERGY STAR 12" The cleaning of the dehumidifier with a brush or a cloth dampened in the bucket. 3. ENGLISH...
Owners Manual
Page 15
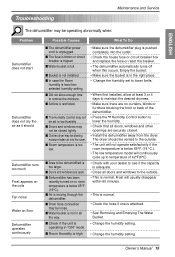
...; Change the humidity set to the outside . • The unit will not operate satisfactorily if the room temperature is pushed completely into the room. Owner's Manual 15 s Room Humidity is high • Make sure the dehumidifier plug is below 65°F (18°C). Empty the bucket. • Make sure the bucket...
...; Change the humidity set to the outside . • The unit will not operate satisfactorily if the room temperature is pushed completely into the room. Owner's Manual 15 s Room Humidity is high • Make sure the dehumidifier plug is below 65°F (18°C). Empty the bucket. • Make sure the bucket...


