
Owners Manual
Page 2
... intended for use and maintain your dehumidifier properly. READ THIS MANUAL Inside you may not need it to prove date of purchase or for warranty issues. Dehumidifier Owner's Manual TABLE OF CONTENTS Safety Precautions 3 Prior to Operation 7 Instruction 8 Electrical Safety 9 Operating Instructions 11 Installation 13 Maintenance and Service...........14 FOR YOUR RECORDS Write the model and serial numbers here: Model # Serial # You can save you need to common problems in...
... intended for use and maintain your dehumidifier properly. READ THIS MANUAL Inside you may not need it to prove date of purchase or for warranty issues. Dehumidifier Owner's Manual TABLE OF CONTENTS Safety Precautions 3 Prior to Operation 7 Instruction 8 Electrical Safety 9 Operating Instructions 11 Installation 13 Maintenance and Service...........14 FOR YOUR RECORDS Write the model and serial numbers here: Model # Serial # You can save you need to common problems in...
Owners Manual
Page 3
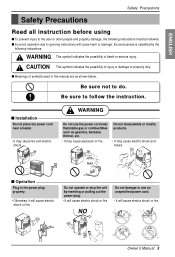
... Owner's Manual 3 s Incorrect operation due to property only. WARNING Do not use an unspecified power cord. • It will cause harm or damage; s Installation Do not place the power cord near flammable gas or combustibles such as shown below. Do not disassemble or modify products. • It may cause fire and electric shock. ENGLISH Safety Precautions Safety Precautions Read all instruction before using...
... Owner's Manual 3 s Incorrect operation due to property only. WARNING Do not use an unspecified power cord. • It will cause harm or damage; s Installation Do not place the power cord near flammable gas or combustibles such as shown below. Do not disassemble or modify products. • It may cause fire and electric shock. ENGLISH Safety Precautions Safety Precautions Read all instruction before using...
Owners Manual
Page 4
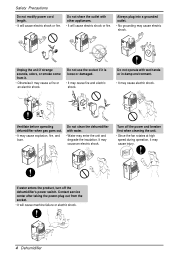
... the insulation. If water enters the product, turn off the power and breaker first when cleaning the unit. • Since the fan rotates at high speed during operation, it may cause electric shock. Unplug the unit if strange sounds, odors, or smoke come from the socket. • It will cause electric shock or fire. Turn off the dehumidifier's power switch. Always plug into...
... the insulation. If water enters the product, turn off the power and breaker first when cleaning the unit. • Since the fan rotates at high speed during operation, it may cause electric shock. Unplug the unit if strange sounds, odors, or smoke come from the socket. • It will cause electric shock or fire. Turn off the dehumidifier's power switch. Always plug into...
Owners Manual
Page 5
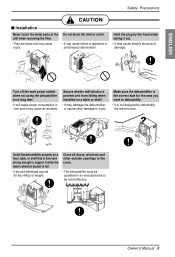
... openings to support it out. • It may cause an accident. Secure wheels with blocks to prevent unit from falling when installed on a floor, table, or shelf that is level and strong enough to the room. • The dehumidifier must be most effective. Owner's Manual 5 Hold the plug by the head when taking it when the water collection bucket is...
... openings to support it out. • It may cause an accident. Secure wheels with blocks to prevent unit from falling when installed on a floor, table, or shelf that is level and strong enough to the room. • The dehumidifier must be most effective. Owner's Manual 5 Hold the plug by the head when taking it when the water collection bucket is...

Owners Manual
Page 6
...°F(18°C). The Low Temperature model will continuously cycle up to temperature 42°F(6°C) • Low temperatures could cause coils to direct air flow. • This could cause illness or personal injury. Do not use wax, thinner, or a strong detergent. Always insert the filter securely. Clean it every two weeks. • Operation without filters will cause failure. 6 Dehumidifier Wax Thinner Do not put...
...°F(18°C). The Low Temperature model will continuously cycle up to temperature 42°F(6°C) • Low temperatures could cause coils to direct air flow. • This could cause illness or personal injury. Do not use wax, thinner, or a strong detergent. Always insert the filter securely. Clean it every two weeks. • Operation without filters will cause failure. 6 Dehumidifier Wax Thinner Do not put...
Owners Manual
Page 7
... during operation. If the cord/plug is damaged, only replace it with other heating devices. Owner's Manual 7 When cleaning the unit, first make sure that the power and breaker are turned off. Consult an installation specialist for extended periods of the unit when removing the filter. Injuries can destroy the insulation, leading to direct airflow for installation. 2. Plug in the power plug properly. 3. Service For repair and maintenance...
... during operation. If the cord/plug is damaged, only replace it with other heating devices. Owner's Manual 7 When cleaning the unit, first make sure that the power and breaker are turned off. Consult an installation specialist for extended periods of the unit when removing the filter. Injuries can destroy the insulation, leading to direct airflow for installation. 2. Plug in the power plug properly. 3. Service For repair and maintenance...
Owners Manual
Page 8
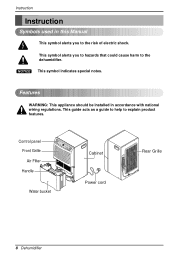
... ENERGY STAR Water bucket Cabinet Power cord Rear Grille 8 Dehumidifier NOTICE This symbol indicates special notes. This symbol alerts you to the risk of electric shock. This guide acts as a guide to help to the dehumidifier. Control panel Front Grille Air Filter Handle 2hr4.hOrC.noO/Onnsf/fOtafnftly On. Instruction Instruction Symbols used in accordance with national wiring regulations. Features WARNING: This appliance should be installed in this Manual...
... ENERGY STAR Water bucket Cabinet Power cord Rear Grille 8 Dehumidifier NOTICE This symbol indicates special notes. This symbol alerts you to the risk of electric shock. This guide acts as a guide to help to the dehumidifier. Control panel Front Grille Air Filter Handle 2hr4.hOrC.noO/Onnsf/fOtafnftly On. Instruction Instruction Symbols used in accordance with national wiring regulations. Features WARNING: This appliance should be installed in this Manual...
Owners Manual
Page 9
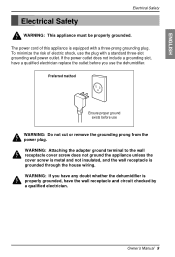
... WARNING: This appliance must be properly grounded. If the power outlet does not include a grounding slot, have the wall receptacle and circuit checked by a qualified electrician. To minimize the risk of this appliance is grounded through the house wiring. The power cord of electric shock, use WARNING: Do not cut or remove the grounding prong from the power plug. Owner's Manual 9
... WARNING: This appliance must be properly grounded. If the power outlet does not include a grounding slot, have the wall receptacle and circuit checked by a qualified electrician. To minimize the risk of this appliance is grounded through the house wiring. The power cord of electric shock, use WARNING: Do not cut or remove the grounding prong from the power plug. Owner's Manual 9
Owners Manual
Page 10
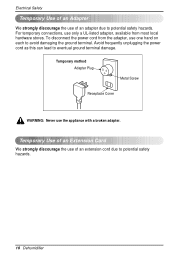
... a UL-listed adapter, available from most local hardware stores. Avoid frequently unplugging the power cord as this can lead to eventual ground terminal damage. Temporary method Adapter Plug Metal Screw Receptacle Cover WARNING: Never use the appliance with a broken adapter. Electrical Safety Temporary Use of an Adapter We strongly discourage the use of an extension cord due to potential safety hazards. 10 Dehumidifier
... a UL-listed adapter, available from most local hardware stores. Avoid frequently unplugging the power cord as this can lead to eventual ground terminal damage. Temporary method Adapter Plug Metal Screw Receptacle Cover WARNING: Never use the appliance with a broken adapter. Electrical Safety Temporary Use of an Adapter We strongly discourage the use of an extension cord due to potential safety hazards. 10 Dehumidifier
Owners Manual
Page 11
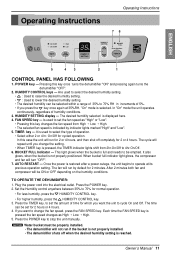
... previous operation setting. Plug the power cord into the electrical outlet. Owner's Manual 11 On/Off 2hr. This light glows when the bucket is indicated by default for 2 or 4 hours. AUTO RESTART --- Set the Humidity control anywhere between 35% to change the setting. • When TIMER key is pressed, the TIMER indicator lights shift from High ¡ Low ¡ High. • The selected fan speed is full and needs...
... previous operation setting. Plug the power cord into the electrical outlet. Owner's Manual 11 On/Off 2hr. This light glows when the bucket is indicated by default for 2 or 4 hours. AUTO RESTART --- Set the Humidity control anywhere between 35% to change the setting. • When TIMER key is pressed, the TIMER indicator lights shift from High ¡ Low ¡ High. • The selected fan speed is full and needs...
Owners Manual
Page 12
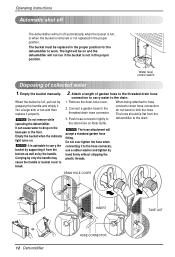
... replace it properly. Operating Instructions Automatic shut off The dehumidifier will turn off automatically when the bucket is full, or when the bucket is advisable to carry the bucket by supporting it from the 3. Do not over tighten the hose when connecting it to the drain. 1. TIMER High Low SPFEAEND SHEUTTMIINDGITY CHOUNMTRIDOITLY PAOUWTOERRESTABFRUUTCLLKET ENERGY STAR ENERGY STAR INSERT TAKE OUT 12 Dehumidifier HOSE-CONNECTOR It can cause water to drop on Rear Grille. Attach a length of collected water...
... replace it properly. Operating Instructions Automatic shut off The dehumidifier will turn off automatically when the bucket is full, or when the bucket is advisable to carry the bucket by supporting it from the 3. Do not over tighten the hose when connecting it to the drain. 1. TIMER High Low SPFEAEND SHEUTTMIINDGITY CHOUNMTRIDOITLY PAOUWTOERRESTABFRUUTCLLKET ENERGY STAR ENERGY STAR INSERT TAKE OUT 12 Dehumidifier HOSE-CONNECTOR It can cause water to drop on Rear Grille. Attach a length of collected water...
Owners Manual
Page 13
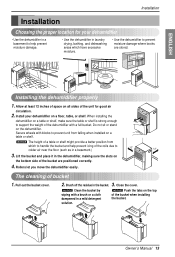
... Low SFPAENED HUMSEIDTITTIYNG HCUOMNIDTIRTOYL BUFCUKLELT AUTO RESTART POWER ENERGY STAR Co4nhs2rt.ahOnr.ntOl/yOnOf/fOnf.f TIMER High Low SFPAENED HUMSIEDTITTYING HCUOMNIDTIRTOYL BUFCUKLELT AUTO RESTART POWER ENERGY STAR Co4nhs2rt.ahOnr.ntOl/yOnOf/fOnf.f TIMER High Low SFPAENED HUMSIEDTITTYING Installing the dehumidifier properly 1. NOTICE Clean the bucket by wiping with blocks to prevent unit from which have excessive moisture. • Use the dehumidifier to colder air near the floor (such...
... Low SFPAENED HUMSEIDTITTIYNG HCUOMNIDTIRTOYL BUFCUKLELT AUTO RESTART POWER ENERGY STAR Co4nhs2rt.ahOnr.ntOl/yOnOf/fOnf.f TIMER High Low SFPAENED HUMSIEDTITTYING HCUOMNIDTIRTOYL BUFCUKLELT AUTO RESTART POWER ENERGY STAR Co4nhs2rt.ahOnr.ntOl/yOnOf/fOnf.f TIMER High Low SFPAENED HUMSIEDTITTYING Installing the dehumidifier properly 1. NOTICE Clean the bucket by wiping with blocks to prevent unit from which have excessive moisture. • Use the dehumidifier to colder air near the floor (such...
Owners Manual
Page 14
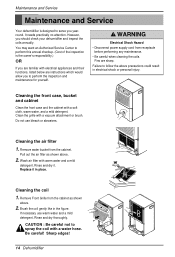
TIMER High Low SPFEAEND SEHTUTMINIGDITY CHOUNMTRIDOITLY PAOUWTOERRESTABRFUUTCLLKET ENERGY STAR Cleaning the air filter 1. Rinse and dry it in the figure. Rinse and dry thoroughly. Clean the grille with warm water and a mild detergent. Wash air filter with a vacuum attachment or brush. Replace it . Remove Front Grille from receptacle before performing any maintenance. • Be careful when cleaning the coils. Be careful! Pull out the air filter as shown above...
TIMER High Low SPFEAEND SEHTUTMINIGDITY CHOUNMTRIDOITLY PAOUWTOERRESTABRFUUTCLLKET ENERGY STAR Cleaning the air filter 1. Rinse and dry it in the figure. Rinse and dry thoroughly. Clean the grille with warm water and a mild detergent. Wash air filter with a vacuum attachment or brush. Replace it . Remove Front Grille from receptacle before performing any maintenance. • Be careful when cleaning the coils. Be careful! Pull out the air filter as shown above...
Owners Manual
Page 15
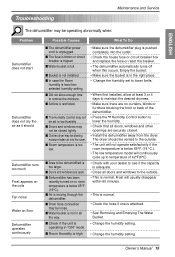
... should Dehumidifier runs too much Frost appears on the coils Fan noise Water on or room temperature is not installed. s Clothes dryer may not be vented to see if the capacity is adequate. • Close all the way. s Drain hose connection may not be loose. Owner's Manual 15 Empty the bucket. • Make sure the bucket is attached. • See Removing and Emptying The Water Bucket. • Change the humidity setting. • Change the humidity setting...
... should Dehumidifier runs too much Frost appears on the coils Fan noise Water on or room temperature is not installed. s Clothes dryer may not be vented to see if the capacity is adequate. • Close all the way. s Drain hose connection may not be loose. Owner's Manual 15 Empty the bucket. • Make sure the bucket is attached. • See Removing and Emptying The Water Bucket. • Change the humidity setting. • Change the humidity setting...
Owners Manual
Page 31
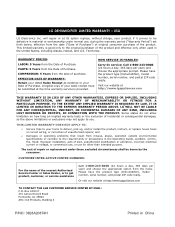
... PROFITS, IN CONNECTION WITH THE PRODUCT. Please have the product type (Dehumidifier), model number, serial number, and postal ZIP code ready. LG DEHUMIDIFIER LIMITED WARRANTY - Visit our website at its option replace, without charge, your sales receipt must be borne by the consumer. and Ð Damages or operating problems that result from the date ("Date of Purchase") of original consumer purchase of purchase. COMPRESSOR: 5 Years...
... PROFITS, IN CONNECTION WITH THE PRODUCT. Please have the product type (Dehumidifier), model number, serial number, and postal ZIP code ready. LG DEHUMIDIFIER LIMITED WARRANTY - Visit our website at its option replace, without charge, your sales receipt must be borne by the consumer. and Ð Damages or operating problems that result from the date ("Date of Purchase") of original consumer purchase of purchase. COMPRESSOR: 5 Years...


