
Service Manual
Page 1
http://biz.LGservice.com Dehumidifier SERVICE MANUAL MODELS: DH300EY5/DH305Y5/DH300MY5 LD40Y5/DH400MY5 DH404EY5/DH400EY5/LD40EY5 DH504ELY5/LD50ELY5 LD65ELY5 CAUTION - ONLY FOR AUTHORIZED SERVICE. BEFORE SERVICING THE UNIT, READ THE SAFETY PRECAUTIONS IN THIS MANUAL. -
http://biz.LGservice.com Dehumidifier SERVICE MANUAL MODELS: DH300EY5/DH305Y5/DH300MY5 LD40Y5/DH400MY5 DH404EY5/DH400EY5/LD40EY5 DH504ELY5/LD50ELY5 LD65ELY5 CAUTION - ONLY FOR AUTHORIZED SERVICE. BEFORE SERVICING THE UNIT, READ THE SAFETY PRECAUTIONS IN THIS MANUAL. -
Service Manual
Page 2
... GUIDE 20 5. EXPLODED VIEWS ...22 6. PREFACE 1.1 SAFETY PRECAUTIONS ...3 1.2 FEATURES AND DIMENSIONS ...3 1.2.1 FEATURES...3 1.2.2 DIMENSIONS ...3 1.3 MODEL NAMES ...4 1.4 SPECIFICATIONS ...4 1.5 CONTROL TYPE ...5 1.5.1 MECHANICAL TYPE...5 1.5.2 ELECTRONIC TYPE ...5 1.6 HOW TO OPERATE DEHUMIDIFIER ...6 1.6.1 HOW DOES THE DEHUMIDIFIER WORK 6 1.6.2 LOCATION FOR THE DEHUMIDIFIER 6 1.6.3 MICRO SWITCH...6 1.6.4 AUTO DEFROST...6 1.6.5 HUMIDITY CONTROLLER...7 2. REPLACEMENT PARTS LIST 28 -2- CONTENTS 1.
... GUIDE 20 5. EXPLODED VIEWS ...22 6. PREFACE 1.1 SAFETY PRECAUTIONS ...3 1.2 FEATURES AND DIMENSIONS ...3 1.2.1 FEATURES...3 1.2.2 DIMENSIONS ...3 1.3 MODEL NAMES ...4 1.4 SPECIFICATIONS ...4 1.5 CONTROL TYPE ...5 1.5.1 MECHANICAL TYPE...5 1.5.2 ELECTRONIC TYPE ...5 1.6 HOW TO OPERATE DEHUMIDIFIER ...6 1.6.1 HOW DOES THE DEHUMIDIFIER WORK 6 1.6.2 LOCATION FOR THE DEHUMIDIFIER 6 1.6.3 MICRO SWITCH...6 1.6.4 AUTO DEFROST...6 1.6.5 HUMIDITY CONTROLLER...7 2. REPLACEMENT PARTS LIST 28 -2- CONTENTS 1.
Service Manual
Page 3
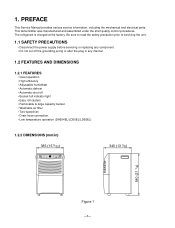
... factory. On/Off High Low TIMER FAN SPEED AUTO RESTART HUMIDITY SETTING HUMIDITY CONTROL BUCKET FULL POWER ENERGY STAR 340 (13 3/8) 540 (21 1/4) Figure 1 -3- 1. This dehumidifier was manufactured and assembled under the strict quality control procedures. On/Off 2Hr. Be sure to read the safety precaution prior to servicing the unit...
... factory. On/Off High Low TIMER FAN SPEED AUTO RESTART HUMIDITY SETTING HUMIDITY CONTROL BUCKET FULL POWER ENERGY STAR 340 (13 3/8) 540 (21 1/4) Figure 1 -3- 1. This dehumidifier was manufactured and assembled under the strict quality control procedures. On/Off 2Hr. Be sure to read the safety precaution prior to servicing the unit...
Service Manual
Page 5
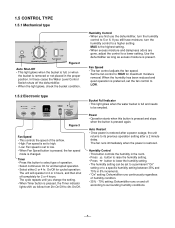
...is restored. The fan runs immediately when the power is restored after a power outage, the unit returns to a higher setting. Use the dehumidifier as long as follow from 2hr.On/Off to LOW. 1.5.2 Electronic type Constantly On. 4hr. On/Off High Low TIMER FAN SPEED HUMIDITY...speed is set the fan control to 4hr.On/Off. Humidity Control • This button controls the humidity in 5% increments. • "On" setting: Dehumidifier runs continuously regardless of operation. • Select continuous On for 2 or 4 hours, and then shut off according to 5 or 6. Fan Speed •...
...is restored. The fan runs immediately when the power is restored after a power outage, the unit returns to a higher setting. Use the dehumidifier as long as follow from 2hr.On/Off to LOW. 1.5.2 Electronic type Constantly On. 4hr. On/Off High Low TIMER FAN SPEED HUMIDITY...speed is set the fan control to 4hr.On/Off. Humidity Control • This button controls the humidity in 5% increments. • "On" setting: Dehumidifier runs continuously regardless of operation. • Select continuous On for 2 or 4 hours, and then shut off according to 5 or 6. Fan Speed •...
Service Manual
Page 6
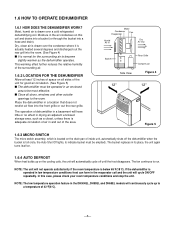
...bucket (or through the bucket into the front grille or out the rear grille. Dry, clean air is drawn over a cold refrigerated dehumidifying coil. NOTE: The low temperature operation feature in its place, the unit again turns itself on. 1.6.4 AUTO DEFROST When frost builds up... to indicate bucket must be emptied). 1.6 HOW TO OPERATE DEHUMIDIFIER 1.6.1 HOW DOES THE DEHUMIDIFIER WORK? Motor Condenser Fan Evaporator Humid Air In Dry Air Out Bucket Rear Grille Compressor Side View Figure 4 12" 12" Figure ...
...bucket (or through the bucket into the front grille or out the rear grille. Dry, clean air is drawn over a cold refrigerated dehumidifying coil. NOTE: The low temperature operation feature in its place, the unit again turns itself on. 1.6.4 AUTO DEFROST When frost builds up... to indicate bucket must be emptied). 1.6 HOW TO OPERATE DEHUMIDIFIER 1.6.1 HOW DOES THE DEHUMIDIFIER WORK? Motor Condenser Fan Evaporator Humid Air In Dry Air Out Bucket Rear Grille Compressor Side View Figure 4 12" 12" Figure ...
Service Manual
Page 20
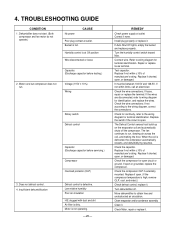
...terminal. If not within ±10% of manufacturer's rating. Check the wire connections; Check for identification, and replace the wires. Turn dehumidifier off the compressor. Clean evaporator and/or condenser assembly Clean it . Check Motor, repair or replace it . Turn the humidity control switch...and automatically shuts off . The fan continues to obtain free and unobstructed air circulation. Replace if shorted, open , or damaged. Dehumidifier does not start. (Both compressor and fan motor do not operate.) No power CAUSE Poor plug contact at Off position Wire ...
...terminal. If not within ±10% of manufacturer's rating. Check the wire connections; Check for identification, and replace the wires. Turn dehumidifier off the compressor. Clean evaporator and/or condenser assembly Clean it . Check Motor, repair or replace it . Turn the humidity control switch...and automatically shuts off . The fan continues to obtain free and unobstructed air circulation. Replace if shorted, open , or damaged. Dehumidifier does not start. (Both compressor and fan motor do not operate.) No power CAUSE Poor plug contact at Off position Wire ...
Service Manual
Page 21
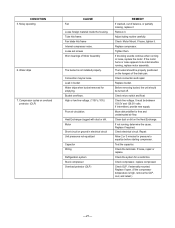
....) -21- Motor Short circuit or ground in bucket Water drips when bucket removed for pressure to be between 103.5V and 126.5V volts. Move dehumidifier for a restriction. Test the capacitor. If knocking sounds continue when running , determine the cause. Replace bucket. Compressor cycles on the Heat Exchange. Check Motor Mount...
....) -21- Motor Short circuit or ground in bucket Water drips when bucket removed for pressure to be between 103.5V and 126.5V volts. Move dehumidifier for a restriction. Test the capacitor. If knocking sounds continue when running , determine the cause. Replace bucket. Compressor cycles on the Heat Exchange. Check Motor Mount...


