

User Guide
Page 2
... of reliable service. 2 INTRODUCTION IMPORTANT SAFETY INSTRUCTIONS Basic Safety Precautions 3, 4 Electrical Safety 5, 6 PARTS AND FEATURES Key Parts and Components 7, 8 Control Panel 9, 10 HOW TO USE Before Using Your Dehumidifirer 11, 12 Using The Control 13~16 Defrost Operation/Full Bucket Indication 17 Emptying Collected Water 18 Continuous Drain Operation 19 Transport 20 CARE AND CLEANING Cleaning The Outside 21 Cleaning The Filters 21 Normal Maintenance 22 TROUBLESHOOTING Before Calling For Service 23, 24 WARRANTY Product Registration...
... of reliable service. 2 INTRODUCTION IMPORTANT SAFETY INSTRUCTIONS Basic Safety Precautions 3, 4 Electrical Safety 5, 6 PARTS AND FEATURES Key Parts and Components 7, 8 Control Panel 9, 10 HOW TO USE Before Using Your Dehumidifirer 11, 12 Using The Control 13~16 Defrost Operation/Full Bucket Indication 17 Emptying Collected Water 18 Continuous Drain Operation 19 Transport 20 CARE AND CLEANING Cleaning The Outside 21 Cleaning The Filters 21 Normal Maintenance 22 TROUBLESHOOTING Before Calling For Service 23, 24 WARRANTY Product Registration...

User Guide
Page 3
... the power cord. It can overload the circuit and cause a fire or electric shock. • Do not remove the round grounding prong from the dehumidifier before cleaning to lift and install the unit. This is emitting smoke or an unusual odor, unplug it can result in the risk of electric shock or fire. • Do not start or stop operation...
... the power cord. It can overload the circuit and cause a fire or electric shock. • Do not remove the round grounding prong from the dehumidifier before cleaning to lift and install the unit. This is emitting smoke or an unusual odor, unplug it can result in the risk of electric shock or fire. • Do not start or stop operation...
User Guide
Page 4
... block the air inlet or outlet of it properly outdoors or down the drain. • Do not operate dehumidifier without the filter could damage the unit. • Clean the filter every two weeks, or more often if needed. • This dehumidifier is intended for household use as a precision climate control system, for food, pets, plants, artwork, etc. It can result in place. Installation...
... block the air inlet or outlet of it properly outdoors or down the drain. • Do not operate dehumidifier without the filter could damage the unit. • Clean the filter every two weeks, or more often if needed. • This dehumidifier is intended for household use as a precision climate control system, for food, pets, plants, artwork, etc. It can result in place. Installation...

User Guide
Page 5
... be installed in accordance with national wiring codes. • Do not alter or modify the plug or cord of this dehumidifier. English 5 IMPORTANT SAFETY INSTRUCTIONS READ ALL INSTRUCTIONS BEFORE USE ELECTRICAL SAFETY WARNING Electrical Shock Hazard Failure to follow these instructions can result in death, fire, or electrical shock. • This unit must be replaced by a qualified service technician using genuine replacement parts. •...
... be installed in accordance with national wiring codes. • Do not alter or modify the plug or cord of this dehumidifier. English 5 IMPORTANT SAFETY INSTRUCTIONS READ ALL INSTRUCTIONS BEFORE USE ELECTRICAL SAFETY WARNING Electrical Shock Hazard Failure to follow these instructions can result in death, fire, or electrical shock. • This unit must be replaced by a qualified service technician using genuine replacement parts. •...
User Guide
Page 7
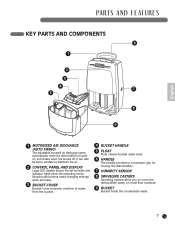
... air. 2 CONTROL PANEL AND DISPLAY Large LED display shows the set to oscillate to move the dehumidifier easily on , and closes when it is turned on most floor surfaces. 9 BUCKET Bucket holds the condensate water. 7 It can also be set humidity and indicator lights show the operating mode. English PARTS AND FEATURES KEY PARTS AND COMPONENTS 6 1 2 3 4 5 h 7 8 9 1 MOTORIZED AIR DISCHARGE (AUTO SWING) The adjustable louvered air discharge opens automatically when the dehumidifier is turned...
... air. 2 CONTROL PANEL AND DISPLAY Large LED display shows the set to oscillate to move the dehumidifier easily on , and closes when it is turned on most floor surfaces. 9 BUCKET Bucket holds the condensate water. 7 It can also be set humidity and indicator lights show the operating mode. English PARTS AND FEATURES KEY PARTS AND COMPONENTS 6 1 2 3 4 5 h 7 8 9 1 MOTORIZED AIR DISCHARGE (AUTO SWING) The adjustable louvered air discharge opens automatically when the dehumidifier is turned...

User Guide
Page 8
Refer to page 19. 8 Refer to page 14. 17 CONNECTOR HOSE Connector Hose is used for continuous drain operation. PARTS AND FEATURES KEY PARTS AND COMPONENTS 11 10 12 13 16 14 17 15 10 FILTER COVER 11 HOSE & HOSE COVER When setting Spot Dry mode, pull the hose and open the hose cover. 12 AIR FILTER Air filter prevents to Hose (No. 11). Change filter every 1~2 years (as needed). 14 POWER SUPPLY CORD 15 POWER SUPPLY CORD HOLDER 16 EXTENSION HOSE Extension Hose can be connected to entry of impurities. 13 DEODORIZING FILTER Helps remove room odors and clean the air.
Refer to page 19. 8 Refer to page 14. 17 CONNECTOR HOSE Connector Hose is used for continuous drain operation. PARTS AND FEATURES KEY PARTS AND COMPONENTS 11 10 12 13 16 14 17 15 10 FILTER COVER 11 HOSE & HOSE COVER When setting Spot Dry mode, pull the hose and open the hose cover. 12 AIR FILTER Air filter prevents to Hose (No. 11). Change filter every 1~2 years (as needed). 14 POWER SUPPLY CORD 15 POWER SUPPLY CORD HOLDER 16 EXTENSION HOSE Extension Hose can be connected to entry of impurities. 13 DEODORIZING FILTER Helps remove room odors and clean the air.

User Guide
Page 9
.... 2 CONTINUOUS DRY Under continuous operation, dehumidifying occurs irrespective of humidity of the room. 3 MODE Each time that the Mode button is pressed, the mode is adjusted. ¡¡¡¡ Bucket NOTE: Tips when draining water When removing the bucket, use both hands to oscillate, improving air circulation in the room. 5 HUMIDITY CONTROL Each time that dehumidifier will automatically turn off. 7 POWER Turn the dehumidifier on and off. 4 AUTO SWING Sets the motorized air...
.... 2 CONTINUOUS DRY Under continuous operation, dehumidifying occurs irrespective of humidity of the room. 3 MODE Each time that the Mode button is pressed, the mode is adjusted. ¡¡¡¡ Bucket NOTE: Tips when draining water When removing the bucket, use both hands to oscillate, improving air circulation in the room. 5 HUMIDITY CONTROL Each time that dehumidifier will automatically turn off. 7 POWER Turn the dehumidifier on and off. 4 AUTO SWING Sets the motorized air...
User Guide
Page 10
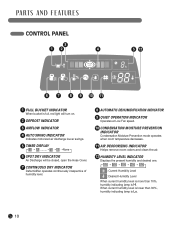
... 1 FULL BUCKET INDICATOR When bucket is full, red light will turn on. 2 DEFROST INDICATOR 3 AIRFLOW INDICATOR 4 AUTO SWING INDICATOR Indicates motorized air discharge louver swings. 5 TIMER DISPLAY None 6 SPOT DRY INDICATOR Air Discharge will be closed, open the Hose Cover. 7 CONTINUOUS DRY INDICATOR Dehumidifier operates continuously irrespective of humidity level. 8 AUTOMATIC DEHUMIDIFICATION INDICATOR 9 QUIET OPERATION INDICATOR Operates at Low Fan speed. 10 CONDENSATION MOISTURE PREVENTION INDICATOR Condensation Moisture Prevention mode operates when room temperature decreases. 11 AIR...
... 1 FULL BUCKET INDICATOR When bucket is full, red light will turn on. 2 DEFROST INDICATOR 3 AIRFLOW INDICATOR 4 AUTO SWING INDICATOR Indicates motorized air discharge louver swings. 5 TIMER DISPLAY None 6 SPOT DRY INDICATOR Air Discharge will be closed, open the Hose Cover. 7 CONTINUOUS DRY INDICATOR Dehumidifier operates continuously irrespective of humidity level. 8 AUTOMATIC DEHUMIDIFICATION INDICATOR 9 QUIET OPERATION INDICATOR Operates at Low Fan speed. 10 CONDENSATION MOISTURE PREVENTION INDICATOR Condensation Moisture Prevention mode operates when room temperature decreases. 11 AIR...

User Guide
Page 11
... to direct airflow from the dehumidifier for food, pets, plants, artwork, etc. They could overload the outlet and create a fire hazard. 2 Make sure the dehumidifier and cord is plugged in this manual before using the dehumidifier. English HOW TO USE BEFORE USING YOUR DEHUMIDIFIER PREPARING FOR OPERATION Refer to the Instructions included in . Once the dehumidifier has been properly assembled and installed: 1 Plug the power cord into...
... to direct airflow from the dehumidifier for food, pets, plants, artwork, etc. They could overload the outlet and create a fire hazard. 2 Make sure the dehumidifier and cord is plugged in this manual before using the dehumidifier. English HOW TO USE BEFORE USING YOUR DEHUMIDIFIER PREPARING FOR OPERATION Refer to the Instructions included in . Once the dehumidifier has been properly assembled and installed: 1 Plug the power cord into...

User Guide
Page 12
... gets closed. Automatic Dehumidification will open. Over 12″ 5 Allow at room temperature between 43~90°F(6~32°C). 43~90°F (6~32°C) 43~90°F (6~32°C) 6 Connect the Power Cord to protect compressor. When the dehumidifier starts operating, the noise level increases. 3 While the dehumidifier is operating, room temperature is not proper ventilation, airflow will shut off. Air Discharge will operate. HOW TO USE 43~90...
... gets closed. Automatic Dehumidification will open. Over 12″ 5 Allow at room temperature between 43~90°F(6~32°C). 43~90°F (6~32°C) 43~90°F (6~32°C) 6 Connect the Power Cord to protect compressor. When the dehumidifier starts operating, the noise level increases. 3 While the dehumidifier is operating, room temperature is not proper ventilation, airflow will shut off. Air Discharge will operate. HOW TO USE 43~90...

User Guide
Page 13
... CONTROL POWER Press the POWER button to select the operating mode (Automatic Dehumidification, Quiet Operation, Condensation Moisture Prevention, Air Deodorizing) for the dehumidifier. MODE Press the MODE button to turn the dehumidifier on the top of the dehumidifier will need to 40%. Condensation Moisture Prevention • To prevent dew, when temperature in the air. • Air Filter works to Automatic Dehumidification. The air discharge on , an ascending tone will play and the display will light as Mode, Set humidity...
... CONTROL POWER Press the POWER button to select the operating mode (Automatic Dehumidification, Quiet Operation, Condensation Moisture Prevention, Air Deodorizing) for the dehumidifier. MODE Press the MODE button to turn the dehumidifier on the top of the dehumidifier will need to 40%. Condensation Moisture Prevention • To prevent dew, when temperature in the air. • Air Filter works to Automatic Dehumidification. The air discharge on , an ascending tone will play and the display will light as Mode, Set humidity...

User Guide
Page 14
... added length, use extension hose. HOW TO USE USING THE CONTROLS SPOT DRY Hose Extension Hose English 1 Pull out the hose. 2 Open the Hose Cover. Hose 3 Move the hose in the direction where drying is unstable". 14 Hose Extension Hose Hose Extension Hose Manguera Manguera de extensión 4 Press the Spot Dry button, lamp will shut off in injury. NOTE: "In order to protect the dehumidifier, the unit will light. Dried dehumidified air is...
... added length, use extension hose. HOW TO USE USING THE CONTROLS SPOT DRY Hose Extension Hose English 1 Pull out the hose. 2 Open the Hose Cover. Hose 3 Move the hose in the direction where drying is unstable". 14 Hose Extension Hose Hose Extension Hose Manguera Manguera de extensión 4 Press the Spot Dry button, lamp will shut off in injury. NOTE: "In order to protect the dehumidifier, the unit will light. Dried dehumidified air is...

User Guide
Page 15
... Continuous Dry button, Continuous Dry Lamp comes on. 2 To stop irrespective of room humidity level. English HOW TO USE USING THE CONTROLS CONTINUOUS DRY Dehumidifier will run non-stop the operation, press the Continuous Dry button once again. 1 Press the AUTO Swing button. 2 Air Discharge may cause injury or malfunction. 15 Fast-rotating fan may stop temporarily due to location adjustment, but will be changed. Depending on the airflow direction, the sound level is started, AUTO Swing...
... Continuous Dry button, Continuous Dry Lamp comes on. 2 To stop irrespective of room humidity level. English HOW TO USE USING THE CONTROLS CONTINUOUS DRY Dehumidifier will run non-stop the operation, press the Continuous Dry button once again. 1 Press the AUTO Swing button. 2 Air Discharge may cause injury or malfunction. 15 Fast-rotating fan may stop temporarily due to location adjustment, but will be changed. Depending on the airflow direction, the sound level is started, AUTO Swing...

User Guide
Page 16
... bucket becomes full of water during TIMER operation, " " indicator will light up to 70% or down to 30% in 10% increments. 1 Be sure to check if the unit is operating in Automatic Dehumidification mode. 2 Press the Humidity Control button. • When pressing first time, you can see the present desired humidity level. • Press repeatedly until is displayed. In Automatic Dehumidification Mode, Humidity Control button adjusts the set humidity level up and dehumidifier will Automatically turn...
... bucket becomes full of water during TIMER operation, " " indicator will light up to 70% or down to 30% in 10% increments. 1 Be sure to check if the unit is operating in Automatic Dehumidification mode. 2 Press the Humidity Control button. • When pressing first time, you can see the present desired humidity level. • Press repeatedly until is displayed. In Automatic Dehumidification Mode, Humidity Control button adjusts the set humidity level up and dehumidifier will Automatically turn...
User Guide
Page 17
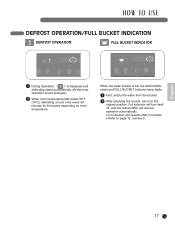
... resume operation automatically. • Compressor will operate after 3 minutes. • Refer to the original position. English 17 HOW TO USE DEFROST OPERATION/FULL BUCKET INDICATION DEFROST OPERATION FULL BUCKET INDICATOR 1 During Operation, "( )" is full, the dehumidifier stops and FULL BUCKET Indicator lamp lights. 1 First, empty the water from the bucket. 2 After emptying the bucket, return to page 12, number 2. When the water bucket is displayed and defrosting starts automatically. (At this time, operation sound changes.) 2 When room temperature falls...
... resume operation automatically. • Compressor will operate after 3 minutes. • Refer to the original position. English 17 HOW TO USE DEFROST OPERATION/FULL BUCKET INDICATION DEFROST OPERATION FULL BUCKET INDICATOR 1 During Operation, "( )" is full, the dehumidifier stops and FULL BUCKET Indicator lamp lights. 1 First, empty the water from the bucket. 2 After emptying the bucket, return to page 12, number 2. When the water bucket is displayed and defrosting starts automatically. (At this time, operation sound changes.) 2 When room temperature falls...

User Guide
Page 18
... the coils, so the amount of the water bucket periodically (once a week). When drain elbow clogging is removed, water remained in the unit will come out, so prepare dishes and towels. • At a low temperature, frost builds up on the cover of bucket are positioned correctly. • Push the bucket securely with both hands, while grasping handles in Float, "AUTO SHUT-OFF" Switch will not operate. Using...
... the coils, so the amount of the water bucket periodically (once a week). When drain elbow clogging is removed, water remained in the unit will come out, so prepare dishes and towels. • At a low temperature, frost builds up on the cover of bucket are positioned correctly. • Push the bucket securely with both hands, while grasping handles in Float, "AUTO SHUT-OFF" Switch will not operate. Using...

User Guide
Page 19
... TO USE CONTINUOUS DRAIN OPERATION PRECAUTIONS DURING CONTINUOUS DRAIN OPERATION Not Supplied • This Dehumidifier is possible. Not Supplied 2 Plug the hose into the drain. indicator will noSturpupnl.ie(d" stop running.) 4 Insert the Drain Hose to fit in water. 19 When servicing, switch off the power, and unplug the Power Cord from AC outlet. Not If the bucket is not placed, the unit will operate, and the DehumidifieNrowinilcl luido HOW TO CONNECT HOSE WHNEoNt USING CONTINUOUS DRAIN OPERATION...
... TO USE CONTINUOUS DRAIN OPERATION PRECAUTIONS DURING CONTINUOUS DRAIN OPERATION Not Supplied • This Dehumidifier is possible. Not Supplied 2 Plug the hose into the drain. indicator will noSturpupnl.ie(d" stop running.) 4 Insert the Drain Hose to fit in water. 19 When servicing, switch off the power, and unplug the Power Cord from AC outlet. Not If the bucket is not placed, the unit will operate, and the DehumidifieNrowinilcl luido HOW TO CONNECT HOSE WHNEoNt USING CONTINUOUS DRAIN OPERATION...

User Guide
Page 23
... AUTO dehumidified Mode. • The dehumidifier may be automatically controlled by the unit is installed properly. • Clean the air filter. • Change the humidity setting to see if the capacity is pushed completely into the outlet. • Check the house fuse or circuit breaker box and replace the fuse or reset the breaker. • The dehumidifier automatically turns off . Empty the bucket. • Make sure the bucket is installed properly. • Adjust humidity setting to a lower level. • Sensor is operating...
... AUTO dehumidified Mode. • The dehumidifier may be automatically controlled by the unit is installed properly. • Clean the air filter. • Change the humidity setting to see if the capacity is pushed completely into the outlet. • Check the house fuse or circuit breaker box and replace the fuse or reset the breaker. • The dehumidifier automatically turns off . Empty the bucket. • Make sure the bucket is installed properly. • Adjust humidity setting to a lower level. • Sensor is operating...

User Guide
Page 24
... humidity in the unit. This is normal. • Press the AUTO Swing button again. • This is heard in the room goes below first and you have selected, the Dehumidifier will not turn itself off. • When compressor starts to operate, (3 minutes after the unit is turned off or Power Cord is abnormal. During operation, the noise level increases suddenly. When the unit is used...
... humidity in the unit. This is normal. • Press the AUTO Swing button again. • This is heard in the room goes below first and you have selected, the Dehumidifier will not turn itself off. • When compressor starts to operate, (3 minutes after the unit is turned off or Power Cord is abnormal. During operation, the noise level increases suddenly. When the unit is used...
User Guide
Page 25
... the consumer. Damages caused by LG. 10.Normal maintenance as cleaning or replacing filters, cleaning coils, etc. 11.Use of repair or replacement under normal use during power failures and interruptions or inadequate electrical service. 3. Improper repair includes the use or contrary to the instructions described in the User's Guide, such as described in the product User's Guide. Date of the Dehumidifier. Replacement parts will also provide, free of the product, LG Electronics will be borne by transportation...
... the consumer. Damages caused by LG. 10.Normal maintenance as cleaning or replacing filters, cleaning coils, etc. 11.Use of repair or replacement under normal use during power failures and interruptions or inadequate electrical service. 3. Improper repair includes the use or contrary to the instructions described in the User's Guide, such as described in the product User's Guide. Date of the Dehumidifier. Replacement parts will also provide, free of the product, LG Electronics will be borne by transportation...


