
Owner's Manual (English)
Page 2
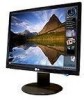
...room for this display. Keep children from the wall outlet. Do not add accessories that have in potential electrical shock or fire hazards. The power supply cord is not operating properly. They may result in your home, consult with the unit. Use only a stand recommended by the supplier... are Dangerous High Voltages inside . Contact your dealer if the display is used as the main disconnection device. On Safety Use only the power cord supplied with your dealer. If you are not sure what type of this manual or listed on a sloping shelf unless properly secured....
...room for this display. Keep children from the wall outlet. Do not add accessories that have in potential electrical shock or fire hazards. The power supply cord is not operating properly. They may result in your home, consult with the unit. Use only a stand recommended by the supplier... are Dangerous High Voltages inside . Contact your dealer if the display is used as the main disconnection device. On Safety Use only the power cord supplied with your dealer. If you are not sure what type of this manual or listed on a sloping shelf unless properly secured....
Owner's Manual (English)
Page 3
...slots by placing the display on the display performance. Place the display in a built-in enclosure unless proper ventilation is characteristic of the fixed-resolution LCD panel. However, this display near a swimming pool. When shipping the unit to transport the unit. Do not use this is provided. They ...waste. Do not rub or strike the Active Matrix LCD with your finger for your local authority. Do not press the LCD screen with anything to rest upon or roll over the power cord, and do not place the display where the power cord is subject to allow anything hard as near a...
...slots by placing the display on the display performance. Place the display in a built-in enclosure unless proper ventilation is characteristic of the fixed-resolution LCD panel. However, this display near a swimming pool. When shipping the unit to transport the unit. Do not use this is provided. They ...waste. Do not rub or strike the Active Matrix LCD with your finger for your local authority. Do not press the LCD screen with anything to rest upon or roll over the power cord, and do not place the display where the power cord is subject to allow anything hard as near a...

Owner's Manual (English)
Page 4
... fall and get damaged or injure your foot. Connecting the stand 1. Hinge Body Stand Body 3. Once assembled take the monitor up the monitor, ensure that the power to the monitor, the computer system, and other attached devices is connected to the base. 4. A3 Assemble the Stand Body into the ...shown in the correct direction. The product may differ from the items shown in the picture. However, the body of connection. Place the monitor with its front facing downward on a soft cloth. 2. Connecting the Display Before setting up carefully and face the front side Stand Body ...
... fall and get damaged or injure your foot. Connecting the stand 1. Hinge Body Stand Body 3. Once assembled take the monitor up the monitor, ensure that the power to the monitor, the computer system, and other attached devices is connected to the base. 4. A3 Assemble the Stand Body into the ...shown in the correct direction. The product may differ from the items shown in the picture. However, the body of connection. Place the monitor with its front facing downward on a soft cloth. 2. Connecting the Display Before setting up carefully and face the front side Stand Body ...

Owner's Manual (English)
Page 6
Adjust the position of the monitor should not exceed 5 degrees. Connecting the Display Before setting up the monitor, ensure that the power to the monitor, the computer system, and other attached devices is recommended that in order to maintain an ergonomic and comfortable viewing position, the forward tilt angle of the panel in various ways for maximum comfort. A5 Tilt Range : -5˚~15˚ Swivel : 355˚ Ergonomic It is turned off. Positioning your display 1.
Adjust the position of the monitor should not exceed 5 degrees. Connecting the Display Before setting up the monitor, ensure that the power to the monitor, the computer system, and other attached devices is recommended that in order to maintain an ergonomic and comfortable viewing position, the forward tilt angle of the panel in various ways for maximum comfort. A5 Tilt Range : -5˚~15˚ Swivel : 355˚ Ergonomic It is turned off. Positioning your display 1.

Owner's Manual (English)
Page 7
...use , or wish to a 15 pin 2 row connector. This function provides the user with optimal display settings.When the user connects the monitor for the first time, this function automatically adjusts the display to 2 . A6 button on the front switch panel to turn off the computer... and product. When monitor power is executed automatically. (Only Analog Mode) NOTE ' Self Image Setting Function'? However, be aware that this function once again, push the 'AUTO...
...use , or wish to a 15 pin 2 row connector. This function provides the user with optimal display settings.When the user connects the monitor for the first time, this function automatically adjusts the display to 2 . A6 button on the front switch panel to turn off the computer... and product. When monitor power is executed automatically. (Only Analog Mode) NOTE ' Self Image Setting Function'? However, be aware that this function once again, push the 'AUTO...

Owner's Manual (English)
Page 9
...mode is used when two computers are connected to turn the display on or off. A8 This feature is - 19 inch monitor : 1440 x 900 - 20.1 inch monitor : 1680 x 1050 Power Button Use this indicator color changes to make D-Sub or DVI connector active. AUTO IMAGE ADJUSTMENT When adjusting your ... the display is D-Sub. For more information, refer to enter a selection in Sleep Mode (Energy Saving), this button to the display. Power Indicator This Indicator lights up blue when the display operates normally(On Mode). AUTO/SET Button Use this button to amber. Use this button ...
...mode is used when two computers are connected to turn the display on or off. A8 This feature is - 19 inch monitor : 1440 x 900 - 20.1 inch monitor : 1680 x 1050 Power Button Use this indicator color changes to make D-Sub or DVI connector active. AUTO IMAGE ADJUSTMENT When adjusting your ... the display is D-Sub. For more information, refer to enter a selection in Sleep Mode (Energy Saving), this button to the display. Power Indicator This Indicator lights up blue when the display operates normally(On Mode). AUTO/SET Button Use this button to amber. Use this button ...

Owner's Manual (English)
Page 11
... the position of the screen To improve the clarity and stability of the screen To customize the screen status for a user's operating environment WHITE BALANCE POWER INDICATOR FLATRON F-ENGINE FACTORY RESET MOVIE / TEXT USER NORMAL To select or customize desired image settings : Adjustable A : Analog Input D : Digital Input NOTE The order of...
... the position of the screen To improve the clarity and stability of the screen To customize the screen status for a user's operating environment WHITE BALANCE POWER INDICATOR FLATRON F-ENGINE FACTORY RESET MOVIE / TEXT USER NORMAL To select or customize desired image settings : Adjustable A : Analog Input D : Digital Input NOTE The order of...

Owner's Manual (English)
Page 14
...when the input signal is an analog signal. FACTORY RESET Restore all factory default settings except "LANGUAGE." If this function to video signal distortion. POWER ME+-NU : : : Exit Adjust Adjust INDICATOR SET : Select another sub-menu SETUP SETUP LANGUAGE To choose the language in which the ...the screen image, restore the factory default settings. A13 If you to remove any vertical bars or stripes visible on the front side of the monitor to reset immediately. Press the - , + button to ON or OFF. On Screen Display(OSD) Selection and Adjustment Main menu Sub menu...
...when the input signal is an analog signal. FACTORY RESET Restore all factory default settings except "LANGUAGE." If this function to video signal distortion. POWER ME+-NU : : : Exit Adjust Adjust INDICATOR SET : Select another sub-menu SETUP SETUP LANGUAGE To choose the language in which the ...the screen image, restore the factory default settings. A13 If you to remove any vertical bars or stripes visible on the front side of the monitor to reset immediately. Press the - , + button to ON or OFF. On Screen Display(OSD) Selection and Adjustment Main menu Sub menu...

Owner's Manual (English)
Page 16
...? • This message appears when the signal cable between your PC and your display again. Do you see "OSD LOCKED" when you see if the power cord is out of the display. G Do you push MENU button? • You can unlock the OSD controls at any key on and the •...; Adjust the brightness and the contrast. G Is the power indicator amber? • If the display is not connected. You can secure the current control settings, so that they cannot be inadvertently changed.
...? • This message appears when the signal cable between your PC and your display again. Do you see "OSD LOCKED" when you see if the power cord is out of the display. G Do you push MENU button? • You can unlock the OSD controls at any key on and the •...; Adjust the brightness and the contrast. G Is the power indicator amber? • If the display is not connected. You can secure the current control settings, so that they cannot be inadvertently changed.

Owner's Manual (English)
Page 19
... Sync Input Video Input Resolution Plug&Play Power Consumption Dimensions & Weight Tilt Range Power Input Environmental Conditions Stand Base Power cord 19 inches (48.14 cm) Flat Panel Active matrix-TFT LCD Glare coating(L196WTG), Anti-Glare coating(L196WTQ) 19 inches viewable 0.285*0.285 mm pixel pitch Horizontal Freq. A18 D Connector (Digital) RGB Analog (0.7 Vp-p/ 75 ohm...
... Sync Input Video Input Resolution Plug&Play Power Consumption Dimensions & Weight Tilt Range Power Input Environmental Conditions Stand Base Power cord 19 inches (48.14 cm) Flat Panel Active matrix-TFT LCD Glare coating(L196WTG), Anti-Glare coating(L196WTQ) 19 inches viewable 0.285*0.285 mm pixel pitch Horizontal Freq. A18 D Connector (Digital) RGB Analog (0.7 Vp-p/ 75 ohm...

Owner's Manual (English)
Page 20
Specifications L206WTG/L206WTQ Display Sync Input Video Input Resolution Plug&Play Power Consumption Dimensions & Weight Tilt Range Power Input Environmental Conditions Stand Base Power cord 20.1 inches (51.11 cm) Flat Panel Active matrix-TFT LCD Glare coating(L206WTG), Anti-Glare coating(L206WTQ) 20.1 inches viewable 0.258*0.258 mm pixel pitch Horizontal Freq. A19 Vertical...
Specifications L206WTG/L206WTQ Display Sync Input Video Input Resolution Plug&Play Power Consumption Dimensions & Weight Tilt Range Power Input Environmental Conditions Stand Base Power cord 20.1 inches (51.11 cm) Flat Panel Active matrix-TFT LCD Glare coating(L206WTG), Anti-Glare coating(L206WTQ) 20.1 inches viewable 0.258*0.258 mm pixel pitch Horizontal Freq. A19 Vertical...


