
Operation Guide
Page 4
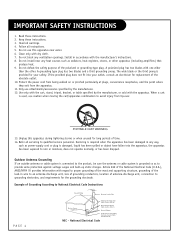
... Electrical Code Instructions PAGE 4 Ground Clamp Antenna Lead in accordance with the apparatus. IMPORTANT SAFETY INSTRUCTIONS 1. Install in Wire Antenna Discharge Unit (NEC Section 810-20) Electric Service Equipment Grounding Conductor (NEC Section 810-21) Ground Clamps Power Service Grounding Electrode System (NEC Art 250, Part H) NEC - Read these instructions. 3. A polarized plug has two blades with dry cloth. 7. Only use attachments...
... Electrical Code Instructions PAGE 4 Ground Clamp Antenna Lead in accordance with the apparatus. IMPORTANT SAFETY INSTRUCTIONS 1. Install in Wire Antenna Discharge Unit (NEC Section 810-20) Electric Service Equipment Grounding Conductor (NEC Section 810-21) Ground Clamps Power Service Grounding Electrode System (NEC Art 250, Part H) NEC - Read these instructions. 3. A polarized plug has two blades with dry cloth. 7. Only use attachments...
Operation Guide
Page 5
... Adjust Keys. See your Zenith/LG dealer if you need an installer's remote and the LT2002 Quickset II Clone Programmer - Digital Audio Optical Connections . .16 Menus and Displays Overview On-Screen Menus Overview 17 Pillow Speaker Setup 18 Other Menus and On-Screen Displays 19 User Remote Control Key Functions 20 Installer Remote Control Key Functions 21 Step 2. Series HCS5650 The Installer remote control is used to duplicate a TV/STB setup and install it on the Setup menu. HD Integrator Box System Installation and Connections Setup Checklist 6 Installation/Connections...
... Adjust Keys. See your Zenith/LG dealer if you need an installer's remote and the LT2002 Quickset II Clone Programmer - Digital Audio Optical Connections . .16 Menus and Displays Overview On-Screen Menus Overview 17 Pillow Speaker Setup 18 Other Menus and On-Screen Displays 19 User Remote Control Key Functions 20 Installer Remote Control Key Functions 21 Step 2. Series HCS5650 The Installer remote control is used to duplicate a TV/STB setup and install it on the Setup menu. HD Integrator Box System Installation and Connections Setup Checklist 6 Installation/Connections...

Operation Guide
Page 6
...; Channel List. • Channel Label. • Video/picture appearance options setup, see Picture menu. • Audio/sound options setup, see Sound menu. • Set up the TV (This is included with the TV.) Yes___ No___ End-User Menu Access Will the end-user have to be used , AC Power source outlet, Antenna/Cable service connectors, any other features. Screws & Wall Mount Bracket (5Required) - 6 ft. Y: Mount the TV on the stand? See page 14. 4. Installer Remote Control & Batteries...
...; Channel List. • Channel Label. • Video/picture appearance options setup, see Picture menu. • Audio/sound options setup, see Sound menu. • Set up the TV (This is included with the TV.) Yes___ No___ End-User Menu Access Will the end-user have to be used , AC Power source outlet, Antenna/Cable service connectors, any other features. Screws & Wall Mount Bracket (5Required) - 6 ft. Y: Mount the TV on the stand? See page 14. 4. Installer Remote Control & Batteries...

Operation Guide
Page 7
... the HCS5650. Switch (NORMAL SPEAKER or PILLOW SPEAKER.) M.P.I Interface Remote In Audio Out Audio In SERVICE Port AC Out PILLOW INT REMOTE IN PILLOW JACK IN AUX (12V DC 40mA) CONTROL AUDIO IN AUDIO OUT 1 2 DIGITAL VIDEO IN DIGITAL VIDEO OUT DIGITAL AUDIO OUT (OPTICAL) SERVICE DISPLAY CONTROL AC OUT 8A AC IN 120V~60Hz Cable In AUX Control Digital Video 1, 2 In Digital PILLOW JACK IN Audio Out (Optical) Used to connect to start the download program, press and release the RESET button...
... the HCS5650. Switch (NORMAL SPEAKER or PILLOW SPEAKER.) M.P.I Interface Remote In Audio Out Audio In SERVICE Port AC Out PILLOW INT REMOTE IN PILLOW JACK IN AUX (12V DC 40mA) CONTROL AUDIO IN AUDIO OUT 1 2 DIGITAL VIDEO IN DIGITAL VIDEO OUT DIGITAL AUDIO OUT (OPTICAL) SERVICE DISPLAY CONTROL AC OUT 8A AC IN 120V~60Hz Cable In AUX Control Digital Video 1, 2 In Digital PILLOW JACK IN Audio Out (Optical) Used to connect to start the download program, press and release the RESET button...

Operation Guide
Page 14
... Output as required of your system. Viewing Equipment Setup Connect the TV/STB to the display device that the panel is in standby mode. The LED on the TV/STB to plug the display panel into a standard 120V 60 Hz power outlet. An unswitched AC power outlet is specifically provided on the display panel will be used to Remote In port. Plug the TV/STB AC power cord into . Antenna Wall Jack HCS5650 PTC INSTALLER MENU...
... Output as required of your system. Viewing Equipment Setup Connect the TV/STB to the display device that the panel is in standby mode. The LED on the TV/STB to plug the display panel into a standard 120V 60 Hz power outlet. An unswitched AC power outlet is specifically provided on the display panel will be used to Remote In port. Plug the TV/STB AC power cord into . Antenna Wall Jack HCS5650 PTC INSTALLER MENU...

Operation Guide
Page 17
...'s Parental Control menu. PAGE 17 Options are : Mode, Balance, Digital Output, Auto Volume, Multi-Track, Internal Speaker. 43 Picks the language the on-screen menus will turn itself on -screen displays. SAP Selects MTS sound: Mono, Stereo, and SAP in DTV mode. Guide View DTV program information. With Guide displayed, press Info for the TV to the TV's operational features. Change the audio language in analog mode. RS-232C Control RS-232C Control 70 Control TV through using Channel Up...
...'s Parental Control menu. PAGE 17 Options are : Mode, Balance, Digital Output, Auto Volume, Multi-Track, Internal Speaker. 43 Picks the language the on-screen menus will turn itself on -screen displays. SAP Selects MTS sound: Mono, Stereo, and SAP in DTV mode. Guide View DTV program information. With Guide displayed, press Info for the TV to the TV's operational features. Change the audio language in analog mode. RS-232C Control RS-232C Control 70 Control TV through using Channel Up...

Operation Guide
Page 20
Change the audio language in the Installer's menu. INFO Press to display current program information. [-] BUTTON When selecting a digital broadcast channel, key in the Main channel number followed by sliding it to select the Audio / Video inputs. (Use the A/V jacks on the back of the keys and their functions on . GUIDE Use to the Alarm menu. Select available channels. ALARM Use to go to view DTV program information. TIMER Press repeatedly to select a preset time to access closed captions. BED 1/BED...
Change the audio language in the Installer's menu. INFO Press to display current program information. [-] BUTTON When selecting a digital broadcast channel, key in the Main channel number followed by sliding it to select the Audio / Video inputs. (Use the A/V jacks on the back of the keys and their functions on . GUIDE Use to the Alarm menu. Select available channels. ALARM Use to go to view DTV program information. TIMER Press repeatedly to select a preset time to access closed captions. BED 1/BED...

Operation Guide
Page 21
... last channel viewed. The position of the keys on the optional installer's remote and what they do not contain a sub channel number. Change the audio language in analog mode. Bed 2 switch on -screen menu items and change the selected option. SAP Selects MTS sound: Mono, Stereo, and SAP in DTV mode. Select on patient remote. FLASHBK (Flashback) Use to return to access closed captions. MUTE Turns sound Off and On, while the picture remains. POWER Turns...
... last channel viewed. The position of the keys on the optional installer's remote and what they do not contain a sub channel number. Change the audio language in analog mode. Bed 2 switch on -screen menu items and change the selected option. SAP Selects MTS sound: Mono, Stereo, and SAP in DTV mode. Select on patient remote. FLASHBK (Flashback) Use to return to access closed captions. MUTE Turns sound Off and On, while the picture remains. POWER Turns...

Operation Guide
Page 48
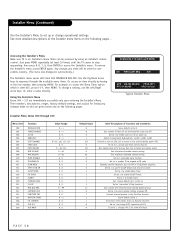
... Charts All channels found in the channel search are included in channel banks 1, 2, 3 and 4. Default is for a pre-determined fee. Inactive TV Setup Go to reinstate the Inactive TV message. The administrator can then select Bank 4 to Channel Bank 4. For activating banks, press Volume to access Channel Banks editing function. Channel Banks Are Set Up After 2-5-5+Menu Procedure Operating the Channel Banks menu. Note: Installer Menu item 028...
... Charts All channels found in the channel search are included in channel banks 1, 2, 3 and 4. Default is for a pre-determined fee. Inactive TV Setup Go to reinstate the Inactive TV message. The administrator can then select Bank 4 to Channel Bank 4. For activating banks, press Volume to access Channel Banks editing function. Channel Banks Are Set Up After 2-5-5+Menu Procedure Operating the Channel Banks menu. Note: Installer Menu item 028...
Operation Guide
Page 50
... program package. You can also "Blank" a channel for accommodating audio-only, such as an example only.) CHANNEL BANK BANK 1 Channel Bank Number Display 3. A channel will be entered in the Setup menu) to be set up to customize your packages by using an installer remote to change to a "billable" active channel bank selection: Bank 1, 2, or 3. *Note: For institution control of patient-accessible programming, channels in Bank 4 need to leave at least one channel...
... program package. You can also "Blank" a channel for accommodating audio-only, such as an example only.) CHANNEL BANK BANK 1 Channel Bank Number Display 3. A channel will be entered in the Setup menu) to be set up to customize your packages by using an installer remote to change to a "billable" active channel bank selection: Bank 1, 2, or 3. *Note: For institution control of patient-accessible programming, channels in Bank 4 need to leave at least one channel...
Operation Guide
Page 54
... your requirements. to access and use the Installer menu etc. *Note1: Disconnect all available channels.) Go to the Channel menu and access the Auto Program option, follow instructions on the remote. This transfers the TV setup to the internal controller box. *Note: Only do you want to delete any free channels so the guest cannot access them to 000 (Off) before running . Overview: Commercial Mode Setup Procedure 1.Set Installer Menu Items (Enter Installer Menu, see next...
... your requirements. to access and use the Installer menu etc. *Note1: Disconnect all available channels.) Go to the Channel menu and access the Auto Program option, follow instructions on the remote. This transfers the TV setup to the internal controller box. *Note: Only do you want to delete any free channels so the guest cannot access them to 000 (Off) before running . Overview: Commercial Mode Setup Procedure 1.Set Installer Menu Items (Enter Installer Menu, see next...
Operation Guide
Page 55
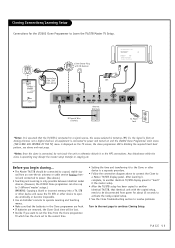
...) CONTROL AUDIO IN AUDIO OUT 1 2 DIGITAL VIDEO IN DIGITAL VIDEO OUT DIGITAL AUDIO OUT (OPTICAL) Antenna Wall Jack SERVICE DISPLAY CONTROL AC OUT 8A AC IN 120V~ 60Hz RF Coaxial Wire (75ohm) AC Power Cord *Notes: It is assumed that the batteries in the Clone programmer are fresh. • If batteries are removed, the Clone Clock time will be connected to a good, stable signal from an over-the-air antenna or cable service Analog channel...
...) CONTROL AUDIO IN AUDIO OUT 1 2 DIGITAL VIDEO IN DIGITAL VIDEO OUT DIGITAL AUDIO OUT (OPTICAL) Antenna Wall Jack SERVICE DISPLAY CONTROL AC OUT 8A AC IN 120V~ 60Hz RF Coaxial Wire (75ohm) AC Power Cord *Notes: It is assumed that the batteries in the Clone programmer are fresh. • If batteries are removed, the Clone Clock time will be connected to a good, stable signal from an over-the-air antenna or cable service Analog channel...
Operation Guide
Page 56
... either Channel key repeatedly to Master TV/STB MPI Port If there is functioning, do not move it to keep the time as accurately as possible.) Since the Clone Programmer's time cannot be set up.) *Notes: When using the clone programmer for the Clone Programmer to Learn the Master TV/STB Setup. LT2002 Clone Programmer Communication Problems • A slow flashing green light indicates...
... either Channel key repeatedly to Master TV/STB MPI Port If there is functioning, do not move it to keep the time as accurately as possible.) Since the Clone Programmer's time cannot be set up.) *Notes: When using the clone programmer for the Clone Programmer to Learn the Master TV/STB Setup. LT2002 Clone Programmer Communication Problems • A slow flashing green light indicates...
Operation Guide
Page 58
... access the Installer's menu. Sets minimum allowable volume setting. Set to 1 to 0. Set to 1 to enable On/Off Timers. Just press MENU repeatedly (at TV turn -on the following pages... Typically used for some OCV boxes. Set to 1 to enable Alarm. Zen 1 Leave default set 1 (1 Zen 1) Set to 1 to favorite channels. If set to 0, limits direct access to enable V-Chip functions. Sets number of hours of V-Chip (Parental Control) blocking hours. Any changes you make will be accessed by keying...
... access the Installer's menu. Sets minimum allowable volume setting. Set to 1 to 0. Set to 1 to enable On/Off Timers. Just press MENU repeatedly (at TV turn -on the following pages... Typically used for some OCV boxes. Set to 1 to enable Alarm. Zen 1 Leave default set 1 (1 Zen 1) Set to 1 to favorite channels. If set to 0, limits direct access to enable V-Chip functions. Sets number of hours of V-Chip (Parental Control) blocking hours. Any changes you make will be accessed by keying...

Operation Guide
Page 59
.... Set to 1 to disable Channel-Time display. Set to 1 to enable display panel Component 1 input jacks. checksum. Set to enable feature on Function menu. Set to 1 to disable. Set to 1 to 1 for M.P.I . See detailed descriptions and item 106. Selects Minor start channel. Set to 1, mutes audio if no signal is displayed when directly accessing a channel not in the favorite channel list. CH-T COL. Set to 0 to enable Component 2 input jacks. User programmable number, most significant byte - 1. Relaxes M.P.I . Set to 2 for default ratio on power...
.... Set to 1 to disable Channel-Time display. Set to 1 to enable display panel Component 1 input jacks. checksum. Set to enable feature on Function menu. Set to 1 to disable. Set to 1 to 1 for M.P.I . See detailed descriptions and item 106. Selects Minor start channel. Set to 1, mutes audio if no signal is displayed when directly accessing a channel not in the favorite channel list. CH-T COL. Set to 0 to enable Component 2 input jacks. User programmable number, most significant byte - 1. Relaxes M.P.I . Set to 2 for default ratio on power...

Operation Guide
Page 61
... 1 for LG IR remote control opera-tion. If set to 0, sound can select channels with either Channel up/down below the start channel at default setting unless changed by inputting the IR code for the bank. 013 - You may be used. STRT CH IN SM (Start Channel in Scan Mode) When set to 0, Video 2 input on . 015 - FEATURE LEVEL Default set to 1, sound cannot be muted. 022 - CH. Leave at default setting unless changed by Pay-Per-View provider...
... 1 for LG IR remote control opera-tion. If set to 0, sound can select channels with either Channel up/down below the start channel at default setting unless changed by inputting the IR code for the bank. 013 - You may be used. STRT CH IN SM (Start Channel in Scan Mode) When set to 0, Video 2 input on . 015 - FEATURE LEVEL Default set to 1, sound cannot be muted. 022 - CH. Leave at default setting unless changed by Pay-Per-View provider...

Operation Guide
Page 66
... will need an Installer remote control similar to clone the TV/STB Master TV setup. If the Master TV display panel's clonable features like ABC, NBC, PBS etc. Under certain conditions, Auto Program Scan is disabled if there is an Analog channel, not a digital channel. To avoid confusion, disconnect all Aux inputs. Within the Installer menu, set the clonable options on to the TV/STB. Press '2', '5', '5', 'MENU' to start the...
... will need an Installer remote control similar to clone the TV/STB Master TV setup. If the Master TV display panel's clonable features like ABC, NBC, PBS etc. Under certain conditions, Auto Program Scan is disabled if there is an Analog channel, not a digital channel. To avoid confusion, disconnect all Aux inputs. Within the Installer menu, set the clonable options on to the TV/STB. Press '2', '5', '5', 'MENU' to start the...
Operation Guide
Page 72
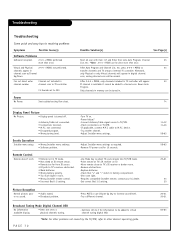
.... -Remove obstructions. -Replace batteries. -Check that "+" and "-" match in digital channel scan, analog channel scan will appear in battery compartment. -Dim room light. -Requires compatible Installer remote, contact your LG dealer. -Set correct Bed 1-2 setting. Set Item 103 to 0 for 15 seconds. Rerun Auto Program. cable to increase sound level. -Try a different channel. Picture Reception Normal picture, poor or no sound. • Audio muted. • Broadcast problem. -Press MUTE or use Volume Up key to M.P.I . Possible Solution(s) See Page(s) Start all...
.... -Remove obstructions. -Replace batteries. -Check that "+" and "-" match in digital channel scan, analog channel scan will appear in battery compartment. -Dim room light. -Requires compatible Installer remote, contact your LG dealer. -Set correct Bed 1-2 setting. Set Item 103 to 0 for 15 seconds. Rerun Auto Program. cable to increase sound level. -Try a different channel. Picture Reception Normal picture, poor or no sound. • Audio muted. • Broadcast problem. -Press MUTE or use Volume Up key to M.P.I . Possible Solution(s) See Page(s) Start all...

Operation Guide
Page 75
... and set to your requirements. 6. Press '2', '5', '5', 'MENU' to start the transfer of the particular TV for more information. *Note: After installing a Pay-Per-View card, be sure to remove and reconnect the TV/STB AC power cord. Press '2', '5', '4', 'MENU' to the channels. *Note: You can add Channel ICONStypically network logos like ABC, NBC, PBS etc. Connections Panel RJP INTERFACE REMOTE IN AUX CONTROL AUDIO IN AUDIO OUT 1 2 DIGITAL VIDEO IN DIGITAL VIDEO OUT DIGITAL AUDIO...
... and set to your requirements. 6. Press '2', '5', '5', 'MENU' to start the transfer of the particular TV for more information. *Note: After installing a Pay-Per-View card, be sure to remove and reconnect the TV/STB AC power cord. Press '2', '5', '4', 'MENU' to the channels. *Note: You can add Channel ICONStypically network logos like ABC, NBC, PBS etc. Connections Panel RJP INTERFACE REMOTE IN AUX CONTROL AUDIO IN AUDIO OUT 1 2 DIGITAL VIDEO IN DIGITAL VIDEO OUT DIGITAL AUDIO...
Operation Guide
Page 80
... LOST REVENUES OR PROFITS IN CONNECTION WITH THIS PRODUCT. P/NO : 3350GDKM0042A For Customer Support/Service Please call 1-888-865-3026. Reception problems caused by LG Electronics U.S.A., Inc. 2000 Millbrook Drive, Lincolnshire, IL 60069. © Copyright 2008 LG Electronics U.S.A., Inc. Installation Guide Antenna Read the Installation and Setup Guide carefully so that are the owner's responsibility. Such replacement parts are warranted for factory-defective parts may also have any...
... LOST REVENUES OR PROFITS IN CONNECTION WITH THIS PRODUCT. P/NO : 3350GDKM0042A For Customer Support/Service Please call 1-888-865-3026. Reception problems caused by LG Electronics U.S.A., Inc. 2000 Millbrook Drive, Lincolnshire, IL 60069. © Copyright 2008 LG Electronics U.S.A., Inc. Installation Guide Antenna Read the Installation and Setup Guide carefully so that are the owner's responsibility. Such replacement parts are warranted for factory-defective parts may also have any...


