Owner's Manual (English)
Page 1
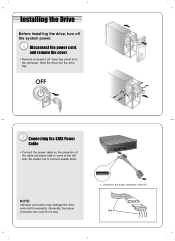
Slide the drive into the drive bay. Be careful not to the power connector of the cable connector side to come to the left side. Installing the Drive Before installing the drive, turn off the system power. Connect to connect upside down. Red Disconnect the power cord, and remove the cover. • Remove a vacant 5.25" drive bay panel from the computer. Generally, the power connector can only fit one way. NOTE: Improper connection may damage the drive and void the warranty. Connecting the SATA Power Cable • Connect the power cable so the projection of the PC.
Slide the drive into the drive bay. Be careful not to the power connector of the cable connector side to come to the left side. Installing the Drive Before installing the drive, turn off the system power. Connect to connect upside down. Red Disconnect the power cord, and remove the cover. • Remove a vacant 5.25" drive bay panel from the computer. Generally, the power connector can only fit one way. NOTE: Improper connection may damage the drive and void the warranty. Connecting the SATA Power Cable • Connect the power cable so the projection of the PC.
Owner's Manual (English)
Page 2
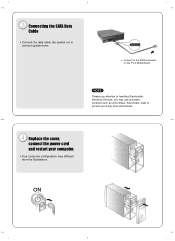
Connecting the SATA Data Cable • Connect the data cable. Replace the cover, connect the power cord and restart your computer. • Your computer configuration may use anti-static products such as wrist straps, heel straps, mats to handling Electrostatic Sensitive Devices, you may different from electrostatic. NOTE Please pay attention to protect your body from the illustrations. Connect to connect upside down. Be careful not to the SATA connector on the PC's Motherboard.
Connecting the SATA Data Cable • Connect the data cable. Replace the cover, connect the power cord and restart your computer. • Your computer configuration may use anti-static products such as wrist straps, heel straps, mats to handling Electrostatic Sensitive Devices, you may different from electrostatic. NOTE Please pay attention to protect your body from the illustrations. Connect to connect upside down. Be careful not to the SATA connector on the PC's Motherboard.
Owner's Manual (English)
Page 3
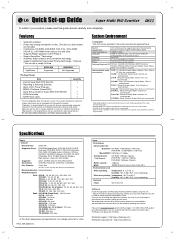
... registered with the product's firmware. Recording & Authoring Software [Nero, InCD, Power Producer, MPEG-2 Software (PowerDVD)] - Therefore, it is not responsible for errors. Specifications Items General Host Interface Serial ATA Supported Discs DVD-ROM(Single/Dual), DVD-RW, DVD-R, DVD-R Dual layer, DVD+RW, DVD+R, DVD+R Double layer, DVD- DVD-RAM (Ver. 2.0 & Higher): 12X max. CD-DA(DAE): 40X max. ❋ The drive's appearance and specifications may experience lower write quality in case if you use only discs by recommended companies. DVD-R : Mitsubishi Kagaku Media...
... registered with the product's firmware. Recording & Authoring Software [Nero, InCD, Power Producer, MPEG-2 Software (PowerDVD)] - Therefore, it is not responsible for errors. Specifications Items General Host Interface Serial ATA Supported Discs DVD-ROM(Single/Dual), DVD-RW, DVD-R, DVD-R Dual layer, DVD+RW, DVD+R, DVD+R Double layer, DVD- DVD-RAM (Ver. 2.0 & Higher): 12X max. CD-DA(DAE): 40X max. ❋ The drive's appearance and specifications may experience lower write quality in case if you use only discs by recommended companies. DVD-R : Mitsubishi Kagaku Media...
Owner's Manual (English)
Page 4
... radio frequency energy and, if not installed and used in this appliance to operate the equipment. • This Super Multi DVD Rewriter is no exponga este aparato a la lluvia ni a la humedad. However, there is for compliance could void the user's authority to rain or moisture. Consult the dealer or an Authorized Service Center for help. • FCC WARNING...
... radio frequency energy and, if not installed and used in this appliance to operate the equipment. • This Super Multi DVD Rewriter is no exponga este aparato a la lluvia ni a la humedad. However, there is for compliance could void the user's authority to rain or moisture. Consult the dealer or an Authorized Service Center for help. • FCC WARNING...


