User Guide
Page 3
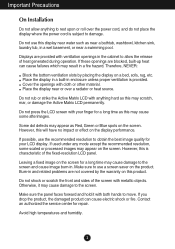
...on the screen. Make sure to the screen and cause image burn-in enclosure unless proper ventilation is characteristic of the fixed-resolution LCD panel. Otherwise, it with metallic objects. Important Precautions On Installation Do not allow the release of heat generated during operation.... Do not use the recommended resolution to the screen. Place the display in a built-in . Place the display near a swimming pool. If possible, use this is ...
...on the screen. Make sure to the screen and cause image burn-in enclosure unless proper ventilation is characteristic of the fixed-resolution LCD panel. Otherwise, it with metallic objects. Important Precautions On Installation Do not allow the release of heat generated during operation.... Do not use the recommended resolution to the screen. Place the display in a built-in . Place the display near a swimming pool. If possible, use this is ...

User Guide
Page 12
... When you encounter problems such as blurry screen, blurred letters, screen flicker or tilted screen while using the device or after changing screen resolution, press the AUTO function button to turn the power on , the 'Self Image Setting Function' is executed automatically. (Only Analog Mode) Power Button NOTE ' Self ...
... When you encounter problems such as blurry screen, blurred letters, screen flicker or tilted screen while using the device or after changing screen resolution, press the AUTO function button to turn the power on , the 'Self Image Setting Function' is executed automatically. (Only Analog Mode) Power Button NOTE ' Self ...

User Guide
Page 14
... is connected, it is running properly (On Mode). Power Button & Power Indicator Use this button to select source from input. Light Sensor This is E2250V/E2350V/E2750V : 1920 x 1080 INPUT Button (SOURCE Hot key) Use this button to turn the display on or off. Control Panel Functions AUTO Button AUTO IMAGE... want. From front view,the power indicator stays purple if the display is automatically detected. The best display mode is lens for the current screen resolution size (display mode).
... is connected, it is running properly (On Mode). Power Button & Power Indicator Use this button to select source from input. Light Sensor This is E2250V/E2350V/E2750V : 1920 x 1080 INPUT Button (SOURCE Hot key) Use this button to turn the display on or off. Control Panel Functions AUTO Button AUTO IMAGE... want. From front view,the power indicator stays purple if the display is automatically detected. The best display mode is lens for the current screen resolution size (display mode).
User Guide
Page 22
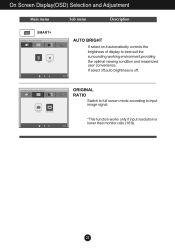
If select off,auto brightness is lower than monitor ratio (16:9). 21 Switch to full screen mode according to best suit the surrounding working environment,providing the optimal viewing condition and maximized user convenience. On Screen Display(OSD) Selection and Adjustment Main menu Sub menu Description If select on,it automatically controls the brightness of display to input image signal. *This function works only if input resolution is off.
If select off,auto brightness is lower than monitor ratio (16:9). 21 Switch to full screen mode according to best suit the surrounding working environment,providing the optimal viewing condition and maximized user convenience. On Screen Display(OSD) Selection and Adjustment Main menu Sub menu Description If select on,it automatically controls the brightness of display to input image signal. *This function works only if input resolution is off.

User Guide
Page 28
...PHASE icon in the on screen display. • Check Control Panel --> Display --> Settings and adjust the display to the recommended resolution or adjust the display image to the ideal setting. The setting method can differ by the video card performance. IMPORTANT Check Control ...Panel --> Display --> Settings and see if the frequency or the resolution were changed. If the recommended resolution (optimal resolution) is incorrect. • Press the AUTO button to automatically adjust your display image to the ideal setting. In...
...PHASE icon in the on screen display. • Check Control Panel --> Display --> Settings and adjust the display to the recommended resolution or adjust the display image to the ideal setting. The setting method can differ by the video card performance. IMPORTANT Check Control ...Panel --> Display --> Settings and see if the frequency or the resolution were changed. If the recommended resolution (optimal resolution) is incorrect. • Press the AUTO button to automatically adjust your display image to the ideal setting. In...

User Guide
Page 29
Settings. Do you installed the display driver? • Be sure to install the display driver from our web site: http://www.lg.com. • Make sure to fasten if necessary. • Make sure the video card is properly inserted in the slot. • Set the color setting ...higher than 24 bits (true color) at Control Panel - Not supply to the recommend resolution. G The screen blinks. • Check if the screen is set to interlace mode and if yes, change it to compressed sound format. 28 Or, you...
Settings. Do you installed the display driver? • Be sure to install the display driver from our web site: http://www.lg.com. • Make sure to fasten if necessary. • Make sure the video card is properly inserted in the slot. • Set the color setting ...higher than 24 bits (true color) at Control Panel - Not supply to the recommend resolution. G The screen blinks. • Check if the screen is set to interlace mode and if yes, change it to compressed sound format. 28 Or, you...

User Guide
Page 30
... without notice. 29 Digital Signal Input Input Form 15 pin D-Sub Connector DVI - D connector (Digital) 19 pin HDMI Connector Analog (0.7 Vp-p/ 75 ohm), Digital, HDMI Resolution Max Recommend VESA 1920 x 1080 @60 Hz VESA 1920 x 1080 @60 Hz Plug&Play DDC 2B (Analog,Digital,HDMI) Power Consumption On Mode Sleep Mode...
... without notice. 29 Digital Signal Input Input Form 15 pin D-Sub Connector DVI - D connector (Digital) 19 pin HDMI Connector Analog (0.7 Vp-p/ 75 ohm), Digital, HDMI Resolution Max Recommend VESA 1920 x 1080 @60 Hz VESA 1920 x 1080 @60 Hz Plug&Play DDC 2B (Analog,Digital,HDMI) Power Consumption On Mode Sleep Mode...

User Guide
Page 31
... 75 Hz (Automatic) HDMI : 56 Hz to change without notice. 30 D connector (Digital) 19 pin HDMI Connector Analog (0.7 Vp-p/ 75 ohm), Digital, HDMI Resolution Max Recommend VESA 1920 x 1080 @60 Hz VESA 1920 x 1080 @60 Hz Plug&Play DDC 2B (Analog,Digital,HDMI) Power Consumption On Mode Sleep Mode...) Height 42.81 cm (16.85 inch) Depth 19.80 cm ( 7.80 inch) Weight(excl. Digital 15 pin D-Sub Connector DVI - Vertical Freq. Specifications E2350V Display 58.4 cm (23.0 inch) Flat Panel Active matrix-TFT LCD Anti-Glare coating Visible diagonal size : 58.4 cm 0.265 x 0.265 mm (Pixel pitch)...
... 75 Hz (Automatic) HDMI : 56 Hz to change without notice. 30 D connector (Digital) 19 pin HDMI Connector Analog (0.7 Vp-p/ 75 ohm), Digital, HDMI Resolution Max Recommend VESA 1920 x 1080 @60 Hz VESA 1920 x 1080 @60 Hz Plug&Play DDC 2B (Analog,Digital,HDMI) Power Consumption On Mode Sleep Mode...) Height 42.81 cm (16.85 inch) Depth 19.80 cm ( 7.80 inch) Weight(excl. Digital 15 pin D-Sub Connector DVI - Vertical Freq. Specifications E2350V Display 58.4 cm (23.0 inch) Flat Panel Active matrix-TFT LCD Anti-Glare coating Visible diagonal size : 58.4 cm 0.265 x 0.265 mm (Pixel pitch)...

User Guide
Page 32
... (27.0 inch) Flat Panel Active matrix-TFT LCD Anti-Glare coating Visible diagonal size : 68.6 cm 0.3114 x 0.3114 mm (Pixel pitch) Sync Input Video Input Resolution Horizontal Freq. packing) Without Stand Width 65.20 cm (25.67 inch) Height 40.96 cm (16.13 inch) Depth 4.11 cm ( 1.62 inch) 5.2 kg...
... (27.0 inch) Flat Panel Active matrix-TFT LCD Anti-Glare coating Visible diagonal size : 68.6 cm 0.3114 x 0.3114 mm (Pixel pitch) Sync Input Video Input Resolution Horizontal Freq. packing) Without Stand Width 65.20 cm (25.67 inch) Height 40.96 cm (16.13 inch) Depth 4.11 cm ( 1.62 inch) 5.2 kg...

User Guide
Page 33
Specifications Preset Modes (Resolution) DSUB/DVI Timing Display Modes (Resolution) 1 720 x 400 2 640 x 480 3 640 x 480 4 800 x 600 5 800 x 600 6 1024 x 768 7 1024 x 768 8 1152 x 864 9 1280 x 1024 10 1280 x 1024 11 1680 x 1050 *12 ... 65.290 67.500 Vertical Freq. (Hz) 70 60 75 60 75 60 75 75 60 75 60 60 * Recommend Mode HDMI Timing Display Modes (Resolution) 1 480P 2 576P 3 720P 4 720P 5 1080i 6 1080i 7 1080P 8 1080P Horizontal Freq. (kHz) 31.50 31.25 37.50 45.00 28.12 33.75 56.25...
Specifications Preset Modes (Resolution) DSUB/DVI Timing Display Modes (Resolution) 1 720 x 400 2 640 x 480 3 640 x 480 4 800 x 600 5 800 x 600 6 1024 x 768 7 1024 x 768 8 1152 x 864 9 1280 x 1024 10 1280 x 1024 11 1680 x 1050 *12 ... 65.290 67.500 Vertical Freq. (Hz) 70 60 75 60 75 60 75 75 60 75 60 60 * Recommend Mode HDMI Timing Display Modes (Resolution) 1 480P 2 576P 3 720P 4 720P 5 1080i 6 1080i 7 1080P 8 1080P Horizontal Freq. (kHz) 31.50 31.25 37.50 45.00 28.12 33.75 56.25...


