
Owners Manual
Page 2
... Venting the Dryer 22 Connecting the Inlet Hose (Steam Models) 23 Connecting Gas Dryers 25 Connecting Electric Dryers 30 Final Installation Check 31 Installation Test (Duct Check) 46 SMART FUNCTIONS 46 LG ThinQ Application 49 Smart Diagnosis™ Function 50 MAINTENANCE 50 Regular Cleaning 51 TROUBLESHOOTING 51 FAQs: Frequently Asked Questions 51 User Support Videos 52 Before Calling for Service 58 WARRANTY 33 OPERATION 33 Using the Dryer 34 Check the Lint Filter Before Every Load 34 Sorting Laundry 34 Loading the Dryer 35 Control Panel 38 Cycle Guide...
... Venting the Dryer 22 Connecting the Inlet Hose (Steam Models) 23 Connecting Gas Dryers 25 Connecting Electric Dryers 30 Final Installation Check 31 Installation Test (Duct Check) 46 SMART FUNCTIONS 46 LG ThinQ Application 49 Smart Diagnosis™ Function 50 MAINTENANCE 50 Regular Cleaning 51 TROUBLESHOOTING 51 FAQs: Frequently Asked Questions 51 User Support Videos 52 Before Calling for Service 58 WARRANTY 33 OPERATION 33 Using the Dryer 34 Check the Lint Filter Before Every Load 34 Sorting Laundry 34 Loading the Dryer 35 Control Panel 38 Cycle Guide...

Owners Manual
Page 3
...-opening door provides easy access for installation location. Flow Sense™ Duct Blockage Sensing System Indicator The Flow Sense™ duct blockage sensing system detects and alerts you see the alert: Clean or repair the ducts to restrictions in the installed household ductwork that reduce exhaust airflow through the dryer. If you to remove the restrictions. LG ThinQ Download the new LG smart phone app to select the desired dry cycle...
...-opening door provides easy access for installation location. Flow Sense™ Duct Blockage Sensing System Indicator The Flow Sense™ duct blockage sensing system detects and alerts you see the alert: Clean or repair the ducts to restrictions in the installed household ductwork that reduce exhaust airflow through the dryer. If you to remove the restrictions. LG ThinQ Download the new LG smart phone app to select the desired dry cycle...
Owners Manual
Page 4
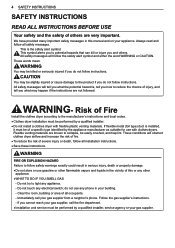
... instructions are very important. This is installed, it must be of a specific type identified by the appliance manufacturer as suitable for use gasoline or other appliance. ••WHAT TO DO IF YOU SMELL GAS - If you to light any electrical switch; WARNING- This symbol alerts you cannot reach your gas supplier, call your appliance. All safety messages will obstruct clothes dryer...
... instructions are very important. This is installed, it must be of a specific type identified by the appliance manufacturer as suitable for use gasoline or other appliance. ••WHAT TO DO IF YOU SMELL GAS - If you to light any electrical switch; WARNING- This symbol alerts you cannot reach your gas supplier, call your appliance. All safety messages will obstruct clothes dryer...

Owners Manual
Page 6
... underneath and around the exhaust opening and adjacent surrounding areas free from the accumulation of combustible materials (lint, paper, rags, etc.), gasoline, chemicals and other flammable vapors and liquids. ••This appliance is regularly switched on the power cord. An accumulation of lint in any area of the dwelling. OPERATION ••Repair or immediately replace all joints with reduced...
... underneath and around the exhaust opening and adjacent surrounding areas free from the accumulation of combustible materials (lint, paper, rags, etc.), gasoline, chemicals and other flammable vapors and liquids. ••This appliance is regularly switched on the power cord. An accumulation of lint in any area of the dwelling. OPERATION ••Repair or immediately replace all joints with reduced...

Owners Manual
Page 8
... not repair or replace any part of electric shock. GROUNDING INSTRUCTIONS ••Improper connection of the equipment-grounding conductor can result in this appliance from the power supply. ••Remove the door before cleaning and attempting any user maintenance. WARNING Fire Hazard Failure to make sure the outlet is not properly grounded. Have the wall outlet and circuit checked by qualified service personnel unless specifically recommended...
... not repair or replace any part of electric shock. GROUNDING INSTRUCTIONS ••Improper connection of the equipment-grounding conductor can result in this appliance from the power supply. ••Remove the door before cleaning and attempting any user maintenance. WARNING Fire Hazard Failure to make sure the outlet is not properly grounded. Have the wall outlet and circuit checked by qualified service personnel unless specifically recommended...

Owners Manual
Page 10
... the proper location Level the dryer Vent the dryer Connect the inlet hose (steam models) Connect the Gas dryer Connect the Electric dryer DLEX4200*, DLGX4201*, DLEX4000*, DLGX4001*, DLEX4500*, DLGX4501* DLE3600*, DLG3601* Gas dryer Electric dryer Plug in the power cord Installation test Test run Product Specifications The appearance and specifications listed in this manual may vary due to constant product improvements. IEC 7.4 cu.ft. (8 lb/3.6 kg) capacity Normal Cycle IEC 7.4 cu.ft. (22.5 lb/10.2 kg) NOTE •• Model numbers can be...
... the proper location Level the dryer Vent the dryer Connect the inlet hose (steam models) Connect the Gas dryer Connect the Electric dryer DLEX4200*, DLGX4201*, DLEX4000*, DLGX4001*, DLEX4500*, DLGX4501* DLE3600*, DLG3601* Gas dryer Electric dryer Plug in the power cord Installation test Test run Product Specifications The appearance and specifications listed in this manual may vary due to constant product improvements. IEC 7.4 cu.ft. (8 lb/3.6 kg) capacity Normal Cycle IEC 7.4 cu.ft. (22.5 lb/10.2 kg) NOTE •• Model numbers can be...

Owners Manual
Page 11
.... See Venting the Dryer. ••A grounded electrical outlet located within 2 ft. (61 cm) of either side of an automatic cycle. Detailed instructions concerning electrical connections, gas connections, and exhaust requirements are required when installing the dryer. The installation requires: ••A location that limit, or do not permit, installation of the dryer in an area where it will need 18 inches (45.7 cm) from the garage floor to support the total dryer weight...
.... See Venting the Dryer. ••A grounded electrical outlet located within 2 ft. (61 cm) of either side of an automatic cycle. Detailed instructions concerning electrical connections, gas connections, and exhaust requirements are required when installing the dryer. The installation requires: ••A location that limit, or do not permit, installation of the dryer in an area where it will need 18 inches (45.7 cm) from the garage floor to support the total dryer weight...

Owners Manual
Page 18
... cover plate to change the dryer vent location. 1 Remove the rear exhaust duct retaining screw. Cover Plate Elbow 1½" (38 mm) Option 2: Bottom Venting 2 Press the adapter duct onto the blower housing and secure it onto the adapter duct. Adapter Duct Bracket 3 Insert the 4-inch (10.2 cm) elbow through the side opening and press it to connect the remaining ductwork. Bracket Knockout Cover Plate Elbow An adapter kit, part number...
... cover plate to change the dryer vent location. 1 Remove the rear exhaust duct retaining screw. Cover Plate Elbow 1½" (38 mm) Option 2: Bottom Venting 2 Press the adapter duct onto the blower housing and secure it onto the adapter duct. Adapter Duct Bracket 3 Insert the 4-inch (10.2 cm) elbow through the side opening and press it to connect the remaining ductwork. Bracket Knockout Cover Plate Elbow An adapter kit, part number...

Owners Manual
Page 23
... or remove the grounding prong from the gas supply system by a qualified technician and the change should be used for Gas Models Only ••Do not, under local codes and ordinances and when acceptable to your dryer. Larger tubing should be plugged directly into a 120-VAC, 60-Hz. Connecting the Gas Supply ••Installation and service must be performed by a 15-ampere fuse or circuit breaker...
... or remove the grounding prong from the gas supply system by a qualified technician and the change should be used for Gas Models Only ••Do not, under local codes and ordinances and when acceptable to your dryer. Larger tubing should be plugged directly into a 120-VAC, 60-Hz. Connecting the Gas Supply ••Installation and service must be performed by a 15-ampere fuse or circuit breaker...

Owners Manual
Page 25
... conductor must be connected to be run with the dryer. ELECTRICAL SERVICE FOR THE DRYER SHOULD BE OF THE MAXIMUM RATE VOLTAGE LISTED ON THE NAMEPLATE. Allow sufficient slack in wiring so the dryer can be installed by a qualified electrician. ••Connect the power cord to the same color screw in length, use UL-listed No.-8 AWG wire (copper wire only), or as required by local codes. Connecting Electric Dryers WARNING To reduce...
... conductor must be connected to be run with the dryer. ELECTRICAL SERVICE FOR THE DRYER SHOULD BE OF THE MAXIMUM RATE VOLTAGE LISTED ON THE NAMEPLATE. Allow sufficient slack in wiring so the dryer can be installed by a qualified electrician. ••Connect the power cord to the same color screw in length, use UL-listed No.-8 AWG wire (copper wire only), or as required by local codes. Connecting Electric Dryers WARNING To reduce...
Owners Manual
Page 32
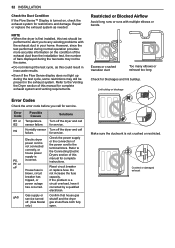
... manual for service. Lint buildup or blockage Error Codes Check the error code before you to the terminal block. Confirm that house gas shutoff and the dryer gas shutoff are both fully open. Make sure the ductwork is a circuit overload, have it corrected by a qualified electrician. Excess or crushed transition duct Too many elbows or exhaust too long Check for service. Humidity sensor failure. Reset circuit breaker or replace fuse. Do not increase the fuse capacity. If the problem...
... manual for service. Lint buildup or blockage Error Codes Check the error code before you to the terminal block. Confirm that house gas shutoff and the dryer gas shutoff are both fully open. Make sure the ductwork is a circuit overload, have it corrected by a qualified electrician. Excess or crushed transition duct Too many elbows or exhaust too long Check for service. Humidity sensor failure. Reset circuit breaker or replace fuse. Do not increase the fuse capacity. If the problem...
Owners Manual
Page 36
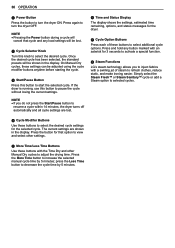
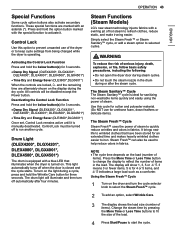
... the Power button during a cycle will cancel that option to view and select other Manual Dry cycles to turn the dryer ON. Press again to adjust the drying time. c Start/Pause Button Press this knob to activate a special function. If the dryer is running, use this button to selected cycles. Simply select the Steam Fresh™ or Steam Sanitary™ cycle or add a Steam option to pause the cycle without losing the current settings...
... the Power button during a cycle will cancel that option to view and select other Manual Dry cycles to turn the dryer ON. Press again to adjust the drying time. c Start/Pause Button Press this knob to activate a special function. If the dryer is running, use this button to selected cycles. Simply select the Steam Fresh™ or Steam Sanitary™ cycle or add a Steam option to pause the cycle without losing the current settings...
Owners Manual
Page 43
... quickly and easily using the power of the load. 4 Press Start/Pause to fit the size of steam. Change the steam time by pressing the More Time or Less Time buttons to start the cycle. Control Lock Use this cycle for 3 seconds. ••Damp Dry Signal (DLEX4200*, DLGX4201*, DLEX4000*, DLGX4001*, DLEX4500*, DLGX4501*) ••Time Dry and Energy Saver (DLE3600*,DLG3601*) Once set, Control Lock remains active until it . Activating the Control Lock Function Press and...
... quickly and easily using the power of the load. 4 Press Start/Pause to fit the size of steam. Change the steam time by pressing the More Time or Less Time buttons to start the cycle. Control Lock Use this cycle for 3 seconds. ••Damp Dry Signal (DLEX4200*, DLGX4201*, DLEX4000*, DLGX4001*, DLEX4500*, DLGX4501*) ••Time Dry and Energy Saver (DLE3600*,DLG3601*) Once set, Control Lock remains active until it . Activating the Control Lock Function Press and...

Owners Manual
Page 44
... steam cycles. NOTE ••When Sensor Dry is operating, the drum will change the steam time ONLY. ••Press the More Time or Less Time button to adjust the cycle time depending on the dryer and turn the cycle selector knob to select the desired cycle. 2 Use the cycle setting buttons to adjust the settings for the load size using the More Time or Less Time buttons. 4 Press Start/Pause to a Standard Cycle 1 Turn on the size of similar size and fabric type...
... steam cycles. NOTE ••When Sensor Dry is operating, the drum will change the steam time ONLY. ••Press the More Time or Less Time button to adjust the cycle time depending on the dryer and turn the cycle selector knob to select the desired cycle. 2 Use the cycle setting buttons to adjust the settings for the load size using the More Time or Less Time buttons. 4 Press Start/Pause to a Standard Cycle 1 Turn on the size of similar size and fabric type...
Owners Manual
Page 51
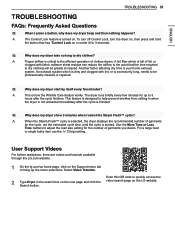
... exhaust system which is excessively long, needs to dry clothing will be professionally cleaned or repaired. For a large load or single bulky item use the (big) setting. A: Proper airflow is how the Wrinkle Care feature works. Use the More Time or Less Time buttons to the efficient operation of garments you desire. A: The Control Lock feature is your home exhaust system. Q: Why does my dryer take so long to 3 hours after the cycle is started. User Support...
... exhaust system which is excessively long, needs to dry clothing will be professionally cleaned or repaired. For a large load or single bulky item use the (big) setting. A: Proper airflow is how the Wrinkle Care feature works. Use the More Time or Less Time buttons to the efficient operation of garments you desire. A: The Control Lock feature is your home exhaust system. Q: Why does my dryer take so long to 3 hours after the cycle is started. User Support...
Owners Manual
Page 52
... shows error code nP Electric dryer power cord is not connected correctly, or house power supply is blown, circuit breaker has tripped, or power outage has occurred. Display shows error Gas supply or service turned code gAS off . House fuse is incorrect. Do not increase fuse capacity. Make sure that the house gas shutoff and the dryer gas shutoff valves are working normally. ••If using the Normal cycle, deselect the ENERGY SAVER option. Power cord is reset. ENERGY SAVER option...
... shows error code nP Electric dryer power cord is not connected correctly, or house power supply is blown, circuit breaker has tripped, or power outage has occurred. Display shows error Gas supply or service turned code gAS off . House fuse is incorrect. Do not increase fuse capacity. Make sure that the house gas shutoff and the dryer gas shutoff valves are working normally. ••If using the Normal cycle, deselect the ENERGY SAVER option. Power cord is reset. ENERGY SAVER option...

Owners Manual
Page 53
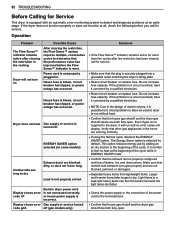
... fuse capacity. TROUBLESHOOTING 53 ENGLISH Problem Clothes take too long to the load. ••If using SENSOR DRY cycles, the electronic control cannot properly sense the dryness of the load and may shut off too soon. With some extra wet clothes to dry Drying time is underloaded. Some loads may be cleaned. Even an unbalanced load in the washer can cause poor spinning, resulting in wetter clothes which will vary depending on some models) Heat settings, load size...
... fuse capacity. TROUBLESHOOTING 53 ENGLISH Problem Clothes take too long to the load. ••If using SENSOR DRY cycles, the electronic control cannot properly sense the dryness of the load and may shut off too soon. With some extra wet clothes to dry Drying time is underloaded. Some loads may be cleaned. Even an unbalanced load in the washer can cause poor spinning, resulting in wetter clothes which will vary depending on some models) Heat settings, load size...

Owners Manual
Page 54
... a light to see if it is overloaded. Adjust settings and use a shorter drying time, or use SENSOR DRY cycles. ••Divide extra large loads into smaller loads for your washer and detergent. Clean and dirty clothes are not being dried together. Garment care instructions are being followed. With the lint removed, hold the filter up to 3 hours to help prevent wrinkling. ••To avoid shrinking your dryer to the clean clothes in...
... a light to see if it is overloaded. Adjust settings and use a shorter drying time, or use SENSOR DRY cycles. ••Divide extra large loads into smaller loads for your washer and detergent. Clean and dirty clothes are not being dried together. Garment care instructions are being followed. With the lint removed, hold the filter up to 3 hours to help prevent wrinkling. ••To avoid shrinking your dryer to the clean clothes in...

Owners Manual
Page 58
... home use, during the warranty period set forth below, LG will be responsible for any water leakage where the unit was not properly installed. ••Damage or failure caused by incorrect electrical current, voltage, or plumbing codes, commercial or industrial use, or use of accessories, components, or consumable cleaning products that vary from natural gas or LP gas. Proof of Warranty Parts and Labor Dryer drum HOW SERVICE...
... home use, during the warranty period set forth below, LG will be responsible for any water leakage where the unit was not properly installed. ••Damage or failure caused by incorrect electrical current, voltage, or plumbing codes, commercial or industrial use, or use of accessories, components, or consumable cleaning products that vary from natural gas or LP gas. Proof of Warranty Parts and Labor Dryer drum HOW SERVICE...

Owners Manual
Page 59
commercial use (e.g. Not heating, long dry time Clean the hood and duct. Excessive duct length and/or multiple elbows Not heating, long dry time Improperly connected power cord or electrical outlet issue. ENGLISH WARRANTY 59 ••Products with original serial numbers that have been removed, altered, or cannot be required. No Power Not Heating Gas valve is clogged. Open the gas valve. The cost of repair or replacement under these excluded circumstances shall be found in the owner's manual. Improper repair includes use of the product...
commercial use (e.g. Not heating, long dry time Clean the hood and duct. Excessive duct length and/or multiple elbows Not heating, long dry time Improperly connected power cord or electrical outlet issue. ENGLISH WARRANTY 59 ••Products with original serial numbers that have been removed, altered, or cannot be required. No Power Not Heating Gas valve is clogged. Open the gas valve. The cost of repair or replacement under these excluded circumstances shall be found in the owner's manual. Improper repair includes use of the product...


