
Owners Manual
Page 2
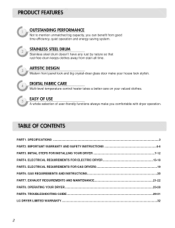
... from stain all time. IMPORTANT WARRANTY AND SAFETY INSTRUCTIONS 4-6 PART3. EXHAUST REQUIREMENTS AND MAINTENANCE 21-22 PART8. OPERATING YOUR DRYER ... 23-28 PART9. TROUBLESHOOTING GUIDE ... 29-31 LG DRYER LIMITED WARRANTY ... 32 2 SPECIFICATIONS ... 3 PART2. ELECTRICAL REQUIREMENTS FOR GAS DRYERS 19 PART6. STAINLESSSTEELDRUM Stainless steel drum doesn't have any rust by nature so that rust-free drum keeps clothes away from good time efficiency, quiet operation and energy saving system. EASY OF USE A whole selection of user-friendly functions...
... from stain all time. IMPORTANT WARRANTY AND SAFETY INSTRUCTIONS 4-6 PART3. EXHAUST REQUIREMENTS AND MAINTENANCE 21-22 PART8. OPERATING YOUR DRYER ... 23-28 PART9. TROUBLESHOOTING GUIDE ... 29-31 LG DRYER LIMITED WARRANTY ... 32 2 SPECIFICATIONS ... 3 PART2. ELECTRICAL REQUIREMENTS FOR GAS DRYERS 19 PART6. STAINLESSSTEELDRUM Stainless steel drum doesn't have any rust by nature so that rust-free drum keeps clothes away from good time efficiency, quiet operation and energy saving system. EASY OF USE A whole selection of user-friendly functions...
Owners Manual
Page 3
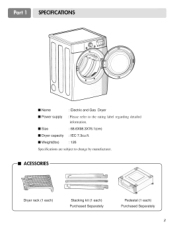
• Name : Electric and Gas Dryer • Power supply : Please refer to the rating label regarding detailed information. • Size • Dryer capacity : 68.6X98.3X76.1 (cm) : IEC 7.3cu.ft. • Weight(Ibs) : 126 Specifications are subject to change by manufacturer. --II ACESSORIES Dryer rack (1 each) Stacking kit (1 each) Purchased Separately Pedestal (1 each) Purchased Separately 3
• Name : Electric and Gas Dryer • Power supply : Please refer to the rating label regarding detailed information. • Size • Dryer capacity : 68.6X98.3X76.1 (cm) : IEC 7.3cu.ft. • Weight(Ibs) : 126 Specifications are subject to change by manufacturer. --II ACESSORIES Dryer rack (1 each) Stacking kit (1 each) Purchased Separately Pedestal (1 each) Purchased Separately 3
Owners Manual
Page 4
... in this manual. You will repair or replace any of its mechanical or electrical parts if they are located on the Model and Serial Number Plate located on the front of this manual, LG will need the complete model and serial numbers when requesting information. Use the space below to record the model number and serial number of fire or explosion, electric shock, or to obtain warranty service. WARNINGS For your new LG dryer. Model No. Date...
... in this manual. You will repair or replace any of its mechanical or electrical parts if they are located on the Model and Serial Number Plate located on the front of this manual, LG will need the complete model and serial numbers when requesting information. Use the space below to record the model number and serial number of fire or explosion, electric shock, or to obtain warranty service. WARNINGS For your new LG dryer. Model No. Date...
Owners Manual
Page 5
... load. 11) Keep area around the exhaust opening and adjacent surrounding areas fiee fiom the accumulation of lint, dust, and dirt. 12) The interior of the appliance and exhaust duct should be exposed to the weather. 7) Do not tamper with controls. 8) Do not repair or replace any part of the appliance or attempt any servicing unless specifically recommended in the user-maintenance instructions. 9) Do not use...
... load. 11) Keep area around the exhaust opening and adjacent surrounding areas fiee fiom the accumulation of lint, dust, and dirt. 12) The interior of the appliance and exhaust duct should be exposed to the weather. 7) Do not tamper with controls. 8) Do not repair or replace any part of the appliance or attempt any servicing unless specifically recommended in the user-maintenance instructions. 9) Do not use...
Owners Manual
Page 9
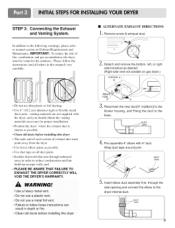
... Maintenance. Insert elbow duct assembly first, through unheated areas in (28cm)] to the blower housing, and Fixing the duct to manual section on gas dryer.) f PORTION A i "_ ® hol_) \ (# J 3, Reconnect the new duct[11 in order to the outdoors. STEP 3: Connecting the Exhaust and Venting System. Remove screw & exhaust duct. '3 /_,, Detach and remove the bottom, left, or right side knockout as possible • Clean old ducts beJbre installing this dryer • ALTERNATE EXHAUST DIRECTIONS...
... Maintenance. Insert elbow duct assembly first, through unheated areas in (28cm)] to the blower housing, and Fixing the duct to manual section on gas dryer.) f PORTION A i "_ ® hol_) \ (# J 3, Reconnect the new duct[11 in order to the outdoors. STEP 3: Connecting the Exhaust and Venting System. Remove screw & exhaust duct. '3 /_,, Detach and remove the bottom, left, or right side knockout as possible • Clean old ducts beJbre installing this dryer • ALTERNATE EXHAUST DIRECTIONS...
Owners Manual
Page 10
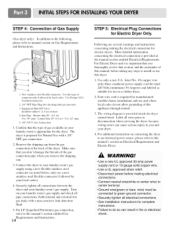
... manual's section entitled Gas Requirements and Instructions. 10 STEP 5: Electrical Plug Connections for Electric Dryer Only• Following are several warnings and instructions concerning making electrical connections. • Connect neutral wire(wh ite or center wire) to center terminal. • Ground wire(green or bare wire) must be connected to green ground connector. • Securely tighten all wires prior to install or use in fire or electrical shock. Equipment Shut-Off ValveInstalled within 6' ( 1.8 m) of Gas Supply (Gas dryer...
... manual's section entitled Gas Requirements and Instructions. 10 STEP 5: Electrical Plug Connections for Electric Dryer Only• Following are several warnings and instructions concerning making electrical connections. • Connect neutral wire(wh ite or center wire) to center terminal. • Ground wire(green or bare wire) must be connected to green ground connector. • Securely tighten all wires prior to install or use in fire or electrical shock. Equipment Shut-Off ValveInstalled within 6' ( 1.8 m) of Gas Supply (Gas dryer...
Owners Manual
Page 11
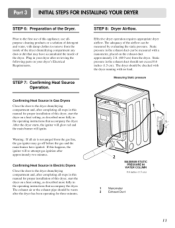
... 2 Exhaust Duct II Confirming Heat Source in Gas Dryers Close the door to the dryer drum/drying compartment and, after reviewing the following parts on the exhaust duct approximately 2 ft. (60.9 cm) from the dryer. Static pressure in the operating instructions that accompany the dryer. If this dryer, start the dryer on a heat setting, as described more fully in the exhaust duct should be measured with a manometer, placed on your dryer after completing all air is...
... 2 Exhaust Duct II Confirming Heat Source in Gas Dryers Close the door to the dryer drum/drying compartment and, after reviewing the following parts on the exhaust duct approximately 2 ft. (60.9 cm) from the dryer. Static pressure in the operating instructions that accompany the dryer. If this dryer, start the dryer on a heat setting, as described more fully in the exhaust duct should be measured with a manometer, placed on your dryer after completing all air is...
Owners Manual
Page 12
... to installations of the dryer in a manufactured or mobile home. The opening for outside fresh air must be a 4-wire connection. Any installation in a manufactured or mobile home must be made of a material that will comply with any other duct, vent, chimney, or other exhaust duct. 8) Make sure the dryer has adequate access to outside using the right side panel because of the burner housing. 6) The dryer exhaust duct must...
... to installations of the dryer in a manufactured or mobile home. The opening for outside fresh air must be a 4-wire connection. Any installation in a manufactured or mobile home must be made of a material that will comply with any other duct, vent, chimney, or other exhaust duct. 8) Make sure the dryer has adequate access to outside using the right side panel because of the burner housing. 6) The dryer exhaust duct must...
Owners Manual
Page 13
... A.W.G. ELECTRICAL SERVICE FOR THE DRYER SHOULD BE OF MAXIMUM RATE VOLTAGE LISTED ON THE NAMEPLATE. Allow sufficient slack in wiring so dryer can cause serious injury to local code and ordinance requirements. Refer to examples on the c) The dryer has its normal location when necessary. d) If branch circuit to operate the dryer. 120V/240M 60 Hertz, 3-Wire Installation Instructions for electric dryers. e) The power cord (pigtail) connection between wall receptacle and dryer terminal block IS...
... A.W.G. ELECTRICAL SERVICE FOR THE DRYER SHOULD BE OF MAXIMUM RATE VOLTAGE LISTED ON THE NAMEPLATE. Allow sufficient slack in wiring so dryer can cause serious injury to local code and ordinance requirements. Refer to examples on the c) The dryer has its normal location when necessary. d) If branch circuit to operate the dryer. 120V/240M 60 Hertz, 3-Wire Installation Instructions for electric dryers. e) The power cord (pigtail) connection between wall receptacle and dryer terminal block IS...
Owners Manual
Page 17
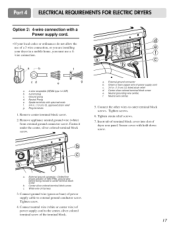
... or bare copper wire of dryer rear panel. Tighten screws. 6. a. Center silver-colored terminal block screw c. Ground prong d. Ring terminals 1. Center silver-colored terminal block screw e. Neutral wire (white) 5. Tighten screw. 4. a. Insert tab of terminal block cover into slot of power supply cord c. 3/4 in. (!. 9 cm) UL-listed strain relief d. External ground connector - Remove center terminal block screw. 2. cd e g a. 4-wire receptable (NEMA type !4-30R) b. 4-pront plug c. Secure cover with a Power supply cord. • If your local codes or ordinances...
... or bare copper wire of dryer rear panel. Tighten screws. 6. a. Center silver-colored terminal block screw c. Ground prong d. Ring terminals 1. Center silver-colored terminal block screw e. Neutral wire (white) 5. Tighten screw. 4. a. Insert tab of terminal block cover into slot of power supply cord c. 3/4 in. (!. 9 cm) UL-listed strain relief d. External ground connector - Remove center terminal block screw. 2. cd e g a. 4-wire receptable (NEMA type !4-30R) b. 4-pront plug c. Secure cover with a Power supply cord. • If your local codes or ordinances...
Owners Manual
Page 19
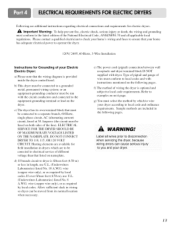
... or circuit breaker. Please contact a qualified electrician to check your home's wiring and fuses to ensure that your home has adequate electrical power to be plugged directed into a properly installed outlet that the wiring diagram is grounded in order to reduce the risk of the National Electrical Code, ANSI/NFPA 70, or the Canadian Electrical Code, CSA C22.1, and all wires prior to disconnection when servicing the dryer, because wMng errors...
... or circuit breaker. Please contact a qualified electrician to check your home's wiring and fuses to ensure that your home has adequate electrical power to be plugged directed into a properly installed outlet that the wiring diagram is grounded in order to reduce the risk of the National Electrical Code, ANSI/NFPA 70, or the Canadian Electrical Code, CSA C22.1, and all wires prior to disconnection when servicing the dryer, because wMng errors...
Owners Manual
Page 20
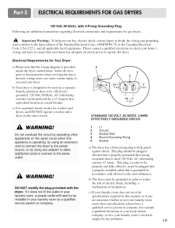
... manual shutoff valve MUST be used for lengths in LP gas. . A 1/8 in . pipe plug must comply with the latest edition of the National Fuel Cas Code, ANSI Z223.1/NFPA 54. 1. have a rigid gas supply line to your gas dryer must be 1/2 inch IPS. water column pressure. 2. Your laundry room must be used where lengths are important instructions and information concerning the requirements for the gas supply and service...
... manual shutoff valve MUST be used for lengths in LP gas. . A 1/8 in . pipe plug must comply with the latest edition of the National Fuel Cas Code, ANSI Z223.1/NFPA 54. 1. have a rigid gas supply line to your gas dryer must be 1/2 inch IPS. water column pressure. 2. Your laundry room must be used where lengths are important instructions and information concerning the requirements for the gas supply and service...

Owners Manual
Page 21
... (8.5 m) Use Only for Short Run Installations 2-1/2" (6.35 cm) 0 55 feet ( 16.8 m) 1 47 feet (14.3 m) 2 41 feet (12.5 m) 3 30 feet (9.1 m) 4 22 feet (6.7 m) NOTE : Deduct 6 feet (1.8 m) for your new dryer. 3. To maximize operating results, please observe the duct length limitations noted in diameter with no obstructions. Venting materials are important instructions and information concerning the exhaust requirements for each additional elbow. The exhaust duct should...
... (8.5 m) Use Only for Short Run Installations 2-1/2" (6.35 cm) 0 55 feet ( 16.8 m) 1 47 feet (14.3 m) 2 41 feet (12.5 m) 3 30 feet (9.1 m) 4 22 feet (6.7 m) NOTE : Deduct 6 feet (1.8 m) for your new dryer. 3. To maximize operating results, please observe the duct length limitations noted in diameter with no obstructions. Venting materials are important instructions and information concerning the exhaust requirements for each additional elbow. The exhaust duct should...
Owners Manual
Page 22
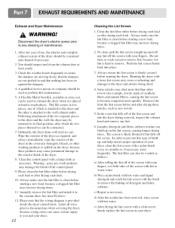
... wall exhaust outlet. Some articles may increase drying times. 11. The lint filter can build up and roll any cleaning or maintenance. 1. Exhaust and Dryer Maintenance Disconnect the dryer,s electric power prior to remove. Please clean the lint filter either before starting a new load, because a clogged lint filter may shed more quickly. Annually remove the lint filter and attach it is hard to any lint off of the control panel. 9. Remove lint from the lint screen before running the dryer. In the event lint falls...
... wall exhaust outlet. Some articles may increase drying times. 11. The lint filter can build up and roll any cleaning or maintenance. 1. Exhaust and Dryer Maintenance Disconnect the dryer,s electric power prior to remove. Please clean the lint filter either before starting a new load, because a clogged lint filter may shed more quickly. Annually remove the lint filter and attach it is hard to any lint off of the control panel. 9. Remove lint from the lint screen before running the dryer. In the event lint falls...
Owners Manual
Page 24
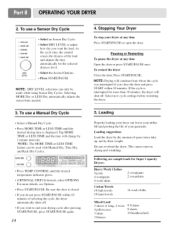
... Options. • Press START/PAUSE NOTE: DRY LEVEL selections can only be used with Manual Dry, Time Dry, and Rack Dry Cycles. Loading Properly loading your dryer can be made while using Sensor Dry Cycles. Loading suggestions Load the dryer by the amount of the load and adjusts the time automatically for Super Capacity Dryers: Heavy Work 4 jeans 4 workpants 4 work shirts Clothes Cotton!Towels 10 bath towels 10 hand towels 2 sweatpants 2 sweatshirts 14 wash cloths Mixed Load 3 sheets (1 king, 2 twin...
... Options. • Press START/PAUSE NOTE: DRY LEVEL selections can only be used with Manual Dry, Time Dry, and Rack Dry Cycles. Loading Properly loading your dryer can be made while using Sensor Dry Cycles. Loading suggestions Load the dryer by the amount of the load and adjusts the time automatically for Super Capacity Dryers: Heavy Work 4 jeans 4 workpants 4 work shirts Clothes Cotton!Towels 10 bath towels 10 hand towels 2 sweatpants 2 sweatshirts 14 wash cloths Mixed Load 3 sheets (1 king, 2 twin...
Owners Manual
Page 27
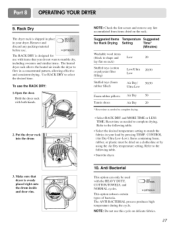
... TIME. NOTE: Check the lint screen and remove any lint accumulated from items dried on delicate fabrics. 27 The ANTI BACTERIAL process produces high temperature during the cycle. To use with items that dryer is evenly placed right onto the drum inside the dryer to the following table. Refer to flow in your load by using the Air Dry temperature setting. Put the dryer rack into the drum 3. Suggested Items Temperature for Rack Drying Setting Washable wool items (block...
... TIME. NOTE: Check the lint screen and remove any lint accumulated from items dried on delicate fabrics. 27 The ANTI BACTERIAL process produces high temperature during the cycle. To use with items that dryer is evenly placed right onto the drum inside the dryer to the following table. Refer to flow in your load by using the Air Dry temperature setting. Put the dryer rack into the drum 3. Suggested Items Temperature for Rack Drying Setting Washable wool items (block...
Owners Manual
Page 29
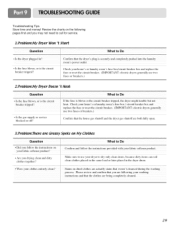
...'s fuse box / circuit breaker box and i replace the fuseo r reset the circuit breaker, (IMPORTANT: electric dryers generally I Make sure to call for service. 1.Problem:My Dryer Won "t Start • Is the dry..e..r plugged lug. Confirm that the house gas shutoff and the dryer gas shutoff are both fully open. 3.Problem:Fhere are be!ng comp!e!e!y c!e_ed 29 Check your fabric softener product '_ • Are you may not need to use two fuses or breakers.) 2.Problem:My Dryer Doesn "t Heat...
...'s fuse box / circuit breaker box and i replace the fuseo r reset the circuit breaker, (IMPORTANT: electric dryers generally I Make sure to call for service. 1.Problem:My Dryer Won "t Start • Is the dry..e..r plugged lug. Confirm that the house gas shutoff and the dryer gas shutoff are both fully open. 3.Problem:Fhere are be!ng comp!e!e!y c!e_ed 29 Check your fabric softener product '_ • Are you may not need to use two fuses or breakers.) 2.Problem:My Dryer Doesn "t Heat...
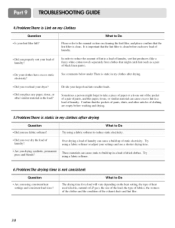
Owners Manual
Page 30
... The drying time for a load will w_ry depending on cletming the lint filter, and please confirm that the lint filter is clean before washing and drying. 5.Problem:Fhere is clean. #.Problem:Fhere is Lint on my Clothes • Is your larger load into smaller loads. See comments below under There is static in the load? Confirm that might forget to the mtmual section on the heat setting, the type of heat used (electric, natural...
... The drying time for a load will w_ry depending on cletming the lint filter, and please confirm that the lint filter is clean before washing and drying. 5.Problem:Fhere is clean. #.Problem:Fhere is Lint on my Clothes • Is your larger load into smaller loads. See comments below under There is static in the load? Confirm that might forget to the mtmual section on the heat setting, the type of heat used (electric, natural...
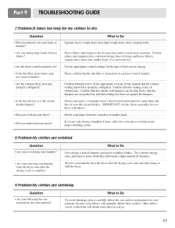
Owners Manual
Page 31
... to retain more consistent drying times for large and heavy fabrics, separate these items into a number of smaller loads, • Did you drying large loads of laundry. To avoid shrinkage, please carefully t_>llow the care and use two ff_ses or breakers.) , Did you r home s or la_ adry room's fuse box/circuit breaker box _md replace the ff_se or reset the circuit breaker. (IMPORTANT: electric dryers generally use instructions for your garment...
... to retain more consistent drying times for large and heavy fabrics, separate these items into a number of smaller loads, • Did you drying large loads of laundry. To avoid shrinkage, please carefully t_>llow the care and use two ff_ses or breakers.) , Did you r home s or la_ adry room's fuse box/circuit breaker box _md replace the ff_se or reset the circuit breaker. (IMPORTANT: electric dryers generally use instructions for your garment...
Owners Manual
Page 32
... from the Date of In-Home Service on all parts including the Drum Tub and Motor. Please have your product type (Dryer), model number, serial number, and ZIP Code; THIS WARRANTY IS IN LIEUOF ANY OTHERWARRANTIES,EXPRESSOR IMPLIED,INCLUDING WITHOUTLIMITATION, ANY WARRANTYOF MERCHANTABILITYOR FITNESSFOR A PARTICULARPURPOSE.TO THE EXTENTANY IMPLIEDWARRANTYIS REQUIREDBY LAW, IT IS LIMITEDIN DURATIONTO THEEXPRESSWARRANTYPERIODABOVE. LG WILLNOT BE LIABLEFOR ANY CONSEQUENTIAL,INDIRECT...
... from the Date of In-Home Service on all parts including the Drum Tub and Motor. Please have your product type (Dryer), model number, serial number, and ZIP Code; THIS WARRANTY IS IN LIEUOF ANY OTHERWARRANTIES,EXPRESSOR IMPLIED,INCLUDING WITHOUTLIMITATION, ANY WARRANTYOF MERCHANTABILITYOR FITNESSFOR A PARTICULARPURPOSE.TO THE EXTENTANY IMPLIEDWARRANTYIS REQUIREDBY LAW, IT IS LIMITEDIN DURATIONTO THEEXPRESSWARRANTYPERIODABOVE. LG WILLNOT BE LIABLEFOR ANY CONSEQUENTIAL,INDIRECT...


