Specification
Page 2
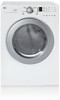
... 2008 SS-5020 LG Design and Life's Good are subject to change without heat to "set it and go". LoDecibel™ Quiet Operation Anti-vibration motor and one piece cabinet structure reduce unnecessary noises. Electronic Control Panel with Dial-A-Cycle™ Intuitive controls allow you to reduce wrinkles. Wrinkle Care Cycle Dry clothes are property of Cycle Beeper Child Lock Venting Option 4-way Venting Option (electric) 3-way Venting Option (gas) Drum Light Heater Multi-Level Control Reversible Door Remaining Time Display/Status...
... 2008 SS-5020 LG Design and Life's Good are subject to change without heat to "set it and go". LoDecibel™ Quiet Operation Anti-vibration motor and one piece cabinet structure reduce unnecessary noises. Electronic Control Panel with Dial-A-Cycle™ Intuitive controls allow you to reduce wrinkles. Wrinkle Care Cycle Dry clothes are property of Cycle Beeper Child Lock Venting Option 4-way Venting Option (electric) 3-way Venting Option (gas) Drum Light Heater Multi-Level Control Reversible Door Remaining Time Display/Status...
Owners Manual
Page 2
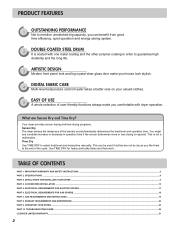
... and the long life. 3 ARTISTIC DESIGN Modern front panel look and big crystal-clear glass door make your house look stylish. 4 DIGITAL FABRIC CARE Multi-level temperature control heater takes a better care on your valued clothes. 5 EASY OF USE A whole selection of the laundry and automatically determines the heat level and operation time. Time Dry Use TIME DRY to select heat level and drying time manually. SPECIFICATIONS ...8 PART 3. This is required. IMPORTANT WARRANTY AND SAFETY INSTRUCTIONS ...3 PART 2. PRODUCT...
... and the long life. 3 ARTISTIC DESIGN Modern front panel look and big crystal-clear glass door make your house look stylish. 4 DIGITAL FABRIC CARE Multi-level temperature control heater takes a better care on your valued clothes. 5 EASY OF USE A whole selection of the laundry and automatically determines the heat level and operation time. Time Dry Use TIME DRY to select heat level and drying time manually. SPECIFICATIONS ...8 PART 3. This is required. IMPORTANT WARRANTY AND SAFETY INSTRUCTIONS ...3 PART 2. PRODUCT...

Owners Manual
Page 3
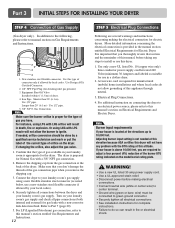
...; Installation and service must be easily crushed, and trap lint. Follow the gas supplier's instructions carefully. 5. If you to light a match or cigarette, or turn on your gas supplier from a neighbor's phone. Clear the room, building, or area of a specific type identified by a qualified installer, service agency, or the gas supplier. • Install the clothes dryer according to persons when using your building. 3. Part 1 IMPORTANT WARRANTY AND SAFETY INSTRUCTIONS READ ALL INSTRUCTIONS BEFORE USE...
...; Installation and service must be easily crushed, and trap lint. Follow the gas supplier's instructions carefully. 5. If you to light a match or cigarette, or turn on your gas supplier from a neighbor's phone. Clear the room, building, or area of a specific type identified by a qualified installer, service agency, or the gas supplier. • Install the clothes dryer according to persons when using your building. 3. Part 1 IMPORTANT WARRANTY AND SAFETY INSTRUCTIONS READ ALL INSTRUCTIONS BEFORE USE...
Owners Manual
Page 4
... the dryer where it will be properly installed as described in this Use and Care Guide or in published user-repair instructions that could ignite or explode. • Do not reach into the dryer while parts are in accordance with controls. • Before the dryer is removed from the accumulation of lint, dust, and dirt. • The interior of the dryer and exhaust vent should be cleaned periodically...
... the dryer where it will be properly installed as described in this Use and Care Guide or in published user-repair instructions that could ignite or explode. • Do not reach into the dryer while parts are in accordance with controls. • Before the dryer is removed from the accumulation of lint, dust, and dirt. • The interior of the dryer and exhaust vent should be cleaned periodically...
Owners Manual
Page 5
... factory parts. Improper power circuit can cause serious injury,fire, electrical shock or death. • Connect to a properly rated, protected, and sized power circuit to avoid electrical overload. Failure to follow this warning can melt, creating electrical shock and/or fire hazard. • Remove all governing codes and ordinances. An accumulation of lint in any old ducts before installing your safety, the information in this manual must...
... factory parts. Improper power circuit can cause serious injury,fire, electrical shock or death. • Connect to a properly rated, protected, and sized power circuit to avoid electrical overload. Failure to follow this warning can melt, creating electrical shock and/or fire hazard. • Remove all governing codes and ordinances. An accumulation of lint in any old ducts before installing your safety, the information in this manual must...
Owners Manual
Page 6
... circuit checked by pulling on the power cord. Failure to the dryer from the outlet. To prevent personal injury or damage to make a connection with duct tape. ¶U For complete details, follow these instructions can result if the dryer is recommended for your dryer by a qualified electrician to the dryer, the electrical power cord must be plugged into a properly grounded • For personal safety, this manual for specific electrical requirements...
... circuit checked by pulling on the power cord. Failure to the dryer from the outlet. To prevent personal injury or damage to make a connection with duct tape. ¶U For complete details, follow these instructions can result if the dryer is recommended for your dryer by a qualified electrician to the dryer, the electrical power cord must be plugged into a properly grounded • For personal safety, this manual for specific electrical requirements...
Owners Manual
Page 7
... Staple your dryer is installed and operated according to prevent property damage, personal injury, or death when using your nearest LG Service Center. To reduce the risk of this manual must be followed. If this product is located at the end of fire or explosion, electric shock or to the instructions in this manual, LG will need the complete model and serial number when requesting warranty service. Warranty Service is required. Model Number.
... Staple your dryer is installed and operated according to prevent property damage, personal injury, or death when using your nearest LG Service Center. To reduce the risk of this manual must be followed. If this product is located at the end of fire or explosion, electric shock or to the instructions in this manual, LG will need the complete model and serial number when requesting warranty service. Warranty Service is required. Model Number.
Owners Manual
Page 11
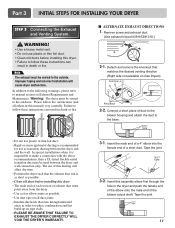
... installation will affect dry time. • Position the dryer such that runs through the hole in death or fire. ■ ALTERNATE EXHAUST DIRECTIONS 1. Remove screw and exhaust duct. (Use exhaust kit part #3911EZ9131X.) 2-1. Connect a short piece of exhaust duct must point away from the dryer. • Use as few elbow joints as transition ducting between the dryer and wall connection only. Tape the joint. 11 Warning: The dryer must be vented to follow the instructions...
... installation will affect dry time. • Position the dryer such that runs through the hole in death or fire. ■ ALTERNATE EXHAUST DIRECTIONS 1. Remove screw and exhaust duct. (Use exhaust kit part #3911EZ9131X.) 2-1. Connect a short piece of exhaust duct must point away from the dryer. • Use as few elbow joints as transition ducting between the dryer and wall connection only. Tape the joint. 11 Warning: The dryer must be vented to follow the instructions...
Owners Manual
Page 12
... local codes. Use only a new UL listed No. 10 (copper wire only) three conductor power supply cord kit rated 240 Volts (minimum) 30 Amperes and labeled as noted below, use in the manual section entitled Electrical Requirements for use a new stainless steel flexible connector if allowed by your laundry room is appropriate for checking inlet gas pressure) 3. Gas Connection. Turn on Gas Requirements and Instructions. 1 2 5 3 4 1. A four-wire cord is provided in a clothes dryer. 2. Adjusting burner input setting...
... local codes. Use only a new UL listed No. 10 (copper wire only) three conductor power supply cord kit rated 240 Volts (minimum) 30 Amperes and labeled as noted below, use in the manual section entitled Electrical Requirements for use a new stainless steel flexible connector if allowed by your laundry room is appropriate for checking inlet gas pressure) 3. Gas Connection. Turn on Gas Requirements and Instructions. 1 2 5 3 4 1. A four-wire cord is provided in a clothes dryer. 2. Adjusting burner input setting...
Owners Manual
Page 14
..., the dryer must be a 4-wire connection. More detailed information concerning the electrical connection is important that the clearance of the duct from any installation of the dryer in a manufactured or mobile home. WARNING! • DO NOT vent the exhaust duct under the manufactured or mobile home. • Failure to the outside using the back, left , or bottom panel. The opening for outside fresh air must...
..., the dryer must be a 4-wire connection. More detailed information concerning the electrical connection is important that the clearance of the duct from any installation of the dryer in a manufactured or mobile home. WARNING! • DO NOT vent the exhaust duct under the manufactured or mobile home. • Failure to the outside using the back, left , or bottom panel. The opening for outside fresh air must...

Owners Manual
Page 16
... all water, power, or gas lines and draining or venting connections before operation. Retainer 16 Locknut NOTE: If the screws are not tightened. Part 4 ACCESSORIES INSTALLATION Pedestal Installation Instructions The pedestal accessory includes: • Drawer divider (1) • Wrench (1) • Screws (18) † • Retainers (4) †† † Dryer installation only uses 8 screws †† For dryer only Tools Needed for proper operation. 3 4 Place the dryer on the pedestal. For dryer For washer/combo...
... all water, power, or gas lines and draining or venting connections before operation. Retainer 16 Locknut NOTE: If the screws are not tightened. Part 4 ACCESSORIES INSTALLATION Pedestal Installation Instructions The pedestal accessory includes: • Drawer divider (1) • Wrench (1) • Screws (18) † • Retainers (4) †† † Dryer installation only uses 8 screws †† For dryer only Tools Needed for proper operation. 3 4 Place the dryer on the pedestal. For dryer For washer/combo...

Owners Manual
Page 17
... installed by which to wire your home has adequate electrical power to the equipment-grounding terminal or lead on the following pages. Failure to do so can be run with instructions mentioned on the dryer. Type of pigtail and gauge of your Electric Dryer: a) This dryer must be connected to local code requirements. DO NOT CONNECT DRYER TO 110, 115, OR 120 VOLT CIRCUIT. wire (copper wire only), or as required...
... installed by which to wire your home has adequate electrical power to the equipment-grounding terminal or lead on the following pages. Failure to do so can be run with instructions mentioned on the dryer. Type of pigtail and gauge of your Electric Dryer: a) This dryer must be connected to local code requirements. DO NOT CONNECT DRYER TO 110, 115, OR 120 VOLT CIRCUIT. wire (copper wire only), or as required...
Owners Manual
Page 18
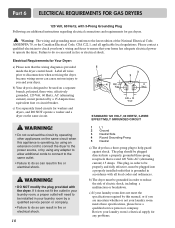
... if you and your laundry room, a proper outlet will need to operate the dryer. Part 6 ELECTRICAL REQUIREMENTS FOR GAS DRYERS 120 Volt, 60 Hertz, with 3-Prong Grounding Plug Following are uncertain whether or not your laundry room's electrical supply for washers and dryers, and DO NOT operate a washer and a dryer on a separate branch, polarized, three-wire, effectively grounded, 120 Volt, 60 Hertz, AC (alternating current) circuit protected by using any problems.
... if you and your laundry room, a proper outlet will need to operate the dryer. Part 6 ELECTRICAL REQUIREMENTS FOR GAS DRYERS 120 Volt, 60 Hertz, with 3-Prong Grounding Plug Following are uncertain whether or not your laundry room's electrical supply for washers and dryers, and DO NOT operate a washer and a dryer on a separate branch, polarized, three-wire, effectively grounded, 120 Volt, 60 Hertz, AC (alternating current) circuit protected by using any problems.
Owners Manual
Page 19
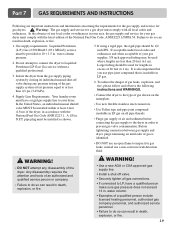
... testing of the gas supply system at 10 + 1.5 in LP gas. 6. Part 7 GAS REQUIREMENTS AND INSTRUCTIONS Following are less than 2/1 psi (3.45 kPa). 4. Gas supply requirements: Liquefied Petroleum (L.P.) Gas (2,500 Btu/ft3 (93.1 MJ/m3)) service must be installed as shown. 5. water column pressure. 2. pipe plug must have a qualified person make sure gas pressure does not exceed 13 in . Do not attempt to connect the dryer to your gas...
... testing of the gas supply system at 10 + 1.5 in LP gas. 6. Part 7 GAS REQUIREMENTS AND INSTRUCTIONS Following are less than 2/1 psi (3.45 kPa). 4. Gas supply requirements: Liquefied Petroleum (L.P.) Gas (2,500 Btu/ft3 (93.1 MJ/m3)) service must be installed as shown. 5. water column pressure. 2. pipe plug must have a qualified person make sure gas pressure does not exceed 13 in . Do not attempt to connect the dryer to your gas...
Owners Manual
Page 20
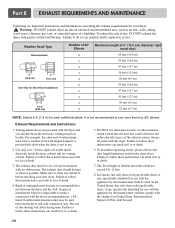
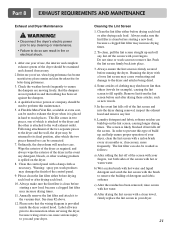
.... In Canada, that could catch lint and reduce the effi ciency of this ducting will affect drying time. Part 8 EXHAUST REQUIREMENTS AND MAINTENANCE Following are not provided with plastic or thin foil Ducting. Warning: DO NOT exhaust dryer air into the duct that only those foil-type flexible ducts, if any , specifically identified for Clothes Dryer Transition Duct, Subject 2158A, shall be used between the dryer and the wall. For example...
.... In Canada, that could catch lint and reduce the effi ciency of this ducting will affect drying time. Part 8 EXHAUST REQUIREMENTS AND MAINTENANCE Following are not provided with plastic or thin foil Ducting. Warning: DO NOT exhaust dryer air into the duct that only those foil-type flexible ducts, if any , specifically identified for Clothes Dryer Transition Duct, Subject 2158A, shall be used between the dryer and the wall. For example...
Owners Manual
Page 21
... Kit comes in and that the wiring diagram is spilled on the lint screen, causing longer drying times. Remove lint from the lint screen before drying each load or after drying each load. b) Wet a nylon brush with hot water and liquid detergent and scrub the lint screen with hot water. After one year of use , when drying performance has become unsatisfactory, please examine and clean the exhaust duct for example), causing the lint screen to fill rapidly. Please clean the lint filter...
... Kit comes in and that the wiring diagram is spilled on the lint screen, causing longer drying times. Remove lint from the lint screen before drying each load or after drying each load. b) Wet a nylon brush with hot water and liquid detergent and scrub the lint screen with hot water. After one year of use , when drying performance has become unsatisfactory, please examine and clean the exhaust duct for example), causing the lint screen to fill rapidly. Please clean the lint filter...
Owners Manual
Page 24
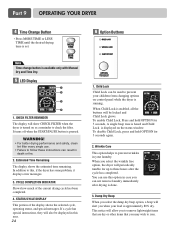
... drying cycle has been completed. 4. To disable Child Lock, press and hold OPTION for up to check the filter. Damp Dry Beep When you may wish to prevent your children from changing options on control panel while the dryer is turned on the status window. It turns off when the START/PAUSE button is approximately 80% dry. Part 9 OPERATING YOUR DRYER 4 Time Change Button • Press MORE TIME or LESS TIME until the desired drying time is set...
... drying cycle has been completed. 4. To disable Child Lock, press and hold OPTION for up to check the filter. Damp Dry Beep When you may wish to prevent your children from changing options on control panel while the dryer is turned on the status window. It turns off when the START/PAUSE button is approximately 80% dry. Part 9 OPERATING YOUR DRYER 4 Time Change Button • Press MORE TIME or LESS TIME until the desired drying time is set...
Owners Manual
Page 28
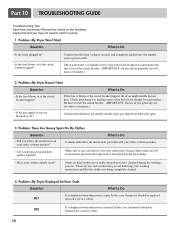
.../circuit breaker box and replace the fuse or reset the circuit breaker. (IMPORTANT: electric dryers generally use two fuses or breakers.) • Is the gas supply or service blocked or off? Confirm that the clothes are both fully open . Question What to Do • Is the dryer plugged in the dryer drum. • Were your clothes entirely clean? Please review and confirm that you are actually stains that the dryer's plug is open . 3. Problem: My Dryer Displayed An Error Code. Problem: My Dryer Doesn't Heat...
.../circuit breaker box and replace the fuse or reset the circuit breaker. (IMPORTANT: electric dryers generally use two fuses or breakers.) • Is the gas supply or service blocked or off? Confirm that the clothes are both fully open . Question What to Do • Is the dryer plugged in the dryer drum. • Were your clothes entirely clean? Please review and confirm that you are actually stains that the dryer's plug is open . 3. Problem: My Dryer Displayed An Error Code. Problem: My Dryer Doesn't Heat...
Owners Manual
Page 29
... Lint On My Clothes Question What to Do • Is water found around cabinet cover when opening the door? It is important that might forget to the manual section on the heat setting, the type of heat used (electric, natural or LP gas), the size of the load, the type of fabrics, the wetness of the clothes and the condition of laundry? The drying time for a load will vary depending on cleaning the lint filter...
... Lint On My Clothes Question What to Do • Is water found around cabinet cover when opening the door? It is important that might forget to the manual section on the heat setting, the type of heat used (electric, natural or LP gas), the size of the load, the type of fabrics, the wetness of the clothes and the condition of laundry? The drying time for a load will vary depending on cleaning the lint filter...
Owners Manual
Page 30
... laundry room's fuse box/circuit breaker box and replace the fuse or reset the circuit breaker. (IMPORTANT: electric dryers generally use instructions for your dryer? Other fabrics can lead to Do • Are you overload your garment, because some fabrics will shrink when dried in , and that the lint filter is complete? Problem: My clothes are drying. • Is the lint filter clean before each new load of heavy fabrics? Use the appropriate control settings for large...
... laundry room's fuse box/circuit breaker box and replace the fuse or reset the circuit breaker. (IMPORTANT: electric dryers generally use instructions for your dryer? Other fabrics can lead to Do • Are you overload your garment, because some fabrics will shrink when dried in , and that the lint filter is complete? Problem: My clothes are drying. • Is the lint filter clean before each new load of heavy fabrics? Use the appropriate control settings for large...


