Owner's Manual
Page 2
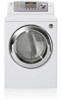
IMPORTANT SAFETY INSTRUCTIONS What to the LG family. Product Registration Information Model: Serial Number: Date of reliable service. By following the operating and care instructions in this manual, your dryer 9 Choose the Proper Location 9 Clearances 9 Installation With Optional Pedestal Base or Stacking Kit 10 Leveling...Kit Installation 36, 37 WARRANTY 38, 39 THANK YOU! Congratulations on the rating plate inside the front door. 2 Your new LG Dryer combines the most advanced drying sensor technology with many years of Purchase: The model and serial number can be located on ...
IMPORTANT SAFETY INSTRUCTIONS What to the LG family. Product Registration Information Model: Serial Number: Date of reliable service. By following the operating and care instructions in this manual, your dryer 9 Choose the Proper Location 9 Clearances 9 Installation With Optional Pedestal Base or Stacking Kit 10 Leveling...Kit Installation 36, 37 WARRANTY 38, 39 THANK YOU! Congratulations on the rating plate inside the front door. 2 Your new LG Dryer combines the most advanced drying sensor technology with many years of Purchase: The model and serial number can be located on ...
Owner's Manual
Page 3
...dryer with clothes dryers. Do not use with flexible plastic venting materials. READ ALL INSTRUCTIONS BEFORE USE wWARNING For your safety, the information in this manual must be killed or seriously injured if you don't immediately follow instructions. Clear the room, building, or area of this... manual and on any other flammable vapors and liquids in the vicinity of all safety messages. If you cannot reach your building. 3. We have provided ...
...dryer with clothes dryers. Do not use with flexible plastic venting materials. READ ALL INSTRUCTIONS BEFORE USE wWARNING For your safety, the information in this manual must be killed or seriously injured if you don't immediately follow instructions. Clear the room, building, or area of this... manual and on any other flammable vapors and liquids in the vicinity of all safety messages. If you cannot reach your building. 3. We have provided ...
Owner's Manual
Page 4
...8226; Before use, the dryer must be minimized further by the incomplete combustion of fire, electric shock, or injury to persons when using this manual. • Do not place items exposed to cause cancer, birth defects, or other flammable or explosive substances as described in this appliance, follow...; Before the dryer is removed from service or discarded, remove the door to play on or in your safety, the information in this manual must be exposed to the weather. • Always check the inside of potential exposure to such substances. Properly adjusted dryers will be properly...
...8226; Before use, the dryer must be minimized further by the incomplete combustion of fire, electric shock, or injury to persons when using this manual. • Do not place items exposed to cause cancer, birth defects, or other flammable or explosive substances as described in this appliance, follow...; Before the dryer is removed from service or discarded, remove the door to play on or in your safety, the information in this manual must be exposed to the weather. • Always check the inside of potential exposure to such substances. Properly adjusted dryers will be properly...
Owner's Manual
Page 5
... a grounding plug. above the floor for electric current. READ ALL INSTRUCTIONS BEFORE USE wWARNING For your safety, the information in this manual must be properly installed as described in this manual. Improper connection of least resistance for a garage installation. Electrical shock can be run with all local codes and ordinances. GROUNDING INSTRUCTIONS...
... a grounding plug. above the floor for electric current. READ ALL INSTRUCTIONS BEFORE USE wWARNING For your safety, the information in this manual must be properly installed as described in this manual. Improper connection of least resistance for a garage installation. Electrical shock can be run with all local codes and ordinances. GROUNDING INSTRUCTIONS...
Owner's Manual
Page 6
... the outside. diameter ductwork inside the dryer cabinet or for use of plastic or other fasteners which extend into the laundry area. Use of this manual must be used between the dryer and the wall. Punctured ductwork can cause a fire if it is impossible to follow these instructions can create a health...
... the outside. diameter ductwork inside the dryer cabinet or for use of plastic or other fasteners which extend into the laundry area. Use of this manual must be used between the dryer and the wall. Punctured ductwork can cause a fire if it is impossible to follow these instructions can create a health...

Owner's Manual
Page 7
... individual electrical outlet which could cause a fire hazard from the power cord. READ ALL INSTRUCTIONS BEFORE USE wWARNING For your safety, the information in this manual must be plugged into its length or at either end. Failure to persons when using this...
... individual electrical outlet which could cause a fire hazard from the power cord. READ ALL INSTRUCTIONS BEFORE USE wWARNING For your safety, the information in this manual must be plugged into its length or at either end. Failure to persons when using this...

Owner's Manual
Page 9
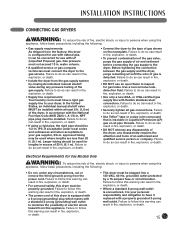
... ordinances. • To reduce the risk of electric shock, do not install the dryer in damp or wet locations. • If you review this entire manual before installing and operating your dryer! Detailed instructions concerning electrical connections, gas connections, and exhaust requirements are installing your dryer in a manufactured or mobile home...
... ordinances. • To reduce the risk of electric shock, do not install the dryer in damp or wet locations. • If you review this entire manual before installing and operating your dryer! Detailed instructions concerning electrical connections, gas connections, and exhaust requirements are installing your dryer in a manufactured or mobile home...
Owner's Manual
Page 10
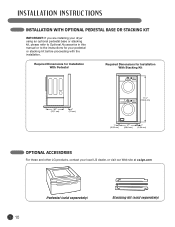
Required Dimensions for Installation With Pedestal Required Dimensions for your local LG dealer, or visit our Web site at ca.lge.com Pedestal (sold separately) Stacking Kit (sold separately) 10 INSTALLATION WITH OPTIONAL PEDESTAL BASE OR STACKING KIT IMPORTANT: If you are installing your dryer using an optional pedestal base or stacking kit, please refer to Optional Accessories in this manual or to the instructions for Installation With Stacking Kit OPTIONAL ACCESSORIES For these and other LG products, contact your pedestal or stacking kit before proceeding with the installation.
Required Dimensions for Installation With Pedestal Required Dimensions for your local LG dealer, or visit our Web site at ca.lge.com Pedestal (sold separately) Stacking Kit (sold separately) 10 INSTALLATION WITH OPTIONAL PEDESTAL BASE OR STACKING KIT IMPORTANT: If you are installing your dryer using an optional pedestal base or stacking kit, please refer to Optional Accessories in this manual or to the instructions for Installation With Stacking Kit OPTIONAL ACCESSORIES For these and other LG products, contact your pedestal or stacking kit before proceeding with the installation.
Owner's Manual
Page 15
...Where a standard 2-prong wall outlet is encountered, it replaced with the National Fuel Gas Code ANSI Z223.1. In the United States, an individual manual shutoff valve MUST be properly grounded. Failure to do so can result in Liquefied Petroleum (LP) gas on the nameplate. Failure to do so... the gas supply of air and sediment before connecting the gas supply to the dryer. grounded outlet protected by closing its individual manual shutoff valve during any disassembly requires the attention and tools of an authorized and qualified service person or company. Failure to do so...
...Where a standard 2-prong wall outlet is encountered, it replaced with the National Fuel Gas Code ANSI Z223.1. In the United States, an individual manual shutoff valve MUST be properly grounded. Failure to do so can result in Liquefied Petroleum (LP) gas on the nameplate. Failure to do so... the gas supply of air and sediment before connecting the gas supply to the dryer. grounded outlet protected by closing its individual manual shutoff valve during any disassembly requires the attention and tools of an authorized and qualified service person or company. Failure to do so...
Owner's Manual
Page 18
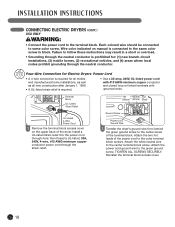
... relief. Terminal Block UL-Listed Strain Relief Hot Neutral Hot (Black) (White) (Red) UL-Listed 4-Wire Power Cord 1 Remove the terminal block access cover on manual is required. • Use a 30-amp, 240V, UL-listed power cord with #10 AWG-minimum copper conductor and closed loop or forked terminals with upturned...
... relief. Terminal Block UL-Listed Strain Relief Hot Neutral Hot (Black) (White) (Red) UL-Listed 4-Wire Power Cord 1 Remove the terminal block access cover on manual is required. • Use a 30-amp, 240V, UL-listed power cord with #10 AWG-minimum copper conductor and closed loop or forked terminals with upturned...
Owner's Manual
Page 19
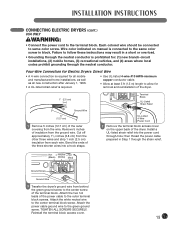
... screws. Remove 5 inches of the terminal block. Terminal Block UL-Listed Strain Relief UL-Listed 4-Wire Power Cord 2 Remove the terminal block access cover on manual is required. • Use UL-listed 4-wire #10 AWG-minimum copper conductor cable. • Allow at least 5 ft (1.5 m) length to the center screw of insulation...
... screws. Remove 5 inches of the terminal block. Terminal Block UL-Listed Strain Relief UL-Listed 4-Wire Power Cord 2 Remove the terminal block access cover on manual is required. • Use UL-listed 4-wire #10 AWG-minimum copper conductor cable. • Allow at least 5 ft (1.5 m) length to the center screw of insulation...
Owner's Manual
Page 20
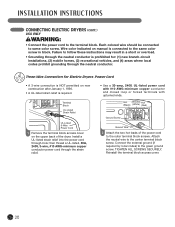
... forked terminals with upturned ends. Attach the neutral wire to the green ground screw. Reinstall the terminal block access cover. 20 Wire color indicated on manual is prohibited for Electric Dryers: Power Cord • A 3-wire connection is NOT permitted on the upper back of the power cord to the same color...
... forked terminals with upturned ends. Attach the neutral wire to the green ground screw. Reinstall the terminal block access cover. 20 Wire color indicated on manual is prohibited for Electric Dryers: Power Cord • A 3-wire connection is NOT permitted on the upper back of the power cord to the same color...
Owner's Manual
Page 21
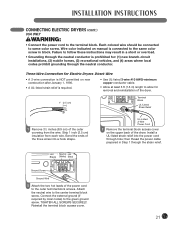
... codes prohibit grounding through the neutral conductor is connected to the terminal block. UL-Listed 3-Wire Power Cord 2 Remove the terminal block access cover on manual is prohibited for removal and reinstallation of the dryer. 1" (2.5 cm) Terminal Block UL-Listed Strain Relief 1 Remove 31⁄2 inches (8.9 cm) of the dryer. Install...
... codes prohibit grounding through the neutral conductor is connected to the terminal block. UL-Listed 3-Wire Power Cord 2 Remove the terminal block access cover on manual is prohibited for removal and reinstallation of the dryer. 1" (2.5 cm) Terminal Block UL-Listed Strain Relief 1 Remove 31⁄2 inches (8.9 cm) of the dryer. Install...
Owner's Manual
Page 23
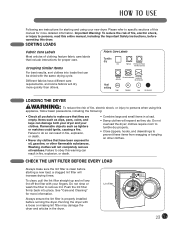
...• Check all pockets to obey this dryer. Do not overload the dryer; SORTING LOADS Fabric Care Labels Most articles of this manual for more information. CHECK THE LINT FILTER BEFORE EVERY LOAD Always make sure that include instructions for proper care. Following are empty. ...Important Warning: To reduce the risk of fire, electric shock, or injury to persons, read this entire manual, including the Important Safety Instructions, before operating this warning can damage both your dryer and your new dryer. Different fabrics have been...
...• Check all pockets to obey this dryer. Do not overload the dryer; SORTING LOADS Fabric Care Labels Most articles of this manual for more information. CHECK THE LINT FILTER BEFORE EVERY LOAD Always make sure that include instructions for proper care. Following are empty. ...Important Warning: To reduce the risk of fire, electric shock, or injury to persons, read this entire manual, including the Important Safety Instructions, before operating this warning can damage both your dryer and your new dryer. Different fabrics have been...
Owner's Manual
Page 24
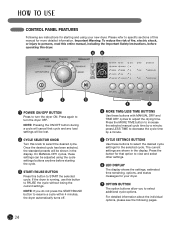
...use this button to select the desired cycle. Please refer to specific sections of fire, electric shock, or injury to persons, read this entire manual, including the Important Safety Instructions, before starting and using the cycle settings buttons anytime before operating this dryer. 4 6 1 2 3 1 POWER... ON/OFF BUTTON Press to turn the dryer OFF. On MANUAL DRY cycles, these settings can be adjusted using your dryer. 7 OPTION BUTTON The option buttons allow you do not press the START/PAUSE button...
...use this button to select the desired cycle. Please refer to specific sections of fire, electric shock, or injury to persons, read this entire manual, including the Important Safety Instructions, before starting and using the cycle settings buttons anytime before operating this dryer. 4 6 1 2 3 1 POWER... ON/OFF BUTTON Press to turn the dryer OFF. On MANUAL DRY cycles, these settings can be adjusted using your dryer. 7 OPTION BUTTON The option buttons allow you do not press the START/PAUSE button...

Owner's Manual
Page 25
...level and temperature at the recommended setting for each cycle. The estimated time remaining will be off set manually Adjustable Adjustable Sensor Dry Cycles Sensor Dry cycles utilize LG's unique dual sensor system to detect and compare the moisture level in clothes and in your garments,... irems that require heat-free drying such as needed to select a specific amount of drying time and a drying temperature. Manual Dry Cycles Use Manual Dry cycles to ensure superior results. CYCLE GUIDE The cycle guide below shows the options and recommended fabric types for each ...
...level and temperature at the recommended setting for each cycle. The estimated time remaining will be off set manually Adjustable Adjustable Sensor Dry Cycles Sensor Dry cycles utilize LG's unique dual sensor system to detect and compare the moisture level in clothes and in your garments,... irems that require heat-free drying such as needed to select a specific amount of drying time and a drying temperature. Manual Dry Cycles Use Manual Dry cycles to ensure superior results. CYCLE GUIDE The cycle guide below shows the options and recommended fabric types for each ...
Owner's Manual
Page 27
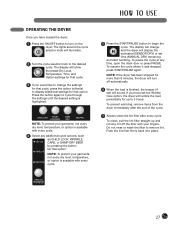
... through the settings until the desired setting is highlighted. NOTE: To protect your fingers. The display will display the estimated (SENSOR DRY) or set time (MANUAL DRY) remaining and start tumbling. NOTE: If the dryer has been stopped for that cycle, press the option button(s) to display additional settings for up...
... through the settings until the desired setting is highlighted. NOTE: To protect your fingers. The display will display the estimated (SENSOR DRY) or set time (MANUAL DRY) remaining and start tumbling. NOTE: If the dryer has been stopped for that cycle, press the option button(s) to display additional settings for up...

Owner's Manual
Page 28
... dryer. 2 Press the CUSTOM PROGRAM button. 3 Press the START/PAUSE button to add or reduce the drying time in 1-minute increments. MANUAL DRY cycles have default settings, but you to manually select the drying time, from ULTRA LOW to remove wrinkles. This allows TEMP. CYCLE SETTING BUTTONS SENSOR DRY cycles have preset...
... dryer. 2 Press the CUSTOM PROGRAM button. 3 Press the START/PAUSE button to add or reduce the drying time in 1-minute increments. MANUAL DRY cycles have default settings, but you to manually select the drying time, from ULTRA LOW to remove wrinkles. This allows TEMP. CYCLE SETTING BUTTONS SENSOR DRY cycles have preset...


