
Owner's Manual
Page 3
...Door...7 Connecting the Exhaust and Venting System 8 Connection of Gas Supply/Electrical Plug Connections for Electric Dryer Only 9 Preparation of the Dryer/Confirming Heat Source Operation/Dryer Airflow 10 Additional Instructions for Installation of Your Dryer in a Manufactured or Mobile Home 11 . PART3. FEATURES AND BENEFITS ...21-26 Using Your Dryer/To use a Sensor Dry Cycle 22 To use a Manual Dryer Cycle/Stopping Your Dryer/Loading 23 Cycle Descriptions...24 Options/Modifiers ...25 Rack Dry/Beeper/Anti-Bacterial/Custom Programming 26 PART8. ELECTRICAL REQUIREMENTS FOR GAS DRYERS...
...Door...7 Connecting the Exhaust and Venting System 8 Connection of Gas Supply/Electrical Plug Connections for Electric Dryer Only 9 Preparation of the Dryer/Confirming Heat Source Operation/Dryer Airflow 10 Additional Instructions for Installation of Your Dryer in a Manufactured or Mobile Home 11 . PART3. FEATURES AND BENEFITS ...21-26 Using Your Dryer/To use a Sensor Dry Cycle 22 To use a Manual Dryer Cycle/Stopping Your Dryer/Loading 23 Cycle Descriptions...24 Options/Modifiers ...25 Rack Dry/Beeper/Anti-Bacterial/Custom Programming 26 PART8. ELECTRICAL REQUIREMENTS FOR GAS DRYERS...
Owner's Manual
Page 4
..., or to the instructions in this dryer is available by contacting your appliance, follow basic precautions, including the following. To reduce the risk of purchase, if this manual, LG will need the complete model and serial numbers when requesting information. You will repair or replace any of its mechanical or electrical parts if they are located on the Model and Serial Number Plate located on the front...
..., or to the instructions in this dryer is available by contacting your appliance, follow basic precautions, including the following. To reduce the risk of purchase, if this manual, LG will need the complete model and serial numbers when requesting information. You will repair or replace any of its mechanical or electrical parts if they are located on the Model and Serial Number Plate located on the front...
Owner's Manual
Page 5
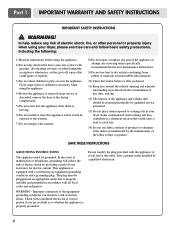
...) Clean lint screen before using your dryer, please exercise care and follow basic safety precautions, including the following: 1) Read all instructions before or after each load. 11) Keep area around the exhaust opening and adjacent surrounding areas free from service or discarded, remove the door to the drying compartment. 5) Do not reach into an appropriate outlet that is properly installed and grounded in accordance with all local codes...
...) Clean lint screen before using your dryer, please exercise care and follow basic safety precautions, including the following: 1) Read all instructions before or after each load. 11) Keep area around the exhaust opening and adjacent surrounding areas free from service or discarded, remove the door to the drying compartment. 5) Do not reach into an appropriate outlet that is properly installed and grounded in accordance with all local codes...
Owner's Manual
Page 9
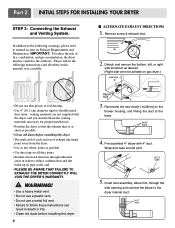
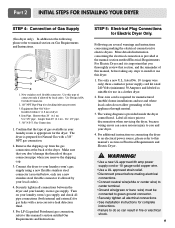
... on gas dryer.) • Do not use a metal foil vent. • Failure to the outdoors. Remove screw & exhaust duct. 2. Detach and remove the bottom, left, or right side knockout as possible • Clean old ducts before installing this dryer 8 Attach hole 3. Insert duct assembly, elbow first, through unheated areas in death or fire. • Clean old ducts before installing this manual) very carefully. Part 2 INITIAL STEPS FOR INSTALLING YOUR DRYER STEP 3: Connecting the Exhaust and Venting...
... on gas dryer.) • Do not use a metal foil vent. • Failure to the outdoors. Remove screw & exhaust duct. 2. Detach and remove the bottom, left, or right side knockout as possible • Clean old ducts before installing this dryer 8 Attach hole 3. Insert duct assembly, elbow first, through unheated areas in death or fire. • Clean old ducts before installing this manual) very carefully. Part 2 INITIAL STEPS FOR INSTALLING YOUR DRYER STEP 3: Connecting the Exhaust and Venting...
Owner's Manual
Page 10
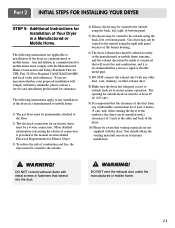
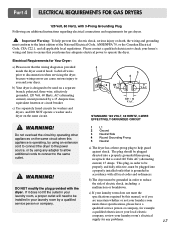
... Shut-Off Valve- Securely tighten all wires prior to disconnection when servicing the dryer, because wiring errors can result in a clothes dryer. 2. Turn on Gas Requirements and Instructions. 1 2 5 3 4 1. Use Design AGA Certified Connector. 2. 1/8" NPT Pipe Plug (for Electric Dryer Only. Remove the shipping cap from the gas connection at the manual section entitled Electrical Requirements For Electric Dryer and it is prepared for use this manual's section entitled Gas Requirements and Instructions. Gas Connection 1. Part 2 INITIAL STEPS FOR INSTALLING YOUR DRYER STEP 4: Connection...
... Shut-Off Valve- Securely tighten all wires prior to disconnection when servicing the dryer, because wiring errors can result in a clothes dryer. 2. Turn on Gas Requirements and Instructions. 1 2 5 3 4 1. Use Design AGA Certified Connector. 2. 1/8" NPT Pipe Plug (for Electric Dryer Only. Remove the shipping cap from the gas connection at the manual section entitled Electrical Requirements For Electric Dryer and it is prepared for use this manual's section entitled Gas Requirements and Instructions. Gas Connection 1. Part 2 INITIAL STEPS FOR INSTALLING YOUR DRYER STEP 4: Connection...
Owner's Manual
Page 12
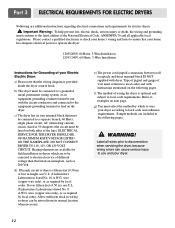
... these standards, please contact a service and installation professional for an electric dryer must comply with the Manufactured Home Construction and Safety Standards Title 24 CFR, Part 32-80 or Standard CAN/CSA0Z240 MH and local codes and ordinances. Gas dryer may be vented to the outside using the right side panel because of the burner housing. 6) The dryer exhaust duct must be affixed securely to...
... these standards, please contact a service and installation professional for an electric dryer must comply with the Manufactured Home Construction and Safety Standards Title 24 CFR, Part 32-80 or Standard CAN/CSA0Z240 MH and local codes and ordinances. Gas dryer may be vented to the outside using the right side panel because of the burner housing. 6) The dryer exhaust duct must be affixed securely to...
Owner's Manual
Page 13
..., OR 120 VOLT CIRCUIT. e) The power cord (pigtail) connection between wall receptacle and dryer terminal block IS NOT supplied with instructions mentioned on nameplate, such as required by local codes. Refer to you and your dryer. 12 Label all applicable local regulations. Part 3 ELECTRICAL REQUIREMENTS FOR ELECTRIC DRYERS Following are additional instructions regarding electrical connections and requirements for field installation in dryers which to wire your dryer according to local code and ordinance requirements. Important Warning...
..., OR 120 VOLT CIRCUIT. e) The power cord (pigtail) connection between wall receptacle and dryer terminal block IS NOT supplied with instructions mentioned on nameplate, such as required by local codes. Refer to you and your dryer. 12 Label all applicable local regulations. Part 3 ELECTRICAL REQUIREMENTS FOR ELECTRIC DRYERS Following are additional instructions regarding electrical connections and requirements for field installation in dryers which to wire your dryer according to local code and ordinance requirements. Important Warning...
Owner's Manual
Page 15
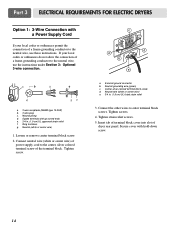
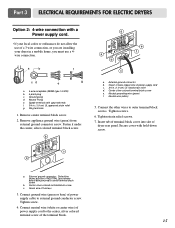
...) b. 3-wire plug c. Neutral (white or center wire) 1. Tighten screw. External ground connector b. Part 3 ELECTRICAL REQUIREMENTS FOR ELECTRIC DRYERS Option 1: 3-Wire Connection with a Power Supply Cord lf your local codes or ordinances do not allow the connection of a frame-grounding conductor to the neutral wire, use the instructions under Section 3: Optional 3-wire connection. If your local codes or ordinances permit the connection of a frame-grounding conductor to the neutral wire, use these instructions. a. Secure cover with up turned...
...) b. 3-wire plug c. Neutral (white or center wire) 1. Tighten screw. External ground connector b. Part 3 ELECTRICAL REQUIREMENTS FOR ELECTRIC DRYERS Option 1: 3-Wire Connection with a Power Supply Cord lf your local codes or ordinances do not allow the connection of a frame-grounding conductor to the neutral wire, use the instructions under Section 3: Optional 3-wire connection. If your local codes or ordinances permit the connection of a frame-grounding conductor to the neutral wire, use these instructions. a. Secure cover with up turned...
Owner's Manual
Page 16
... cord to external ground conductor screw. Remove appliance ground wire (green) from external ground connector screw. Green or bare copper wire of the terminal block. 15 Part 3 ELECTRICAL REQUIREMENTS FOR ELECTRIC DRYERS Option 2: 4-wire connection with upturned ends f. 3/4 in. (1.9 cm) UL approved strain relief g. a. 4-wire receptable (NEMA type 14-30R) b. 4-pront plug c. Fasten it under the center, silver colored terminal block screw. a. Ground prong d. Ring terminals 1. External ground connector b. Center silver-colored terminal block...
... cord to external ground conductor screw. Remove appliance ground wire (green) from external ground connector screw. Green or bare copper wire of the terminal block. 15 Part 3 ELECTRICAL REQUIREMENTS FOR ELECTRIC DRYERS Option 2: 4-wire connection with upturned ends f. 3/4 in. (1.9 cm) UL approved strain relief g. a. 4-wire receptable (NEMA type 14-30R) b. 4-pront plug c. Fasten it under the center, silver colored terminal block screw. a. Ground prong d. Ring terminals 1. External ground connector b. Center silver-colored terminal block...
Owner's Manual
Page 18
... 4 Round Grounding Prong 5 Neutral a) The dryer has a three-prong plug to be plugged directed into a properly installed outlet that the wiring diagram is operating, by using any problems. 17 Electrical Requirements for gas dryers. ! WARNING! WARNING! Do not overload the circuit by a qualified service person or company. 5 1 3 2 4 120 ± 12 V.A.C 0 V.A.C. 120 + 12 V.A.C. Label all applicable local regulations. Part 4 ELECTRICAL REQUIREMENTS FOR GAS DRYERS 120 Volt, 60 Hertz, with the dryer. The plug should be used on the...
... 4 Round Grounding Prong 5 Neutral a) The dryer has a three-prong plug to be plugged directed into a properly installed outlet that the wiring diagram is operating, by using any problems. 17 Electrical Requirements for gas dryers. ! WARNING! WARNING! Do not overload the circuit by a qualified service person or company. 5 1 3 2 4 120 ± 12 V.A.C 0 V.A.C. 120 + 12 V.A.C. Label all applicable local regulations. Part 4 ELECTRICAL REQUIREMENTS FOR GAS DRYERS 120 Volt, 60 Hertz, with the dryer. The plug should be used on the...
Owner's Manual
Page 19
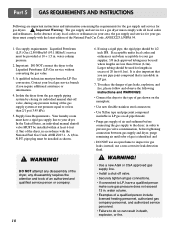
... your gas dryer must be 1/2 inch IPS. N.P.T. instead, use an open flame to the Liquefied Petroleum (LP) Gas service without converting the gas value. 3. in LP gas on the nameplate; • Use new flexible stainless steel connectors; • Use Teflon tape and pipe joint compound insoluble in order to prevent gas valve contamination, before connecting the gas supply to your area, the gas supply and service for gas dryers. ! Part 5 GAS REQUIREMENTS AND INSTRUCTIONS...
... your gas dryer must be 1/2 inch IPS. N.P.T. instead, use an open flame to the Liquefied Petroleum (LP) Gas service without converting the gas value. 3. in LP gas on the nameplate; • Use new flexible stainless steel connectors; • Use Teflon tape and pipe joint compound insoluble in order to prevent gas valve contamination, before connecting the gas supply to your area, the gas supply and service for gas dryers. ! Part 5 GAS REQUIREMENTS AND INSTRUCTIONS...
Owner's Manual
Page 20
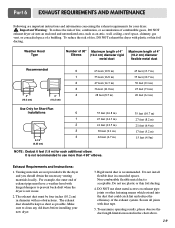
... (11.0 m) 28 feet (8.5 m) Use Only for Short Run Installations 2-1/2" (6.35 cm) 0 55 feet (16.8 m) 1 47 feet (14.3 m) 2 41 feet (12.5 m) 3 30 feet (9.1 m) 4 22 feet (6.7 m) NOTE : Deduct 6 feet (1.8 m) for your new dryer. 3. Part 6 EXHAUST REQUIREMENTS AND MAINTENANCE Following are not provided with hinged dampers to clean any old ducts before installing your dryer. ! Venting materials are important instructions and information concerning the exhaust requirements for each additional...
... (11.0 m) 28 feet (8.5 m) Use Only for Short Run Installations 2-1/2" (6.35 cm) 0 55 feet (16.8 m) 1 47 feet (14.3 m) 2 41 feet (12.5 m) 3 30 feet (9.1 m) 4 22 feet (6.7 m) NOTE : Deduct 6 feet (1.8 m) for your new dryer. 3. Part 6 EXHAUST REQUIREMENTS AND MAINTENANCE Following are not provided with hinged dampers to clean any old ducts before installing your dryer. ! Venting materials are important instructions and information concerning the exhaust requirements for each additional...
Owner's Manual
Page 21
... warm water. In the event lint falls off of the lint screen and into place. 3. In order to exhaust the dryer when it to remove. c) Repeat as necessary. Ordinarily, the dryer drum will need no care. Please clean the lint filter either before running the dryer. Please note that nothing has been set against the dampers. 4. d) After the residue has been removed, rinse screen with a loose lint screen may increase drying times. 2. A qualified service...
... warm water. In the event lint falls off of the lint screen and into place. 3. In order to exhaust the dryer when it to remove. c) Repeat as necessary. Ordinarily, the dryer drum will need no care. Please clean the lint filter either before running the dryer. Please note that nothing has been set against the dampers. 4. d) After the residue has been removed, rinse screen with a loose lint screen may increase drying times. 2. A qualified service...
Owner's Manual
Page 24
... time Open the door or press START/PAUSE once. This causes uneven drying and wrinkling. Part 7 FEATURES AND BENEFITS 3. CONTROL until the desired drying time is displayed. NOTE: Drying will change by 1 minute intervals. To enable the Child Lock feature: Press and hold RACK DRY and ANTI BACTERIAL for Super Capacity Dryers: Heavy Work Clothes 4 jeans 4 workpants 4 work shirts 2 sweatpants 2 sweatshirts Towels 10 bath towels 10 hand towels 14 wash cloths Mixed Load 3 sheets...
... time Open the door or press START/PAUSE once. This causes uneven drying and wrinkling. Part 7 FEATURES AND BENEFITS 3. CONTROL until the desired drying time is displayed. NOTE: Drying will change by 1 minute intervals. To enable the Child Lock feature: Press and hold RACK DRY and ANTI BACTERIAL for Super Capacity Dryers: Heavy Work Clothes 4 jeans 4 workpants 4 work shirts 2 sweatpants 2 sweatshirts Towels 10 bath towels 10 hand towels 14 wash cloths Mixed Load 3 sheets...
Owner's Manual
Page 27
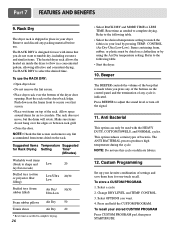
... rubber pillows Air Dry 50 Tennis shoes Air Dry 20 * Reset time as needed to secure over the edges or between rack grill. • Close the door. Reset time as needed to the following table. • Start the dryer. 10. Push down on top of bacteria. The ANTI BACTERIAL process produces high temperature during the cycle. Press and hold the CUSTOM PROGRAM. NOTE: Check the lint screen and remove any...
... rubber pillows Air Dry 50 Tennis shoes Air Dry 20 * Reset time as needed to secure over the edges or between rack grill. • Close the door. Reset time as needed to the following table. • Start the dryer. 10. Push down on top of bacteria. The ANTI BACTERIAL process produces high temperature during the cycle. Press and hold the CUSTOM PROGRAM. NOTE: Check the lint screen and remove any...

Owner's Manual
Page 28
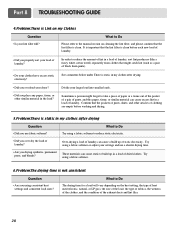
... room's fuse box / circuit breaker box and replace the fuse or reset the circuit breaker. (IMPORTANT: electric dryers generally use your dryer to Do • Is the dryer plugged in the dryer drum. • Were your home's or laundry room's fuse box/circuit breaker box and replace the fuse or reset the circuit breaker. (IMPORTANT: electric dryers generally use two fuses or breakers.) 2.Problem:My Dryer Doesn 't Heat Question • Is the fuse blown, or is the circuit breaker tripped? • Is the gas supply or service blocked or off...
... room's fuse box / circuit breaker box and replace the fuse or reset the circuit breaker. (IMPORTANT: electric dryers generally use your dryer to Do • Is the dryer plugged in the dryer drum. • Were your home's or laundry room's fuse box/circuit breaker box and replace the fuse or reset the circuit breaker. (IMPORTANT: electric dryers generally use two fuses or breakers.) 2.Problem:My Dryer Doesn 't Heat Question • Is the fuse blown, or is the circuit breaker tripped? • Is the gas supply or service blocked or off...
Owner's Manual
Page 29
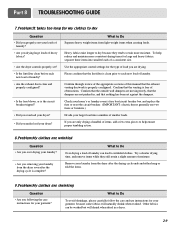
..., tissue, or other similar material in the load? Divide your settings and use fabric softener? Part 8 TROUBLESHOOTING GUIDE 4.Problem:There is Lint on my Clothes Question What to build up of static electricity. These materials can cause a build up in a load of laundry. • Did you use a shorter drying time. Please refer to the manual section on cleaning the lint filter, and please confirm that the pockets of...
..., tissue, or other similar material in the load? Divide your settings and use fabric softener? Part 8 TROUBLESHOOTING GUIDE 4.Problem:There is Lint on my Clothes Question What to build up of static electricity. These materials can cause a build up in a load of laundry. • Did you use a shorter drying time. Please refer to the manual section on cleaning the lint filter, and please confirm that the pockets of...
Owner's Manual
Page 30
Check your home's or laundry room's fuse box/circuit breaker box and replace the fuse or reset the circuit breaker. (IMPORTANT: electric dryers generally use instructions for your garment? Remove your loads of laundry? • Are you drying large loads of heavy fabrics? • Are the dryer controls properly set against the dampers. What to dry Question • Did you properly sort your laundry from the dryer after the drying cycle is complete? Part 8 TROUBLESHOOTING GUIDE 7.Problem:It takes too...
Check your home's or laundry room's fuse box/circuit breaker box and replace the fuse or reset the circuit breaker. (IMPORTANT: electric dryers generally use instructions for your garment? Remove your loads of laundry? • Are you drying large loads of heavy fabrics? • Are the dryer controls properly set against the dampers. What to dry Question • Did you properly sort your laundry from the dryer after the drying cycle is complete? Part 8 TROUBLESHOOTING GUIDE 7.Problem:It takes too...
Service Manual
Page 7
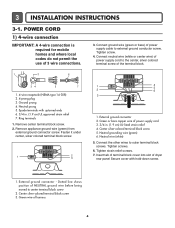
.... 4. Remove center terminal block screw. 2. Connect ground wire (green or bare) of 3 wire connections. 3. Neutral prong 5. POWER CORD 1) 4-wire connection IMPORTANT: A 4-wire connection is required for mobile homes and where local codes do not permit the use of power supply cable to outer terminal block screws. Insert tab of terminal block cover into slot of harness 6 Green wire of dryer rear panel Secure cover with upturned ends 6. 3/4 in . (1.9 cm) UL-listed strain relief 4. 3 INSTALLATION INSTRUCTIONS 3-1. Fasten it under center, silver colored terminal block...
.... 4. Remove center terminal block screw. 2. Connect ground wire (green or bare) of 3 wire connections. 3. Neutral prong 5. POWER CORD 1) 4-wire connection IMPORTANT: A 4-wire connection is required for mobile homes and where local codes do not permit the use of power supply cable to outer terminal block screws. Insert tab of terminal block cover into slot of harness 6 Green wire of dryer rear panel Secure cover with upturned ends 6. 3/4 in . (1.9 cm) UL-listed strain relief 4. 3 INSTALLATION INSTRUCTIONS 3-1. Fasten it under center, silver colored terminal block...
Service Manual
Page 20
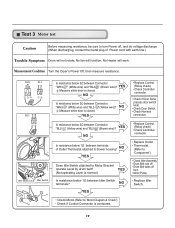
... to Motor Bracket operate Level by drum belt? Test 3 Motor test Caution Before measuring resistance, be sure to turn Power off from • Motor Pulley. • Replace Idler Switch. • Check Motor.(Refer to 'Motor Diagram & Check') • Check if Control Connector is contacted. 19 YES • Replace Control. (Relay check) • Check Controller connector. • Check if Door flame presses door switch knob. • Check Door Switch. • Check Harness connection. Is resistance below 3Ω between terminals of Power cord with earth line.) Trouble Symptom Drum...
... to Motor Bracket operate Level by drum belt? Test 3 Motor test Caution Before measuring resistance, be sure to turn Power off from • Motor Pulley. • Replace Idler Switch. • Check Motor.(Refer to 'Motor Diagram & Check') • Check if Control Connector is contacted. 19 YES • Replace Control. (Relay check) • Check Controller connector. • Check if Door flame presses door switch knob. • Check Door Switch. • Check Harness connection. Is resistance below 3Ω between terminals of Power cord with earth line.) Trouble Symptom Drum...


