Owner's Manual
Page 1
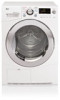
1-800-243-0000 24 HOURS A DAY, 7 DAYS A WEEK FOR LG CUSTOMER SERVICE Owner's manual Electric Dryer DLEC855W DLEC855R Thank you for future reference. For more information, visit our website at http://us.lge.com Model # Serial # Date of purchase P/ No.: 3828EL4003R Record the model and Serial Numbers, and retain the manual for buying an LG Dryer. Please read your manual carefully, as it provides instructions on safe installation, Use, and Maintenance.
1-800-243-0000 24 HOURS A DAY, 7 DAYS A WEEK FOR LG CUSTOMER SERVICE Owner's manual Electric Dryer DLEC855W DLEC855R Thank you for future reference. For more information, visit our website at http://us.lge.com Model # Serial # Date of purchase P/ No.: 3828EL4003R Record the model and Serial Numbers, and retain the manual for buying an LG Dryer. Please read your manual carefully, as it provides instructions on safe installation, Use, and Maintenance.

Owner's Manual
Page 2
... efficient air flow system and an optimized heater. What are normal, and do indicate a product malfunction. The control will change the estimated time remaining if it senses a large change in the time display are Sensor Dry and Manual Dry? C ontents F Safety Instructions 3 Installation Instructions 6 Electrical Requirement 10 Appearance And Design 13 Operating Your Dryer 14 Additional Functions 17 Caring For Your Dryer 19 Additional Tips For Smart Use 22 Troubleshooting Guide 24 Technical Data 28 Warranty...
... efficient air flow system and an optimized heater. What are normal, and do indicate a product malfunction. The control will change the estimated time remaining if it senses a large change in the time display are Sensor Dry and Manual Dry? C ontents F Safety Instructions 3 Installation Instructions 6 Electrical Requirement 10 Appearance And Design 13 Operating Your Dryer 14 Additional Functions 17 Caring For Your Dryer 19 Additional Tips For Smart Use 22 Troubleshooting Guide 24 Technical Data 28 Warranty...
Owner's Manual
Page 3
... a qualified installer, service agency, or the gas supplier. • Install the clothes dryer according to reduce the chance of a specific type identified by a qualified electrician. Always read and obey all local codes and ordinances. If flexible metal (foil type) duct is , tell you how to the manufacturer's instructions and local codes. • Save these instructions. GROUNDING INSTRUCTIONS This appliance must be plugged into an appropriate outlet that...
... a qualified installer, service agency, or the gas supplier. • Install the clothes dryer according to reduce the chance of a specific type identified by a qualified electrician. Always read and obey all local codes and ordinances. If flexible metal (foil type) duct is , tell you how to the manufacturer's instructions and local codes. • Save these instructions. GROUNDING INSTRUCTIONS This appliance must be plugged into an appropriate outlet that...
Owner's Manual
Page 4
...; All repairs and servicing must be performed by qualified service personnel. • Do not install or store the dryer where it will be exposed to the weather. • Always check the inside of the dryer or attempt any servicing unless specifically recommended in this Use and Care Guide or in published user-repair instructions that could cause a load to catch fire. • Do not dry articles that...
...; All repairs and servicing must be performed by qualified service personnel. • Do not install or store the dryer where it will be exposed to the weather. • Always check the inside of the dryer or attempt any servicing unless specifically recommended in this Use and Care Guide or in published user-repair instructions that could cause a load to catch fire. • Do not dry articles that...
Owner's Manual
Page 5
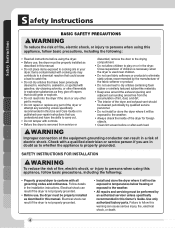
...; Connect to a properly rated, protected, and sized power circuit to do so can melt, creating electrical shock and/or fire hazard. • Remove all packing items and dispose of the product. The power cord can cause damage, smoke, and fire. • Remove all packaging from overheated wires. • Never unplug your model. The power cord can be damaged, resulting in this dryer must be careful not...
...; Connect to a properly rated, protected, and sized power circuit to do so can melt, creating electrical shock and/or fire hazard. • Remove all packing items and dispose of the product. The power cord can cause damage, smoke, and fire. • Remove all packaging from overheated wires. • Never unplug your model. The power cord can be damaged, resulting in this dryer must be careful not...

Owner's Manual
Page 7
... terminal. • Ground wire (green or bare) must comply with a damp cloth to remove from the inside of the dryer drum/drying compartment any steps to this manual's section on a heat setting, as suitable for use and where local codes do so can result in a Manufactured or Mobile Home The following parts on connecting the dryer to an electrical power source, please refer to install or use this appliance, use...
... terminal. • Ground wire (green or bare) must comply with a damp cloth to remove from the inside of the dryer drum/drying compartment any steps to this manual's section on a heat setting, as suitable for use and where local codes do so can result in a Manufactured or Mobile Home The following parts on connecting the dryer to an electrical power source, please refer to install or use this appliance, use...
Owner's Manual
Page 8
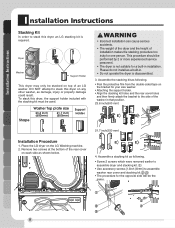
.... 8 Assemble the stacking kit as following . To stack this dryer an LG stacking kit is required. Please do not install as a built-in. • Do not operate the dryer is not suitable for a built-in that position. 23.6 inch(600 mm) Shape Washer Top plate size 23.6 inch (600mm) 21.7 inch (550mm) Support Holder 21.7 inch(550 mm) Installation Procedure 1. Installation Instructions I nstallation Instructions Stacking Kit In order to stack this dryer, the support...
.... 8 Assemble the stacking kit as following . To stack this dryer an LG stacking kit is required. Please do not install as a built-in. • Do not operate the dryer is not suitable for a built-in that position. 23.6 inch(600 mm) Shape Washer Top plate size 23.6 inch (600mm) 21.7 inch (550mm) Support Holder 21.7 inch(550 mm) Installation Procedure 1. Installation Instructions I nstallation Instructions Stacking Kit In order to stack this dryer, the support...
Owner's Manual
Page 10
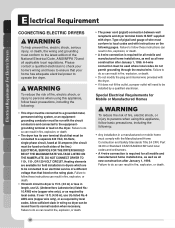
... home installations, as well as required by a qualified electrician. WARNING F • The power cord (pigtail) connection between wall receptacle and dryer terminal block IS NOT supplied with the circuit conductors and connected to the equipmentgrounding terminal or lead on the dryer. Heating elements are to be run with dryer. To reduce the risk of fire, electric shock, or injury to persons when using this appliance, follow these instructions can...
... home installations, as well as required by a qualified electrician. WARNING F • The power cord (pigtail) connection between wall receptacle and dryer terminal block IS NOT supplied with the circuit conductors and connected to the equipmentgrounding terminal or lead on the dryer. Heating elements are to be run with dryer. To reduce the risk of fire, electric shock, or injury to persons when using this appliance, follow these instructions can...
Owner's Manual
Page 11
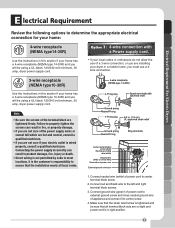
Connect neutral wire (white) of appliance and connect it to center screw. 4. Electrical Requirement For Electric Dryers E lectrical Requirement Review the following options to determine the appropriate electrical F connection for your home: 4-wire receptacle (NEMA type14-30R) Use the instructions in this section if your electric outlet is not permitted by code in fire, or property damage. • If you are not sure of the power supply wires or cannot...
Connect neutral wire (white) of appliance and connect it to center screw. 4. Electrical Requirement For Electric Dryers E lectrical Requirement Review the following options to determine the appropriate electrical F connection for your home: 4-wire receptacle (NEMA type14-30R) Use the instructions in this section if your electric outlet is not permitted by code in fire, or property damage. • If you are not sure of the power supply wires or cannot...
Owner's Manual
Page 15
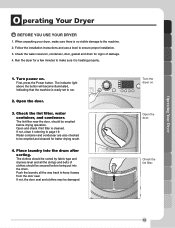
... the strings and belts of damage. 4. Check the water reservoir, condenser, door, gasket and drum for better drying result. 4. Check the lint filter, water container, and condenser. Check the lint filter. 15 Turn power on . First, press the Power button. The indicator light above the button will become illuminated, indicating that the machine is no visible damage to page 19. The clothes should be secured before drying operation. F Turn the dryer on . If not...
... the strings and belts of damage. 4. Check the water reservoir, condenser, door, gasket and drum for better drying result. 4. Check the lint filter, water container, and condenser. Check the lint filter. 15 Turn power on . First, press the Power button. The indicator light above the button will become illuminated, indicating that the machine is no visible damage to page 19. The clothes should be secured before drying operation. F Turn the dryer on . If not...
Owner's Manual
Page 16
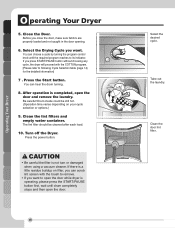
... the Start button. Turn off the Dryer. You can choose a cycle by turning the program control knob until drum completely stops and then open the door and remove the laundry. If there is completed, open the door. 16 F Select the desired cycle. Clean the door lint filter. The lint filter should be still hot. (Operation time varies depending on filter, you can scrub lint screen with the COTTON program. [Please refer to open the door while dryer is not turn...
... the Start button. Turn off the Dryer. You can choose a cycle by turning the program control knob until drum completely stops and then open the door and remove the laundry. If there is completed, open the door. 16 F Select the desired cycle. Clean the door lint filter. The lint filter should be still hot. (Operation time varies depending on filter, you can scrub lint screen with the COTTON program. [Please refer to open the door while dryer is not turn...
Owner's Manual
Page 18
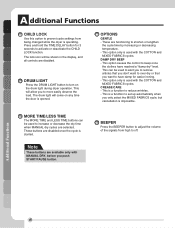
... dryer is started. Note These buttons are selected. This is opened. Additional Functions 18 The drum light will be used to increase or decrease the dry time when MANUAL dry cycles are available only with MANUAL DRY, before you to turn on any time the door is a function to reduce wrinkles. - This option only is used with the COTTON and MIXED FABRICS cycles. This option causes the control to beep once the clothes...
... dryer is started. Note These buttons are selected. This is opened. Additional Functions 18 The drum light will be used to increase or decrease the dry time when MANUAL dry cycles are available only with MANUAL DRY, before you to turn on any time the door is a function to reduce wrinkles. - This option only is used with the COTTON and MIXED FABRICS cycles. This option causes the control to beep once the clothes...
Owner's Manual
Page 19
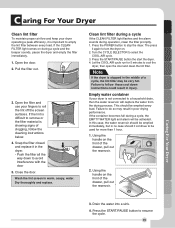
... fingers to roll the lint off the screen surfaces. Using the handle on . 2. Turn the CYCLE SELECTOR to resume the cycle. 19 Failure to follow the cleaning instructions below. 4. Wash the lint screen in the dryer. - Press the START/PAUSE button to select the COOL AIR cycle. 3. Note If the dryer is not connected to a household drain, then the water reservoir will be very hot. If the CLEAN FILTER light comes on the front...
... fingers to roll the lint off the screen surfaces. Using the handle on . 2. Turn the CYCLE SELECTOR to resume the cycle. 19 Failure to follow the cleaning instructions below. 4. Wash the lint screen in the dryer. - Press the START/PAUSE button to select the COOL AIR cycle. 3. Note If the dryer is not connected to a household drain, then the water reservoir will be very hot. If the CLEAN FILTER light comes on the front...
Owner's Manual
Page 21
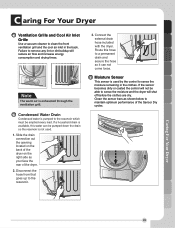
... shut off before the clothes are dry. Route this water can not come loose. Clean the sensor bars as your face the rear of the Sensor Dry cycles. C aring For Your Dryer F Ventilation Grille and Cool Air Inlet Grille Use a vacuum cleaner to maintain optimum performance of the dryer. 2. Failure to sense the moisture and the dryer will reduce air flow and increase energy consumption and drying times. 3. If a household drain is exhausted...
... shut off before the clothes are dry. Route this water can not come loose. Clean the sensor bars as your face the rear of the Sensor Dry cycles. C aring For Your Dryer F Ventilation Grille and Cool Air Inlet Grille Use a vacuum cleaner to maintain optimum performance of the dryer. 2. Failure to sense the moisture and the dryer will reduce air flow and increase energy consumption and drying times. 3. If a household drain is exhausted...
Owner's Manual
Page 23
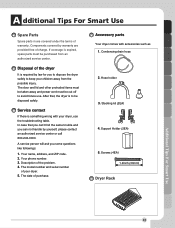
... purchase. 2. Screws (4EA) 1.2inch (30mm) Dryer Rack Additional Tips For Smart Use 23 Your dryer comes with your dryer, use . The model number and serial number of warranty. A dditional Tips For Smart Use Spare Parts F Accessory parts Spare parts in are provided free of the dryer It is required by yourself, please contact an authorized service center or call 800-243-0000. Components covered by warranty are covered under the terms of your...
... purchase. 2. Screws (4EA) 1.2inch (30mm) Dryer Rack Additional Tips For Smart Use 23 Your dryer comes with your dryer, use . The model number and serial number of warranty. A dditional Tips For Smart Use Spare Parts F Accessory parts Spare parts in are provided free of the dryer It is required by yourself, please contact an authorized service center or call 800-243-0000. Components covered by warranty are covered under the terms of your...
Owner's Manual
Page 24
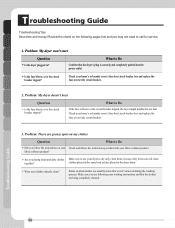
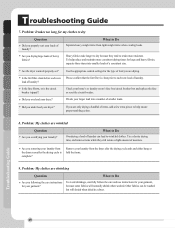
... drying clean and dirty clothes Make sure to call for service. 1. Problem: There are being completely cleaned. Problem: My dryer won't start Question Is the dryer plugged in the dryer drum. fabric softener product? clothes placed in the same load or later placed in ? Check your home's or laundry room's fuse box/circuit breaker box and replace the fuse or reset the circuit breaker. 3. Make sure you may not need to use your clothes entirely clean? Problem: My dryer doesn't heat...
... drying clean and dirty clothes Make sure to call for service. 1. Problem: There are being completely cleaned. Problem: My dryer won't start Question Is the dryer plugged in the dryer drum. fabric softener product? clothes placed in the same load or later placed in ? Check your home's or laundry room's fuse box/circuit breaker box and replace the fuse or reset the circuit breaker. 3. Make sure you may not need to use your clothes entirely clean? Problem: My dryer doesn't heat...
Owner's Manual
Page 25
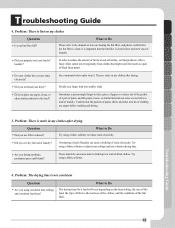
... drying time for a load will vary depending on cleaning the lint filter, and please confirm that the lint filter is static in a load of black linen pants). Try using consistent heat settings and consistent load sizes? Problem: There is static in a load of laundry? Divide your clothes have excess static electricity? Problem: There is clean before washing and drying. 5. These materials can cause static to build up of laundry. Problem: The drying time is clean...
... drying time for a load will vary depending on cleaning the lint filter, and please confirm that the lint filter is static in a load of black linen pants). Try using consistent heat settings and consistent load sizes? Problem: There is static in a load of laundry? Divide your clothes have excess static electricity? Problem: There is clean before washing and drying. 5. These materials can cause static to build up of laundry. Problem: The drying time is clean...
Owner's Manual
Page 26
... loads. Is the fuse blown, or is complete? T roubleshooting Guide 7. Did you are drying. Other fabrics can lead to wrinkled clothes. Problem: It takes too long for your home's or laundry room's fuse box/circuit breaker box and replace the fuse or reset the circuit breaker. If you properly sort your dryer? Are you under load your loads of a consistent size. Remove your laundry? Check your garment? Are the dryer controls properly set? Is the lint filter clean...
... loads. Is the fuse blown, or is complete? T roubleshooting Guide 7. Did you are drying. Other fabrics can lead to wrinkled clothes. Problem: It takes too long for your home's or laundry room's fuse box/circuit breaker box and replace the fuse or reset the circuit breaker. If you properly sort your dryer? Are you under load your loads of a consistent size. Remove your laundry? Check your garment? Are the dryer controls properly set? Is the lint filter clean...
Owner's Manual
Page 29
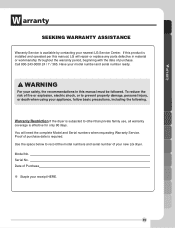
... will repair or replace any parts defective in this manual must be followed. Warranty Restriction If the dryer is subjected to record the model numbers and serial number of purchase. Use the space below to other than private family use, all warranty coverage is installed and operated per this product is effective for only 90 days. Model No. If this manual, LG will need the complete Model and Serial numbers when requesting Warranty Service.
... will repair or replace any parts defective in this manual must be followed. Warranty Restriction If the dryer is subjected to record the model numbers and serial number of purchase. Use the space below to other than private family use, all warranty coverage is installed and operated per this product is effective for only 90 days. Model No. If this manual, LG will need the complete Model and Serial numbers when requesting Warranty Service.
Specification
Page 2
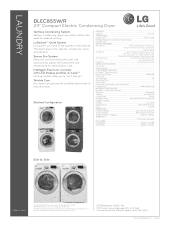
... condensing dryers dry clothes without the need for optimal fabric care. LoDecibel™ Quiet System LG washers are subject to change without notice 2009 LG Electronics U.S.A., Inc. Sensor Dry System Measures moisture during the cycle, and automatically adjusts the drying time and temperature for external venting. warranty 1 Year Parts and Labor upc codes DLEC855W 048231 010399 DLEC855R 048231 010405 Side by Side LGusa.com Design and specifications are some of their respective owners. LG...
... condensing dryers dry clothes without the need for optimal fabric care. LoDecibel™ Quiet System LG washers are subject to change without notice 2009 LG Electronics U.S.A., Inc. Sensor Dry System Measures moisture during the cycle, and automatically adjusts the drying time and temperature for external venting. warranty 1 Year Parts and Labor upc codes DLEC855W 048231 010399 DLEC855R 048231 010405 Side by Side LGusa.com Design and specifications are some of their respective owners. LG...


