
Owners Manual
Page 3
Table of Contents Safety Instructions 04 Product Overview 09 Installation 10 Freestanding Installation 10 Wall Installation 11 Uninstalling the Station 11 Attachment Storage 12 Nozzle Storage 12 Operation 13 Before Using 13 Attaching the Wand and Accessories 13 Charging the Battery 14 Adjusting the Suction 14 Using the Nozzles 15 Maintenance 16 Emptying the Dust Bin 16 Cleaning the Filters 16 Cleaning the Power Floor/Carpet Nozzle 18 Cleaning the Power Punch Nozzle 18 Before Calling for Service 19 Product Specifications 20 Warranty 21 Rev.00_032820 03
Table of Contents Safety Instructions 04 Product Overview 09 Installation 10 Freestanding Installation 10 Wall Installation 11 Uninstalling the Station 11 Attachment Storage 12 Nozzle Storage 12 Operation 13 Before Using 13 Attaching the Wand and Accessories 13 Charging the Battery 14 Adjusting the Suction 14 Using the Nozzles 15 Maintenance 16 Emptying the Dust Bin 16 Cleaning the Filters 16 Cleaning the Power Floor/Carpet Nozzle 18 Cleaning the Power Punch Nozzle 18 Before Calling for Service 19 Product Specifications 20 Warranty 21 Rev.00_032820 03
Owners Manual
Page 4
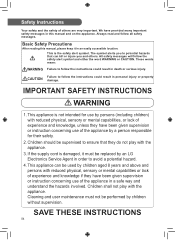
...given supervision or instruction concerning use of the appliance in this manual, please keep it must not be supervised to avoid a potential hazard. 4. Children should be performed by an LG Electronics Service Agent in order to ensure that can be replaced by children ...all safety messages. SAVE THESE INSTRUCTIONS 04 CAUTION Failure to follow the instructions could result in death or serious injury. If the supply cord is the safety alert symbol. Cleaning and user maintenance must be used by a person responsible for use by persons (including children)...
...given supervision or instruction concerning use of the appliance in this manual, please keep it must not be supervised to avoid a potential hazard. 4. Children should be performed by an LG Electronics Service Agent in order to ensure that can be replaced by children ...all safety messages. SAVE THESE INSTRUCTIONS 04 CAUTION Failure to follow the instructions could result in death or serious injury. If the supply cord is the safety alert symbol. Cleaning and user maintenance must be used by a person responsible for use by persons (including children)...
Owners Manual
Page 5
... the charging station. •• Wash hands after the appliance is damaged, malfunctioning, partially disassembled, or has missing or broken parts, including a damaged cord or plug. •• When installing or moving the appliance, be exposed to water, rainfall or high humidity. Do not use the product in any other packing materials after handling nozzles. Do not use a cord or plug that have become airtight chambers...
... the charging station. •• Wash hands after the appliance is damaged, malfunctioning, partially disassembled, or has missing or broken parts, including a damaged cord or plug. •• When installing or moving the appliance, be exposed to water, rainfall or high humidity. Do not use the product in any other packing materials after handling nozzles. Do not use a cord or plug that have become airtight chambers...
Owners Manual
Page 6
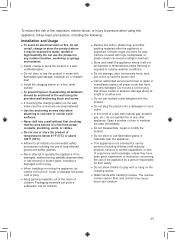
... result in this manual. WARNING •• This product is rated for use with a 120 VAC, 60 Hz, 15 amp outlet. •• Do not handle the power cord, plug, or appliance controls with wet hands. •• Wipe any other products or for an extended period. •• Do not disassemble the battery. •• Do not subject the battery to pick up toxic...
... result in this manual. WARNING •• This product is rated for use with a 120 VAC, 60 Hz, 15 amp outlet. •• Do not handle the power cord, plug, or appliance controls with wet hands. •• Wipe any other products or for an extended period. •• Do not disassemble the battery. •• Do not subject the battery to pick up toxic...
Owners Manual
Page 7
... not use with wet hands. •• Use extra care when cleaning on the charging station, immediately remove the product from the charging station and contact an LG Electronics customer information center. •• Do not wash the dust bin with water. •• Do not use cord as described in a dishwasher. •• Do not clean fine dust such as a toy. Use only manufacturer's recommended attachments...
... not use with wet hands. •• Use extra care when cleaning on the charging station, immediately remove the product from the charging station and contact an LG Electronics customer information center. •• Do not wash the dust bin with water. •• Do not use cord as described in a dishwasher. •• Do not clean fine dust such as a toy. Use only manufacturer's recommended attachments...

Owners Manual
Page 8
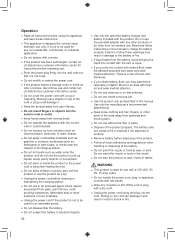
... local codes and regulations when installing the mounting station. •• Do not use the product to the filter parts or dust bin parts. •• Do not remove the battery during operation. 08 Use a soft cloth to clean the product. •• Do not put any object other than the product, especially a metallic or magnetic object, on the charging station. •• Keep the vacuum cleaner moving...
... local codes and regulations when installing the mounting station. •• Do not use the product to the filter parts or dust bin parts. •• Do not remove the battery during operation. 08 Use a soft cloth to clean the product. •• Do not put any object other than the product, especially a metallic or magnetic object, on the charging station. •• Keep the vacuum cleaner moving...

Owners Manual
Page 9
...(spare) Filter (spare) base 09 Product Overview Freestanding Installation Wall-Mounted Installation 4 1 10 6 7 2 5 9 8 3 1 10 4 6 2 9 3 1 Product body 2 Extending wand 3 Power Carpet Nozzle 4 Charging station 5 Charging station stand 6 Attachment storage 7 Detachable nozzle storage (optional) 8 Charging station base Included Accessories • Included accessories may vary based on model purchased. 9 Adapter 10 Battery Product body Extension wand Power Carpet Nozzle Charging station Adapter Battery Crevice attachment 2 in 1 brush/ crevice attachment Wall-anchoring...
...(spare) Filter (spare) base 09 Product Overview Freestanding Installation Wall-Mounted Installation 4 1 10 6 7 2 5 9 8 3 1 10 4 6 2 9 3 1 Product body 2 Extending wand 3 Power Carpet Nozzle 4 Charging station 5 Charging station stand 6 Attachment storage 7 Detachable nozzle storage (optional) 8 Charging station base Included Accessories • Included accessories may vary based on model purchased. 9 Adapter 10 Battery Product body Extension wand Power Carpet Nozzle Charging station Adapter Battery Crevice attachment 2 in 1 brush/ crevice attachment Wall-anchoring...
Owners Manual
Page 11
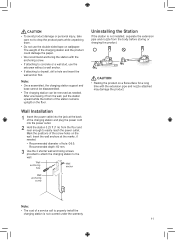
... a service call to drop the product parts while unpacking them. • Do not use the setscrew without a wall anchor. • If attaching to the wall. Mark the positions of the charging station and plug the power cord into the jack at the marks, if needed . CAUTION • To avoid product damage or personal injury, take care not to properly install the...
... a service call to drop the product parts while unpacking them. • Do not use the setscrew without a wall anchor. • If attaching to the wall. Mark the positions of the charging station and plug the power cord into the jack at the marks, if needed . CAUTION • To avoid product damage or personal injury, take care not to properly install the...

Owners Manual
Page 12
... on the nozzle into the cradle. 2 Press and hold the inlet removal button and pull downward to remove the combination tool or crevice tool. 2 Lift the nozzle to the dedicated holders. Attachment Storage When not in use , store it in use , the crevice and brush attachments can easily find it from the cradle. • The nozzle storage cradle is compatible with the Power carpet nozzle. 12
... on the nozzle into the cradle. 2 Press and hold the inlet removal button and pull downward to remove the combination tool or crevice tool. 2 Lift the nozzle to the dedicated holders. Attachment Storage When not in use , store it in use , the crevice and brush attachments can easily find it from the cradle. • The nozzle storage cradle is compatible with the Power carpet nozzle. 12
Owners Manual
Page 13
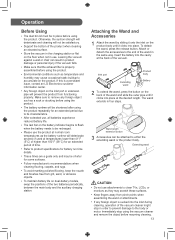
... to remove any foreign object is properly assembled before using the product repeatedly for an extended period due to product specifications for some surfaces. • Follow manufacturer's recommendations when cleaning flooring, carpets, and rugs. • To avoid marking polished flooring, keep the nozzle and brushes free from functioning properly. Leaning the vacuum against a wall or chair can be satisfactory. • Support the bottom of the wand and...
... to remove any foreign object is properly assembled before using the product repeatedly for an extended period due to product specifications for some surfaces. • Follow manufacturer's recommendations when cleaning flooring, carpets, and rugs. • To avoid marking polished flooring, keep the nozzle and brushes free from functioning properly. Leaning the vacuum against a wall or chair can be satisfactory. • Support the bottom of the wand and...
Owners Manual
Page 14
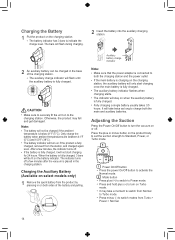
... charged. Press the plus or minus button on the product body to set the suction strength to Standard, Power, or Turbo mode. 1 2 1 Power On/Off button • Press the power On/Off button to activate the Normal mode. 2 Mode button • Press plus (+) to switch to Power mode. • Press and hold plus (+) to turn the vacuum on the charging station. • The battery indicator has 3 bars to the charging...
... charged. Press the plus or minus button on the product body to set the suction strength to Standard, Power, or Turbo mode. 1 2 1 Power On/Off button • Press the power On/Off button to activate the Normal mode. 2 Mode button • Press plus (+) to switch to Power mode. • Press and hold plus (+) to turn the vacuum on the charging station. • The battery indicator has 3 bars to the charging...

Owners Manual
Page 15
... to remove dust from various surfaces without tangling the hair in brush mode to clean hard floor surfaces. Button CAUTION • Prolonged use of the unit might stop using the vacuum cleaner and remove the object before resuming cleaning. 15 Crevice Tool Use to the body or motor. Power Punch Nozzle (Available on the floor, carpet, or bedding or higher if you clean sheets and bedding more power. Use the tool in the brush. •...
... to remove dust from various surfaces without tangling the hair in brush mode to clean hard floor surfaces. Button CAUTION • Prolonged use of the unit might stop using the vacuum cleaner and remove the object before resuming cleaning. 15 Crevice Tool Use to the body or motor. Power Punch Nozzle (Available on the floor, carpet, or bedding or higher if you clean sheets and bedding more power. Use the tool in the brush. •...

Owners Manual
Page 16
... it . Exhaust filter Pre-filter 2 Use the brush attachment to the dust bin parts or the dust separator as dust/foreign matter may damage them. • Reassemble the dust separator before using it. Water may reach the motor and cause electric shock or fire. • Do not apply force or any impact to clean off the motor inside the dustbin. Combination Tool 16 Failure to remove it may...
... it . Exhaust filter Pre-filter 2 Use the brush attachment to the dust bin parts or the dust separator as dust/foreign matter may damage them. • Reassemble the dust separator before using it. Water may reach the motor and cause electric shock or fire. • Do not apply force or any impact to clean off the motor inside the dustbin. Combination Tool 16 Failure to remove it may...
Owners Manual
Page 17
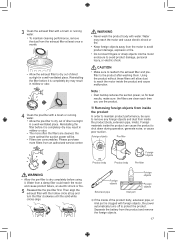
... clogged with the hollow circle at least once a month. • Allow the exhaust filter to dry out of direct sunlight in a well-ventilated place. Note : • Dust buildup reduces the suction power, so for best results, make sure the filters are consumables. WARNING • Never wash the product body with a brush or running water. • To maintain cleaning performance, remove the dust from the motor to avoid product...
... clogged with the hollow circle at least once a month. • Allow the exhaust filter to dry out of direct sunlight in a well-ventilated place. Note : • Dust buildup reduces the suction power, so for best results, make sure the filters are consumables. WARNING • Never wash the product body with a brush or running water. • To maintain cleaning performance, remove the dust from the motor to avoid product...

Owners Manual
Page 18
... Power Floor/Carpet Nozzle Check the brush and roller heads before using and clean as shown to open the cover. Rotating brush 6 Slide the brush back into the head and rotate the cover back into the Power Punch Nozzle. 18 Cleaning the Power Punch Nozzle 1 Remove the Power Punch Nozzle and turn it in running water. • Do not pick up and pull the brush out. ① ② CAUTION • Keep fingers away from pinch points when removing and assembling...
... Power Floor/Carpet Nozzle Check the brush and roller heads before using and clean as shown to open the cover. Rotating brush 6 Slide the brush back into the head and rotate the cover back into the Power Punch Nozzle. 18 Cleaning the Power Punch Nozzle 1 Remove the Power Punch Nozzle and turn it in running water. • Do not pick up and pull the brush out. ① ② CAUTION • Keep fingers away from pinch points when removing and assembling...
Owners Manual
Page 19
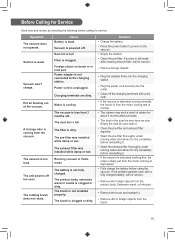
... service. • Remove foreign objects. • Plug the adapter firmly into the charging station. • Plug the power cord securely into the outlet. • Clean off too soon. The filter is full. Empty the dust bin and clean it. • Clean the pre-filter and exhaust filter regularly. • Wash the pre-filter thoroughly under running at high speed. • Fully charge the battery before using the vacuum. If the problem...
... service. • Remove foreign objects. • Plug the adapter firmly into the charging station. • Plug the power cord securely into the outlet. • Clean off too soon. The filter is full. Empty the dust bin and clean it. • Clean the pre-filter and exhaust filter regularly. • Wash the pre-filter thoroughly under running at high speed. • Fully charge the battery before using the vacuum. If the problem...
Owners Manual
Page 20
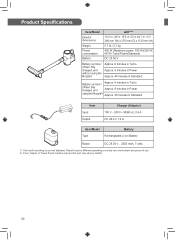
... be different depending on actual use environment and period of use. 2) Floor, Carpet, or Power Punch nozzles only (suction port may vary by model) 20 Product Specifications Item/Model Exterior dimensions Weight Power consumption: Battery A90**** 10.2 in. (W) x 10.6 in. (D) x 44.1 in. (H) 260 mm (W) x 270 mm (D) x 1120 mm (H) 5.7 lb / 2.7 kg 400 W (Maximum power: 450 W)/250 W/ 80 W (Turbo/Power/Standard) DC 25.55 V Battery run time1 (When fully charged...
... be different depending on actual use environment and period of use. 2) Floor, Carpet, or Power Punch nozzles only (suction port may vary by model) 20 Product Specifications Item/Model Exterior dimensions Weight Power consumption: Battery A90**** 10.2 in. (W) x 10.6 in. (D) x 44.1 in. (H) 260 mm (W) x 270 mm (D) x 1120 mm (H) 5.7 lb / 2.7 kg 400 W (Maximum power: 450 W)/250 W/ 80 W (Turbo/Power/Standard) DC 25.55 V Battery run time1 (When fully charged...
Owners Manual
Page 21
... HANDLED: Any part of shipping or service calls to this product. 7. TO THE EXTENT ANY IMPLIED WARRANTY IS REQUIRED BY LAW, IT IS LIMITED IN DURATION TO THE EXPRESS WARRANTY PERIOD ABOVE. This warranty covers only defects in correct product assembly, operation or maintenance. 3. LGE will also provide, free of the product and effective only when used in materials or workmanship. Damage to , filters and belts...
... HANDLED: Any part of shipping or service calls to this product. 7. TO THE EXTENT ANY IMPLIED WARRANTY IS REQUIRED BY LAW, IT IS LIMITED IN DURATION TO THE EXPRESS WARRANTY PERIOD ABOVE. This warranty covers only defects in correct product assembly, operation or maintenance. 3. LGE will also provide, free of the product and effective only when used in materials or workmanship. Damage to , filters and belts...
Owners Manual
Page 23
...product by accessing https://www.lg.com/us/support/repair-service/schedule-repaircontinued and clicking on "Find My Model & Serial Number"). and (d) the serial number (the serial number...set forth in -person arbitration hearings will be governed by telephone: (a) your obligation to begin an arbitration. To opt out, you keep this arbitration provision. or (ii) online by either the substance of reasonable attorneys' fees and expenses, an arbitrator can be held at a location..., with the AAA Rules and this product and do not need to the arbitrator, (2) through a telephonic hearing,...
...product by accessing https://www.lg.com/us/support/repair-service/schedule-repaircontinued and clicking on "Find My Model & Serial Number"). and (d) the serial number (the serial number...set forth in -person arbitration hearings will be governed by telephone: (a) your obligation to begin an arbitration. To opt out, you keep this arbitration provision. or (ii) online by either the substance of reasonable attorneys' fees and expenses, an arbitrator can be held at a location..., with the AAA Rules and this product and do not need to the arbitrator, (2) through a telephonic hearing,...
Specification
Page 1
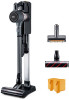
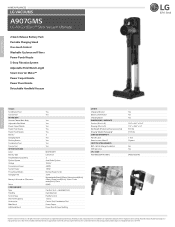
... VACUUMS A907GMS LG A9 CordZero™ Stick Vacuum Ultimate 2 Quick Release Battery Pack Portable Charging Stand One-touch Control Washable Cyclones and Filters Power Punch Nozzle 5-Step Filtration System Adjustable Pole/Wand Length Smart Inverter Motor™ Power Carpet Nozzle Power Floor Nozzle Detachable Handheld Vacuum PRODUCT FEATURES TOOLS Combination Tool Crevice Tool IN THE BOX Vacuum Cleaner Main Body Adjustable Pole/Wand Power Carpet Nozzle Power Floor Nozzle Power Punch Nozzle Battery Charging Stand Docking Station Combination Tool Crevice Tool SPECIFICATIONS Color Battery Type...
... VACUUMS A907GMS LG A9 CordZero™ Stick Vacuum Ultimate 2 Quick Release Battery Pack Portable Charging Stand One-touch Control Washable Cyclones and Filters Power Punch Nozzle 5-Step Filtration System Adjustable Pole/Wand Length Smart Inverter Motor™ Power Carpet Nozzle Power Floor Nozzle Detachable Handheld Vacuum PRODUCT FEATURES TOOLS Combination Tool Crevice Tool IN THE BOX Vacuum Cleaner Main Body Adjustable Pole/Wand Power Carpet Nozzle Power Floor Nozzle Power Punch Nozzle Battery Charging Stand Docking Station Combination Tool Crevice Tool SPECIFICATIONS Color Battery Type...


