User Manual
Page 3
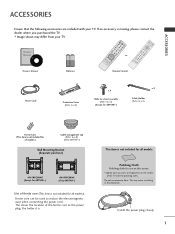
.... 1 Owner's Manual AV MODE POWER ENERGY SAVING LIST MUTE Q.VIEW MENU Q.MENU INFO i GUIDE FAMVARK RETURN / EXIT or FREEZE ENERGY SAVING RATIO Owner's Manual Batteries Remote Control Power Cord Protection Cover (Refer to p.8) x 4 Bolts for stand assembly (Refer to p.8) (Except for 60PS40**) x 2 Cable Holder (Refer to reduce the electromagnetic wave when connecting...
.... 1 Owner's Manual AV MODE POWER ENERGY SAVING LIST MUTE Q.VIEW MENU Q.MENU INFO i GUIDE FAMVARK RETURN / EXIT or FREEZE ENERGY SAVING RATIO Owner's Manual Batteries Remote Control Power Cord Protection Cover (Refer to p.8) x 4 Bolts for stand assembly (Refer to p.8) (Except for 60PS40**) x 2 Cable Holder (Refer to reduce the electromagnetic wave when connecting...
User Manual
Page 4
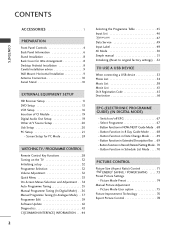
...in Record/Remind Setting Mode . 70 - CONTENTS CONTENTS ACCESSORIES 1 PREPARATION Front Panel Controls 4 Back Panel Information 6 Stand Installation 8 Back Cover for PC Mode 24 WATCHING TV / PROGRAMME CONTROL Remote Control Key Functions 28 Turning on /off EPG 67 - Button Function in Schedule List Mode... . . . . 70 PICTURE CONTROL Picture Size (Aspect Ratio) Control 71 ENERGY SAVING / POWER SAVING . . . . .73...
...in Record/Remind Setting Mode . 70 - CONTENTS CONTENTS ACCESSORIES 1 PREPARATION Front Panel Controls 4 Back Panel Information 6 Stand Installation 8 Back Cover for PC Mode 24 WATCHING TV / PROGRAMME CONTROL Remote Control Key Functions 28 Turning on /off EPG 67 - Button Function in Schedule List Mode... . . . . 70 PICTURE CONTROL Picture Size (Aspect Ratio) Control 71 ENERGY SAVING / POWER SAVING . . . . .73...
User Manual
Page 6
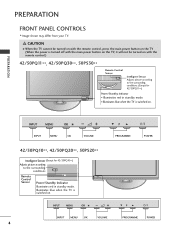
... is turned off with the main power button on the TV, it will not be turned on with the remote control.) 42/50PQ11**, 42/50PQ30**, 50PS30** Remote Control Sensor Intelligent Sensor Adjusts picture according to the surrounding conditions. (Except for 42/50PQ10**) Adjusts picture according to ...the surrounding conditions Remote Control Sensor Power/Standby Indicator Illuminates red in standby mode. • Illuminates blue when the TV is switched on . POWER...
... is turned off with the main power button on the TV, it will not be turned on with the remote control.) 42/50PQ11**, 42/50PQ30**, 50PS30** Remote Control Sensor Intelligent Sensor Adjusts picture according to the surrounding conditions. (Except for 42/50PQ10**) Adjusts picture according to ...the surrounding conditions Remote Control Sensor Power/Standby Indicator Illuminates red in standby mode. • Illuminates blue when the TV is switched on . POWER...

User Manual
Page 7
OK MENU + - + OK - + PP VOLUME P PROGRAMME 5 PREPARATION 42/50PQ60**, 50PS60** P PROGRAMME P Remote Control Sensor Intelligent Sensor Adjusts picture according to the surrounding conditions Power/Standby Indicator • Illuminates red in standby mode. • illuminates green when the TV ... TV remains on . INPUT MENU OK INPUT MENU OK INPUT MENU INPUT - UT MENU OK 60PS40** P POWER OK MENU INPUT VOLUME OK MENU INPUT POWER Remote Control Sensor POWER Power/Standby Indicator • illuminates red in standby mode. • The LED is switched on .
OK MENU + - + OK - + PP VOLUME P PROGRAMME 5 PREPARATION 42/50PQ60**, 50PS60** P PROGRAMME P Remote Control Sensor Intelligent Sensor Adjusts picture according to the surrounding conditions Power/Standby Indicator • Illuminates red in standby mode. • illuminates green when the TV ... TV remains on . INPUT MENU OK INPUT MENU OK INPUT MENU INPUT - UT MENU OK 60PS40** P POWER OK MENU INPUT VOLUME OK MENU INPUT POWER Remote Control Sensor POWER Power/Standby Indicator • illuminates red in standby mode. • The LED is switched on .
User Manual
Page 13
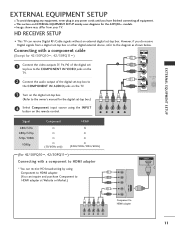
I This section on the remote control. Connecting with a component to HDMI adapter * You can receive HD broadcasting by using the INPUT button on EXTERNAL EQUIPMENT SETUP mainly uses diagrams for the ...
I This section on the remote control. Connecting with a component to HDMI adapter * You can receive HD broadcasting by using the INPUT button on EXTERNAL EQUIPMENT SETUP mainly uses diagrams for the ...
User Manual
Page 14
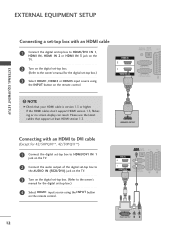
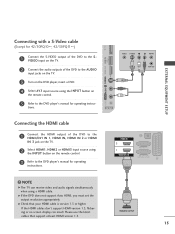
... digital set-top box. (Refer to the owner's manual for the digital set -top box.) 4 Select HDMI1 input source using the INPUT button on the remote control. If the HDMI cables don't support HDMI version 1.3, flickering or no screen display can result. EXTERNAL EQUIPMENT SETUP EXTERNAL EQUIPMENT SETUP Connecting a set-top box... box. (Refer to the owner's manual for the digital set -top box.) 3 Select HDMI1, HDMI2 or HDMI3 input source using the INPUT button on the remote control. NOTE G Check that support at least HDMI version 1.3. HDMI IN 2 1 HDMI/DVI IN 1 2 12
... digital set-top box. (Refer to the owner's manual for the digital set -top box.) 4 Select HDMI1 input source using the INPUT button on the remote control. If the HDMI cables don't support HDMI version 1.3, flickering or no screen display can result. EXTERNAL EQUIPMENT SETUP EXTERNAL EQUIPMENT SETUP Connecting a set-top box... box. (Refer to the owner's manual for the digital set -top box.) 3 Select HDMI1, HDMI2 or HDMI3 input source using the INPUT button on the remote control. NOTE G Check that support at least HDMI version 1.3. HDMI IN 2 1 HDMI/DVI IN 1 2 12
User Manual
Page 15
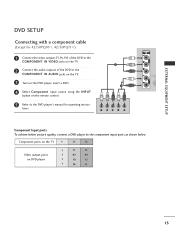
... picture quality, connect a DVD player to the DVD player's manual for operating instruc- Component ports on the TV Y PB PR Video output ports on the remote control. 5 Refer to the component input ports as shown below.
... picture quality, connect a DVD player to the DVD player's manual for operating instruc- Component ports on the TV Y PB PR Video output ports on the remote control. 5 Refer to the component input ports as shown below.
User Manual
Page 16
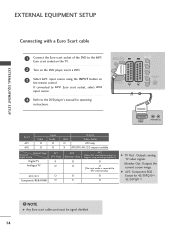
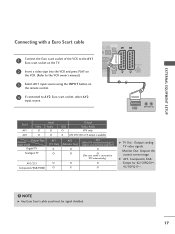
... SETUP Connecting with a Euro Scart cable 1 Connect the Euro scart socket of the DVD to the A V 1 Euro scart socket on the TV. 2 Turn on the remote control. Output Type Current input mode Digital TV Analogue TV AV1 (TV Out) X O AV2 (Monitor Out) O O AV2 (When DTV scheduled recording is available. Monitor Out: Outputs...
... SETUP Connecting with a Euro Scart cable 1 Connect the Euro scart socket of the DVD to the A V 1 Euro scart socket on the TV. 2 Turn on the remote control. Output Type Current input mode Digital TV Analogue TV AV1 (TV Out) X O AV2 (Monitor Out) O O AV2 (When DTV scheduled recording is available. Monitor Out: Outputs...
User Manual
Page 17
... a DVD. AV IN 3 Connecting the HDMI cable 1 Connect the HDMI output of the DVD to the AUDIO input jacks on the TV. 3 Turn on the remote control. 3 Refer to the DVD player's manual for operating instruc- VIDEO S-VIDEO L R ANT IN OUTPUT SWITCH 1 ANT OUT 2 VIDEO L/MONO AUDIO R S-VIDEO HDMI ...IN 3 4 Select AV3 input source using the INPUT button on the remote control. 5 Refer to the HDMI/DVI IN 1, HDMI IN, HDMI IN 2 or H D M I IN 3 jack on the TV. 2 Select HDMI1, HDMI2 or HDMI3 input ...
... a DVD. AV IN 3 Connecting the HDMI cable 1 Connect the HDMI output of the DVD to the AUDIO input jacks on the TV. 3 Turn on the remote control. 3 Refer to the DVD player's manual for operating instruc- VIDEO S-VIDEO L R ANT IN OUTPUT SWITCH 1 ANT OUT 2 VIDEO L/MONO AUDIO R S-VIDEO HDMI ...IN 3 4 Select AV3 input source using the INPUT button on the remote control. 5 Refer to the HDMI/DVI IN 1, HDMI IN, HDMI IN 2 or H D M I IN 3 jack on the TV. 2 Select HDMI1, HDMI2 or HDMI3 input ...
User Manual
Page 19
... Euro scart socket of the VCR to the A V 1 Euro scart socket on the TV. 2 Insert a video tape into the VCR and press PLAY on the remote control. 4 If connected to AV2 Euro scart socket, select AV2 input source. 1 AUDIO/ VIDEO (R) AUDIO (L) Input Scart Video Audio RGB AV1 O O O Output Video, Audio ATV only...
... Euro scart socket of the VCR to the A V 1 Euro scart socket on the TV. 2 Insert a video tape into the VCR and press PLAY on the remote control. 4 If connected to AV2 Euro scart socket, select AV2 input source. 1 AUDIO/ VIDEO (R) AUDIO (L) Input Scart Video Audio RGB AV1 O O O Output Video, Audio ATV only...
User Manual
Page 20
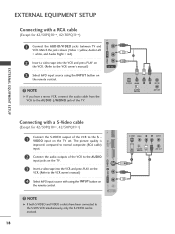
... the VCR and press PLAY on the VCR. (Refer to the VCR owner's manual.) AV IN 3 3 Select A V 3 input source using the INPUT button on the remote control. AV IN 3 ! EXTERNAL EQUIPMENT SETUP VIDEO L/MONO AUDIO R S-VIDEO HDMI IN 3 Connecting with a RCA cable (Except for 42/50PQ10**, 42/50PQ11**) 1 Connect the S-VIDEO output...
... the VCR and press PLAY on the VCR. (Refer to the VCR owner's manual.) AV IN 3 3 Select A V 3 input source using the INPUT button on the remote control. AV IN 3 ! EXTERNAL EQUIPMENT SETUP VIDEO L/MONO AUDIO R S-VIDEO HDMI IN 3 Connecting with a RCA cable (Except for 42/50PQ10**, 42/50PQ11**) 1 Connect the S-VIDEO output...

User Manual
Page 22
... USB IN jacks, you use the U S B 1 2 function. (G p.53) VIDEO L/MONO AUDIO R S-VIDEO HDMI IN 3 20 AV IN 3 Refer to the USB IN jacks on the remote control. 3 Operate the corresponding external equipment. AV IN 3 VIDEO L/MONO AUDIO R S-VIDEO HDMI IN 3 Camcorder Video Game Set VIDEO L R 1 USB SETUP (Except for 42/50PQ10**, 42...
... USB IN jacks, you use the U S B 1 2 function. (G p.53) VIDEO L/MONO AUDIO R S-VIDEO HDMI IN 3 20 AV IN 3 Refer to the USB IN jacks on the remote control. 3 Operate the corresponding external equipment. AV IN 3 VIDEO L/MONO AUDIO R S-VIDEO HDMI IN 3 Camcorder Video Game Set VIDEO L R 1 USB SETUP (Except for 42/50PQ10**, 42...

User Manual
Page 23
... the AUDIO IN (RGB/DVI) jack on the TV. 3 Turn on the PC and the TV 4 Select R G B input source using the INPUT button on the remote control. HDMI IN 2 1 HDMI/DVI IN 2 1 Connecting with a D-sub 15 pin cable 1 Connect the RGB output of the PC to the HDMI/DVI IN1 jack on... AUDIO IN (RGB/DVI) jack on the TV. 3 Turn on the PC and the TV. 4 Select HDMI1 input source using the INPUT button on the remote control. AUDIO RGB OUTPUT HDMI IN 2 1 HDMI/DVI IN 1 2 DVI-PC OUTPUT AUDIO 21
... the AUDIO IN (RGB/DVI) jack on the TV. 3 Turn on the PC and the TV 4 Select R G B input source using the INPUT button on the remote control. HDMI IN 2 1 HDMI/DVI IN 2 1 Connecting with a D-sub 15 pin cable 1 Connect the RGB output of the PC to the HDMI/DVI IN1 jack on... AUDIO IN (RGB/DVI) jack on the TV. 3 Turn on the PC and the TV. 4 Select HDMI1 input source using the INPUT button on the remote control. AUDIO RGB OUTPUT HDMI IN 2 1 HDMI/DVI IN 1 2 DVI-PC OUTPUT AUDIO 21
User Manual
Page 30
.... Coloured These buttons are used for teletext. When you toggle this button, the Simplink menu appears at the remote control sensor on the TV. WATCHING TV / PROGRAMME CONTROL V MODE AV MODE POWER POWER SAVING POWER SAVING 1 POWER AV MODE 1 ENERGY SAVING LIST AV MODE POWER... images and sounds when con- Q.VIEW Returns to the previously viewed programme. WATCHING TV / PROGRAMME CONTROL REMOTE CONTROL KEY FUNCTIONS (Only 42/50PQ10**, 42/50PQ11**, 42/50PQ20**, 42/50PQ30**) When using the remote control, aim it at the screen.(G p.47)(Except for 42/50PQ10**, 42/50PQ11**)
.... Coloured These buttons are used for teletext. When you toggle this button, the Simplink menu appears at the remote control sensor on the TV. WATCHING TV / PROGRAMME CONTROL V MODE AV MODE POWER POWER SAVING POWER SAVING 1 POWER AV MODE 1 ENERGY SAVING LIST AV MODE POWER... images and sounds when con- Q.VIEW Returns to the previously viewed programme. WATCHING TV / PROGRAMME CONTROL REMOTE CONTROL KEY FUNCTIONS (Only 42/50PQ10**, 42/50PQ11**, 42/50PQ20**, 42/50PQ30**) When using the remote control, aim it at the screen.(G p.47)(Except for 42/50PQ10**, 42/50PQ11**)
User Manual
Page 34
...on, you wish to turn TV on, press the INPUT or P D E button on the TV or press the POWER, INPUT, P or NUMBER button on the remote control and the TV will switch on the TV or press the POWER but- c. Note: a. Press the RETURN button to change the current OSD to adjust... can adjust the Language, Mode Setting, Country, Auto tuning. or NUMBER buttons to turn TV on, press the INPUT or P D E button on . ton on the remote control and the TV will switch on. The mode (Home Use, Store Demo) can cancel this function by us after turning on the DTV broadcasting environment...
...on, you wish to turn TV on, press the INPUT or P D E button on the TV or press the POWER, INPUT, P or NUMBER button on the remote control and the TV will switch on the TV or press the POWER but- c. Note: a. Press the RETURN button to change the current OSD to adjust... can adjust the Language, Mode Setting, Country, Auto tuning. or NUMBER buttons to turn TV on, press the INPUT or P D E button on . ton on the remote control and the TV will switch on. The mode (Home Use, Store Demo) can cancel this function by us after turning on the DTV broadcasting environment...

User Manual
Page 44
...Information Move OK : : OOnn SETUP Auto Tuning Manual Tuning Programme Edit Software Update Diagnostics CI Information Move OK O::fOOfnn OOnn WATCHING TV / PROGRAMME CONTROL 1 MENU 2 OK Select SETUP. Do you like to "O n" appears. - i Close Simple Update :for scheduled update stream When the ...off , downloading starts. When the power is turned on while updating, the progress status is completed. Select the Y E S using the remote control or local key. During Progress of updated digital software information will result in the following menu on the TV screen. Do you want stop ...
...Information Move OK : : OOnn SETUP Auto Tuning Manual Tuning Programme Edit Software Update Diagnostics CI Information Move OK O::fOOfnn OOnn WATCHING TV / PROGRAMME CONTROL 1 MENU 2 OK Select SETUP. Do you like to "O n" appears. - i Close Simple Update :for scheduled update stream When the ...off , downloading starts. When the power is turned on while updating, the progress status is completed. Select the Y E S using the remote control or local key. During Progress of updated digital software information will result in the following menu on the TV screen. Do you want stop ...

User Manual
Page 50
...output terminal of the Home Theater using HDMI cables. 2 Connect the Digital Audio output terminal on the remote control, you can stop the operation of the screen. 3 3 VCR playback : Play and control the connected VCR. 4 Selected Device When device is connected (displayed in the Speaker menu by SIMPLINK... switches to home theater speaker (HT speaker). When a device is not connected (displayed in gray) 4 HDD Recordings playback : Play and control 5 recordings stored in HDD. Home Theater ! NOTE G Connect the HDMI/DVI IN or HDMI IN terminal of the TV to the previous...
...output terminal of the Home Theater using HDMI cables. 2 Connect the Digital Audio output terminal on the remote control, you can stop the operation of the screen. 3 3 VCR playback : Play and control the connected VCR. 4 Selected Device When device is connected (displayed in the Speaker menu by SIMPLINK... switches to home theater speaker (HT speaker). When a device is not connected (displayed in gray) 4 HDD Recordings playback : Play and control 5 recordings stored in HDD. Home Theater ! NOTE G Connect the HDMI/DVI IN or HDMI IN terminal of the TV to the previous...

User Manual
Page 54
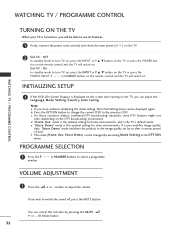
WATCHING TV / PROGRAMME CONTROL WATCHING TV / PROGRAMME CONTROL Initializing (Reset to other city or country. When the Factory Reset is "O n", the message to the previous menu screen. 52 OPTION Move OK E SIMPLINK Key ... settings of D a y and Night of the Picture Mode cannot be : r1eset. When the Lock System menu is completed, you forget your password, press '7', '7', '7', '7' on the remote control handset. • Press the MENU button to return to normal TV viewing. • Press the RETURN button to move to original factory settings) This function...
WATCHING TV / PROGRAMME CONTROL WATCHING TV / PROGRAMME CONTROL Initializing (Reset to other city or country. When the Factory Reset is "O n", the message to the previous menu screen. 52 OPTION Move OK E SIMPLINK Key ... settings of D a y and Night of the Picture Mode cannot be : r1eset. When the Lock System menu is completed, you forget your password, press '7', '7', '7', '7' on the remote control handset. • Press the MENU button to return to normal TV viewing. • Press the RETURN button to move to original factory settings) This function...

User Manual
Page 56
... USB Connector (sold separately) to fix the USB memory stick to the USB connector holder of marked photos 4 Usable USB memory 5 Corresponding buttons on the remote control 1 2 3 Photo List Drive1 1366x768, 125KB Up Folder Page 2/3 No Marked Up Folder KY101 KY102 JMJ001 JMJ002 JMJ003 JMJ004 Navigation Option P Page Change 5 4 KY103 KY104 KY105...
... USB Connector (sold separately) to fix the USB memory stick to the USB connector holder of marked photos 4 Usable USB memory 5 Corresponding buttons on the remote control 1 2 3 Photo List Drive1 1366x768, 125KB Up Folder Page 2/3 No Marked Up Folder KY101 KY102 JMJ001 JMJ002 JMJ003 JMJ004 Navigation Option P Page Change 5 4 KY103 KY104 KY105...

User Manual
Page 60
Music file on the remote control 1 2 3 Music List Music S003 1:340, 120KB Up Folder Page 2/3 No Marked Title Up Folder S001 S002 S003 S004 S005 Navigation Option P Page Change 5 4 USB Device ...
Music file on the remote control 1 2 3 Music List Music S003 1:340, 120KB Up Folder Page 2/3 No Marked Title Up Folder S001 S002 S003 S004 S005 Navigation Option P Page Change 5 4 USB Device ...

