Owner's Manual
Page 4
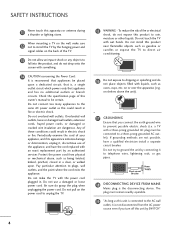
Any of this owner's manual to dripping or splashing and do grasp the plug when unplugging the power cord. Do not use of the TV. 13 Do not allow an ... which powers only that is not disconnected from physical or mechanical abuse, such as this unit is connected to ground the unit by an authorized servicer. Do not overload wall outlets. a TV with an exact replacement part by connecting it , discontinue use a damaged or loose power cord. Short-circuit Breaker Power...
Any of this owner's manual to dripping or splashing and do grasp the plug when unplugging the power cord. Do not use of the TV. 13 Do not allow an ... which powers only that is not disconnected from physical or mechanical abuse, such as this unit is connected to ground the unit by an authorized servicer. Do not overload wall outlets. a TV with an exact replacement part by connecting it , discontinue use a damaged or loose power cord. Short-circuit Breaker Power...
Owner's Manual
Page 23
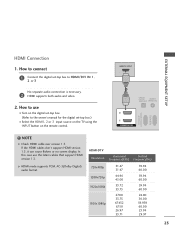
HDMI-DTV OUTPUT 1 OPTICAL DIGITAL AUDIO OUT AUDIO (RGB/DVI) 2 1 HDMI/DVI IN RS-232C IN (CONTROL & SERVICE) RGB IN(PC) ! NOTE G Check HDMI cable over version 1.3. If the HDMI cables don't support HDMI version 1.3, it can cause flickers or no screen display. ... case use I Select the HDMI1, 2 or 3 input source on the TV using the INPUT button on the digital set-top box. (Refer to the owner's manual for the digital set -top box to use the latest cables that support HDMI version 1.3. EXTERNAL EQUIPMENT SETUP HDMI Connection 1.
HDMI-DTV OUTPUT 1 OPTICAL DIGITAL AUDIO OUT AUDIO (RGB/DVI) 2 1 HDMI/DVI IN RS-232C IN (CONTROL & SERVICE) RGB IN(PC) ! NOTE G Check HDMI cable over version 1.3. If the HDMI cables don't support HDMI version 1.3, it can cause flickers or no screen display. ... case use I Select the HDMI1, 2 or 3 input source on the TV using the INPUT button on the digital set-top box. (Refer to the owner's manual for the digital set -top box to use the latest cables that support HDMI version 1.3. EXTERNAL EQUIPMENT SETUP HDMI Connection 1.
Owner's Manual
Page 24
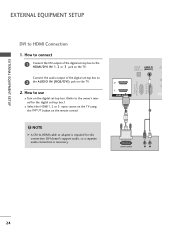
... 3 input source on the TV using the INPUT button on the TV. OPTICAL DIGITAL AUDIO OUT AUDIO IN (RGB/DVI) R CO RS-232C IN (CONTROL & SERVICE) RGB IN (PC) 2 2 1 1 HDMI/DVI IN 1 2 DVI-DTV OUTPUT R L 24 EXTERNAL EQUIPMENT SETUP EXTERNAL EQUIPMENT SETUP DVI to HDMI cable or adapter is necessary. DVI... TV. 2. How to connect 1 Connect the DVI output of the digital set -top box.) I Turn on the digital set-top box. (Refer to the owner's manual for this connection. NOTE G A DVI to HDMI Connection 1.
... 3 input source on the TV using the INPUT button on the TV. OPTICAL DIGITAL AUDIO OUT AUDIO IN (RGB/DVI) R CO RS-232C IN (CONTROL & SERVICE) RGB IN (PC) 2 2 1 1 HDMI/DVI IN 1 2 DVI-DTV OUTPUT R L 24 EXTERNAL EQUIPMENT SETUP EXTERNAL EQUIPMENT SETUP DVI to HDMI cable or adapter is necessary. DVI... TV. 2. How to connect 1 Connect the DVI output of the digital set -top box.) I Turn on the digital set-top box. (Refer to the owner's manual for this connection. NOTE G A DVI to HDMI Connection 1.

Owner's Manual
Page 26
How to the HDMI/DVI IN 1, 2 or 3 jack on the remote control. HDMI-DVD OUTPUT 1 OPTICAL DIGITAL AUDIO OUT AUD (RGB/D 2 1 HDMI/DVI IN RS-232C IN (CONTROL & SERVICE) RGB IN (PC) 26 HDMI supports both audio and video. 2. EXTERNAL EQUIPMENT SETUP EXTERNAL EQUIPMENT SETUP HDMI Connection 1. How to connect 1 Connect the HDMI output of the DVD to use I Refer to the DVD player's manual for operating instructions. I Select the HDMI1, 2 or 3 input source on the TV using the INPUT button on the TV. 2 No separate audio connection is necessary.
How to the HDMI/DVI IN 1, 2 or 3 jack on the remote control. HDMI-DVD OUTPUT 1 OPTICAL DIGITAL AUDIO OUT AUD (RGB/D 2 1 HDMI/DVI IN RS-232C IN (CONTROL & SERVICE) RGB IN (PC) 26 HDMI supports both audio and video. 2. EXTERNAL EQUIPMENT SETUP EXTERNAL EQUIPMENT SETUP HDMI Connection 1. How to connect 1 Connect the HDMI output of the DVD to use I Refer to the DVD player's manual for operating instructions. I Select the HDMI1, 2 or 3 input source on the TV using the INPUT button on the TV. 2 No separate audio connection is necessary.
Owner's Manual
Page 29
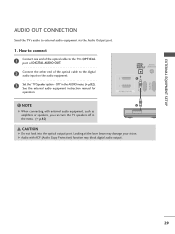
...into the optical output port. NOTE 2 G When connecting with ACP (Audio Copy Protection) function may damage your vision. EXTERNAL EQUIPMENT SETUP (CONTROL & SERVICE) AUDIO OUT CONNECTION Send the TV's audio to the digital audio input on the audio equipment. 3 Set the "TV Speaker option - How to ... audio equipment via the Audio Output port. 1. Looking at the laser beam may block digital audio output. 29 See the external audio equipment instruction manual for operation. OPTICAL DIGITAL AUDIO OUT AUDIO (RGB/DVI) RS-232C IN RGB(PC) 2 1 1 HDMII/DVI IN ! G Audio with ...
...into the optical output port. NOTE 2 G When connecting with ACP (Audio Copy Protection) function may damage your vision. EXTERNAL EQUIPMENT SETUP (CONTROL & SERVICE) AUDIO OUT CONNECTION Send the TV's audio to the digital audio input on the audio equipment. 3 Set the "TV Speaker option - How to ... audio equipment via the Audio Output port. 1. Looking at the laser beam may block digital audio output. 29 See the external audio equipment instruction manual for operation. OPTICAL DIGITAL AUDIO OUT AUDIO (RGB/DVI) RS-232C IN RGB(PC) 2 1 1 HDMII/DVI IN ! G Audio with ...
Specification
Page 2
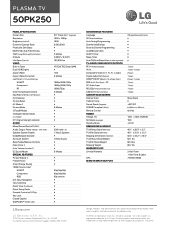
PLASMA TV 50PK250 Panel SPECIFICATION Screen Size 50" Class (50.0" diagonal)...Closed Caption • SIMPLINK™ (HDMI CEC) • LGusa.com LG Electronics U.S.A., Inc. 1000 Sylvan Avenue Englewood Cliffs, NJ 07632 Customer Service and Technical Support: (800) 243-0000 CONVENIENCE FEATURES Language 3D User Interface ...Auto Tuning/Programming Channel Add/Delete Favorite Channel Programming Auto/Manual Clock On/Off Timer Sleep...
PLASMA TV 50PK250 Panel SPECIFICATION Screen Size 50" Class (50.0" diagonal)...Closed Caption • SIMPLINK™ (HDMI CEC) • LGusa.com LG Electronics U.S.A., Inc. 1000 Sylvan Avenue Englewood Cliffs, NJ 07632 Customer Service and Technical Support: (800) 243-0000 CONVENIENCE FEATURES Language 3D User Interface ...Auto Tuning/Programming Channel Add/Delete Favorite Channel Programming Auto/Manual Clock On/Off Timer Sleep...


