Owner's Manual
Page 6
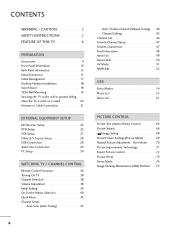
... SIMPLINK 52 USB Entry Modes 54 Photo List 55 Music List 61 PICTURE CONTROL Picture Size (Aspect Ratio) Control 64 Picture Wizard 66 Energy Saving 68 Preset Picture Settings(Picture Mode 69 Manual Picture Adjustment - User Mode 70 Picture Improvement Technology 71 Expert Picture Control 72 Picture Reset 74 Demo Mode 74 Image Sticking Minimization (ISM) Method 75 6 Auto...
... SIMPLINK 52 USB Entry Modes 54 Photo List 55 Music List 61 PICTURE CONTROL Picture Size (Aspect Ratio) Control 64 Picture Wizard 66 Energy Saving 68 Preset Picture Settings(Picture Mode 69 Manual Picture Adjustment - User Mode 70 Picture Improvement Technology 71 Expert Picture Control 72 Picture Reset 74 Demo Mode 74 Image Sticking Minimization (ISM) Method 75 6 Auto...
Owner's Manual
Page 8
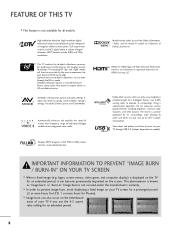
... period (2 or more hours for it can also save up to evaluate its surroundings. Using a sophisticated algorithm, the LG processes picture quality elements including brightness, contrast, color, sharpness and white balance. logos, screen menus, video game, and computer display) is... switch between common settings. Automatically enhances and amplifies the sound of ambient light, LG's "Intelligent Sensor" uses 4,096 sensing steps to 50% in power consumption. This phenomenon is three preset picture and audio settings. High-definition television. View videos and photos and listen to...
... period (2 or more hours for it can also save up to evaluate its surroundings. Using a sophisticated algorithm, the LG processes picture quality elements including brightness, contrast, color, sharpness and white balance. logos, screen menus, video game, and computer display) is... switch between common settings. Automatically enhances and amplifies the sound of ambient light, LG's "Intelligent Sensor" uses 4,096 sensing steps to 50% in power consumption. This phenomenon is three preset picture and audio settings. High-definition television. View videos and photos and listen to...
Owner's Manual
Page 9
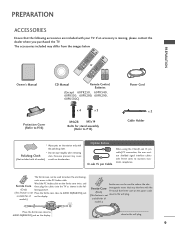
.... available for all models.) Place the ferrite core close to P.15) x 2 Cable Holder * Wipe spots on the display. netic waves in the fol- (Gray) lowing picture. (This feature is not Place the ferrite core close to reduce the electromag- close to the wall plug. 9 If an accessory is not close to...
.... available for all models.) Place the ferrite core close to P.15) x 2 Cable Holder * Wipe spots on the display. netic waves in the fol- (Gray) lowing picture. (This feature is not Place the ferrite core close to reduce the electromag- close to the wall plug. 9 If an accessory is not close to...
Owner's Manual
Page 10
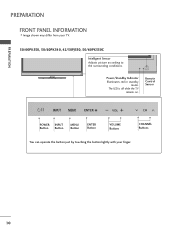
Remote Control Sensor ENTER VOL CH POWER INPUT Button Button MENU Button ENTER Button VOLUME Buttons CHANNEL Buttons ENTER You can operate the button just by touching the button lightly with your TV. 50/60PK550, 50/60PK540, 42/50PJ550, 50/60PK550C Intelligent Sensor Adjusts picture according to the surrounding conditions. PREPARATION PREPARATION FRONT PANEL INFORMATION I Image shown may differ from your finger. 10 The LED is off while the TV remains on. ENTER VOL CH Power/Standby Indicator Illuminates red in standby mode.
Remote Control Sensor ENTER VOL CH POWER INPUT Button Button MENU Button ENTER Button VOLUME Buttons CHANNEL Buttons ENTER You can operate the button just by touching the button lightly with your TV. 50/60PK550, 50/60PK540, 42/50PJ550, 50/60PK550C Intelligent Sensor Adjusts picture according to the surrounding conditions. PREPARATION PREPARATION FRONT PANEL INFORMATION I Image shown may differ from your finger. 10 The LED is off while the TV remains on. ENTER VOL CH Power/Standby Indicator Illuminates red in standby mode.

Owner's Manual
Page 11
PREPARATION 50/60PK250, 42/50PJ250, 60PK280, 60PK290 Intelligent Sensor Adjusts picture according to the surrounding conditions. ENTER VOL CH Power/Standby Indicator Illuminates red in standby mode. Remote Control Sensor ENTER VOL CH POWER INPUT Button Button MENU Button ENTER Button VOLUME Buttons CHANNEL Buttons ENTER You can operate the button just by touching the button lightly with your finger. 11 The LED is off while the TV remains on.
PREPARATION 50/60PK250, 42/50PJ250, 60PK280, 60PK290 Intelligent Sensor Adjusts picture according to the surrounding conditions. ENTER VOL CH Power/Standby Indicator Illuminates red in standby mode. Remote Control Sensor ENTER VOL CH POWER INPUT Button Button MENU Button ENTER Button VOLUME Buttons CHANNEL Buttons ENTER You can operate the button just by touching the button lightly with your finger. 11 The LED is off while the TV remains on.

Owner's Manual
Page 12
... it to the surrounding conditions. The floor or the product may fall. PREPARATION PREPARATION 42/50PJ350, 42/50PJ340, 50PK340, 50PK350, 42/50PJ350C Intelligent Sensor Adjusts picture according to any impact.It may break, causing possible injury from fragments of glass, or the TV may be damaged. 12 G Do not drag the...
... it to the surrounding conditions. The floor or the product may fall. PREPARATION PREPARATION 42/50PJ350, 42/50PJ340, 50PK340, 50PK350, 42/50PJ350C Intelligent Sensor Adjusts picture according to any impact.It may break, causing possible injury from fragments of glass, or the TV may be damaged. 12 G Do not drag the...
Owner's Manual
Page 20
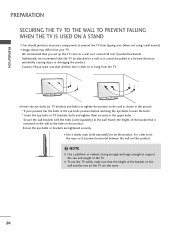
... damaging the product. Additionally, we recommend that is safer to tie the rope so it cannot be attached to the wall as shown in the picture. * If your TV. Match the height of the TV.
... damaging the product. Additionally, we recommend that is safer to tie the rope so it cannot be attached to the wall as shown in the picture. * If your TV. Match the height of the TV.
Owner's Manual
Page 21
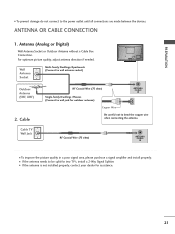
...RF Coaxial Wire (75 ohm) ANTENNA /CABLE IN I If the antenna is not installed properly, contact your dealer for assistance. 21 For optimum picture quality, adjust antenna direction if needed. Wall Antenna Socket Multi-family Dwellings/Apartments (Connect to be split for outdoor antenna) ANTENNA /CABLE IN Copper ... Wire (75 ohm) Single-family Dwellings /Houses (Connect to wall jack for two TV's, install a 2-Way Signal Splitter. I To improve the picture quality in a poor signal area, please purchase a signal amplifier and install properly. ANTENNA OR CABLE CONNECTION R 1.
...RF Coaxial Wire (75 ohm) ANTENNA /CABLE IN I If the antenna is not installed properly, contact your dealer for assistance. 21 For optimum picture quality, adjust antenna direction if needed. Wall Antenna Socket Multi-family Dwellings/Apartments (Connect to be split for outdoor antenna) ANTENNA /CABLE IN Copper ... Wire (75 ohm) Single-family Dwellings /Houses (Connect to wall jack for two TV's, install a 2-Way Signal Splitter. I To improve the picture quality in a poor signal area, please purchase a signal amplifier and install properly. ANTENNA OR CABLE CONNECTION R 1.
Owner's Manual
Page 25
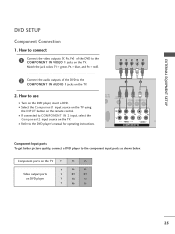
...'s manual for operating instructions. 1 2 DIO IN B/DVI) REMOTE CONTROL IN AV IN 1 VIDEO /MONO AUDIO 2 L R 1 VIDEO AUDIO A COMPONENT IN Component Input ports To get better picture quality, connect a DVD player to the COMPONENT IN AUDIO 1 jacks on the DVD player, insert a DVD. I Turn on the TV. 2. How to connect 1 Connect the...
...'s manual for operating instructions. 1 2 DIO IN B/DVI) REMOTE CONTROL IN AV IN 1 VIDEO /MONO AUDIO 2 L R 1 VIDEO AUDIO A COMPONENT IN Component Input ports To get better picture quality, connect a DVD player to the COMPONENT IN AUDIO 1 jacks on the DVD player, insert a DVD. I Turn on the TV. 2. How to connect 1 Connect the...
Owner's Manual
Page 31
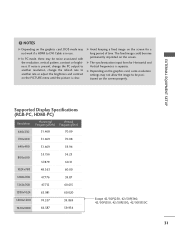
... contrast on the graphics card, DOS mode may not allow the image to DVI Cable is clear. EXTERNAL EQUIPMENT SETUP ! NOTES G Depending on the PICTURE menu until the picture is in use. G Depending on the graphics card, some resolution settings may not work if a HDMI to be noise associated with the resolution...
... contrast on the graphics card, DOS mode may not allow the image to DVI Cable is clear. EXTERNAL EQUIPMENT SETUP ! NOTES G Depending on the PICTURE menu until the picture is in use. G Depending on the graphics card, some resolution settings may not work if a HDMI to be noise associated with the resolution...
Owner's Manual
Page 32
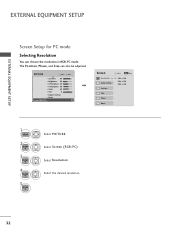
Select Resolution. Select the desired resolution. 32 PICTURE Move E • Contrast 90 • Brightness 50 • H Sharpness 60 • V Sharpness 60 • Color 60 • Tint 0R • Expert Control • Reset Screen (... Resolution You can also be adjusted. Position Size Phase Reset Move MENU Prev. 1024 x 768 1280 x 768 1360 x 768 1 MENU 2 ENTER 3 ENTER 4 ENTER 5 ENTER Select PICTURE. The Position, Phase, and Size can choose the resolution in RGB-PC mode.
Select Resolution. Select the desired resolution. 32 PICTURE Move E • Contrast 90 • Brightness 50 • H Sharpness 60 • V Sharpness 60 • Color 60 • Tint 0R • Expert Control • Reset Screen (... Resolution You can also be adjusted. Position Size Phase Reset Move MENU Prev. 1024 x 768 1280 x 768 1360 x 768 1 MENU 2 ENTER 3 ENTER 4 ENTER 5 ENTER Select PICTURE. The Position, Phase, and Size can choose the resolution in RGB-PC mode.
Owner's Manual
Page 33
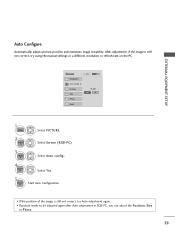
EXTERNAL EQUIPMENT SETUP Auto Configure Automatically adjusts picture position and minimizes image instability. Screen Resolution Auto config. G Position Size Phase Reset Move MENU Prev. Select Screen (RGB-PC). 3 ENTER Select Auto config.. 4 ENTER ...Select Y e s. 5 ENTER Start Auto Configuration. • If the position of the image is still not correct, try Auto adjustment again. • If picture needs to be adjusted again after Auto adjustment in RGB-PC, you can adjust the Position, S i z e or Phase. 33 After adjustment, if the image is...
EXTERNAL EQUIPMENT SETUP Auto Configure Automatically adjusts picture position and minimizes image instability. Screen Resolution Auto config. G Position Size Phase Reset Move MENU Prev. Select Screen (RGB-PC). 3 ENTER Select Auto config.. 4 ENTER ...Select Y e s. 5 ENTER Start Auto Configuration. • If the position of the image is still not correct, try Auto adjustment again. • If picture needs to be adjusted again after Auto adjustment in RGB-PC, you can adjust the Position, S i z e or Phase. 33 After adjustment, if the image is...

Owner's Manual
Page 34
.... I S i z e: This function is to remove any vertical bars or stripes visible on the screen background. This feature operates only in RGB-PC mode. PICTURE Move E • Contrast 90 • Brightness 50 • H Sharpness 60 • V Sharpness 60 • Color 60 • Tint 0R •...auto adjustment and especially if characters are still trembling, adjust the picture phase manually. EXTERNAL EQUIPMENT SETUP EXTERNAL EQUIPMENT SETUP Adjustment for screen Position, Size, and Phase If the picture is to adjust picture to left/right and up/down as you to minimize any ...
.... I S i z e: This function is to remove any vertical bars or stripes visible on the screen background. This feature operates only in RGB-PC mode. PICTURE Move E • Contrast 90 • Brightness 50 • H Sharpness 60 • V Sharpness 60 • Color 60 • Tint 0R •...auto adjustment and especially if characters are still trembling, adjust the picture phase manually. EXTERNAL EQUIPMENT SETUP EXTERNAL EQUIPMENT SETUP Adjustment for screen Position, Size, and Phase If the picture is to adjust picture to left/right and up/down as you to minimize any ...
Owner's Manual
Page 35
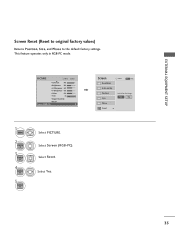
... 60 • V Sharpness 60 • Color 60 • Tint 0R • Expert Control • Reset Screen (RGB-PC) Enter G 1 MENU 2 ENTER 3 ENTER 4 ENTER 5 ENTER Select PICTURE. Select Reset. Screen Resolution Move MENU Prev. Auto config. Position Size Initialize Settings. Select Screen (RGB-PC). EXTERNAL EQUIPMENT SETUP Screen Reset (Reset to original...
... 60 • V Sharpness 60 • Color 60 • Tint 0R • Expert Control • Reset Screen (RGB-PC) Enter G 1 MENU 2 ENTER 3 ENTER 4 ENTER 5 ENTER Select PICTURE. Select Reset. Screen Resolution Move MENU Prev. Auto config. Position Size Initialize Settings. Select Screen (RGB-PC). EXTERNAL EQUIPMENT SETUP Screen Reset (Reset to original...
Owner's Manual
Page 39
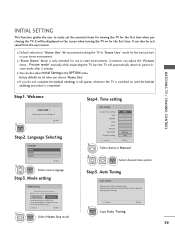
...use in your antenna connection. Mode setting Mode Setting Selecting the environment. Store Demo Home Use Select [Home Use] to "Home Use" mode for choosing LG Next Step2. Previous Next 1 ENTER Select H o m e U s e mode. WATCHING TV / CHANNEL CONTROL Step1. Choose the setting mode you ... to preset instore mode after 5 minutes. It will be activated from the user menus. I You can get picture quality you for the best picture in retail environments. Picture mode" manually while inspecting the TV, but the TV will appear whenever the TV is completed. I "Store ...
...use in your antenna connection. Mode setting Mode Setting Selecting the environment. Store Demo Home Use Select [Home Use] to "Home Use" mode for choosing LG Next Step2. Previous Next 1 ENTER Select H o m e U s e mode. WATCHING TV / CHANNEL CONTROL Step1. Choose the setting mode you ... to preset instore mode after 5 minutes. It will be activated from the user menus. I You can get picture quality you for the best picture in retail environments. Picture mode" manually while inspecting the TV, but the TV will appear whenever the TV is completed. I "Store ...
Owner's Manual
Page 40
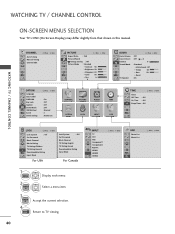
... in this manual. Return to TV viewing. WATCHING TV / CHANNEL CONTROL CHANNEL Auto Tuning Manual Tuning Channel Edit Move Enter PICTURE Move Aspect Ratio : 16:9 Picture Wizard Energy Saving : Off Picture Mode : Standard • Contrast 90 • Brightness 50 • Sharpness 60 • Color 60 • Tint ...Caption Demo Mode ISM Method Set ID Initial Setting Move Enter : On : Off : Off : Off : Normal : 1 : Home Use CHANNEL PICTURE AUDIO TIME OPTION LOCK INPUT USB TIME Clock Off Time : Off On Time : Off Sleep Timer : Off Move Enter 40 LOCK Move Enter Lock...
... in this manual. Return to TV viewing. WATCHING TV / CHANNEL CONTROL CHANNEL Auto Tuning Manual Tuning Channel Edit Move Enter PICTURE Move Aspect Ratio : 16:9 Picture Wizard Energy Saving : Off Picture Mode : Standard • Contrast 90 • Brightness 50 • Sharpness 60 • Color 60 • Tint ...Caption Demo Mode ISM Method Set ID Initial Setting Move Enter : On : Off : Off : Off : Normal : 1 : Home Use CHANNEL PICTURE AUDIO TIME OPTION LOCK INPUT USB TIME Clock Off Time : Off On Time : Off Sleep Timer : Off Move Enter 40 LOCK Move Enter Lock...
Owner's Manual
Page 41
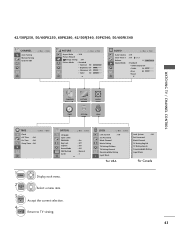
...50/60PK250, 60PK280, 42/50PJ340, 50PK340, 50/60PK540 CHANNEL Auto Tuning Manual Tuning Channel Edit Move Enter PICTURE Move Enter Aspect Ratio : 16:9 Picture Wizard Energy Saving : Off Picture Mode : Standard • Contrast 90 • Brightness 50 • Sharpness 60 • Color 60...Standard • Infinite Sound: Off • Treble 50 • Bass 50 • Reset E Enter R WATCHING TV / CHANNEL CONTROL CHANNEL PICTURE AUDIO TIME OPTION LOCK TIME Clock Off Time : Off On Time : Off Sleep Timer : Off Move Enter OPTION Move Enter Language Input Label ...
...50/60PK250, 60PK280, 42/50PJ340, 50PK340, 50/60PK540 CHANNEL Auto Tuning Manual Tuning Channel Edit Move Enter PICTURE Move Enter Aspect Ratio : 16:9 Picture Wizard Energy Saving : Off Picture Mode : Standard • Contrast 90 • Brightness 50 • Sharpness 60 • Color 60...Standard • Infinite Sound: Off • Treble 50 • Bass 50 • Reset E Enter R WATCHING TV / CHANNEL CONTROL CHANNEL PICTURE AUDIO TIME OPTION LOCK TIME Clock Off Time : Off On Time : Off Sleep Timer : Off Move Enter OPTION Move Enter Language Input Label ...
Owner's Manual
Page 42
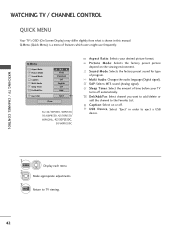
... on or off automatically. Sleep Timer: Select the amount of time before your desired picture format. USB Device: Select "Eject" in this manual. Sound Mode: Selects the factory preset sound for type of features which users might use frequently. Multi ...'s OSD (On Screen Display) may differ slightly from what is a menu of program. Make appropriate adjustments. 3 EXIT Return to the Favorite List. Q.Menu Aspect Ratio Picture Mode Sound Mode Caption Multi Audio Sleep Timer CH Del/Add/Fav F 16:9 G Vivid Standard Off English Off Add Eject USB Eject Close For 42...
... on or off automatically. Sleep Timer: Select the amount of time before your desired picture format. USB Device: Select "Eject" in this manual. Sound Mode: Selects the factory preset sound for type of features which users might use frequently. Multi ...'s OSD (On Screen Display) may differ slightly from what is a menu of program. Make appropriate adjustments. 3 EXIT Return to the Favorite List. Q.Menu Aspect Ratio Picture Mode Sound Mode Caption Multi Audio Sleep Timer CH Del/Add/Fav F 16:9 G Vivid Standard Off English Off Add Eject USB Eject Close For 42...
Owner's Manual
Page 47
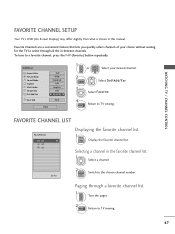
... TV / CHANNEL CONTROL FAVORITE CHANNEL SETUP Your TV's OSD (On Screen Display) may differ slightly from what is shown in -between channels. Q.Menu Aspect Ratio Picture Mode Sound Mode Caption Multi Audio Sleep Timer CH Del/Add/Fav Eject USB 16:9 Vivid Standard Off English Off F Favorite G Eject Close 1 or P CH...
... TV / CHANNEL CONTROL FAVORITE CHANNEL SETUP Your TV's OSD (On Screen Display) may differ slightly from what is shown in -between channels. Q.Menu Aspect Ratio Picture Mode Sound Mode Caption Multi Audio Sleep Timer CH Del/Add/Fav Eject USB 16:9 Vivid Standard Off English Off F Favorite G Eject Close 1 or P CH...
Owner's Manual
Page 51
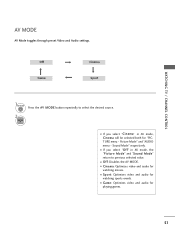
... movies. I O f f: Disables the AV MODE. Sound Mode" respectively. I If you select "Cinema" in AV mode, the "Picture Mode" and "Sound Mode" return to select the desired source. 2 ENTER I Cinema: Optimizes video and audio for "PICTURE menu - Off Game Cinema Sport 1AV MODE Press the AV MODE button repeatedly to previous selected value...
... movies. I O f f: Disables the AV MODE. Sound Mode" respectively. I If you select "Cinema" in AV mode, the "Picture Mode" and "Sound Mode" return to select the desired source. 2 ENTER I Cinema: Optimizes video and audio for "PICTURE menu - Off Game Cinema Sport 1AV MODE Press the AV MODE button repeatedly to previous selected value...


