
Owners Manual
Page 1
Retain this manual for future reference. Model Number : Serial Number : See the label attached on the back cover and relate this information to your Monitor. Record model number and serial number of the Monitor in the spaces provided below. PLASMA MONITOR OWNER'S MANUAL MODELS: 42PM1M 42PM1M-UC 42PM3MV 42PM3MV-UC 50PM1M 50PM1M-UC Please read this manual carefully and completely before operating your dealer if you require service.
Retain this manual for future reference. Model Number : Serial Number : See the label attached on the back cover and relate this information to your Monitor. Record model number and serial number of the Monitor in the spaces provided below. PLASMA MONITOR OWNER'S MANUAL MODELS: 42PM1M 42PM1M-UC 42PM3MV 42PM3MV-UC 50PM1M 50PM1M-UC Please read this manual carefully and completely before operating your dealer if you require service.

Owners Manual
Page 2
... has been tested and found to comply with the instructions, may be determined by turning the equipment off and on a circuit different from LG Electronics. This equipment generates, uses and can be of sufficient magnitude to constitute a risk of electric shock to Part 15 of important operating...www.lgusa.com WARNING/CAUTION TO REDUCE THE RISK OF FIRE AND ELECTRIC SHOCK, DO NOT EXPOSE THIS PRODUCT TO RAIN OR MOISTURE. 2 Plasma Monitor The lightning flash with arrowhead symbol, within an equilateral triangle is intended to alert the user to modify this product. Consult the dealer or...
... has been tested and found to comply with the instructions, may be determined by turning the equipment off and on a circuit different from LG Electronics. This equipment generates, uses and can be of sufficient magnitude to constitute a risk of electric shock to Part 15 of important operating...www.lgusa.com WARNING/CAUTION TO REDUCE THE RISK OF FIRE AND ELECTRIC SHOCK, DO NOT EXPOSE THIS PRODUCT TO RAIN OR MOISTURE. 2 Plasma Monitor The lightning flash with arrowhead symbol, within an equilateral triangle is intended to alert the user to modify this product. Consult the dealer or...

Owners Manual
Page 4
... plugs, wall outlets, and the point where the cord exits the appliance. 16. CAUTION concerning the Power Cord : 18. The manufacturer will NOT be certain. 4 Plasma Monitor Check the specification page of these conditions could result in a door, or walked upon a dedicated circuit; Most appliances recommend they be placed upon . To Reduce...
... plugs, wall outlets, and the point where the cord exits the appliance. 16. CAUTION concerning the Power Cord : 18. The manufacturer will NOT be certain. 4 Plasma Monitor Check the specification page of these conditions could result in a door, or walked upon a dedicated circuit; Most appliances recommend they be placed upon . To Reduce...

Owners Manual
Page 6
... Picture-in each sub-pixel to be present on the screen should be viewed as televisions and common computer monitors. Several tiny, minute colored dots visible on the PDP screen The PDP (Plasma Display Panel), which are easily viewable. This also occurs in Cathode Ray Tube (CRT) devices such as ... to a PC and you can use it can be thought of fluorescent lamps. A plasma display panel is an array of cells, known as pixels, which is the display device of this product. 6 Plasma Monitor PDP is the latest display technology and the best way to achieve flat panel displays with...
... Picture-in each sub-pixel to be present on the screen should be viewed as televisions and common computer monitors. Several tiny, minute colored dots visible on the PDP screen The PDP (Plasma Display Panel), which are easily viewable. This also occurs in Cathode Ray Tube (CRT) devices such as ... to a PC and you can use it can be thought of fluorescent lamps. A plasma display panel is an array of cells, known as pixels, which is the display device of this product. 6 Plasma Monitor PDP is the latest display technology and the best way to achieve flat panel displays with...

Owners Manual
Page 7
... accessories are included with your Monitor. Power Standby Indicator Illuminates red in standby mode, Illuminates green when the Set is turned on from your plasma display. MENU Button 6. If an accessory is a simplified representation of front panel. Front Panel Controls 3 3 ON/OFF 7 42/50PM1M 12 5 OK 4 5 6 6 7 42/50PM1M 42PM3MV 1. OK Button 5. INPUT SELECT...
... accessories are included with your Monitor. Power Standby Indicator Illuminates red in standby mode, Illuminates green when the Set is turned on from your plasma display. MENU Button 6. If an accessory is a simplified representation of front panel. Front Panel Controls 3 3 ON/OFF 7 42/50PM1M 12 5 OK 4 5 6 6 7 42/50PM1M 42PM3MV 1. OK Button 5. INPUT SELECT...
Owners Manual
Page 8
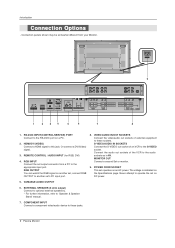
...DVI(VIDEO) AUDIO INPUT RGB OUTPUT RGB INPUT AUDIO R L R L VARIABLE AUDIO OUT EXTERNAL SPEAKER VIDEO R L AUDIO COMPONENT INPUT 2 COMPONENT INPUT 1 MONITOR OUT A/V INPUT R L (MONO) AUDIO VIDEO S-VIDEO 1 2 3 4 5 6 7 8 1. VIDEO/AUDIO IN/OUT SOCKETS Connect the video/audio ...VCR to another set output connector from your Monitor. COMPONENT INPUT Connect a component video/audio device to these jacks. 8 Plasma Monitor REMOTE CONTROL / AUDIO INPUT (for RGB, DVI) 4. MONITOR OUT Connect a second Set or monitor. 9. VARIABLE AUDIO OUTPUT 6. Connection panels ...
...DVI(VIDEO) AUDIO INPUT RGB OUTPUT RGB INPUT AUDIO R L R L VARIABLE AUDIO OUT EXTERNAL SPEAKER VIDEO R L AUDIO COMPONENT INPUT 2 COMPONENT INPUT 1 MONITOR OUT A/V INPUT R L (MONO) AUDIO VIDEO S-VIDEO 1 2 3 4 5 6 7 8 1. VIDEO/AUDIO IN/OUT SOCKETS Connect the video/audio ...VCR to another set output connector from your Monitor. COMPONENT INPUT Connect a component video/audio device to these jacks. 8 Plasma Monitor REMOTE CONTROL / AUDIO INPUT (for RGB, DVI) 4. MONITOR OUT Connect a second Set or monitor. 9. VARIABLE AUDIO OUTPUT 6. Connection panels ...

Owners Manual
Page 10
..., have a qualified electrician install a separate circuit breaker. If grounding methods are shown for example only. • Pedestal mount minimum allowable clearances for adequate ventilation. 10 Plasma Monitor Power Supply Short-circuit Breaker Desktop Pedestal Installation • For proper ventilation, allow a clearance of 4" on each side and the top, 2.36" on the bottom...
..., have a qualified electrician install a separate circuit breaker. If grounding methods are shown for example only. • Pedestal mount minimum allowable clearances for adequate ventilation. 10 Plasma Monitor Power Supply Short-circuit Breaker Desktop Pedestal Installation • For proper ventilation, allow a clearance of 4" on each side and the top, 2.36" on the bottom...
Owners Manual
Page 12
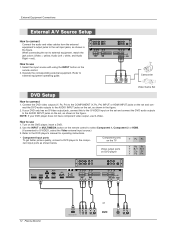
...AUDIO INPUT RGB INPUT AUDIO R L VARIABLE AUDIO OUT R L EXTERNAL SPEAKER VIDEO R L AUDIO COMPONENT INPUT 2 COMPONENT INPUT 1 MONITOR OUT A/V INPUT R L MONO AUDIO VIDEO S-VIDEO 12 Plasma Monitor or HDMI-DTV OUTPUT B R (R) AUDIO (L) DVD S-VIDEO (R) AUDIO (L) Component ports on the TV Video output ports on...AUDIO INPUT jacks on the set input jacks, as shown in the figure. VIDEO R L AUDIO COMPONENT INPUT 2 COMPONENT INPUT 1 MONITOR OUT A/V INPUT R L MONO AUDIO VIDEO S-VIDEO Camcorder R AUDIO L VIDEO Video Game Set DVD Setup How to external equipment ...
...AUDIO INPUT RGB INPUT AUDIO R L VARIABLE AUDIO OUT R L EXTERNAL SPEAKER VIDEO R L AUDIO COMPONENT INPUT 2 COMPONENT INPUT 1 MONITOR OUT A/V INPUT R L MONO AUDIO VIDEO S-VIDEO 12 Plasma Monitor or HDMI-DTV OUTPUT B R (R) AUDIO (L) DVD S-VIDEO (R) AUDIO (L) Component ports on the TV Video output ports on...AUDIO INPUT jacks on the set input jacks, as shown in the figure. VIDEO R L AUDIO COMPONENT INPUT 2 COMPONENT INPUT 1 MONITOR OUT A/V INPUT R L MONO AUDIO VIDEO S-VIDEO Camcorder R AUDIO L VIDEO Video Game Set DVD Setup How to external equipment ...
Owners Manual
Page 14
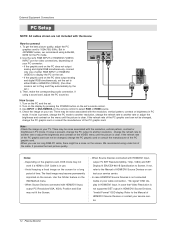
Then, make the corresponding audio connection. There may be noise associated with the resolution, vertical pattern, contrast or brightness in 42PM3MV series, we recommend using 640x480, 60HZ for the PC mode. 2. We recommend using a sound card, adjust the PC sound as REMOTE CONTROL... another resolution, change the PC graphic card or consult the manufacturer of HDMI/DVI Source Devices or contact your service center. 14 Plasma Monitor In case that Video Resolution is set 's remote control. 3. External Equipment Connections PC Setup NOTE: All cables shown are not included with ...
Then, make the corresponding audio connection. There may be noise associated with the resolution, vertical pattern, contrast or brightness in 42PM3MV series, we recommend using 640x480, 60HZ for the PC mode. 2. We recommend using a sound card, adjust the PC sound as REMOTE CONTROL... another resolution, change the PC graphic card or consult the manufacturer of HDMI/DVI Source Devices or contact your service center. 14 Plasma Monitor In case that Video Resolution is set 's remote control. 3. External Equipment Connections PC Setup NOTE: All cables shown are not included with ...

Owners Manual
Page 16
... G button and then use D / E button to be away on the screen in the language of your choice. 4. English Español Français 16 Plasma Monitor If you intend to select your language. 1. Press the ENTER button to select Language. 3. NOTE • If you want to standby mode. 2. You can be... off , press the MUTE button. 3. The menus can cancel this point on, the on the set will switch on . Basic Operation Basic Operation Turning the monitor On Turning on -screen menus will be shown in the selected language.
... G button and then use D / E button to be away on the screen in the language of your choice. 4. English Español Français 16 Plasma Monitor If you intend to select your language. 1. Press the ENTER button to select Language. 3. NOTE • If you want to standby mode. 2. You can be... off , press the MUTE button. 3. The menus can cancel this point on, the on the set will switch on . Basic Operation Basic Operation Turning the monitor On Turning on -screen menus will be shown in the selected language.
Owners Manual
Page 18
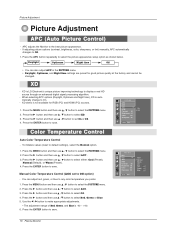
XD - XD demo is LG Electronic's unique picture improving technology to display a real ...), or Warm (Preset). 4. Press the G button and then use D / E button to On. - APC adjusts the Monitor to default settings), select the Normal option. 1. XD is not available for good picture quality at the factory and cannot be changed... prefer. 1. Manual Color Temperature Control (ACC set On or Off. 4. Cool Normal Warm Off Red 0 Green 0 Blue 0 18 Plasma Monitor Press the G button and then use D / E button to select Off. 4. When selecting APC options (Daylight, Optimum and Night...
XD - XD demo is LG Electronic's unique picture improving technology to display a real ...), or Warm (Preset). 4. Press the G button and then use D / E button to On. - APC adjusts the Monitor to default settings), select the Normal option. 1. XD is not available for good picture quality at the factory and cannot be changed... prefer. 1. Manual Color Temperature Control (ACC set On or Off. 4. Cool Normal Warm Off Red 0 Green 0 Blue 0 18 Plasma Monitor Press the G button and then use D / E button to select Off. 4. When selecting APC options (Daylight, Optimum and Night...

Owners Manual
Page 20
... as shown below. SOUND DASP BBE G On AVL Off Balance 0 Treble 50 Bass 50 TV speaker MENU Prev. 20 Plasma Monitor If you enjoy the best sound without any special adjustment because the Monitor has the appropriate sound options based on the program content. - BBE - Press the ENTER button to Off. 1. Press the...
... as shown below. SOUND DASP BBE G On AVL Off Balance 0 Treble 50 Bass 50 TV speaker MENU Prev. 20 Plasma Monitor If you enjoy the best sound without any special adjustment because the Monitor has the appropriate sound options based on the program content. - BBE - Press the ENTER button to Off. 1. Press the...

Owners Manual
Page 22
TIMER Clock G Off timer On timer Auto off On G Off 10 : 30 AM Volume 30 MENU Prev. 22 Plasma Monitor Press the MENU button and then use D / E button to select the TIMER menu. 2. Press the G button and then use D / E button to select On. • To ... the minutes. 6. Press the G button and then use D / E button to set the hour. 5. TIMER Clock Off timer On timer Auto off - - : - - AM MENU Prev. The Monitor must be in standby mode for the On-Timer to select Clock. 3. Press the G button and then use D / E button to select the TIMER menu. 2. Off...
TIMER Clock G Off timer On timer Auto off On G Off 10 : 30 AM Volume 30 MENU Prev. 22 Plasma Monitor Press the MENU button and then use D / E button to select the TIMER menu. 2. Press the G button and then use D / E button to select On. • To ... the minutes. 6. Press the G button and then use D / E button to set the hour. 5. TIMER Clock Off timer On timer Auto off - - : - - AM MENU Prev. The Monitor must be in standby mode for the On-Timer to select Clock. 3. Press the G button and then use D / E button to select the TIMER menu. 2. Off...

Owners Manual
Page 24
...Upside → Upside → Downside → Downside. • Inversion Inversion will result in a ghost image remaining even when you turn the Monitor off. 1. SPECIAL Input Language Key lock G On ISM Method Off Low power Set ID Caption / Text Demo OSD Rotate MENU Prev. Press ...Orbiter Orbiter may be set up so that it is pressed. Special Features Special Features Key Lock - Normal White wash Orbiter Inversion 24 Plasma Monitor Press the MENU button and then use D / E button to clear entirely with the remote control. - SPECIAL Input Language Key lock...
...Upside → Upside → Downside → Downside. • Inversion Inversion will result in a ghost image remaining even when you turn the Monitor off. 1. SPECIAL Input Language Key lock G On ISM Method Off Low power Set ID Caption / Text Demo OSD Rotate MENU Prev. Press ...Orbiter Orbiter may be set up so that it is pressed. Special Features Special Features Key Lock - Normal White wash Orbiter Inversion 24 Plasma Monitor Press the MENU button and then use D / E button to clear entirely with the remote control. - SPECIAL Input Language Key lock...

Owners Manual
Page 25
... XD Demo on and XD Demo off. - Press the MENU button and then use D / E button to begin XD Demo. 4. OSD Rotate 1. Low power reduces the plasma display power consumption. 1. Press the G button to select Low power. 3. Normal Rotate Owner's Manual 25 Press the G button and then use D / E button to select On...
... XD Demo on and XD Demo off. - Press the MENU button and then use D / E button to begin XD Demo. 4. OSD Rotate 1. Low power reduces the plasma display power consumption. 1. Press the G button to select Low power. 3. Normal Rotate Owner's Manual 25 Press the G button and then use D / E button to select On...

Owners Manual
Page 26
... ENTER button to run Auto configure. • When Auto config. G VGA Mode ARC Zoom +/Position Cinema NR Reset MENU Prev. Phase 0 Clock 0 H-position 0 V-position 0 26 Plasma Monitor Screen Adjustment Screen Adjustment Auto Adjustment - RGB (PC) mode only; The Auto config. are still jittery, adjust the picture Phase manually. - Press the G button and...
... ENTER button to run Auto configure. • When Auto config. G VGA Mode ARC Zoom +/Position Cinema NR Reset MENU Prev. Phase 0 Clock 0 H-position 0 V-position 0 26 Plasma Monitor Screen Adjustment Screen Adjustment Auto Adjustment - RGB (PC) mode only; The Auto config. are still jittery, adjust the picture Phase manually. - Press the G button and...

Owners Manual
Page 28
... be used for all input sources. - Press the ENTER button to select the SCREEN menu. 2. If an image is enlarged to fill the screen. 28 Plasma Monitor Press the G button. Manual config. Position Cinema NR Reset G MENU Prev. Press the SPLIT ZOOM button repeatedly to select 3D NR or MPEG NR. 4. Press...
... be used for all input sources. - Press the ENTER button to select the SCREEN menu. 2. If an image is enlarged to fill the screen. 28 Plasma Monitor Press the G button. Manual config. Position Cinema NR Reset G MENU Prev. Press the SPLIT ZOOM button repeatedly to select 3D NR or MPEG NR. 4. Press...

Owners Manual
Page 30
...; G&above • PG&above • PG-13&above • R&above • NC-17&above • X (Permits all the movies with the ratings above X Unblocked 30 Plasma Monitor LOCK Lock on TV, not TV programs, such as the 4 digits are entered, re-enter the same 4 digits on /off Set password MPAA G Age block...
...; G&above • PG&above • PG-13&above • R&above • NC-17&above • X (Permits all the movies with the ratings above X Unblocked 30 Plasma Monitor LOCK Lock on TV, not TV programs, such as the 4 digits are entered, re-enter the same 4 digits on /off Set password MPAA G Age block...

Owners Manual
Page 32
RGB HDMI Component 1 Component 2 Video 32 Plasma Monitor block. 2. Press the G button and then use the D / E button to choose Aux. block G MENU Prev. After inputting the password, use the D / E to select RGB, HDMI, ...
RGB HDMI Component 1 Component 2 Video 32 Plasma Monitor block. 2. Press the G button and then use the D / E button to choose Aux. block G MENU Prev. After inputting the password, use the D / E to select RGB, HDMI, ...

Owners Manual
Page 34
...Setting j 27. Auto Configure j 28. If the data is controlled. Error Acknowledgement [Command2][ ][Set ID][ ][NG][Data][x] * The Monitor transmits ACK (acknowledgement) based on this format when receiving normal data. Press the ENTER button to 'Real Data Mapping 1'. Volume Mute k... set ID to select the SPECIAL menu. 2. Set ID is indicated as decimal (1~99) on menu and as Hexa decimal (0x0~0x63) on screen. 34 Plasma Monitor Transmission / Receiving Protocol Transmission [Command1][Command2][ ][Set ID][ ][Data][Cr] * [Command 1] * [Command 2] * [Set ID] * [DATA] * [Cr] *[ ] :...
...Setting j 27. Auto Configure j 28. If the data is controlled. Error Acknowledgement [Command2][ ][Set ID][ ][NG][Data][x] * The Monitor transmits ACK (acknowledgement) based on this format when receiving normal data. Press the ENTER button to 'Real Data Mapping 1'. Volume Mute k... set ID to select the SPECIAL menu. 2. Set ID is indicated as decimal (1~99) on menu and as Hexa decimal (0x0~0x63) on screen. 34 Plasma Monitor Transmission / Receiving Protocol Transmission [Command1][Command2][ ][Set ID][ ][Data][Cr] * [Command 1] * [Command 2] * [Set ID] * [DATA] * [Cr] *[ ] :...


